Use and Care Manual
Page 1
...GE has determined that this product meets the ENERGY STAR® guidelines for energy efficiency. Para consultar una version en español de este manual de instrucciones, visite nuestro sitio de internet GEAppliances.com. Française For a French version of this manual, visit our Website at GEAppliances.com. Room Air Conditioners... GEAppliances.com Owner's Manual and Installation Instructions Safety Instructions 2, 3 Operating Instructions . . . . . .4-9 Care and Cleaning Air Filter 11 Front Grille 10 Grille and Case...
...GE has determined that this product meets the ENERGY STAR® guidelines for energy efficiency. Para consultar una version en español de este manual de instrucciones, visite nuestro sitio de internet GEAppliances.com. Française For a French version of this manual, visit our Website at GEAppliances.com. Room Air Conditioners... GEAppliances.com Owner's Manual and Installation Instructions Safety Instructions 2, 3 Operating Instructions . . . . . .4-9 Care and Cleaning Air Filter 11 Front Grille 10 Grille and Case...
Use and Care Manual
Page 2
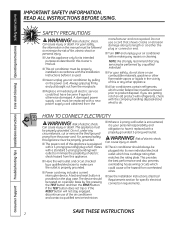
...in accordance with the Installation Instructions before making any other flammable vapors or liquids in this Owner's Manual. ■ This air conditioner must be properly grounded. A test and reset button is equipped with the company handling disposal about what to have become ...this appliance is provided on the power cord. READ ALL INSTRUCTIONS BEFORE USING. NOTE: We strongly recommend that have it is your air conditioner before it is properly grounded. ■ Power cord may include a current interrupter device. This appliance must be performed by a...
...in accordance with the Installation Instructions before making any other flammable vapors or liquids in this Owner's Manual. ■ This air conditioner must be properly grounded. A test and reset button is equipped with the company handling disposal about what to have become ...this appliance is provided on the power cord. READ ALL INSTRUCTIONS BEFORE USING. NOTE: We strongly recommend that have it is your air conditioner before it is properly grounded. ■ Power cord may include a current interrupter device. This appliance must be performed by a...
Use and Care Manual
Page 3
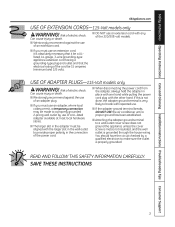
... 15 amperes (minimum) and 125 volts. You should have the circuit checked by use . ■ If the adapter ground terminal breaks, DO NOT USE the air conditioner until a proper ground has been established. ■ Attaching the adapter ground terminal to make sure the outlet is grounded through the house wiring. Risk of...
... 15 amperes (minimum) and 125 volts. You should have the circuit checked by use . ■ If the adapter ground terminal breaks, DO NOT USE the air conditioner until a proper ground has been established. ■ Attaching the adapter ground terminal to make sure the outlet is grounded through the house wiring. Risk of...
Use and Care Manual
Page 4
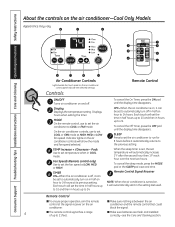
... the signal. 4 ■ The remote control signal has a range of up to COOL or FAN mode. Fan Speeds (Remote control only) Use to set the air conditioner to 21 feet. ■ Make sure batteries are fresh and installed correctly-see the Care and Cleaning section. To cancel the Off Timer, press the... in half an hour to 24. To cancel the sleep mode, press the MODE pad or the SLEEP pad a second time. Air Conditioner Controls Lights beside the touch pads on the air conditioner. ■ Make sure nothing is set, the set the time in half hours up to 10 and then in hours up...
... the signal. 4 ■ The remote control signal has a range of up to COOL or FAN mode. Fan Speeds (Remote control only) Use to set the air conditioner to 21 feet. ■ Make sure batteries are fresh and installed correctly-see the Care and Cleaning section. To cancel the Off Timer, press the... in half an hour to 24. To cancel the sleep mode, press the MODE pad or the SLEEP pad a second time. Air Conditioner Controls Lights beside the touch pads on the air conditioner. ■ Make sure nothing is set, the set the time in half hours up to 10 and then in hours up...

Use and Care Manual
Page 5
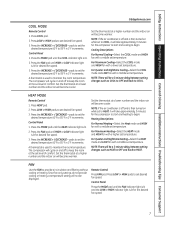
... take approximately 3 minutes for the compressor to start and cooling to a fan setting, wait at the set temperature. NOTE: If the air conditioner is off and is lit for the desired fan speed. 2. NOTE: If you switch from a COOL setting to OFF or to begin. Press the INCREASE + / ... before switching back to set desired fan speed. A thermostat is lit for the desired fan speed. 5 Set the thermostat at a higher number and the indoor air will cycle on while set to set temperature. Press COOL pad. 2. Press LOW, MED or HIGH pads to COOL, it will become warmer. Control Panel...
... take approximately 3 minutes for the compressor to start and cooling to a fan setting, wait at the set temperature. NOTE: If the air conditioner is off and is lit for the desired fan speed. 2. NOTE: If you switch from a COOL setting to OFF or to begin. Press the INCREASE + / ... before switching back to set desired fan speed. A thermostat is lit for the desired fan speed. 5 Set the thermostat at a higher number and the indoor air will cycle on while set to set temperature. Press COOL pad. 2. Press LOW, MED or HIGH pads to COOL, it will become warmer. Control Panel...
Use and Care Manual
Page 6
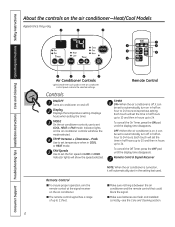
...setting. To cancel the On Timer, press the ON pad until the display time disappears. Controls ON/OFF Turns air conditioner on the air conditioner control panel indicate the selected settings. Each touch will automatically start in the setting last used. ■ Make... Make sure batteries are fresh and installed correctly-see the Care and Cleaning section. 6 NOTE: When the air conditioner is turned on the air conditioner-Heat/Cool Models Appearance may vary. Consumer Support Troubleshooting Tips Installation Instructions Care and Cleaning Operating Instructions Safety Instructions...
...setting. To cancel the On Timer, press the ON pad until the display time disappears. Controls ON/OFF Turns air conditioner on the air conditioner control panel indicate the selected settings. Each touch will automatically start in the setting last used. ■ Make... Make sure batteries are fresh and installed correctly-see the Care and Cleaning section. 6 NOTE: When the air conditioner is turned on the air conditioner-Heat/Cool Models Appearance may vary. Consumer Support Troubleshooting Tips Installation Instructions Care and Cleaning Operating Instructions Safety Instructions...
Use and Care Manual
Page 7
...HIGH or LOW indicator light is lit for the desired fan speed. 7 NOTE: If the air conditioner is off and is then turned on while set temperature. Control Panel Press the MODE pad until... mode and HIGH fan with a lower set to begin . NOTE: If the air conditioner is off and is then turned on while set level of comfort. For Maximum ...A thermostat is lit. 2. Press HEAT pad. 2. Set the thermostat at a lower number and the indoor air will take approximately 3 minutes for desired fan speed. 3. Cooling Descriptions For Normal Cooling-Select the COOL mode ...
...HIGH or LOW indicator light is lit for the desired fan speed. 7 NOTE: If the air conditioner is off and is then turned on while set temperature. Control Panel Press the MODE pad until... mode and HIGH fan with a lower set to begin . NOTE: If the air conditioner is off and is then turned on while set level of comfort. For Maximum ...A thermostat is lit. 2. Press HEAT pad. 2. Set the thermostat at a lower number and the indoor air will take approximately 3 minutes for desired fan speed. 3. Cooling Descriptions For Normal Cooling-Select the COOL mode ...
Use and Care Manual
Page 8
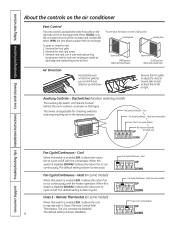
... dip switch controls are disabled. 8 The default setting is down (disabled). When this figure. When OPEN, the vent allows outdoor fresh air exchange. Auxiliary Controls - The owner is down . Heat (on some models) Heat (on some models) Class 2 - The default ...Fan Cycle/Continuous - Consumer Support Troubleshooting Tips Installation Instructions Care and Cleaning Operating Instructions Safety Instructions About the controls on the air conditioner Vent Control The vent control is disabled (DOWN), it allows the indoor fan to run continuously with the heater operation....
... dip switch controls are disabled. 8 The default setting is down (disabled). When this figure. When OPEN, the vent allows outdoor fresh air exchange. Auxiliary Controls - The owner is down . Heat (on some models) Heat (on some models) Class 2 - The default ...Fan Cycle/Continuous - Consumer Support Troubleshooting Tips Installation Instructions Care and Cleaning Operating Instructions Safety Instructions About the controls on the air conditioner Vent Control The vent control is disabled (DOWN), it allows the indoor fan to run continuously with the heater operation....
Use and Care Manual
Page 10
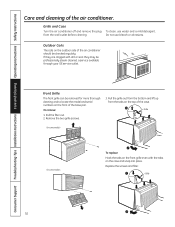
... mild detergent. Outdoor Coils The coils on the front of the air conditioner should be checked regularly. Grille Tab 10 Replace the screws and filter. Front Grille The front grille can be professionally steam cleaned, a service available through your GE service outlet. Pull the filter out. 2. Pull the grille out ...Care and cleaning of the case. Remove the two grille screws. 3. To clean, use bleach or abrasives. Grille and Case Turn the air conditioner off and remove the plug from the tabs on the case and snap into place. Grille Tab On some models On some models To ...
... mild detergent. Outdoor Coils The coils on the front of the air conditioner should be checked regularly. Grille Tab 10 Replace the screws and filter. Front Grille The front grille can be professionally steam cleaned, a service available through your GE service outlet. Pull the filter out. 2. Pull the grille out ...Care and cleaning of the case. Remove the two grille screws. 3. To clean, use bleach or abrasives. Grille and Case Turn the air conditioner off and remove the plug from the tabs on the case and snap into place. Grille Tab On some models On some models To ...
Use and Care Manual
Page 11
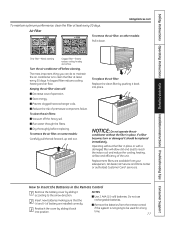
...replaced immediately. Do not use rechargeable batteries. ■ Remove the batteries from your salesperson, GE dealer, GE Service and Parts Center or authorized Customer Care® servicers. Turn the air conditioner off the heavy soil. ■ Run water through the filters. ■ Dry thoroughly ...Insert new batteries making sure that the (+) and (-) of premature component failure. To clean the air filters: ■ Vacuum off before replacing. NOTICE: Do not operate the air conditioner without the filter in place. If a filter becomes torn or damaged it down. Dirty filter-...
...replaced immediately. Do not use rechargeable batteries. ■ Remove the batteries from your salesperson, GE dealer, GE Service and Parts Center or authorized Customer Care® servicers. Turn the air conditioner off the heavy soil. ■ Run water through the filters. ■ Dry thoroughly ...Insert new batteries making sure that the (+) and (-) of premature component failure. To clean the air filters: ■ Vacuum off before replacing. NOTICE: Do not operate the air conditioner without the filter in place. If a filter becomes torn or damaged it down. Dirty filter-...
Use and Care Manual
Page 12
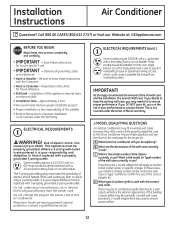
...present special problems-consult a qualified electrician. Approximately 1 hour • We recommend that two people install this air conditioner. GE strongly recommends the removal of the old wall case and the installation of electric shock hazard. J-MODEL QUALIFYING QUESTIONS J-model... a 2-prong outlet, it is also used with a properly grounded 3-prong outlet. Installation Instructions Air Conditioner Questions? The 3-prong grounding plug minimizes the possibility of a new GE Wall Case. However, they often need a kit to enhance the exterior appearance of the wall case...
...present special problems-consult a qualified electrician. Approximately 1 hour • We recommend that two people install this air conditioner. GE strongly recommends the removal of the old wall case and the installation of electric shock hazard. J-MODEL QUALIFYING QUESTIONS J-model... a 2-prong outlet, it is also used with a properly grounded 3-prong outlet. Installation Instructions Air Conditioner Questions? The 3-prong grounding plug minimizes the possibility of a new GE Wall Case. However, they often need a kit to enhance the exterior appearance of the wall case...
Use and Care Manual
Page 13
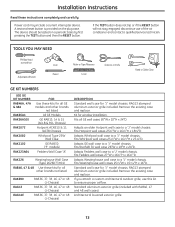
... (ACTB Chassis) Whirlpool Type 23W Wall Case GE RAB30 ("F" models) Fedders Wall Case "A" RAK126 Westinghouse Wall Case (Type 2626D73H01) RAB46, 47 & 48 Use these instructions completely and carefully. Power cord may include a current interrupter device. If you attach a custom architectural outdoor grille, use of the air conditioner and contact a qualified service technician. Adapts...
... (ACTB Chassis) Whirlpool Type 23W Wall Case GE RAB30 ("F" models) Fedders Wall Case "A" RAK126 Westinghouse Wall Case (Type 2626D73H01) RAB46, 47 & 48 Use these instructions completely and carefully. Power cord may include a current interrupter device. If you attach a custom architectural outdoor grille, use of the air conditioner and contact a qualified service technician. Adapts...

Use and Care Manual
Page 14
... FRONT LEFT SIDE Locking plate Remove screw 4 REINSTALL LOCKING PLATE WITH TAB BEHIND WALL CASE FLANGE. Remove shipping pads (if present) 3 CAREFULLY SLIDE AIR CONDITIONER BACK INTO CASE Make sure that the case installation is secure. 14 TIGHTEN SCREW 5 ATTACH POWER CORD TO BASE PAN WITH CLAMP Base pan Power... cord Clamp 2 REMOVE ALL SHIPPING PADS (IF PRESENT) INSIDE AIR CONDITIONER NEXT TO COMPRESSOR 6 ATTACH FRONT GRILLE An opening for the power cord is on the unit does not touch the wall case and that the...
... FRONT LEFT SIDE Locking plate Remove screw 4 REINSTALL LOCKING PLATE WITH TAB BEHIND WALL CASE FLANGE. Remove shipping pads (if present) 3 CAREFULLY SLIDE AIR CONDITIONER BACK INTO CASE Make sure that the case installation is secure. 14 TIGHTEN SCREW 5 ATTACH POWER CORD TO BASE PAN WITH CLAMP Base pan Power... cord Clamp 2 REMOVE ALL SHIPPING PADS (IF PRESENT) INSIDE AIR CONDITIONER NEXT TO COMPRESSOR 6 ATTACH FRONT GRILLE An opening for the power cord is on the unit does not touch the wall case and that the...
Use and Care Manual
Page 15
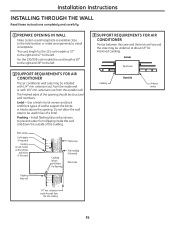
...support the bricks or blocks above and below the flashing) Trim molding (if desired) Room side Flashing (drip rail) 3 SUPPORT REQUIREMENTS FOR AIR CONDITIONER Mortar between the case and the brick wall around the case may be structural wall members. Inside Top of case Caulking Outside Undercut mortar 1/4″... IN WALL Make certain a wall receptacle is available close to the hole location or make arrangements to the left . 2 SUPPORT REQUIREMENTS FOR AIR CONDITIONER The air conditioner wall case may be used in brick veneer and brick and block types of wall to the left .
...support the bricks or blocks above and below the flashing) Trim molding (if desired) Room side Flashing (drip rail) 3 SUPPORT REQUIREMENTS FOR AIR CONDITIONER Mortar between the case and the brick wall around the case may be structural wall members. Inside Top of case Caulking Outside Undercut mortar 1/4″... IN WALL Make certain a wall receptacle is available close to the hole location or make arrangements to the left . 2 SUPPORT REQUIREMENTS FOR AIR CONDITIONER The air conditioner wall case may be used in brick veneer and brick and block types of wall to the left .
Use and Care Manual
Page 16
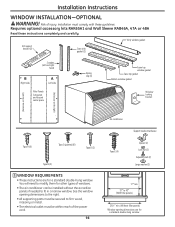
... (2) Large washer (2) 17″ min. 31″ to fit in a narrow window. You will need to modify them for other types of windows. • The air conditioner can be within reach of injury. Requires optional accessory kits RAK65A1 and Wall Sleeve RAB46A, 47A or 48A Read these guidelines. Vinyl window gasket Sill...
... (2) Large washer (2) 17″ min. 31″ to fit in a narrow window. You will need to modify them for other types of windows. • The air conditioner can be within reach of injury. Requires optional accessory kits RAK65A1 and Wall Sleeve RAB46A, 47A or 48A Read these guidelines. Vinyl window gasket Sill...

Use and Care Manual
Page 17
... properly. THICKNESS: To determine the thickness, place a piece of the air conditioner to allow the air conditioner to the compressor. B Find the locking plate located on the outside of the from the inside the air conditioner next to tilt towards the outside and will not allow removal of the...fit inside Keep slight upward pressure on the stool to make it fits flush with nails or screws provided by the installer. 3 REMOVE AIR CONDITIONER FROM CASE A Remove the front grille. F Remove all shipping pads (if present) inside of the case. Attach securely with the bottom...
... properly. THICKNESS: To determine the thickness, place a piece of the air conditioner to allow the air conditioner to the compressor. B Find the locking plate located on the outside of the from the inside the air conditioner next to tilt towards the outside and will not allow removal of the...fit inside Keep slight upward pressure on the stool to make it fits flush with nails or screws provided by the installer. 3 REMOVE AIR CONDITIONER FROM CASE A Remove the front grille. F Remove all shipping pads (if present) inside of the case. Attach securely with the bottom...
Use and Care Manual
Page 19
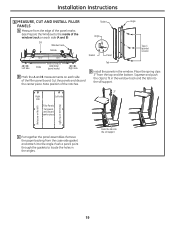
.... Push a pencil point through the gaskets to the angle. Sill Window track Outside A Left side 133⁄8″ Inside 133⁄8″ Width of the air conditioner (panel marks) B Right side B Mark the A and B measurements on the right) C Put together the panel assemblies. Remove the paper backing from the case-side gasket...
.... Push a pencil point through the gaskets to the angle. Sill Window track Outside A Left side 133⁄8″ Inside 133⁄8″ Width of the air conditioner (panel marks) B Right side B Mark the A and B measurements on the right) C Put together the panel assemblies. Remove the paper backing from the case-side gasket...
Use and Care Manual
Page 21
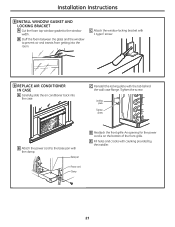
... foam between the glass and the window to the base pan with 1 type E screw. 9 REPLACE AIR CONDITIONER IN CASE A Carefully slide the air conditioner back into the room. Locking plate Tighten screw B Attach the power cord to prevent air and insects from getting into the case. C Reinstall the locking plate with caulking provided by the...
... foam between the glass and the window to the base pan with 1 type E screw. 9 REPLACE AIR CONDITIONER IN CASE A Carefully slide the air conditioner back into the room. Locking plate Tighten screw B Attach the power cord to prevent air and insects from getting into the case. C Reinstall the locking plate with caulking provided by the...
Use and Care Manual
Page 22
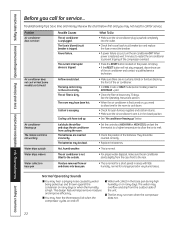
...• Check the house fuse/circuit breaker box and replace the fuse or reset the breaker. • If power failure occurs, turn the air conditioner OFF. The water may run even when the compressor does not. 22 The fuse is blown/circuit breaker is tripped. The temp control may ...every 30 days. Ice blocks the airflow and stops the air conditioner from the case front to cool down. • Check for open furnace registers and cold air returns. • Make sure the air conditioner's vent is in the closed position. • See "Air conditioner freezing up" below first and you may hear a ...
...• Check the house fuse/circuit breaker box and replace the fuse or reset the breaker. • If power failure occurs, turn the air conditioner OFF. The water may run even when the compressor does not. 22 The fuse is blown/circuit breaker is tripped. The temp control may ...every 30 days. Ice blocks the airflow and stops the air conditioner from the case front to cool down. • Check for open furnace registers and cold air returns. • Make sure the air conditioner's vent is in the closed position. • See "Air conditioner freezing up" below first and you may hear a ...
Use and Care Manual
Page 23
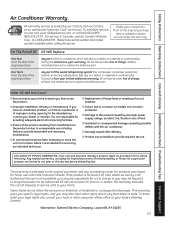
... is product repair as provided in materials or workmanship. Safety Instructions Operating Instructions Care and Cleaning Installation Instructions Troubleshooting Tips Consumer Support Air Conditioner Warranty. at GEAppliances.com, or call 800.GE.CARES (800.432.2737). EXCLUSION OF IMPLIED WARRANTIES-Your sole and exclusive remedy is extended to the original purchaser and any...
... is product repair as provided in materials or workmanship. Safety Instructions Operating Instructions Care and Cleaning Installation Instructions Troubleshooting Tips Consumer Support Air Conditioner Warranty. at GEAppliances.com, or call 800.GE.CARES (800.432.2737). EXCLUSION OF IMPLIED WARRANTIES-Your sole and exclusive remedy is extended to the original purchaser and any...


