
User Manual (English)
Page 39
File protection icon 4. Video file icon 6. Photo audio status 13. Audio file icon 5. WB 18. Aperture value 35 Battery status 9. Image size (Press the shutter button to record sound) (Press the shutter button to play sound) 10. Shutter speed 14. Exposure value 15. Playback mode icon 2. Picture ID 8. ISO value 17. DPOF file icon 3. Recording date and time 11. Memory card/internal memory indicator 7. Histogram 12. Memory capacity (current picture/total picture number) 16. Playback mode display Mode: 1 23456 78 9 11 12 13 14 10 15 18 17 16 1.
File protection icon 4. Video file icon 6. Photo audio status 13. Audio file icon 5. WB 18. Aperture value 35 Battery status 9. Image size (Press the shutter button to record sound) (Press the shutter button to play sound) 10. Shutter speed 14. Exposure value 15. Playback mode icon 2. Picture ID 8. ISO value 17. DPOF file icon 3. Recording date and time 11. Memory card/internal memory indicator 7. Histogram 12. Memory capacity (current picture/total picture number) 16. Playback mode display Mode: 1 23456 78 9 11 12 13 14 10 15 18 17 16 1.
User Manual (English)
Page 44
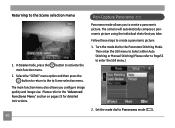
...these steps to activate the 2. Turn the mode dial to enter the Still menu.) 2. The camera will automatically compose a panoramic picture using the individual shots that you to create a panoramic picture. Then enter the Still menu to Select either Auto Stitching or Manual Stitching (Please refer to ...Page53 to the Panorama Stitching Mode. The main function menu also allows you configure image quality and image size. Select the "SCENE" menu ...
...these steps to activate the 2. Turn the mode dial to enter the Still menu.) 2. The camera will automatically compose a panoramic picture using the individual shots that you to create a panoramic picture. Then enter the Still menu to Select either Auto Stitching or Manual Stitching (Please refer to ...Page53 to the Panorama Stitching Mode. The main function menu also allows you configure image quality and image size. Select the "SCENE" menu ...
User Manual (English)
Page 68
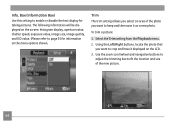
... displayed on the screen: histogram display, aperture value, shutter speed, exposure value, image size, image quality, and ISO value. (Please refer to keep and then save it displayed...menu. 2. Trim The trim setting allows you select an area of the new picture. 64 To trim a picture: 1. Info. Use the zoom scroll wheel and navigation buttons to adjust the trimming box to fit... the location and size of the photo you want to page 35 for taking pictures. Box (Information Box) Use this setting to crop and have it as ...
... displayed on the screen: histogram display, aperture value, shutter speed, exposure value, image size, image quality, and ISO value. (Please refer to keep and then save it displayed...menu. 2. Trim The trim setting allows you select an area of the new picture. 64 To trim a picture: 1. Info. Use the zoom scroll wheel and navigation buttons to adjust the trimming box to fit... the location and size of the photo you want to page 35 for taking pictures. Box (Information Box) Use this setting to crop and have it as ...
User Manual (English)
Page 69
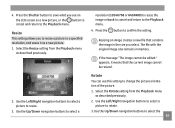
... it means that contains the image in memory. The file with the original image also remains in the size you see on the LCD screen as a new picture. 1. appears, it as a new picture, or the button to cancel and return to rotate. 3. Use the Left/Right navigation buttons to select...return to confirm the setting. Rotate You can use this setting to select the 65 Use the Up/Down navigation buttons to change the picture orientation of the picture. 1. Select the Rotate setting from the Playback menu as described previously. 2. 4. Resizing an image creates a new file that the current...
... it means that contains the image in memory. The file with the original image also remains in the size you see on the LCD screen as a new picture. 1. appears, it as a new picture, or the button to cancel and return to rotate. 3. Use the Left/Right navigation buttons to select...return to confirm the setting. Rotate You can use this setting to select the 65 Use the Up/Down navigation buttons to change the picture orientation of the picture. 1. Select the Rotate setting from the Playback menu as described previously. 2. 4. Resizing an image creates a new file that the current...


