GE A1235-RD - Digital Camera 12MP Support and Manuals
Get Help and Manuals for this General Electric item
Popular GE A1235-RD Manual Pages
User Manual (English) - Page 5
... purchasing GE digital cameras.
Improper handling may damage the camera and invalidate the warranty.
• When using the product.
• Do not take apart or attempt to the camera and possibly start a fire.
• Do not touch the camera lens.
No part of their respective owners. Inserting the batteries upside down can cause damage to service the camera...
User Manual (English) - Page 7
... 1
Safety information 1 About this manual 2
Symbols used in this manual 2
CONTENTS 3 GETTING READY 7
Unpacking 7 Camera Views : A Series 8
: E Series 10 Charging the battery 12 Inserting the battery 13
Inserting an optional SD/SDHC card 16 Turning on and off 17 Using the Mode Dial 18 Setting date/time and language 19
Setting the Date and Time...
User Manual (English) - Page 16
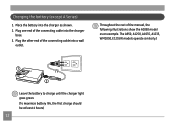
... rest of the connecting cable into a wall
outlet. Charging the battery (except A Series)
1. Plug one end of the manual, the following illustrations show the A1050 model as shown. 2. The A950, A1250, A1035, A1235, WM1050, E1255W models operate similarly.)
1
2
Leave the battery to charge until the charger light goes green. (To maximize battery life, the...
User Manual (English) - Page 22

... shots and stitch them together into a panoramic photo. Switch to take still pictures. (The camera uses the default programmed automatic settings.)
Playback
Switch to record videos. Switch to use a preset scene mode for advanced users only) Movie Image Stabilization Scene
Auto Scene
Panorama
Manual
18
Switch to view the pictures/videos stored in the memory card and...
User Manual (English) - Page 32
... on the screen. Size The size setting refers to the various GE digital camera models.
3. A higher image resolution allows you will be able to page 30 for a list of recorded pixels is displayed on a memory card.
The number of recorded pixels becomes smaller, you to print that are available to the image resolution in larger sizes without degrading the image. As the number...
User Manual (English) - Page 33
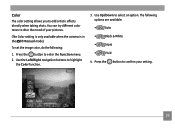
... an option. Press the button to highlight
the Color function.
3. The following :
1. Use the Left/Right navigation buttons to confirm your pictures.
(The Color setting is only available when the camera is in the Manual mode). To set the image color, do the following options are available:
•
Auto
•
Black & White
•
Sepia
•
Vivid
4.
User Manual (English) - Page 44
The camera will automatically compose a panoramic picture using the individual shots that you configure image quality and image size. Then enter the Still menu to Select either Auto Stitching or Manual Stitching (Please refer to Page53 to the "Advanced Functions Menu" section on pages 25 for detailed instructions. The main function menu also allows you take.
Please refer...
User Manual (English) - Page 50

...enter the Photo menu.
2. Press the shutter button fully to select "Blink detection" setting.
3. In photography modes, press the button to confirm the setting and ...photo, a warning message will automatically show blink detection warning message. Use the Up/Down navigation buttons to capture the image, if
someone's eyes blink, the camera will pop up if a blink had been detected in the photo...
User Manual (English) - Page 60
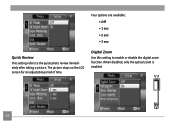
When disabled, only the optical zoom is enabled.
56 Digital Zoom
Use this setting to the quick photo review immediately after taking a picture.
The picture stays on the LCD screen for an adjustable period of time. Four options are available: • Off • 1 sec • 2 sec • 3 sec
Quick Review
This setting refers to enable or disable the digital zoom function.
User Manual (English) - Page 68
... the screen: histogram display, aperture value, shutter speed, exposure value, image size, image quality, and ISO value. (Please refer to crop and have it as a new photo.
Info. Box (Information Box)
Use this setting to fit the location and size of the photo you want to keep and then save it displayed on the LCD. 3. To trim a picture:
1.
User Manual (English) - Page 69
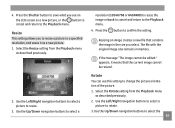
... as described previously. 2. Select the Rotate setting from the Playback menu
as a new picture, or the button to cancel and return to a specified resolution, and saves it means that contains the image in memory. The file with the original image also remains in the size you select. Resize This setting allows you see on the LCD screen...
User Manual (English) - Page 73
... select to Auto or
Manual brightness adjustment, and then press to adjust the volume and change the tones for shutter, buttons, self-timer, and power-on/power-off. Use the Left/Right navigation buttons to confirm your LCD screen. 1.
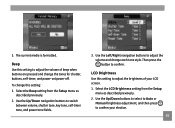
Beep Use this setting: 1. 3.
Select the LCD Brightness setting from the Setup menu as described...
User Manual (English) - Page 74
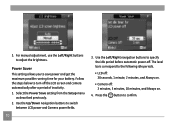
...manual adjustment, use the Left/Right buttons to turn off the LCD screen and camera... Use the Left/Right navigation buttons to switch
between LCD power and Camera power fields.
70
3. Press the button to the following idle periods.
• ... minutes, and Always on.
• Camera off . The level bars correspond to confirm.
Power Saver This setting allows you to save power and get the...
User Manual (English) - Page 79
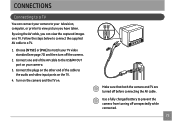
... battery to a TV.
1. Choose [NTSC] or [PAL] to match your camera.
3. Video Audio
Make sure that both the camera and TV are turned off before connecting the AV cable. Connect one end of the ...TV. CONNECTIONS
Connecting to a TV
You can connect your camera to your television, computer, or printer to view picture you can view the captured images on your TV video standard (see page 72) and ...
User Manual (English) - Page 95
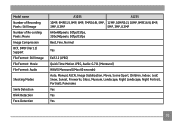
Model name Number of Recording Pixels : Still Image Number of Re-cording Pixels :Movie Image Compression DCF, DPOF (Ver1.1) Support File Format : Still Image File Format : Movie File Format : Audio
Shooting Modes
Smile Detection Blink Detection Face-Detection
A1035
A1235
10MP, 9MP(3:2), 9MP, 8MP, 7MP(16:9), 5MP, 12MP, 10MP(3:2), 10MP, 9MP(16:9), 8MP,
3MP, 0.3MP
5MP, 3MP, 0.3MP
640x480pixels...
GE A1235-RD Reviews
We have not received any reviews for GE yet.