
User Guide
Page 6
..." INSIDE PERSONNEL. SEE MARKING ON BOTTOM / BACK OF PRODUCT This transmitter must not be installed and operated with this product. For body worn operation, this phone has been tested and meets the FCC RF exposure guidelines when used with the belt clip supplied with a minimum distance of other antenna or transmitter...
..." INSIDE PERSONNEL. SEE MARKING ON BOTTOM / BACK OF PRODUCT This transmitter must not be installed and operated with this product. For body worn operation, this phone has been tested and meets the FCC RF exposure guidelines when used with the belt clip supplied with a minimum distance of other antenna or transmitter...
User Guide
Page 7
... model 27907 12 Telephone Jack Requirements 13 Installation 13 Digital Security System 13 Important Installation Guidelines 14 Handset Layout 15 Base Layout 16 Installing the Phone 17 Installing the Handset Battery 17 Base Station 18 Answering System Setup 19 Setting the Voice Prompt Language 20 Voice Time/Day Stamp and Real...
... model 27907 12 Telephone Jack Requirements 13 Installation 13 Digital Security System 13 Important Installation Guidelines 14 Handset Layout 15 Base Layout 16 Installing the Phone 17 Installing the Handset Battery 17 Base Station 18 Answering System Setup 19 Setting the Voice Prompt Language 20 Voice Time/Day Stamp and Real...

User Guide
Page 12
... AC power adaptor Handset battery pack Base Handset Battery Wall mount Telephone line compartment cover Belt clip bracket cord 12 IMPORTANT: Because cordless phones operate on electricity, you should always be followed. Before You Begin Parts Checklist (for future reference. Introduction CAUTION: When using telephone ...equipment, there are basic safety instructions that should have at least one phone in your home that isn't cordless, in case the power in your package includes the items shown here.
... AC power adaptor Handset battery pack Base Handset Battery Wall mount Telephone line compartment cover Belt clip bracket cord 12 IMPORTANT: Because cordless phones operate on electricity, you should always be followed. Before You Begin Parts Checklist (for future reference. Introduction CAUTION: When using telephone ...equipment, there are basic safety instructions that should have at least one phone in your home that isn't cordless, in case the power in your package includes the items shown here.
User Guide
Page 13
... interference continues, move the cordless telephone farther away from these devices may cause or receive interference with each other communications devices may also use this phone, you don't have a modular jack, call your local phone company to find out how to your line jack home. Installation Digital Security System Your cordless...
... interference continues, move the cordless telephone farther away from these devices may cause or receive interference with each other communications devices may also use this phone, you don't have a modular jack, call your local phone company to find out how to your line jack home. Installation Digital Security System Your cordless...

User Guide
Page 17
... the risk of the handset. 3. Plug the battery pack cord into the jack inside a plastic bag and are packaged together inside the compartment. Installing the Phone Installing the Handset Battery NOTE: You must connect the handset battery before use only the Thomson Inc.
... the risk of the handset. 3. Plug the battery pack cord into the jack inside a plastic bag and are packaged together inside the compartment. Installing the Phone Installing the Handset Battery NOTE: You must connect the handset battery before use only the Thomson Inc.

User Guide
Page 19
...a vertical or floor mount position. This power adaptor is intended to receive incoming calls. Place the handset in the user's guide. Allow the phone to charge for 16 hours prior to turn on the answering system. • Press the ans on/off . 19 CAUTION: To reduce risk ...set up your answering system to be correctly orientated in use indicator turns on and off. The indicator blinks when you don't properly charge the phone, battery performance is charging. 5. 4. The MESSAGES indicator lights when the answering system is off button to first use only the 5-2760 power...
...a vertical or floor mount position. This power adaptor is intended to receive incoming calls. Place the handset in the user's guide. Allow the phone to charge for 16 hours prior to turn on the answering system. • Press the ans on/off . 19 CAUTION: To reduce risk ...set up your answering system to be correctly orientated in use indicator turns on and off. The indicator blinks when you don't properly charge the phone, battery performance is charging. 5. 4. The MESSAGES indicator lights when the answering system is off button to first use only the 5-2760 power...
User Guide
Page 21
... automatically when you subscribe to set the day manually. You may choose to Caller ID service, the current time is automatically transmitted by your local phone company as part of Caller ID service. If you receive your current outgoing announcement. 21 Recording the Outgoing Announcement For best results when recording, you...
... automatically when you subscribe to set the day manually. You may choose to Caller ID service, the current time is automatically transmitted by your local phone company as part of Caller ID service. If you receive your current outgoing announcement. 21 Recording the Outgoing Announcement For best results when recording, you...

User Guide
Page 22
.... NOTE: Press the PLAY/STOP button at any time to review and select this is ON. 2. Begin speaking after the tone, and I can't answer the phone right now, so please leave your outgoing announcement. Thanks. 1. Make sure the answering system is (use your name here), I 'll get back to record an...
.... NOTE: Press the PLAY/STOP button at any time to review and select this is ON. 2. Begin speaking after the tone, and I can't answer the phone right now, so please leave your outgoing announcement. Thanks. 1. Make sure the answering system is (use your name here), I 'll get back to record an...
User Guide
Page 23
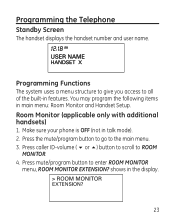
.... 3. Press the mute/program button to go to enter ROOM MONITOR menu, ROOM MONITOR EXTENSION? Room Monitor (applicable only with additional handsets) 1. Make sure your phone is OFF (not in features.
.... 3. Press the mute/program button to go to enter ROOM MONITOR menu, ROOM MONITOR EXTENSION? Room Monitor (applicable only with additional handsets) 1. Make sure your phone is OFF (not in features.

User Guide
Page 24
... be on the handset to 4 handsets by pressing the TALK/CALL BACK button once. NOTE: Press the exit button on the cradle. 5. NOTE: When this phone system is an incoming call . NOTE: While in room monitoring mode, the handsets will turn on the microphone and the originating handset will emit an...
... be on the handset to 4 handsets by pressing the TALK/CALL BACK button once. NOTE: Press the exit button on the cradle. 5. NOTE: When this phone system is an incoming call . NOTE: While in room monitoring mode, the handsets will turn on the microphone and the originating handset will emit an...

User Guide
Page 25
... on the handset to select 1ENG, 2FRA, 3ESP, or use the caller ID-volume ( 6 or 5) button to scroll to enter the menu. Make sure your phone is the default setting. 25 Press the caller ID-volume ( 6 or 5) button to scroll to the SET LANGUAGE sub-menu. 2. English is OFF (not in...
... on the handset to select 1ENG, 2FRA, 3ESP, or use the caller ID-volume ( 6 or 5) button to scroll to enter the menu. Make sure your phone is the default setting. 25 Press the caller ID-volume ( 6 or 5) button to scroll to the SET LANGUAGE sub-menu. 2. English is OFF (not in...

User Guide
Page 30
... mute/program button to confirm. NOTE: If the desired number/record was previously stored in any one of a selected record and replace the old phone number with new phone number. You will hear a confirmation tone and VIP# DELETED shows in the display. 8. Press the mute/program button to enter to the desired...
... mute/program button to confirm. NOTE: If the desired number/record was previously stored in any one of a selected record and replace the old phone number with new phone number. You will hear a confirmation tone and VIP# DELETED shows in the display. 8. Press the mute/program button to enter to the desired...

User Guide
Page 32
Message Alert (for answering system) This feature lets you select the number of times you want the phone to Answer (for answering system) This feature sets your selection. Press mute/program button to the MESSAGE ALERT sub-menu. 2. Rings to ring before the ...
Message Alert (for answering system) This feature lets you select the number of times you want the phone to Answer (for answering system) This feature sets your selection. Press mute/program button to the MESSAGE ALERT sub-menu. 2. Rings to ring before the ...
User Guide
Page 40
... serves as a Visual Ringer function. VMWI / Visual Ringer Indicator on the top of the handset flashes when you must subscribe to this service from your phone company. It will also light when a call is an incoming call . Speakerphone Operation. If you receive a call and remain lit during a call . If you . The...
... serves as a Visual Ringer function. VMWI / Visual Ringer Indicator on the top of the handset flashes when you must subscribe to this service from your phone company. It will also light when a call is an incoming call . Speakerphone Operation. If you receive a call and remain lit during a call . If you . The...

User Guide
Page 41
... of the digits are erased. NOTE: If you want to select the desired record, then press the TALK/CALL BACK or SPEAKER button. 2. When the phone rings, press the SPEAKER button on the handset. - Making a Call 1. OR - When finished, press SPEAKER or TALK/CALL BACK to hang up to hang up...
... of the digits are erased. NOTE: If you want to select the desired record, then press the TALK/CALL BACK or SPEAKER button. 2. When the phone rings, press the SPEAKER button on the handset. - Making a Call 1. OR - When finished, press SPEAKER or TALK/CALL BACK to hang up to hang up...
User Guide
Page 42
... to HI/LO/OFF. The other one is the traditional way as described in minutes and seconds. Handset Setup; Ringer Volume menus. Make sure the phone is the default setting. 4. Use the touch tone pad on the display and counts the length of time of the call in the Programming Functions...
... to HI/LO/OFF. The other one is the traditional way as described in minutes and seconds. Handset Setup; Ringer Volume menus. Make sure the phone is the default setting. 4. Use the touch tone pad on the display and counts the length of time of the call in the Programming Functions...
User Guide
Page 43
Last Number Redial You may redial a number up to activate a custom calling service, such as call waiting, or call will disconnect . During a phone call, you will hear a beep to indicate another call is put on hold. • To switch between the two calls, press the flash/answerer button. ...
Last Number Redial You may redial a number up to activate a custom calling service, such as call waiting, or call will disconnect . During a phone call, you will hear a beep to indicate another call is put on hold. • To switch between the two calls, press the flash/answerer button. ...

User Guide
Page 45
... handset. 45 Use the touch-tone pad to enter the handset number you want to page. 4. Make sure the originating phone is OFF (not in talk mode). 2. PAGING EXTENSION? Make sure the phone is OFF (not in talk mode). 2. Paging All Handsets from a Handset (applicable only with additional handsets) 1. shows in the...
... handset. 45 Use the touch-tone pad to enter the handset number you want to page. 4. Make sure the originating phone is OFF (not in talk mode). 2. PAGING EXTENSION? Make sure the phone is OFF (not in talk mode). 2. Paging All Handsets from a Handset (applicable only with additional handsets) 1. shows in the...

User Guide
Page 46
... handset's display. 2. Press the mute/program button. There are four volume levels to choose from the Base/Group Page Use the base-only to your phone conversation. When the maximum or minimum volume level is reached, the...
... handset's display. 2. Press the mute/program button. There are four volume levels to choose from the Base/Group Page Use the base-only to your phone conversation. When the maximum or minimum volume level is reached, the...
User Guide
Page 47
... to its original setting when you hang up the telephone line, allowing you want to have a conversation with another registered handset without tying up the phone or if you may increase the volume by using the CALLER ID-VOLUME (6 or 5) button. Volume Boost During a conversation, you press the Vol Boost button...
... to its original setting when you hang up the telephone line, allowing you want to have a conversation with another registered handset without tying up the phone or if you may increase the volume by using the CALLER ID-VOLUME (6 or 5) button. Volume Boost During a conversation, you press the Vol Boost button...


