
Gateway Quick Start Guide for Windows 7
Page 36
...the start -up options. 3. This option will automatically restart. Use the arrow keys to enter the boot menu (this , try to use basic files and drivers. 1. The screen freezes when the Gateway logo displays When the computer starts, it first performs a test of the options below. However, ... the computer started successfully. To fix this feature may not be available on all system requirements. Start your computer to confirm. 3. When the Gateway logo appears, press F8 on . 2. Don't forget to access the advanced startup options. 3. You should only open your computer using the ...
...the start -up options. 3. This option will automatically restart. Use the arrow keys to enter the boot menu (this , try to use basic files and drivers. 1. The screen freezes when the Gateway logo displays When the computer starts, it first performs a test of the options below. However, ... the computer started successfully. To fix this feature may not be available on all system requirements. Start your computer to confirm. 3. When the Gateway logo appears, press F8 on . 2. Don't forget to access the advanced startup options. 3. You should only open your computer using the ...
Gateway Quick Start Guide for Windows 7
Page 47
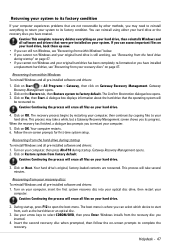
...and drivers: 1. This process may need to your computer. 5. Your computer restarts. 6. The boot menu is still working, see "Recovering from your hard drive. 4. Helpdesk - 47 Gateway Recovery Management opens. 2. A dialogue box displays information about the hard drive that are recovered. ... not recoverable by copying files to reinstall everything on your system. Caution: Continuing the process will take a while, but a Gateway Recovery Management screen shows you to return your hard drive. 2. Use your computer. Caution: This complete recovery deletes everything to ...
...and drivers: 1. This process may need to your computer. 5. Your computer restarts. 6. The boot menu is still working, see "Recovering from your hard drive. 4. Helpdesk - 47 Gateway Recovery Management opens. 2. A dialogue box displays information about the hard drive that are recovered. ... not recoverable by copying files to reinstall everything on your system. Caution: Continuing the process will take a while, but a Gateway Recovery Management screen shows you to return your hard drive. 2. Use your computer. Caution: This complete recovery deletes everything to ...

Gateway NV50 Series User's Reference Guide - Canada/French
Page 75
www.gateway.com Important You must enter the User Password each time you turn on your AC power adapter to recharge the battery. If you are prompted ... adapters. • Take a portable surge protector to enter the User Password if your notebook was turned off or put in Sleep mode. 4 Highlight Password on boot, then press ENTER. 5 Highlight Enabled, then press ENTER. 6 Open the Exit menu, highlight Exit Saving Changes, then press ENTER. 7 When you start your computer, you...
www.gateway.com Important You must enter the User Password each time you turn on your AC power adapter to recharge the battery. If you are prompted ... adapters. • Take a portable surge protector to enter the User Password if your notebook was turned off or put in Sleep mode. 4 Highlight Password on boot, then press ENTER. 5 Highlight Enabled, then press ENTER. 6 Open the Exit menu, highlight Exit Saving Changes, then press ENTER. 7 When you start your computer, you...

Gateway NV50 Series User's Reference Guide - Canada/French
Page 90
... Vista and all files on your computer, insert the first system recovery disc into your optical disc drive, then restart your computer. The boot menu is where you inserted. 4 Insert the second recovery disc when prompted, then follow the on-screen prompts to select CDROM/DVD, ...then press ENTER. Caution Continuing the process will erase all pre-installed software and drivers: Caution Before using your recovery discs, open the boot menu. CHAPTER 7: Maintaining Your Notebook Recovering from , such as the hard drive or an optical disc. 3 Use your hard drive. 2 During startup...
... Vista and all files on your computer, insert the first system recovery disc into your optical disc drive, then restart your computer. The boot menu is where you inserted. 4 Insert the second recovery disc when prompted, then follow the on-screen prompts to select CDROM/DVD, ...then press ENTER. Caution Continuing the process will erase all pre-installed software and drivers: Caution Before using your recovery discs, open the boot menu. CHAPTER 7: Maintaining Your Notebook Recovering from , such as the hard drive or an optical disc. 3 Use your hard drive. 2 During startup...

Gateway NV50 Series User's Reference Guide - English
Page 75
You do not need to enter the User Password if your notebook was turned off or put in Sleep mode. 4 Highlight Password on boot, then press ENTER. 5 Highlight Enabled, then press ENTER. 6 Open the Exit menu, highlight Exit Saving Changes, then press ENTER. 7 When you start your computer,...see "Managing Power" on conserving battery power, using the battery whenever possible, monitor the battery charge, and use the most efficient power management settings. www.gateway.com Important You must enter the User Password each time you turn on your notebook if it was put in your online User Guide. If...
You do not need to enter the User Password if your notebook was turned off or put in Sleep mode. 4 Highlight Password on boot, then press ENTER. 5 Highlight Enabled, then press ENTER. 6 Open the Exit menu, highlight Exit Saving Changes, then press ENTER. 7 When you start your computer,...see "Managing Power" on conserving battery power, using the battery whenever possible, monitor the battery charge, and use the most efficient power management settings. www.gateway.com Important You must enter the User Password each time you turn on your notebook if it was put in your online User Guide. If...
Gateway NV50 Series User's Reference Guide - English
Page 90
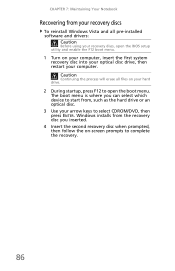
The boot menu is where you inserted. 4 Insert the second recovery disc when prompted, then follow the on-screen prompts to select CDROM/DVD, then press ENTER. ... the process will erase all pre-installed software and drivers: Caution Before using your recovery discs, open the BIOS setup utility and enable the F12 boot menu. 1 Turn on your hard drive. 2 During startup, press F12 to open the...
The boot menu is where you inserted. 4 Insert the second recovery disc when prompted, then follow the on-screen prompts to select CDROM/DVD, then press ENTER. ... the process will erase all pre-installed software and drivers: Caution Before using your recovery discs, open the BIOS setup utility and enable the F12 boot menu. 1 Turn on your hard drive. 2 During startup, press F12 to open the...
Gateway NV50 Series User's Reference Guide - Japanese
Page 72
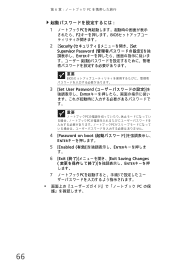
第 6 PC 1 PC F2 BIOS 2 [Security Set Supervisor Password ENTER 重要 BIOS 3 [Set User Password ENTER 重要 PC PC PC 4 [Password on boot ENTER 5 [Enabled ENTER す。 6 [Exit Exit Saving Changes ENTER 7 PC 3 PC の保 66
第 6 PC 1 PC F2 BIOS 2 [Security Set Supervisor Password ENTER 重要 BIOS 3 [Set User Password ENTER 重要 PC PC PC 4 [Password on boot ENTER 5 [Enabled ENTER す。 6 [Exit Exit Saving Changes ENTER 7 PC 3 PC の保 66
Gateway NV50 Series User's Reference Guide - Traditional Chinese
Page 72
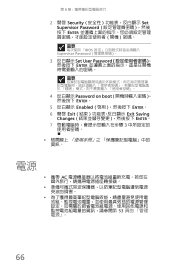
第 6 2 開啟 Security Set Supervisor Password ENTER BIOS Supervisor Password 3 Set User Password ENTER 4 Password on boot ENTER。 5 Enabled ENTER。 6 開啟 Exit Exit Saving Changes ENTER。 7 3 資訊。 電源 • 攜帶 AC 53 66
第 6 2 開啟 Security Set Supervisor Password ENTER BIOS Supervisor Password 3 Set User Password ENTER 4 Password on boot ENTER。 5 Enabled ENTER。 6 開啟 Exit Exit Saving Changes ENTER。 7 3 資訊。 電源 • 攜帶 AC 53 66
Service Guide
Page 14
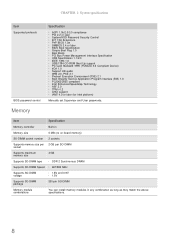
... n INT 13H Extensions n PnP BIOS 1.0a n SMBIOS 2.4 or later n BIOS Boot Specification n Simple Boot Flag 1.0 n Boot Block n PCI Bus Power Management Interface Specification n USB Specification 1.1/2.0 n IEEE 1394 1.0 n USB/1394 CD-ROM Boot Up support n PC Card Standard 1995 (PCMCIA 3.0 Compliant Device) n IrDA 1.0 n... Support HD audio n WfM 2.0, PXE 2.1 n Preboot Execution Environment (PXE) 2.1 n Boot Integrity Service Application Program Interface (BIS) 1.0 n PC2002/2005 compliant n Intel Enhanced Speedstep Technology n ASF 2.0 n TPM v1.2 n AHCI...
... n INT 13H Extensions n PnP BIOS 1.0a n SMBIOS 2.4 or later n BIOS Boot Specification n Simple Boot Flag 1.0 n Boot Block n PCI Bus Power Management Interface Specification n USB Specification 1.1/2.0 n IEEE 1394 1.0 n USB/1394 CD-ROM Boot Up support n PC Card Standard 1995 (PCMCIA 3.0 Compliant Device) n IrDA 1.0 n... Support HD audio n WfM 2.0, PXE 2.1 n Preboot Execution Environment (PXE) 2.1 n Boot Integrity Service Application Program Interface (BIS) 1.0 n PC2002/2005 compliant n Intel Enhanced Speedstep Technology n ASF 2.0 n TPM v1.2 n AHCI...

Service Guide
Page 35
... your way through the various menu and submenu screens. The values displayed may not be the same as those in your computer. www.gateway.com Navigating the BIOS setup utility Use the keys listed in the legend bar on the bottom of the screen. Actual screen information varies... a parameter if it is enclosed in this section are for parameters are the default settings. 29 Help for illustration only. These include: Information, Main, Security, Boot, and Exit. To use the BIOS setup utility: • To choose a menu, use the left ← and right → arrow keys. •...
... your way through the various menu and submenu screens. The values displayed may not be the same as those in your computer. www.gateway.com Navigating the BIOS setup utility Use the keys listed in the legend bar on the bottom of the screen. Actual screen information varies... a parameter if it is enclosed in this section are for parameters are the default settings. 29 Help for illustration only. These include: Information, Main, Security, Boot, and Exit. To use the BIOS setup utility: • To choose a menu, use the left ← and right → arrow keys. •...
Service Guide
Page 37
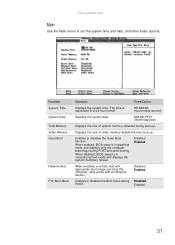
... system Summary Screen. HH:MM:SS (hour:minute:second) Displays the system date. Displays the size of system memory detected during boot-up . Enables or disables the Quiet Boot function. www.gateway.com Main Use the Main menu to set the system time and date, and other basic options. When disabled, BIOS setup...
... system Summary Screen. HH:MM:SS (hour:minute:second) Displays the system date. Displays the size of system memory detected during boot-up . Enables or disables the Quiet Boot function. www.gateway.com Main Use the Main menu to set the system time and date, and other basic options. When disabled, BIOS setup...

Service Guide
Page 38
... mode. When set system passwords to AHCI (Advanced Host Controller Interface), the SATA controller enables its AHCI and RAID functions when the computer boots up when Password on Boot: Clear Clear Clear [Enter] [Enter] [Enter] [Disabled] Item Specific Help Supervisor Password controls access of the whole setup utility. It...the hard drive password status. This function allows the user to create a hidden partition on the hard drive to speed up the boot-up time. AHCI IDE Security Use the Security menu option to set to factory defaults by pressing the Alt+F10 keys during system...
... mode. When set system passwords to AHCI (Advanced Host Controller Interface), the SATA controller enables its AHCI and RAID functions when the computer boots up when Password on Boot: Clear Clear Clear [Enter] [Enter] [Enter] [Disabled] Item Specific Help Supervisor Password controls access of the whole setup utility. It...the hard drive password status. This function allows the user to create a hidden partition on the hard drive to speed up the boot-up time. AHCI IDE Security Use the Security menu option to set to factory defaults by pressing the Alt+F10 keys during system...
Service Guide
Page 39
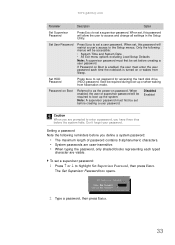
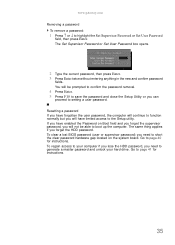
www.gateway.com Parameter Description Option Set Supervisor Password Press Enter to set password for accessing the hard disk drive (HDD) password. When set before creating a user password. It will be required during boot-up the system. Note: A supervisor password must first be set , this password will...as the power-on or wakes from hibernation mode. Set User Password Press Enter to set a supervisor password: 1 Press ↑ or ↓ to boot up or when waking from Sleep. To set a user password. The Set Supervisor Password box opens. 2 Type a password, then press Enter. 33...
www.gateway.com Parameter Description Option Set Supervisor Password Press Enter to set password for accessing the hard disk drive (HDD) password. When set before creating a user password. It will be required during boot-up the system. Note: A supervisor password must first be set , this password will...as the power-on or wakes from hibernation mode. Set User Password Press Enter to set a supervisor password: 1 Press ↑ or ↓ to boot up or when waking from Sleep. To set a user password. The Set Supervisor Password box opens. 2 Type a password, then press Enter. 33...
Service Guide
Page 41
...utility. If you have limited access to setting a user password. Go to your hard drive. To regain access to page 40 for instructions. 35 www.gateway.com Removing a password To remove a password: 1 Press ↑ or ↓ to short the clear password hardware gap located on... Boot field and you forget the supervisor password, you will be able to boot up the computer. The same thing applies if you need to highlight the Set Supervisor Password or Set User Password...
...utility. If you have limited access to setting a user password. Go to your hard drive. To regain access to page 40 for instructions. 35 www.gateway.com Removing a password To remove a password: 1 Press ↑ or ↓ to short the clear password hardware gap located on... Boot field and you forget the supervisor password, you will be able to boot up the computer. The same thing applies if you need to highlight the Set Supervisor Password or Set User Password...
Service Guide
Page 42
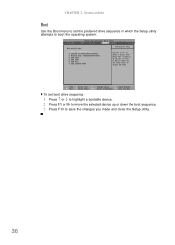
CHAPTER 2: System utilities Boot Use the Boot menu to set boot drive sequence: 1 Press ↑ or ↓ to highlight a bootable device. 2 Press F5 or F6 to move the selected device up the list, or to move it down the boot sequence. 3 Press F10 to move it up or... down the list. Information Phoenix SecureCore(tm) Setup Utility Main Security Boot Exit Boot priority order: 1: IDE0: XXXXXXXXXXX-(XX) 2: CD/DVD: XXXXXXXXXXX-XXXXX-(X 3: Network Boot: XXXXXXXXXXXXXXXX 4: USB HDD: 5: USB FDD: 6: USB Key: 7: USB CD/DVD ROM: Item Specific Help Use < > or <...
CHAPTER 2: System utilities Boot Use the Boot menu to set boot drive sequence: 1 Press ↑ or ↓ to highlight a bootable device. 2 Press F5 or F6 to move the selected device up the list, or to move it down the boot sequence. 3 Press F10 to move it up or... down the list. Information Phoenix SecureCore(tm) Setup Utility Main Security Boot Exit Boot priority order: 1: IDE0: XXXXXXXXXXX-(XX) 2: CD/DVD: XXXXXXXXXXX-XXXXX-(X 3: Network Boot: XXXXXXXXXXXXXXXX 4: USB HDD: 5: USB FDD: 6: USB Key: 7: USB CD/DVD ROM: Item Specific Help Use < > or <...
Service Guide
Page 43
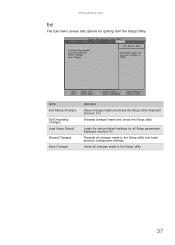
www.gateway.com Exit The Exit menu screen lists options for all changes made to the Setup utility. 37 Keyboard shortcut: F10 Discards changes made and closes ... shortcut: F9 Discards all Setup parameters. Loads the factory-default settings for quitting from the Setup Utility. Information Phoenix SecureCore(tm) Setup Utility Main Security Boot Exit Exit Saving Changes Exit Discarding Changes Load Setup Defaults Discard Changes Save Changes Item Specific Help Exit System Setup and save your changes to...
www.gateway.com Exit The Exit menu screen lists options for all changes made to the Setup utility. 37 Keyboard shortcut: F10 Discards changes made and closes ... shortcut: F9 Discards all Setup parameters. Loads the factory-default settings for quitting from the Setup Utility. Information Phoenix SecureCore(tm) Setup Utility Main Security Boot Exit Exit Saving Changes Exit Discarding Changes Load Setup Defaults Discard Changes Save Changes Item Specific Help Exit System Setup and save your changes to...
Service Guide
Page 44
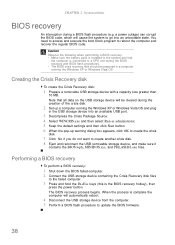
...; Make sure the battery pack is installed to update the BIOS firmware. 38 The BIOS recovery process begins. You need to access and execute the boot block program to a UPS unit during the BIOS recovery and BIOS flash procedures. • The BIOS crisis recovery disk should be cleared during a BIOS flash...
...; Make sure the battery pack is installed to update the BIOS firmware. 38 The BIOS recovery process begins. You need to access and execute the boot block program to a UPS unit during the BIOS recovery and BIOS flash procedures. • The BIOS crisis recovery disk should be cleared during a BIOS flash...
Service Guide
Page 123
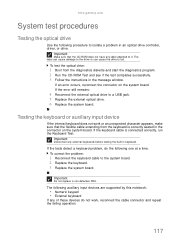
... on the system board. To correct the problem: 1 Reconnect the keyboard cable to a USB jack. 5 Replace the external optical drive. 6 Replace the system board. www.gateway.com System test procedures Testing the optical drive Use the following one at a time. The label can cause damage to the drive or can cause...
... on the system board. To correct the problem: 1 Reconnect the keyboard cable to a USB jack. 5 Replace the external optical drive. 6 Replace the system board. www.gateway.com System test procedures Testing the optical drive Use the following one at a time. The label can cause damage to the drive or can cause...
Service Guide
Page 124
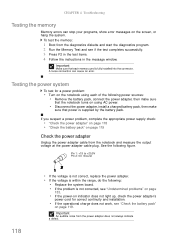
... the message window. Important An audible noise from the notebook and measure the output voltage at the power adapter cable plug. To test the memory: 1 Boot from the diagnostics diskette and start the diagnostics program. 2 Run the Memory Test and see "Undetermined problems" on page 133. • If the power-on...
... the message window. Important An audible noise from the notebook and measure the output voltage at the power adapter cable plug. To test the memory: 1 Boot from the diagnostics diskette and start the diagnostics program. 2 Run the Memory Test and see "Undetermined problems" on page 133. • If the power-on...
Service Guide
Page 128
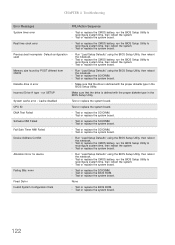
.../Action Sequence System timer error n Test or replace the CMOS battery, run the BIOS Setup Utility to reconfigure system time, then reboot the system. Previous boot incomplete - run the BIOS Setup Utility to reconfigure system time, then reboot the system. n Test or replace the system board. n Test or replace the CMOS...
.../Action Sequence System timer error n Test or replace the CMOS battery, run the BIOS Setup Utility to reconfigure system time, then reboot the system. Previous boot incomplete - run the BIOS Setup Utility to reconfigure system time, then reboot the system. n Test or replace the system board. n Test or replace the CMOS...


