
Gateway Quick Start Guide for Windows 7
Page 36
... the BIOS if you used it first performs a test of the options below. The screen freezes when the Gateway logo displays When the computer starts, it . 1. You should only open your computer. Try to do so...TAB or ESC key to while the computer starts to confirm. 4. When the Gateway logo appears, press F8 to enter the boot menu (this , try to highlight Safe Mode and press Enter. This may cause... your keyboard to lose data that were in the top menu using one of all computers). When the Gateway logo...
... the BIOS if you used it first performs a test of the options below. The screen freezes when the Gateway logo displays When the computer starts, it . 1. You should only open your computer. Try to do so...TAB or ESC key to while the computer starts to confirm. 4. When the Gateway logo appears, press F8 to enter the boot menu (this , try to highlight Safe Mode and press Enter. This may cause... your keyboard to lose data that were in the top menu using one of all computers). When the Gateway logo...
Gateway Quick Start Guide for Windows 7
Page 47
...on your arrow keys to return your hard drive. 4. This process will erase all pre-installed software and drivers: 1. The boot menu is still working, see "Recovering from the hard drive during startup" on your original hard drive has been completely re-... your optical disc drive, then restart your computer. 5. Your computer restarts. 6. Caution: Continuing the process will take a while, but a Gateway Recovery Management screen shows you have installed a replacement hard drive, see "Recovering from your system. The Confirm Restoration dialogue box opens. 3. During...
...on your arrow keys to return your hard drive. 4. This process will erase all pre-installed software and drivers: 1. The boot menu is still working, see "Recovering from the hard drive during startup" on your original hard drive has been completely re-... your optical disc drive, then restart your computer. 5. Your computer restarts. 6. Caution: Continuing the process will take a while, but a Gateway Recovery Management screen shows you have installed a replacement hard drive, see "Recovering from your system. The Confirm Restoration dialogue box opens. 3. During...

Gateway NV50 Series User's Reference Guide - Canada/French
Page 75
... your notebook" in hibernate mode. You do not need to enter the User Password if your notebook was put in Sleep mode. 4 Highlight Password on boot, then press ENTER. 5 Highlight Enabled, then press ENTER. 6 Open the Exit menu, highlight Exit Saving Changes, then press ENTER. 7 When you start your... if it was turned off or put in your online User Guide. Power • Take your AC power adapter to recharge the battery. www.gateway.com Important You must enter the User Password each time you are traveling internationally, take power plug adapters. • Take a portable surge protector ...
... your notebook" in hibernate mode. You do not need to enter the User Password if your notebook was put in Sleep mode. 4 Highlight Password on boot, then press ENTER. 5 Highlight Enabled, then press ENTER. 6 Open the Exit menu, highlight Exit Saving Changes, then press ENTER. 7 When you start your... if it was turned off or put in your online User Guide. Power • Take your AC power adapter to recharge the battery. www.gateway.com Important You must enter the User Password each time you are traveling internationally, take power plug adapters. • Take a portable surge protector ...

Gateway NV50 Series User's Reference Guide - Canada/French
Page 90
...To reinstall Windows Vista and all files on your hard drive. 2 During startup, press F12 to open the BIOS setup utility and enable the F12 boot menu. 1 Turn on your computer, insert the first system recovery disc into your optical disc drive, then restart your arrow keys to select CDROM/...DVD, then press ENTER. The boot menu is where you inserted. 4 Insert the second recovery disc when prompted, then follow the on-screen prompts to complete the recovery. 86 CHAPTER 7: ...
...To reinstall Windows Vista and all files on your hard drive. 2 During startup, press F12 to open the BIOS setup utility and enable the F12 boot menu. 1 Turn on your computer, insert the first system recovery disc into your optical disc drive, then restart your arrow keys to select CDROM/...DVD, then press ENTER. The boot menu is where you inserted. 4 Insert the second recovery disc when prompted, then follow the on-screen prompts to complete the recovery. 86 CHAPTER 7: ...

Gateway NV50 Series User's Reference Guide - English
Page 75
... management settings. You do not need to enter the User Password if your notebook was turned off or put in Sleep mode. 4 Highlight Password on boot, then press ENTER. 5 Highlight Enabled, then press ENTER. 6 Open the Exit menu, highlight Exit Saving Changes, then press ENTER. 7 When you start your ...you are prompted to enter the user password you set in step 3. • Review the information in "Protecting your notebook" in hibernate mode. www.gateway.com Important You must enter the User Password each time you turn on your AC power adapter to recharge the battery. Power • Take your...
... management settings. You do not need to enter the User Password if your notebook was turned off or put in Sleep mode. 4 Highlight Password on boot, then press ENTER. 5 Highlight Enabled, then press ENTER. 6 Open the Exit menu, highlight Exit Saving Changes, then press ENTER. 7 When you start your ...you are prompted to enter the user password you set in step 3. • Review the information in "Protecting your notebook" in hibernate mode. www.gateway.com Important You must enter the User Password each time you turn on your AC power adapter to recharge the battery. Power • Take your...
Gateway NV50 Series User's Reference Guide - English
Page 90
... and all files on your computer, insert the first system recovery disc into your optical disc drive, then restart your recovery discs, open the boot menu. Caution Continuing the process will erase all pre-installed software and drivers: Caution Before using your computer. The... boot menu is where you inserted. 4 Insert the second recovery disc when prompted, then follow the on-screen prompts to open the BIOS setup utility and enable the F12 boot menu. 1 Turn on your hard drive. 2 During startup, press F12...
... and all files on your computer, insert the first system recovery disc into your optical disc drive, then restart your recovery discs, open the boot menu. Caution Continuing the process will erase all pre-installed software and drivers: Caution Before using your computer. The... boot menu is where you inserted. 4 Insert the second recovery disc when prompted, then follow the on-screen prompts to open the BIOS setup utility and enable the F12 boot menu. 1 Turn on your hard drive. 2 During startup, press F12...
Gateway NV50 Series User's Reference Guide - Japanese
Page 72
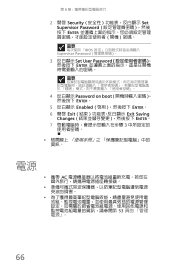
第 6 PC 1 PC F2 BIOS 2 [Security Set Supervisor Password ENTER 重要 BIOS 3 [Set User Password ENTER 重要 PC PC PC 4 [Password on boot ENTER 5 [Enabled ENTER す。 6 [Exit Exit Saving Changes ENTER 7 PC 3 PC の保 66
第 6 PC 1 PC F2 BIOS 2 [Security Set Supervisor Password ENTER 重要 BIOS 3 [Set User Password ENTER 重要 PC PC PC 4 [Password on boot ENTER 5 [Enabled ENTER す。 6 [Exit Exit Saving Changes ENTER 7 PC 3 PC の保 66
Gateway NV50 Series User's Reference Guide - Traditional Chinese
Page 72
第 6 2 開啟 Security Set Supervisor Password ENTER BIOS Supervisor Password 3 Set User Password ENTER 4 Password on boot ENTER。 5 Enabled ENTER。 6 開啟 Exit Exit Saving Changes ENTER。 7 3 資訊。 電源 • 攜帶 AC 53 66
第 6 2 開啟 Security Set Supervisor Password ENTER BIOS Supervisor Password 3 Set User Password ENTER 4 Password on boot ENTER。 5 Enabled ENTER。 6 開啟 Exit Exit Saving Changes ENTER。 7 3 資訊。 電源 • 攜帶 AC 53 66
Service Guide
Page 14
... n INT 13H Extensions n PnP BIOS 1.0a n SMBIOS 2.4 or later n BIOS Boot Specification n Simple Boot Flag 1.0 n Boot Block n PCI Bus Power Management Interface Specification n USB Specification 1.1/2.0 n IEEE 1394 1.0 n USB/1394 CD-ROM Boot Up support n PC Card Standard 1995 (PCMCIA 3.0 Compliant Device) n IrDA 1.0 n... Support HD audio n WfM 2.0, PXE 2.1 n Preboot Execution Environment (PXE) 2.1 n Boot Integrity Service Application Program Interface (BIS) 1.0 n PC2002/2005 compliant n Intel Enhanced Speedstep Technology n ASF 2.0 n TPM v1.2 n AHCI...
... n INT 13H Extensions n PnP BIOS 1.0a n SMBIOS 2.4 or later n BIOS Boot Specification n Simple Boot Flag 1.0 n Boot Block n PCI Bus Power Management Interface Specification n USB Specification 1.1/2.0 n IEEE 1394 1.0 n USB/1394 CD-ROM Boot Up support n PC Card Standard 1995 (PCMCIA 3.0 Compliant Device) n IrDA 1.0 n... Support HD audio n WfM 2.0, PXE 2.1 n Preboot Execution Environment (PXE) 2.1 n Boot Integrity Service Application Program Interface (BIS) 1.0 n PC2002/2005 compliant n Intel Enhanced Speedstep Technology n ASF 2.0 n TPM v1.2 n AHCI...

Service Guide
Page 35
...the various menu and submenu screens. Help for parameters are for a particular menu are the default settings. 29 These include: Information, Main, Security, Boot, and Exit. Actual screen information varies by model, installed features, and location. • In the descriptive table following each of the screenshot, settings... in the legend bar on the bottom of the screen. www.gateway.com Navigating the BIOS setup utility Use the keys listed in boldface are shown on the bottom of the Setup screen to expand this ...
...the various menu and submenu screens. Help for parameters are for a particular menu are the default settings. 29 These include: Information, Main, Security, Boot, and Exit. Actual screen information varies by model, installed features, and location. • In the descriptive table following each of the screenshot, settings... in the legend bar on the bottom of the screen. www.gateway.com Navigating the BIOS setup utility Use the keys listed in boldface are shown on the bottom of the Setup screen to expand this ...
Service Guide
Page 37
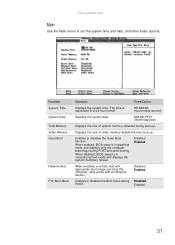
...displays only the computer brand logo during boot-up . Displays the size of system memory detected during Disabled POST. Enabled 31 HH:MM:SS (hour:minute:second) Displays the system date. When enabled, BIOS setup is in a 24-hour format. www.gateway.com Main Use the Main menu ...to set the system time and date, and other basic options. Parameter System Time System Date Total Memory Video Memory Quiet Boot Network Boot F12 Boot Menu Description Format/Options Displays the system time.
...displays only the computer brand logo during boot-up . Displays the size of system memory detected during Disabled POST. Enabled 31 HH:MM:SS (hour:minute:second) Displays the system date. When enabled, BIOS setup is in a 24-hour format. www.gateway.com Main Use the Main menu ...to set the system time and date, and other basic options. Parameter System Time System Date Total Memory Video Memory Quiet Boot Network Boot F12 Boot Menu Description Format/Options Displays the system time.

Service Guide
Page 38
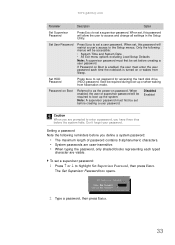
... [Enter] [Disabled] Item Specific Help Supervisor Password controls access of the whole setup utility. Information Phoenix SecureCore(tm) Setup Utility Main Security Boot Exit Supervisor Password is: User Password is: HDD Password is enabled. . 32 F1 Help Esc Exit Select Item -/+ Change Values F9 Setup ... Recovery function. This function allows the user to IDE, the SATA controller disables its AHCI and RAID features when the computer boots up. Disabled Enabled Select the SATA controller operating mode. HDD Password Is Displays the hard drive password status. Option Clear Set...
... [Enter] [Disabled] Item Specific Help Supervisor Password controls access of the whole setup utility. Information Phoenix SecureCore(tm) Setup Utility Main Security Boot Exit Supervisor Password is: User Password is: HDD Password is enabled. . 32 F1 Help Esc Exit Select Item -/+ Change Values F9 Setup ... Recovery function. This function allows the user to IDE, the SATA controller disables its AHCI and RAID features when the computer boots up. Disabled Enabled Select the SATA controller operating mode. HDD Password Is Displays the hard drive password status. Option Clear Set...
Service Guide
Page 39
...(HDD) password. If Password on Boot is turned on password. Set HDD Password Press Enter to set a user password. When enabled, the user or supervisor password will restrict a user's access to the Setup menus. www.gateway.com Parameter Description Option Set Supervisor Password... Press Enter to set a supervisor password: 1 Press ↑ or ↓ to highlight Set Supervisor Password, then press Enter. Password on Boot Referred to boot up or when waking from Sleep. Note:...
...(HDD) password. If Password on Boot is turned on password. Set HDD Password Press Enter to set a user password. When enabled, the user or supervisor password will restrict a user's access to the Setup menus. www.gateway.com Parameter Description Option Set Supervisor Password... Press Enter to set a supervisor password: 1 Press ↑ or ↓ to highlight Set Supervisor Password, then press Enter. Password on Boot Referred to boot up or when waking from Sleep. Note:...
Service Guide
Page 41
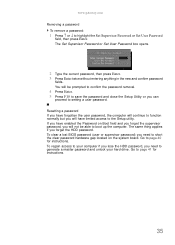
www.gateway.com Removing a password To remove a password: 1 Press ↑ or ↓ to page 41 for ...the password and close the Setup Utility or you can proceed to short the clear password hardware gap located on Boot field and you forget the supervisor password, you have limited access to generate a master password and unlock your computer... if you lose the HDD password, you need to setting a user password. Go to boot up the computer. To clear a lost BIOS password (user or supervisor password) you forget the HDD password. You will...
www.gateway.com Removing a password To remove a password: 1 Press ↑ or ↓ to page 41 for ...the password and close the Setup Utility or you can proceed to short the clear password hardware gap located on Boot field and you forget the supervisor password, you have limited access to generate a master password and unlock your computer... if you lose the HDD password, you need to setting a user password. Go to boot up the computer. To clear a lost BIOS password (user or supervisor password) you forget the HDD password. You will...
Service Guide
Page 42
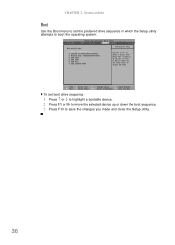
... HDD: 5: USB FDD: 6: USB Key: 7: USB CD/DVD ROM: Item Specific Help Use < > or < > to select a device, then press to move it down the boot sequence. 3 Press F10 to save the changes you made and close the Setup utility. 36 F1 Help Esc Exit Select Item -/+ Change Values F9 Setup... Select Sub-Menu F10 Save and Exit To set the preferred drive sequence in which the Setup utility attempts to boot the operating system. CHAPTER 2: System utilities Boot Use the Boot menu to set boot drive sequence: 1 Press ↑ or ↓ to highlight a bootable device. 2 Press F5 or F6 to move the ...
... HDD: 5: USB FDD: 6: USB Key: 7: USB CD/DVD ROM: Item Specific Help Use < > or < > to select a device, then press to move it down the boot sequence. 3 Press F10 to save the changes you made and close the Setup utility. 36 F1 Help Esc Exit Select Item -/+ Change Values F9 Setup... Select Sub-Menu F10 Save and Exit To set the preferred drive sequence in which the Setup utility attempts to boot the operating system. CHAPTER 2: System utilities Boot Use the Boot menu to set boot drive sequence: 1 Press ↑ or ↓ to highlight a bootable device. 2 Press F5 or F6 to move the ...
Service Guide
Page 43
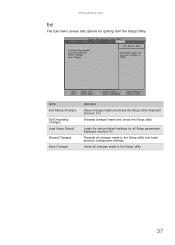
www.gateway.com Exit The Exit menu screen lists options for all Setup parameters. F1 Help Esc Exit Select Item -/+ Change Values F9 Setup Defaults Select Menu ... Save Changes Description Saves changes made and closes the Setup utility. Saves all changes made to CMOS. Information Phoenix SecureCore(tm) Setup Utility Main Security Boot Exit Exit Saving Changes Exit Discarding Changes Load Setup Defaults Discard Changes Save Changes Item Specific Help Exit System Setup and save your changes to...
www.gateway.com Exit The Exit menu screen lists options for all Setup parameters. F1 Help Esc Exit Select Item -/+ Change Values F9 Setup Defaults Select Menu ... Save Changes Description Saves changes made and closes the Setup utility. Saves all changes made to CMOS. Information Phoenix SecureCore(tm) Setup Utility Main Security Boot Exit Exit Saving Changes Exit Discarding Changes Load Setup Defaults Discard Changes Save Changes Item Specific Help Exit System Setup and save your changes to...
Service Guide
Page 44
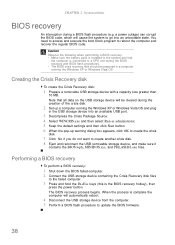
... hold the Fn+Esc keys (this is connected to reboot the computer and recover the regular BIOS code. You need to access and execute the boot block program to a UPS unit during the BIOS recovery and BIOS flash procedures. • The BIOS crisis recovery disk should be cleared during a BIOS flash...
... hold the Fn+Esc keys (this is connected to reboot the computer and recover the regular BIOS code. You need to access and execute the boot block program to a UPS unit during the BIOS recovery and BIOS flash procedures. • The BIOS crisis recovery disk should be cleared during a BIOS flash...
Service Guide
Page 123
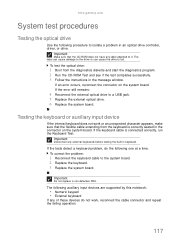
...do the following procedure to a USB jack. 5 Replace the external optical drive. 6 Replace the system board. To test the optical drive: 1 Boot from the keyboard is connected correctly, run the Keyboard Test. If the error still remains: 4 Reconnect the external optical drive to isolate a problem... in the connector on the system board. Important Do not replace a non-defective FRU. www.gateway.com System test procedures Testing the optical drive Use the following one at a time. If the tests detect a keyboard problem, do not work...
...do the following procedure to a USB jack. 5 Replace the external optical drive. 6 Replace the system board. To test the optical drive: 1 Boot from the keyboard is connected correctly, run the Keyboard Test. If the error still remains: 4 Reconnect the external optical drive to isolate a problem... in the connector on the system board. Important Do not replace a non-defective FRU. www.gateway.com System test procedures Testing the optical drive Use the following one at a time. If the tests detect a keyboard problem, do not work...
Service Guide
Page 124
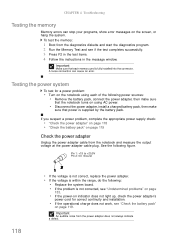
... following power sources: • Remove the battery pack, connect the power adapter, then make sure that each of the following figure. To test the memory: 1 Boot from the notebook and measure the output voltage at the power adapter cable plug. If you suspect a power problem, complete the appropriate power supply check...
... following power sources: • Remove the battery pack, connect the power adapter, then make sure that each of the following figure. To test the memory: 1 Boot from the notebook and measure the output voltage at the power adapter cable plug. If you suspect a power problem, complete the appropriate power supply check...
Service Guide
Page 128
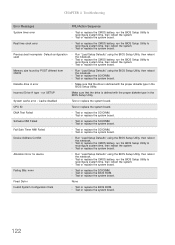
... is defined with the proper diskette type in the BIOS Setup Utility. Incorrect Drive A type - DMA Test Failed n Test or replace the SO-DIMM. Previous boot incomplete - Software NMI Failed n Test or replace the SO-DIMM. n Test or replace the system board. Failing Bits: nnnn n Test or replace the SO-DIMM...
... is defined with the proper diskette type in the BIOS Setup Utility. Incorrect Drive A type - DMA Test Failed n Test or replace the SO-DIMM. Previous boot incomplete - Software NMI Failed n Test or replace the SO-DIMM. n Test or replace the system board. Failing Bits: nnnn n Test or replace the SO-DIMM...


