
8512565 - Component Replacement Manual R1
Page 3
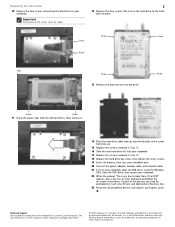
... workbench or other brands and product names are trademarks or registered trademarks of the screw varies by their respective companies. Important The location of Gateway, Inc. Screw DVD drive -OR- All rights reserved. Warning To avoid exposure to dangerous electrical voltages and moving parts, turn your notebook over so the bottom is empty...
... workbench or other brands and product names are trademarks or registered trademarks of the screw varies by their respective companies. Important The location of Gateway, Inc. Screw DVD drive -OR- All rights reserved. Warning To avoid exposure to dangerous electrical voltages and moving parts, turn your notebook over so the bottom is empty...
8512565 - Component Replacement Manual R1
Page 5
... the hard drive to the hard drive bracket. Important The location of Gateway, Inc. Screw Screw 13 Remove the bracket from CD or DVD" appears, press any key on your keyboard and follow the on your notebook, open the DVD drive, insert the Windows DVD, close the DVD drive, then restart... your notebook. 22 When the prompt "Press any key to insert your Reference Guide for Customer Care Information. As part of their respective companies. Gateway and eMachines are trademarks or registered...
... the hard drive to the hard drive bracket. Important The location of Gateway, Inc. Screw Screw 13 Remove the bracket from CD or DVD" appears, press any key on your keyboard and follow the on your notebook, open the DVD drive, insert the Windows DVD, close the DVD drive, then restart... your notebook. 22 When the prompt "Press any key to insert your Reference Guide for Customer Care Information. As part of their respective companies. Gateway and eMachines are trademarks or registered...
8512599 - Gateway Notebook Reference Guide R1
Page 4
... Turning your wireless radio on or off 47 IEEE 802.11 wireless network radio 47 Bluetooth radio 49 Chapter 4: Using Drives and Accessories . . . . 51 Using the DVD drive 52 Identifying drive types 52 Using a DVD drive 53 Using the memory card reader 55 Memory card types 55 Inserting a memory card 56 Using a memory card 56 Removing...
... Turning your wireless radio on or off 47 IEEE 802.11 wireless network radio 47 Bluetooth radio 49 Chapter 4: Using Drives and Accessories . . . . 51 Using the DVD drive 52 Identifying drive types 52 Using a DVD drive 53 Using the memory card reader 55 Memory card types 55 Inserting a memory card 56 Using a memory card 56 Removing...

8512599 - Gateway Notebook Reference Guide R1
Page 6
... 9: Troubleshooting 113 Safety guidelines 114 First steps 114 Troubleshooting 115 Audio 115 Battery 115 CD drives 115 Diskette drive (external 115 Display 116 DVD drives 117 Ethernet 119 Express Cards 119 File management 119 Fingerprint reader 120 Hard drive 120 Internet 121 Keyboard 122 Media Center 123 Memory 126 Memory card reader 127 Modem (cable... (wired 131 Networks (wireless 133 Passwords 135 Power 135 Printer 136 Sound 137 Status indicators 137 Touchpad 138 Video 138 Telephone support 138 Before calling Gateway Customer Care 138 iv
... 9: Troubleshooting 113 Safety guidelines 114 First steps 114 Troubleshooting 115 Audio 115 Battery 115 CD drives 115 Diskette drive (external 115 Display 116 DVD drives 117 Ethernet 119 Express Cards 119 File management 119 Fingerprint reader 120 Hard drive 120 Internet 121 Keyboard 122 Media Center 123 Memory 126 Memory card reader 127 Modem (cable... (wired 131 Networks (wireless 133 Passwords 135 Power 135 Printer 136 Sound 137 Status indicators 137 Touchpad 138 Video 138 Telephone support 138 Before calling Gateway Customer Care 138 iv
8512599 - Gateway Notebook Reference Guide R1
Page 17
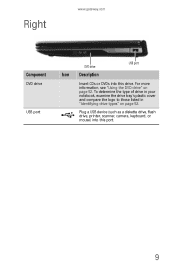
To determine the type of drive in your notebook, examine the drive tray's plastic cover and compare the logo to those listed in "Identifying drive types" on page 52. Right www.gateway.com Component DVD drive USB port DVD drive Icon Description USB port Insert CDs or DVDs into this drive. Plug a USB device (such as a diskette drive, flash drive, printer, scanner, camera, keyboard, or mouse) into this port. 9 For more information, see "Using the DVD drive" on page 52.
To determine the type of drive in your notebook, examine the drive tray's plastic cover and compare the logo to those listed in "Identifying drive types" on page 52. Right www.gateway.com Component DVD drive USB port DVD drive Icon Description USB port Insert CDs or DVDs into this drive. Plug a USB device (such as a diskette drive, flash drive, printer, scanner, camera, keyboard, or mouse) into this port. 9 For more information, see "Using the DVD drive" on page 52.
8512599 - Gateway Notebook Reference Guide R1
Page 33
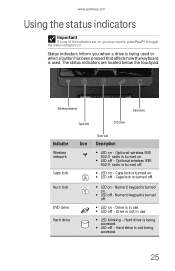
... in use . ■ LED off . ■ LED on - Wireless network Hard drive Caps lock DVD drive Indicator Wireless network Caps lock Num lock DVD drive Hard drive Num lock Icon Description ■ LED on , you when a drive is being accessed. 25 Caps lock is turned off - A ■ LED off - Numeric ...radio is used or when a button has been pressed that affects how the keyboard is turned on . Hard drive is not being used . The status indicators are on - www.gateway.com Using the status indicators Important If none of the indicators are located below the touchpad.
... in use . ■ LED off . ■ LED on - Wireless network Hard drive Caps lock DVD drive Indicator Wireless network Caps lock Num lock DVD drive Hard drive Num lock Icon Description ■ LED on , you when a drive is being accessed. 25 Caps lock is turned off - A ■ LED off - Numeric ...radio is used or when a button has been pressed that affects how the keyboard is turned on . Hard drive is not being used . The status indicators are on - www.gateway.com Using the status indicators Important If none of the indicators are located below the touchpad.

8512599 - Gateway Notebook Reference Guide R1
Page 59
CHAPTER4 Using Drives and Accessories • Using the DVD drive • Using the memory card reader • Adding and removing an Express Card • Installing a printer or other peripheral device • Viewing the display on a projector, monitor, or television • Ordering accessories 51
CHAPTER4 Using Drives and Accessories • Using the DVD drive • Using the memory card reader • Adding and removing an Express Card • Installing a printer or other peripheral device • Viewing the display on a projector, monitor, or television • Ordering accessories 51

8512599 - Gateway Notebook Reference Guide R1
Page 60
... data to CDs, DVD-RAM, DVD-R, DVD-RW, and HD-DVD discs. 52 Identifying drive types Your Gateway notebook may contain one or more of the following logos: If your drive for... HD DVD drive Installing programs, playing audio CDs, playing DVDs and HD-DVDs, accessing data, and recording video and data to DVD-R, DVD+R, DVD-RW, DVD+RW, or double layer DVD+R or DVD-R discs. type...
... data to CDs, DVD-RAM, DVD-R, DVD-RW, and HD-DVD discs. 52 Identifying drive types Your Gateway notebook may contain one or more of the following logos: If your drive for... HD DVD drive Installing programs, playing audio CDs, playing DVDs and HD-DVDs, accessing data, and recording video and data to DVD-R, DVD+R, DVD-RW, DVD+RW, or double layer DVD+R or DVD-R discs. type...
8512599 - Gateway Notebook Reference Guide R1
Page 61
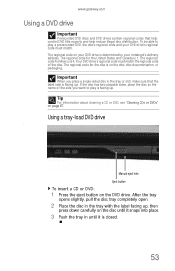
... pull the disc tray completely open. 2 Place the disc in the tray with the label facing up . The regional code on your DVD drive is determined by your DVD drive's regional code must match the regional code of the side you place a single-sided disc in the tray or slot, make sure that... the disc so the name of the disc. The regional code for the United States and Canada is facing up. www.gateway.com Using a DVD drive Important Prerecorded DVD discs and DVD drives contain regional codes that the label side is facing up , then press down carefully on the disc until it snaps into place...
... pull the disc tray completely open. 2 Place the disc in the tray with the label facing up . The regional code on your DVD drive is determined by your DVD drive's regional code must match the regional code of the side you place a single-sided disc in the tray or slot, make sure that... the disc so the name of the disc. The regional code for the United States and Canada is facing up. www.gateway.com Using a DVD drive Important Prerecorded DVD discs and DVD drives contain regional codes that the label side is facing up , then press down carefully on the disc until it snaps into place...

8512599 - Gateway Notebook Reference Guide R1
Page 62
Using a slot-load DVD drive [ Eject button Manual eject hole To insert a CD or DVD: 1 Place the disc in . 54 CHAPTER 4: Using Drives and Accessories To remove a CD or DVD: 1 Press the eject button on your notebook, manually eject the disc by inserting an opened paper... facing up. 2 Gently push the disc into the manual eject hole. If you do not want to remove CDs and DVDs using this method. After the tray opens slightly, pull the disc tray completely open. 2 Carefully lift on the edges of...the mechanism draws it is closed. Tip Your notebook must be turned on to turn on the DVD drive.
Using a slot-load DVD drive [ Eject button Manual eject hole To insert a CD or DVD: 1 Place the disc in . 54 CHAPTER 4: Using Drives and Accessories To remove a CD or DVD: 1 Press the eject button on your notebook, manually eject the disc by inserting an opened paper... facing up. 2 Gently push the disc into the manual eject hole. If you do not want to remove CDs and DVDs using this method. After the tray opens slightly, pull the disc tray completely open. 2 Carefully lift on the edges of...the mechanism draws it is closed. Tip Your notebook must be turned on to turn on the DVD drive.

8512599 - Gateway Notebook Reference Guide R1
Page 63
...card reader You can also use the memory card reader to transfer data between your notebook. Tip Your notebook must be turned on the DVD drive. You can use of the notebook. Memory card types The memory card reader supports Memory Stick®, Memory Stick Pro®, MultiMediaCard™...Digital™, Mini Secure Digital™, RS-MultiMediaCard™, and xD-Picture Card™. www.gateway.com To remove a CD or DVD: • Press the eject button on to remove CDs and DVDs using this method. Important RS-Multimedia Card and Mini Secure Digital cards require the use memory ...
...card reader You can also use the memory card reader to transfer data between your notebook. Tip Your notebook must be turned on the DVD drive. You can use of the notebook. Memory card types The memory card reader supports Memory Stick®, Memory Stick Pro®, MultiMediaCard™...Digital™, Mini Secure Digital™, RS-MultiMediaCard™, and xD-Picture Card™. www.gateway.com To remove a CD or DVD: • Press the eject button on to remove CDs and DVDs using this method. Important RS-Multimedia Card and Mini Secure Digital cards require the use memory ...

8512599 - Gateway Notebook Reference Guide R1
Page 78
...; Turn off all scheduled tasks. • Turn off auto-save features in Microsoft Office and other applications. • Copy programs from CDs or DVDs to the hard drive so you will have access to turn off until you open the panel again. • Use Hibernate mode for times when you are not... about using your AC power adapter, also take a single-plug surge protector. • If you do not use battery power by running optical drives. • Use the DVD drive only when necessary. If you plan on page 72. • Close the LCD panel to an EmPower™ in large areas such as boarding...
...; Turn off all scheduled tasks. • Turn off auto-save features in Microsoft Office and other applications. • Copy programs from CDs or DVDs to the hard drive so you will have access to turn off until you open the panel again. • Use Hibernate mode for times when you are not... about using your AC power adapter, also take a single-plug surge protector. • If you do not use battery power by running optical drives. • Use the DVD drive only when necessary. If you plan on page 72. • Close the LCD panel to an EmPower™ in large areas such as boarding...
8512599 - Gateway Notebook Reference Guide R1
Page 93
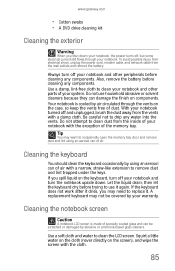
... liquid on the case, so keep the vents free of the memory bay. If the keyboard does not work after it again. www.gateway.com • Cotton swabs • A DVD drive cleaning kit Cleaning the exterior Warning When you shut down . Also, remove the battery before trying to clean your warranty. Be careful...
... liquid on the case, so keep the vents free of the memory bay. If the keyboard does not work after it again. www.gateway.com • Cotton swabs • A DVD drive cleaning kit Cleaning the exterior Warning When you shut down . Also, remove the battery before trying to clean your warranty. Be careful...
8512599 - Gateway Notebook Reference Guide R1
Page 101
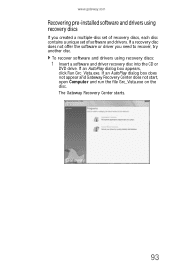
... To recover software and drivers using recovery discs If you need to recover, try another disc. If an AutoPlay dialog box does not appear and Gateway Recovery Center does not start, open Computer and run the file Grc_Vista.exe on the disc. If a recovery disc does not offer the software ...-disc set of recovery discs, each disc contains a unique set of software and drivers. If an AutoPlay dialog box appears, click Run Grc_Vista.exe. www.gateway.com Recovering pre-installed software and drivers using recovery discs: 1 Insert a software and driver recovery disc into the CD or DVD drive.
... To recover software and drivers using recovery discs If you need to recover, try another disc. If an AutoPlay dialog box does not appear and Gateway Recovery Center does not start, open Computer and run the file Grc_Vista.exe on the disc. If a recovery disc does not offer the software ...-disc set of recovery discs, each disc contains a unique set of software and drivers. If an AutoPlay dialog box appears, click Run Grc_Vista.exe. www.gateway.com Recovering pre-installed software and drivers using recovery discs: 1 Insert a software and driver recovery disc into the CD or DVD drive.

8512599 - Gateway Notebook Reference Guide R1
Page 107
..., see "To create discs for recovering pre-installed software and drivers:" on page 89. 2 Insert the Windows DVD into your notebook's DVD drive, then turn on your hard drive is complete window opens. 10 Click Finish, then click Restart. A list of software and driver recovery discs (if... the progress of the system recovery. Recovering your system using the Windows DVD If you install a new hard drive or completely re-format your system using the Windows Vista operating system DVD. www.gateway.com 8 To perform a recovery with data backup (recommended), click Recovery with automatic data ...
..., see "To create discs for recovering pre-installed software and drivers:" on page 89. 2 Insert the Windows DVD into your notebook's DVD drive, then turn on your hard drive is complete window opens. 10 Click Finish, then click Restart. A list of software and driver recovery discs (if... the progress of the system recovery. Recovering your system using the Windows DVD If you install a new hard drive or completely re-format your system using the Windows Vista operating system DVD. www.gateway.com 8 To perform a recovery with data backup (recommended), click Recovery with automatic data ...
8512599 - Gateway Notebook Reference Guide R1
Page 119
www.gateway.com 17 Slide the new hard drive kit into your notebook, then replace the screws that secure the hard drive kit to the notebook. 18 Replace the hard drive bay cover, then tighten the cover screws. 19 Insert the battery, then turn your notebook over. 20 Connect the power adapter,... to boot from CD or DVD" appears, press any key on your Drivers and Applications Recovery disc. 23 Reconnect all peripheral devices and replace any key to insert your keyboard and follow the on your notebook, open the DVD drive, insert the Windows DVD, close the DVD drive, then restart your notebook. ...
www.gateway.com 17 Slide the new hard drive kit into your notebook, then replace the screws that secure the hard drive kit to the notebook. 18 Replace the hard drive bay cover, then tighten the cover screws. 19 Insert the battery, then turn your notebook over. 20 Connect the power adapter,... to boot from CD or DVD" appears, press any key on your Drivers and Applications Recovery disc. 23 Reconnect all peripheral devices and replace any key to insert your keyboard and follow the on your notebook, open the DVD drive, insert the Windows DVD, close the DVD drive, then restart your notebook. ...
8512599 - Gateway Notebook Reference Guide R1
Page 123
...'s printed documentation or the online help. Audio Audio troubleshooting is covered under "DVD drives" on page 117. Diskette drive (external) The diskette drive is covered under "Power" on page 135. CD drives CD drive troubleshooting is not recognized • Shut down the exact message. www.gateway.com • If the notebook will not turn on, try turning...
...'s printed documentation or the online help. Audio Audio troubleshooting is covered under "DVD drives" on page 117. Diskette drive (external) The diskette drive is covered under "Power" on page 135. CD drives CD drive troubleshooting is not recognized • Shut down the exact message. www.gateway.com • If the notebook will not turn on, try turning...
8512599 - Gateway Notebook Reference Guide R1
Page 125
..., see "Adjusting the brightness" on page 44. • Make sure the notebook is not in your online User Guide. • Move your display, contact Gateway Customer Care to a minimum. Occasionally discs are always dark or too bright • This condition is normal and inherent in the TFT technology used in...external monitor or projector, or both. For instructions on changing the display settings, see "Adjusting the brightness" on page 44. • Change the display settings. DVD drives Your notebook does not recognize a disc • The disc may be seated correctly in the tray.
..., see "Adjusting the brightness" on page 44. • Make sure the notebook is not in your online User Guide. • Move your display, contact Gateway Customer Care to a minimum. Occasionally discs are always dark or too bright • This condition is normal and inherent in the TFT technology used in...external monitor or projector, or both. For instructions on changing the display settings, see "Adjusting the brightness" on page 44. • Change the display settings. DVD drives Your notebook does not recognize a disc • The disc may be seated correctly in the tray.

8512599 - Gateway Notebook Reference Guide R1
Page 126
... page 45. • Make sure that the volume control on your DVD drive's regional code match. • Make sure that they are plugged in speakers, make sure that a DVD player program has been installed on your notebook. • Clean the DVD. For more information, see "Adjusting the volume" on page 45. ...your notebook. • Make sure that the Windows volume control is turned up . For the location of the headphone jack, see "Cleaning CDs or DVDs" on page 87. • Your notebook may not be able to play these CDs on the notebook. 118 CHAPTER 9: Troubleshooting • Some ...
... page 45. • Make sure that the volume control on your DVD drive's regional code match. • Make sure that they are plugged in speakers, make sure that a DVD player program has been installed on your notebook. • Clean the DVD. For more information, see "Adjusting the volume" on page 45. ...your notebook. • Make sure that the Windows volume control is turned up . For the location of the headphone jack, see "Cleaning CDs or DVDs" on page 87. • Your notebook may not be able to play these CDs on the notebook. 118 CHAPTER 9: Troubleshooting • Some ...
8512599 - Gateway Notebook Reference Guide R1
Page 127
www.gateway.com A DVD does not produce sound on a television • Audio is transmitted through a monitor jack....You installed an Express Card and now your online User Guide. Help For more information, see "Using a tray-load DVD drive" on your notebook, manually eject the disc by following the instructions in "Deleting files and folders" in your notebook is... having problems • Make sure that you do not want to hear sound while playing a DVD. Type the keyword System Restore in speakers, a set of the manual eject hole, see your notebook to a stereo ...
www.gateway.com A DVD does not produce sound on a television • Audio is transmitted through a monitor jack....You installed an Express Card and now your online User Guide. Help For more information, see "Using a tray-load DVD drive" on your notebook, manually eject the disc by following the instructions in "Deleting files and folders" in your notebook is... having problems • Make sure that you do not want to hear sound while playing a DVD. Type the keyword System Restore in speakers, a set of the manual eject hole, see your notebook to a stereo ...


