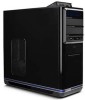
8513029R - Gateway Setup Guide
Page 1
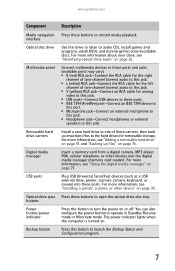
Note: If you have a speaker bar, follow the instructions that came with options) Memory card reader DVD/CD drive IEEE 1394/ FireWire™ port (optional) Microphone jack Headphone jack USB ports Smart Copy button (optional) DVD/CD... to the modem jack and telephone wall jack. Trademarks used herein are trademarks or registered trademarks of their respective companies. SEE YOUR DOCUMENTATION. Your Gateway computer is installed. CONTACT TECH SUPPORT. Note: You can connect your computer. WARNING: To protect your computer as easy as a printer or scanner...
Note: If you have a speaker bar, follow the instructions that came with options) Memory card reader DVD/CD drive IEEE 1394/ FireWire™ port (optional) Microphone jack Headphone jack USB ports Smart Copy button (optional) DVD/CD... to the modem jack and telephone wall jack. Trademarks used herein are trademarks or registered trademarks of their respective companies. SEE YOUR DOCUMENTATION. Your Gateway computer is installed. CONTACT TECH SUPPORT. Note: You can connect your computer. WARNING: To protect your computer as easy as a printer or scanner...

8513217 - Gateway Hardware Reference Guide
Page 4
Contents Playing discs 27 Creating discs 28 Using the digital media manager 29 Memory card types 29 Using a memory card 29 Using the Copy button 30 Adjusting the volume 31 Configuring the audio jacks 33 Installing a printer, scanner, or other device 34 Chapter 4: Advanced ... side panel 46 Removing the front bezel 47 Closing the case 48 Replacing the front bezel 48 Replacing the side panels 48 Adding or replacing memory 48 Adding or replacing an optical disc drive 50 Adding or replacing a hard drive 52 Adding or replacing an internal hard drive 52 Adding a removable...
Contents Playing discs 27 Creating discs 28 Using the digital media manager 29 Memory card types 29 Using a memory card 29 Using the Copy button 30 Adjusting the volume 31 Configuring the audio jacks 33 Installing a printer, scanner, or other device 34 Chapter 4: Advanced ... side panel 46 Removing the front bezel 47 Closing the case 48 Replacing the front bezel 48 Replacing the side panels 48 Adding or replacing memory 48 Adding or replacing an optical disc drive 50 Adding or replacing a hard drive 52 Adding or replacing an internal hard drive 52 Adding a removable...

8513217 - Gateway Hardware Reference Guide
Page 6
Contents Memory card reader 92 Mouse 92 Keyboard 93 Files 93 Memory 96 Audio 96 Passwords 97 Expansion cards 97 Media Center 98 Checking for device problems 100 Recovering your system 101 Creating recovery discs 102 Recovering pre-installed software and drivers 104 Returning to a previous system condition 105 Returning your system to its factory condition 106 Technical support 109 Before calling Gateway Customer Care 109 Calling Customer Care 109 Appendix A: Legal Notices 111 Index 121 iv
Contents Memory card reader 92 Mouse 92 Keyboard 93 Files 93 Memory 96 Audio 96 Passwords 97 Expansion cards 97 Media Center 98 Checking for device problems 100 Recovering your system 101 Creating recovery discs 102 Recovering pre-installed software and drivers 104 Returning to a previous system condition 105 Returning your system to its factory condition 106 Technical support 109 Before calling Gateway Customer Care 109 Calling Customer Care 109 Appendix A: Legal Notices 111 Index 121 iv
8513217 - Gateway Hardware Reference Guide
Page 13
... launch the Backup Status and Configuration program. 7 Optical drive eject Press these ports. Backup button Press this jack. Digital media manager Insert a memory card from a digital camera, MP3 player, PDA, cellular telephone, or other device" on page 26. For more information, see "Installing a... to operate in Standby/Resume mode or Hibernate mode. Multimedia panel Connect multimedia devices to these buttons to control media playback. www.gateway.com Component Description Media navigation Press these ports and jacks. (available ports may vary) ■ R (red) RCA jack-Connect...
... launch the Backup Status and Configuration program. 7 Optical drive eject Press these ports. Backup button Press this jack. Digital media manager Insert a memory card from a digital camera, MP3 player, PDA, cellular telephone, or other device" on page 26. For more information, see "Installing a... to operate in Standby/Resume mode or Hibernate mode. Multimedia panel Connect multimedia devices to these buttons to control media playback. www.gateway.com Component Description Media navigation Press these ports and jacks. (available ports may vary) ■ R (red) RCA jack-Connect...
8513217 - Gateway Hardware Reference Guide
Page 14
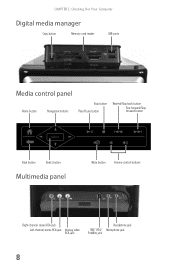
CHAPTER 2: Checking Out Your Computer Digital media manager Copy button Memory card reader USB ports Media control panel Home button Navigation buttons Stop button Play/Pause button Rewind/Skip back button Fast forward/Skip forward button Back button Select button Multimedia panel Mute button Volume control buttons Right-channel stereo RCA jack Left-channel stereo RCA jack Analog video RCA jack Headphone jack IEEE 1394/ Microphone jack FireWire jack 8
CHAPTER 2: Checking Out Your Computer Digital media manager Copy button Memory card reader USB ports Media control panel Home button Navigation buttons Stop button Play/Pause button Rewind/Skip back button Fast forward/Skip forward button Back button Select button Multimedia panel Mute button Volume control buttons Right-channel stereo RCA jack Left-channel stereo RCA jack Analog video RCA jack Headphone jack IEEE 1394/ Microphone jack FireWire jack 8

8513217 - Gateway Hardware Reference Guide
Page 27
To open the hideaway port panels: 1 Press the front edge (marked with finger grip lines) of keys and buttons. www.gateway.com Opening the hideaway port panels In addition to the many ports and jacks on the back, your computer also has ports contained within panels ... key Application Navigation keys Numeric keypad key 21 Your keyboard also has status indicators that can be retracted into place. The retractable panels are the memory card reader and the multimedia panel.
To open the hideaway port panels: 1 Press the front edge (marked with finger grip lines) of keys and buttons. www.gateway.com Opening the hideaway port panels In addition to the many ports and jacks on the back, your computer also has ports contained within panels ... key Application Navigation keys Numeric keypad key 21 Your keyboard also has status indicators that can be retracted into place. The retractable panels are the memory card reader and the multimedia panel.

8513217 - Gateway Hardware Reference Guide
Page 35
...gateway.com Using the digital media manager You can use the digital media manager to transfer pictures from one memory card type to another. You can be transferred from a digital camera to transfer data between your computer. Copy button Memory card reader USB ports Memory card types The digital media manager supports several memory...letter (for example, the E: drive), then double-click the file name. 29 To insert a memory card: 1 Insert the memory card into a slot, make sure that uses memory cards, such as a PDA, MP3 player, or cellular telephone. Each slot is empty, or...
...gateway.com Using the digital media manager You can use the digital media manager to transfer pictures from one memory card type to another. You can be transferred from a digital camera to transfer data between your computer. Copy button Memory card reader USB ports Memory card types The digital media manager supports several memory...letter (for example, the E: drive), then double-click the file name. 29 To insert a memory card: 1 Insert the memory card into a slot, make sure that uses memory cards, such as a PDA, MP3 player, or cellular telephone. Each slot is empty, or...
8513217 - Gateway Hardware Reference Guide
Page 36
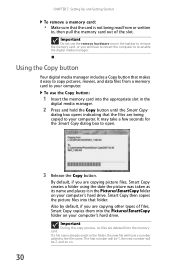
...manager. 2 Press and hold the Copy button until the Smart Copy dialog box opens indicating that folder. CHAPTER 3: Setting Up and Getting Started To remove a memory card: • Make sure that the card is not being copied to open. 30 3 Release the Copy button. It may take a few seconds for the... Also by default, if you are being read from or written to your computer's hard drive. Important Do not use the Copy button: 1 Insert the memory card into the Pictures\SmartCopy folder on your computer. If a file name already exists in the taskbar to the file name. By default, if you...
...manager. 2 Press and hold the Copy button until the Smart Copy dialog box opens indicating that folder. CHAPTER 3: Setting Up and Getting Started To remove a memory card: • Make sure that the card is not being copied to open. 30 3 Release the Copy button. It may take a few seconds for the... Also by default, if you are being read from or written to your computer's hard drive. Important Do not use the Copy button: 1 Insert the memory card into the Pictures\SmartCopy folder on your computer. If a file name already exists in the taskbar to the file name. By default, if you...

8513217 - Gateway Hardware Reference Guide
Page 37
www.gateway.com 4 When the Smart Copy dialog box closes, remove the memory card. For more information, see "Using the keyboard" on the taskbar. To adjust the volume from Windows: 1 Click (Volume) on page 21. To restore volume, ...
www.gateway.com 4 When the Smart Copy dialog box closes, remove the memory card. For more information, see "Using the keyboard" on the taskbar. To adjust the volume from Windows: 1 Click (Volume) on page 21. To restore volume, ...

8513217 - Gateway Hardware Reference Guide
Page 49
CHAPTER5 Upgrading Your Computer • Preventing static electricity discharge • Opening the case • Closing the case • Adding or replacing memory • Adding or replacing an optical disc drive • Adding or replacing a hard drive • Replacing the power supply • Adding or replacing an expansion card 43
CHAPTER5 Upgrading Your Computer • Preventing static electricity discharge • Opening the case • Closing the case • Adding or replacing memory • Adding or replacing an optical disc drive • Adding or replacing a hard drive • Replacing the power supply • Adding or replacing an expansion card 43

8513217 - Gateway Hardware Reference Guide
Page 54
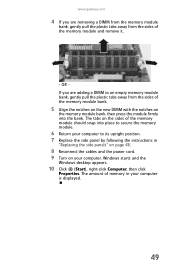
... when you close the computer. 2 Slide the side panels toward the front of the computer until its side. Adding or replacing memory When you upgrade the computer memory, make sure that you removed previously by following the instructions in "Replacing the side panels" on page 48. Your computer uses... panels are flush with the back of the computer. 3 Secure each side panel with the two Phillips screws you install the correct type of memory module for your computer. CHAPTER 5: Upgrading Your Computer Closing the case Replacing the front bezel To replace the front bezel: 1 Slide the hinge...
... when you close the computer. 2 Slide the side panels toward the front of the computer until its side. Adding or replacing memory When you upgrade the computer memory, make sure that you removed previously by following the instructions in "Replacing the side panels" on page 48. Your computer uses... panels are flush with the back of the computer. 3 Secure each side panel with the two Phillips screws you install the correct type of memory module for your computer. CHAPTER 5: Upgrading Your Computer Closing the case Replacing the front bezel To replace the front bezel: 1 Slide the hinge...
8513217 - Gateway Hardware Reference Guide
Page 55
...upright position. 7 Replace the side panel by following the instructions in your computer is displayed. 49 The tabs on the sides of the memory module should snap into the bank. Windows starts and the Windows desktop appears. 10 Click (Start), right-click Computer, then click Properties. www....gateway.com 4 If you are removing a DIMM from the memory module bank, gently pull the plastic tabs away from the sides of the memory module bank. 5 Align the notches on the new DIMM with the notches on the...
...upright position. 7 Replace the side panel by following the instructions in your computer is displayed. 49 The tabs on the sides of the memory module should snap into the bank. Windows starts and the Windows desktop appears. 10 Click (Start), right-click Computer, then click Properties. www....gateway.com 4 If you are removing a DIMM from the memory module bank, gently pull the plastic tabs away from the sides of the memory module bank. 5 Align the notches on the new DIMM with the notches on the...

8513217 - Gateway Hardware Reference Guide
Page 87
CHAPTER7 Troubleshooting • Safety guidelines • Try these steps first • Error messages • Internet and networking • Power • Display • Printing • Optical discs • Memory card reader • Mouse • Keyboard • Files • Memory • Audio • Passwords • Expansion cards • Media Center • Checking for device problems • Recovering your system • Technical support 81
CHAPTER7 Troubleshooting • Safety guidelines • Try these steps first • Error messages • Internet and networking • Power • Display • Printing • Optical discs • Memory card reader • Mouse • Keyboard • Files • Memory • Audio • Passwords • Expansion cards • Media Center • Checking for device problems • Recovering your system • Technical support 81
8513217 - Gateway Hardware Reference Guide
Page 89
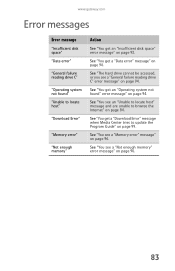
...The hard drive cannot be accessed, or you see an "Unable to locate host" message and are unable to locate host" "Download Error" "Memory error" "Not enough memory" Action See "You get an "Operating system not found " "Unable to browse the Internet" on page 84. See "You get an "...Insufficient disk space" error message" on page 93. www.gateway.com Error messages Error message "Insufficient disk space" "Data error" "General failure reading drive C" "...
...The hard drive cannot be accessed, or you see an "Unable to locate host" message and are unable to locate host" "Download Error" "Memory error" "Not enough memory" Action See "You get an "Operating system not found " "Unable to browse the Internet" on page 84. See "You get an "...Insufficient disk space" error message" on page 93. www.gateway.com Error messages Error message "Insufficient disk space" "Data error" "General failure reading drive C" "...

8513217 - Gateway Hardware Reference Guide
Page 97
For information on cleaning the disc, see "Cleaning optical discs" on page 68. • Update the device driver. www.gateway.com • Reinstall the printer driver. Help For more information about printer troubleshooting, click Start, then click Help and Support. For information... on page 68. 91 Type printer troubleshooter in the Search Help box, then press ENTER. For instructions, see "Cleaning optical discs" on adding additional memory. • Contact your computer. The computer does not recognize a disc or the disc drive • Make sure that the disc label is facing ...
For information on cleaning the disc, see "Cleaning optical discs" on page 68. • Update the device driver. www.gateway.com • Reinstall the printer driver. Help For more information about printer troubleshooting, click Start, then click Help and Support. For information... on page 68. 91 Type printer troubleshooter in the Search Help box, then press ENTER. For instructions, see "Cleaning optical discs" on adding additional memory. • Contact your computer. The computer does not recognize a disc or the disc drive • Make sure that the disc label is facing ...
8513217 - Gateway Hardware Reference Guide
Page 98
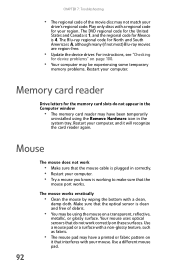
...may have been temporarily uninstalled using the mouse on these surfaces. Make sure that do not appear in the Computer window • The memory card reader may have a printed or fabric pattern on page 100. • Your computer may be using the Remove Hardware icon in... "Checking for your drive's regional code. CHAPTER 7: Troubleshooting • The regional code of debris. • You may be experiencing some temporary memory problems. Restart your computer. Your mouse uses optical sensors that the optical sensor is 4. Use a different mouse pad. 92 The Blu-ray regional...
...may have been temporarily uninstalled using the mouse on these surfaces. Make sure that do not appear in the Computer window • The memory card reader may have a printed or fabric pattern on page 100. • Your computer may be using the Remove Hardware icon in... "Checking for your drive's regional code. CHAPTER 7: Troubleshooting • The regional code of debris. • You may be experiencing some temporary memory problems. Restart your computer. Your mouse uses optical sensors that the optical sensor is 4. Use a different mouse pad. 92 The Blu-ray regional...

8513217 - Gateway Hardware Reference Guide
Page 102
... Restart now and check for more information, see "Optical discs" on , and check the speaker connections. CHAPTER 7: Troubleshooting Memory Help For more memory to receive this error message, consider adding more information about sound troubleshooting, click Start, then click Help and Support. See ...your computer's universal audio jacks are turned on page 91. You see a "Memory error" message • Run the Memory Diagnostic Tool. For more troubleshooting tips. • Make sure that the speakers are configured correctly. Audio You are ...
... Restart now and check for more information, see "Optical discs" on , and check the speaker connections. CHAPTER 7: Troubleshooting Memory Help For more memory to receive this error message, consider adding more information about sound troubleshooting, click Start, then click Help and Support. See ...your computer's universal audio jacks are turned on page 91. You see a "Memory error" message • Run the Memory Diagnostic Tool. For more troubleshooting tips. • Make sure that the speakers are configured correctly. Audio You are ...

8513217 - Gateway Hardware Reference Guide
Page 127
...C cable modem 17 connecting 11 troubleshooting 85 cards adding expansion 60 inserting memory card 29 installing memory card 29 removing memory card 29 replacing expansion 60 slots 29 troubleshooting add-in card 97 troubleshooting expansion 97 troubleshooting memory card 92 types of memory cards supported 29 case closing 48 opening 45 CD cleaning 68 copying... 25 playing audio 27 recording 28 troubleshooting 91 CD drive adding 50 identifying 26 replacing 50 See also optical drive troubleshooting 91 cellular phone memory cards 29 Certificate of Authenticity 3 cleaning audio CD 68 case 66 CD 68 121
...C cable modem 17 connecting 11 troubleshooting 85 cards adding expansion 60 inserting memory card 29 installing memory card 29 removing memory card 29 replacing expansion 60 slots 29 troubleshooting add-in card 97 troubleshooting expansion 97 troubleshooting memory card 92 types of memory cards supported 29 case closing 48 opening 45 CD cleaning 68 copying... 25 playing audio 27 recording 28 troubleshooting 91 CD drive adding 50 identifying 26 replacing 50 See also optical drive troubleshooting 91 cellular phone memory cards 29 Certificate of Authenticity 3 cleaning audio CD 68 case 66 CD 68 121
8513217 - Gateway Hardware Reference Guide
Page 128
... 86 troubleshooting connection speed 87 digital audio out 10 digital camera locating USB port 7, 10 digital video camera locating IEEE 1394 port 11 DIMM See memory Disk Cleanup 71 Disk Defragmenter 73 display cleaning 67 troubleshooting 91 122
... 86 troubleshooting connection speed 87 digital audio out 10 digital camera locating USB port 7, 10 digital video camera locating IEEE 1394 port 11 DIMM See memory Disk Cleanup 71 Disk Defragmenter 73 display cleaning 67 troubleshooting 91 122
8513217 - Gateway Hardware Reference Guide
Page 130
... Microdrive 29 IEEE 11 IEEE 1394 port 7, 11, 34 installing devices 34 digital camera 34 digital video camera 34 expansion card 60 front bezel 47 memory 48 peripheral devices 34 power supply 58 printer 34 scanner 34 side panel 45, 46 Internet troubleshooting 84, 87 J jacks See connections K keyboard buttons 21... mouse 67 cleaning optical disc 68 defragmenting 73 deleting files 71 extending computer life 65 suggested schedule 64 using Task Scheduler 77 media reader See memory card reader memory adding 48
... Microdrive 29 IEEE 11 IEEE 1394 port 7, 11, 34 installing devices 34 digital camera 34 digital video camera 34 expansion card 60 front bezel 47 memory 48 peripheral devices 34 power supply 58 printer 34 scanner 34 side panel 45, 46 Internet troubleshooting 84, 87 J jacks See connections K keyboard buttons 21... mouse 67 cleaning optical disc 68 defragmenting 73 deleting files 71 extending computer life 65 suggested schedule 64 using Task Scheduler 77 media reader See memory card reader memory adding 48


