User Guide
Page 19
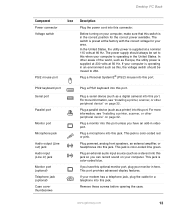
...Monitor port Microphone jack Audio output (Line out) jack Audio input (Line in the United States. Plug a microphone into this port. www.gateway.com 13 The switch is operating in ) jack Monitor port (optional) Telephone jack (optional) Case cover thumbscrews Plug a PS/2 keyboard into... into this connector. If your computer. Desktop PC Back Component Power connector Voltage switch PS/2 mouse port Icon Description Plug the power cord into this jack. Plug a serial device (such as Europe, the utility power is in video port. This jack is supplied at a nominal 115 volts at 50 ...
...Monitor port Microphone jack Audio output (Line out) jack Audio input (Line in the United States. Plug a microphone into this port. www.gateway.com 13 The switch is operating in ) jack Monitor port (optional) Telephone jack (optional) Case cover thumbscrews Plug a PS/2 keyboard into... into this connector. If your computer. Desktop PC Back Component Power connector Voltage switch PS/2 mouse port Icon Description Plug the power cord into this jack. Plug a serial device (such as Europe, the utility power is in video port. This jack is supplied at a nominal 115 volts at 50 ...

User Guide
Page 23
... and shut down your entire system, you probably need to back up your computer. Uninterruptible power supplies A standby, uninterruptible power supply (UPS) protects your computer from your existing hard drive with a larger drive. A UPS may also provide protection from power surges. Laser printers and cartridges are more of data. Storage Devices If you need additional.... Inkjet printers and cartridges are slower than inkjet printers when you are inkjet and laser printers, which print in color or black and white. www.gateway.com 17 If you want to store data.
... and shut down your entire system, you probably need to back up your computer. Uninterruptible power supplies A standby, uninterruptible power supply (UPS) protects your computer from your existing hard drive with a larger drive. A UPS may also provide protection from power surges. Laser printers and cartridges are more of data. Storage Devices If you need additional.... Inkjet printers and cartridges are slower than inkjet printers when you are inkjet and laser printers, which print in color or black and white. www.gateway.com 17 If you want to store data.
User Guide
Page 28
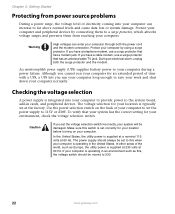
... and shut down your environment, check the voltage selection switch. In the United States, the utility power is supplied at 230 volts at 50 Hz. If your system will be moved to 230. 22 www.gateway.com Warning High voltages can increase to far above normal levels and cause data loss or system... damage. Use the power selection switch on your location is operating in the United States. If you ...
... and shut down your environment, check the voltage selection switch. In the United States, the utility power is supplied at 230 volts at 50 Hz. If your system will be moved to 230. 22 www.gateway.com Warning High voltages can increase to far above normal levels and cause data loss or system... damage. Use the power selection switch on your location is operating in the United States. If you ...

User Guide
Page 30
..., then click Turn Off Computer. Tips & Tricks For more information about five seconds, then release it. 24 www.gateway.com We recommend disconnecting the power cord and modem cable when your computer will not be used your computer for several minutes or have not turned off your... up . Important If for long periods. While in the power supply and system board remain energized. In order to turn off your computer, press and hold the power button for about changing the power button mode, see "Changing Power-Saving Settings" in Using Your Computer which has been included ...
..., then click Turn Off Computer. Tips & Tricks For more information about five seconds, then release it. 24 www.gateway.com We recommend disconnecting the power cord and modem cable when your computer will not be used your computer for several minutes or have not turned off your... up . Important If for long periods. While in the power supply and system board remain energized. In order to turn off your computer, press and hold the power button for about changing the power button mode, see "Changing Power-Saving Settings" in Using Your Computer which has been included ...
User Guide
Page 55
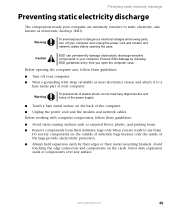
... static-causing surfaces such as electrostatic discharge (ESD). Never slide expansion cards or components over any object into the vent holes of the power supply. ■ Touch a bare metal surface on the back of the bags provide electrostatic protection. ■ Always hold expansion cards by ...carpeted floors, plastic, and packing foam. ■ Remove components from their metal mounting brackets. Do not lay components on the cards. www.gateway.com 49 Before opening the computer case, follow these guidelines: ■ Turn off your computer. ■ Wear a grounding wrist strap (...
... static-causing surfaces such as electrostatic discharge (ESD). Never slide expansion cards or components over any object into the vent holes of the power supply. ■ Touch a bare metal surface on the back of the bags provide electrostatic protection. ■ Always hold expansion cards by ...carpeted floors, plastic, and packing foam. ■ Remove components from their metal mounting brackets. Do not lay components on the cards. www.gateway.com 49 Before opening the computer case, follow these guidelines: ■ Turn off your computer. ■ Wear a grounding wrist strap (...

User Guide
Page 140
Web site connection speed 66 turning off computer 11, 24, 25 turning on computer 11, 23 tutoring fee-based 79 U uninterruptible power supply (UPS) 17, 22 updating device drivers 4 updating Norton AntiVirus 43 updating Windows 42 UPS 17, 22 USB port 11, 14, 32 V video playing 39 streaming ... Norton AntiVirus 43 voltage switch 13 volume adjusting 25 adjusting modem 71 controls 25 muting 25 troubleshooting 76 W WAN IP Address 96, 104 Web site Gateway 3 Windows file and printer sharing 109 New Connection Wizard 106 Product Key Code 15 Windows key 27 Windows Media Player 39 Windows Update 42 wired...
Web site connection speed 66 turning off computer 11, 24, 25 turning on computer 11, 23 tutoring fee-based 79 U uninterruptible power supply (UPS) 17, 22 updating device drivers 4 updating Norton AntiVirus 43 updating Windows 42 UPS 17, 22 USB port 11, 14, 32 V video playing 39 streaming ... Norton AntiVirus 43 voltage switch 13 volume adjusting 25 adjusting modem 71 controls 25 muting 25 troubleshooting 76 W WAN IP Address 96, 104 Web site Gateway 3 Windows file and printer sharing 109 New Connection Wizard 106 Product Key Code 15 Windows key 27 Windows Media Player 39 Windows Update 42 wired...

User Guide
Page 6
... 133 Activating and using Hibernate mode 134 Setting up an uninterruptible power supply 136 9 Networking Your Computer 139 Benefits of networking 140 Sharing a single Internet connection 140 Sharing drives 140 Sharing peripheral devices 141 Streaming audio and video ...
... 133 Activating and using Hibernate mode 134 Setting up an uninterruptible power supply 136 9 Networking Your Computer 139 Benefits of networking 140 Sharing a single Internet connection 140 Sharing drives 140 Sharing peripheral devices 141 Streaming audio and video ...
User Guide
Page 7
... diskette drive 198 Replacing the hard drive 203 Adding or replacing add-in cards 206 Installing memory 208 Replacing the system battery 212 Replacing the power supply 214 Replacing the system board 216 v
... diskette drive 198 Replacing the hard drive 203 Adding or replacing add-in cards 206 Installing memory 208 Replacing the system battery 212 Replacing the power supply 214 Replacing the system board 216 v

User Guide
Page 13
...a PS/2 keyboard into this jack. Plug USB (Universal Serial Bus) devices (such as Europe, the utility power is supplied at a nominal 115 volts at 60 Hz. The power supply should always be set to 230. Plug a modem cable into this port. Thumbscrews Parallel port Ethernet (network...page 24. Back Component Power connector Voltage switch PS/2 mouse port Icon Description Plug the power cable into this jack. In the United States, the utility power is supplied at 230 volts at the factory with the correct voltage for the correct power available. www.gateway.com 5 Plug a ...
...a PS/2 keyboard into this jack. Plug USB (Universal Serial Bus) devices (such as Europe, the utility power is supplied at a nominal 115 volts at 60 Hz. The power supply should always be set to 230. Plug a modem cable into this port. Thumbscrews Parallel port Ethernet (network...page 24. Back Component Power connector Voltage switch PS/2 mouse port Icon Description Plug the power cable into this jack. In the United States, the utility power is supplied at 230 volts at the factory with the correct voltage for the correct power available. www.gateway.com 5 Plug a ...

User Guide
Page 17
For more information about setting up a UPS, see "Setting up files, then removing them from power surges. www.gateway.com 9 Uninterruptible power supplies A standby, uninterruptible power supply (UPS) protects your programs are running temporarily during a total power failure. A UPS may also provide protection from your hard drive. With a recordable CD or DVD drive, you can hold as much...
For more information about setting up a UPS, see "Setting up files, then removing them from power surges. www.gateway.com 9 Uninterruptible power supplies A standby, uninterruptible power supply (UPS) protects your programs are running temporarily during a total power failure. A UPS may also provide protection from your hard drive. With a recordable CD or DVD drive, you can hold as much...
User Guide
Page 23
... connection. www.gateway.com 15 Warning High voltages can increase to your computer through both the surge protector and the modem. If you have a telephone modem, use a surge protector that has a modem jack. For more information, see "Setting up an uninterruptible power supply" on page 136. An uninterruptible power supply (UPS) supplies battery power to far above...
... connection. www.gateway.com 15 Warning High voltages can increase to your computer through both the surge protector and the modem. If you have a telephone modem, use a surge protector that has a modem jack. For more information, see "Setting up an uninterruptible power supply" on page 136. An uninterruptible power supply (UPS) supplies battery power to far above...
User Guide
Page 25
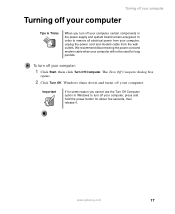
... in Windows to remove all electrical power from the wall outlets. Turning off your computer Turning off your computer Tips & Tricks When you cannot use the Turn Off Computer option in the power supply and system board remain energized. www.gateway.com 17 Windows shuts down and turns... off your computer, unplug the power cord and modem cable from your computer. The Turn Off Computer dialog box opens...
... in Windows to remove all electrical power from the wall outlets. Turning off your computer Turning off your computer Tips & Tricks When you cannot use the Turn Off Computer option in the power supply and system board remain energized. www.gateway.com 17 Windows shuts down and turns... off your computer, unplug the power cord and modem cable from your computer. The Turn Off Computer dialog box opens...

User Guide
Page 144
... View, click Performance and Maintenance. 2 Click/Double-click the Power Options icon. Open the Power Options Properties dialog box, then click the Advanced tab. The Power Options Properties dialog box opens. 136 www.gateway.com Type the keyword hibernate in the Search box , then ... click the time you want to use Hibernate mode: ■ As an automatic power savings mode: Open the Power Options Properties dialog box, then click the Power Schemes tab. Setting up an uninterruptible power supply To install an uninterruptible power supply (UPS): 1 Click Start, then click Control Panel.
... View, click Performance and Maintenance. 2 Click/Double-click the Power Options icon. Open the Power Options Properties dialog box, then click the Advanced tab. The Power Options Properties dialog box opens. 136 www.gateway.com Type the keyword hibernate in the Search box , then ... click the time you want to use Hibernate mode: ■ As an automatic power savings mode: Open the Power Options Properties dialog box, then click the Power Schemes tab. Setting up an uninterruptible power supply To install an uninterruptible power supply (UPS): 1 Click Start, then click Control Panel.
User Guide
Page 145
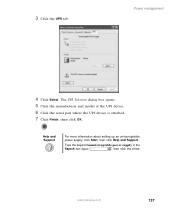
Help and Support For more information about setting up an uninterruptable power supply, click Start, then click Help and Support. Type the keyword uninterruptable power supply in the Search box , then click the arrow. 3 Click the UPS tab. Power management 4 Click Select. The UPS Selection dialog box opens. 5 Click the manufacturer and model of the UPS device. 6 Click the serial port where the UPS device is attached. 7 Click Finish, then click OK. www.gateway.com 137
Help and Support For more information about setting up an uninterruptable power supply, click Start, then click Help and Support. Type the keyword uninterruptable power supply in the Search box , then click the arrow. 3 Click the UPS tab. Power management 4 Click Select. The UPS Selection dialog box opens. 5 Click the manufacturer and model of the UPS device. 6 Click the serial port where the UPS device is attached. 7 Click Finish, then click OK. www.gateway.com 137
User Guide
Page 199
...strap (available at most electronics stores) and attach it to a bare metal part of your computer and unplug the power cord and modem and network cables before opening the computer case, follow these guidelines: ■ Avoid static-causing surfaces ...gateway.com 191 Warning ESD can permanently damage electrostatic discharge-sensitive components in your computer are ready to use them. Do not lay components on the outside of antistatic bags because only the inside your computer. Never slide expansion cards or components over any object into the vent holes of the power supply...
...strap (available at most electronics stores) and attach it to a bare metal part of your computer and unplug the power cord and modem and network cables before opening the computer case, follow these guidelines: ■ Avoid static-causing surfaces ...gateway.com 191 Warning ESD can permanently damage electrostatic discharge-sensitive components in your computer are ready to use them. Do not lay components on the outside of antistatic bags because only the inside your computer. Never slide expansion cards or components over any object into the vent holes of the power supply...

User Guide
Page 210
See the drive documentation for further instructions. 12 Close the case by following the instructions in "Closing the case" on the side closest to the power supply connection). Chapter 11: Upgrading Your Computer 11 Reconnect the drive cables using your notes from Step 3. The red-striped edge of the data ribbon cable indicates Pin 1 and corresponds with Pin 1 on the drive (typically on page 196. 202 www.gateway.com
See the drive documentation for further instructions. 12 Close the case by following the instructions in "Closing the case" on the side closest to the power supply connection). Chapter 11: Upgrading Your Computer 11 Reconnect the drive cables using your notes from Step 3. The red-striped edge of the data ribbon cable indicates Pin 1 and corresponds with Pin 1 on the drive (typically on page 196. 202 www.gateway.com
User Guide
Page 213
See the drive documentation for further instructions. 8 Replace the side panel following the instructions in "Replacing the side panel" on the side closest to the power supply connection). The red-striped edge of the data ribbon cable indicates Pin 1 and corresponds with Pin 1 on the drive (typically on page 196. www.gateway.com 205 Replacing the hard drive 7 Reconnect the drive cables using your notes from Step 2.
See the drive documentation for further instructions. 8 Replace the side panel following the instructions in "Replacing the side panel" on the side closest to the power supply connection). The red-striped edge of the data ribbon cable indicates Pin 1 and corresponds with Pin 1 on the drive (typically on page 196. www.gateway.com 205 Replacing the hard drive 7 Reconnect the drive cables using your notes from Step 2.
User Guide
Page 222
Chapter 11: Upgrading Your Computer Replacing the power supply To replace the power supply: 1 Remove the side panel by following the instructions in "Replacing the side panel" on page 196. 2 Place your computer on a towel or other non-abrasive surface. 3 Disconnect the power supply cables from all components (such as hard drives, CD or DVD drives, and the system board), noting their locations and orientation. (You will reconnect the cables after you install the new power supply.) 214 www.gateway.com To avoid scratching the case, place it on its side.
Chapter 11: Upgrading Your Computer Replacing the power supply To replace the power supply: 1 Remove the side panel by following the instructions in "Replacing the side panel" on page 196. 2 Place your computer on a towel or other non-abrasive surface. 3 Disconnect the power supply cables from all components (such as hard drives, CD or DVD drives, and the system board), noting their locations and orientation. (You will reconnect the cables after you install the new power supply.) 214 www.gateway.com To avoid scratching the case, place it on its side.
User Guide
Page 223
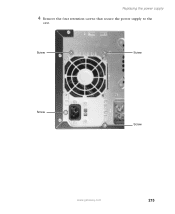
Replacing the power supply 4 Remove the four retention screws that secure the power supply to the case. Screw Screw Screw Screw www.gateway.com 215
Replacing the power supply 4 Remove the four retention screws that secure the power supply to the case. Screw Screw Screw Screw www.gateway.com 215
User Guide
Page 224
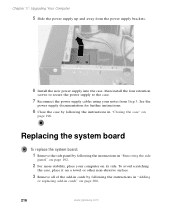
...Upgrading Your Computer 5 Slide the power supply up and away from the power supply brackets. 6 Install the new power supply into the case, then install the four retention screws to secure the power supply to the case. 7 Reconnect the power supply cables using your computer on its side. See the power supply documentation for further instructions. 8... Remove the side panel by following the instructions in "Adding or replacing add-in "Closing the case" on page 206. 216 www.gateway.com To avoid scratching the case, place it on a towel or other non-abrasive surface. 3 Remove all of the add-in ...
...Upgrading Your Computer 5 Slide the power supply up and away from the power supply brackets. 6 Install the new power supply into the case, then install the four retention screws to secure the power supply to the case. 7 Reconnect the power supply cables using your computer on its side. See the power supply documentation for further instructions. 8... Remove the side panel by following the instructions in "Adding or replacing add-in "Closing the case" on page 206. 216 www.gateway.com To avoid scratching the case, place it on a towel or other non-abrasive surface. 3 Remove all of the add-in ...

