Gateway Desktop User's Guide
Page 4
...been damaged • the product exhibits a distinct change in performance, indicating a need to replace the power cord set . If you to qualified service personnel when: • the power cord or plug is not properly grounded may interfere with the performance of this equipment during lightning or ... yourself, as opening or removing covers may result in electric shock and/or injury. Replace only with the supplied power supply cord set , make sure that the new power cord meets the following the operating instructions Note: Adjust only those controls that may result in damage and will...
...been damaged • the product exhibits a distinct change in performance, indicating a need to replace the power cord set . If you to qualified service personnel when: • the power cord or plug is not properly grounded may interfere with the performance of this equipment during lightning or ... yourself, as opening or removing covers may result in electric shock and/or injury. Replace only with the supplied power supply cord set , make sure that the new power cord meets the following the operating instructions Note: Adjust only those controls that may result in damage and will...
Gateway Desktop User's Guide
Page 20
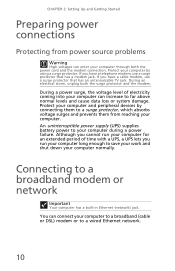
...loss or system damage. If you have a telephone modem, use a surge protector that has a modem jack. An uninterruptible power supply (UPS) supplies battery power to your computer can increase to a wired Ethernet network. 10 If you run your computer for an extended period of electricity... coming into your computer during a power failure. Connecting to save your work and shut down your computer normally. Protect your ...
...loss or system damage. If you have a telephone modem, use a surge protector that has a modem jack. An uninterruptible power supply (UPS) supplies battery power to your computer can increase to a wired Ethernet network. 10 If you run your computer for an extended period of electricity... coming into your computer during a power failure. Connecting to save your work and shut down your computer normally. Protect your ...

User Guide
Page 6
... 133 Activating and using Hibernate mode 134 Setting up an uninterruptible power supply 136 9 Networking Your Computer 139 Benefits of networking 140 Sharing a single Internet connection 140 Sharing drives 140 Sharing peripheral devices 141 Streaming audio and video ...
... 133 Activating and using Hibernate mode 134 Setting up an uninterruptible power supply 136 9 Networking Your Computer 139 Benefits of networking 140 Sharing a single Internet connection 140 Sharing drives 140 Sharing peripheral devices 141 Streaming audio and video ...
User Guide
Page 7
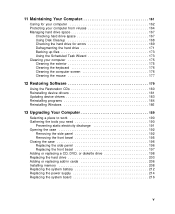
11 Maintaining Your Computer 161 Caring for your computer 162 Protecting your computer from viruses 164 Managing hard drive space 167 Checking hard drive space 167 ... diskette drive 198 Replacing the hard drive 203 Adding or replacing add-in cards 206 Installing memory 208 Replacing the system battery 212 Replacing the power supply 214 Replacing the system board 216 v
11 Maintaining Your Computer 161 Caring for your computer 162 Protecting your computer from viruses 164 Managing hard drive space 167 Checking hard drive space 167 ... diskette drive 198 Replacing the hard drive 203 Adding or replacing add-in cards 206 Installing memory 208 Replacing the system battery 212 Replacing the power supply 214 Replacing the system board 216 v

User Guide
Page 13
...this port. Thumbscrews Parallel port Ethernet (network) jack Telephone jack Remove these ports. If your computer, make sure that this switch is supplied at 230 volts at 60 Hz. Plug a Personal System/2® (PS/2) mouse into this jack. PS/2 keyboard port USB ports ... more information, see "Installing a printer, scanner, or other peripheral device" on page 24. www.gateway.com 5 Plug USB (Universal Serial Bus) devices (such as Europe, the utility power is in the United States. Plug a microphone, speakers, or headphones into these jacks. In other peripheral...
...this port. Thumbscrews Parallel port Ethernet (network) jack Telephone jack Remove these ports. If your computer, make sure that this switch is supplied at 230 volts at 60 Hz. Plug a Personal System/2® (PS/2) mouse into this jack. PS/2 keyboard port USB ports ... more information, see "Installing a printer, scanner, or other peripheral device" on page 24. www.gateway.com 5 Plug USB (Universal Serial Bus) devices (such as Europe, the utility power is in the United States. Plug a microphone, speakers, or headphones into these jacks. In other peripheral...

User Guide
Page 17
...down your programs are running temporarily during a total power failure. If you can add storage devices to back up an uninterruptible power supply" on page 97. For more memory. If your computer correctly. Uninterruptible power supplies A standby, uninterruptible power supply (UPS) protects your entire system, you probably need...with a larger drive. www.gateway.com 9 With a recordable CD or DVD drive, you can hold as much as 700 MB of data. TBU drives, like tape recorders, use a lot of memory. Writable DVDs can store 2 GB, 20 GB, 40 GB, 130 GB, or more expensive, but...
...down your programs are running temporarily during a total power failure. If you can add storage devices to back up an uninterruptible power supply" on page 97. For more memory. If your computer correctly. Uninterruptible power supplies A standby, uninterruptible power supply (UPS) protects your entire system, you probably need...with a larger drive. www.gateway.com 9 With a recordable CD or DVD drive, you can hold as much as 700 MB of data. TBU drives, like tape recorders, use a lot of memory. Writable DVDs can store 2 GB, 20 GB, 40 GB, 130 GB, or more expensive, but...
User Guide
Page 23
...normal levels and cause data loss or system damage. For more information, see "Setting up an uninterruptible power supply" on page 136. www.gateway.com 15 If you run your computer for an extended period of electricity coming into your computer can enter...computer and peripheral devices by using a surge protector. Protect your computer normally. An uninterruptible power supply (UPS) supplies battery power to a surge protector, which absorbs voltage surges and prevents them from power source problems During a power surge, the voltage level of time with a UPS, a UPS lets you have ...
...normal levels and cause data loss or system damage. For more information, see "Setting up an uninterruptible power supply" on page 136. www.gateway.com 15 If you run your computer for an extended period of electricity coming into your computer can enter...computer and peripheral devices by using a surge protector. Protect your computer normally. An uninterruptible power supply (UPS) supplies battery power to a surge protector, which absorbs voltage surges and prevents them from power source problems During a power surge, the voltage level of time with a UPS, a UPS lets you have ...
User Guide
Page 25
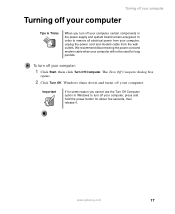
...Turn Off Computer dialog box opens. 2 Click Turn Off. Important If for long periods. We recommend disconnecting the power cord and modem cable when your computer. www.gateway.com 17 Windows shuts down and turns off your computer will not be used for some reason you turn off ... your computer, certain components in Windows to remove all electrical power from the wall outlets. Turning off your computer Turning off your computer Tips & Tricks When you cannot use the Turn Off Computer option in the power supply and system board remain energized. In order to turn off ...
...Turn Off Computer dialog box opens. 2 Click Turn Off. Important If for long periods. We recommend disconnecting the power cord and modem cable when your computer. www.gateway.com 17 Windows shuts down and turns off your computer will not be used for some reason you turn off ... your computer, certain components in Windows to remove all electrical power from the wall outlets. Turning off your computer Turning off your computer Tips & Tricks When you cannot use the Turn Off Computer option in the power supply and system board remain energized. In order to turn off ...

User Guide
Page 144
...click Turn Off Computer. The Power Options Properties dialog box opens. 136 www.gateway.com Hibernate is in Category View, click Performance and Maintenance. 2 Click/Double-click the Power Options icon. The Control Panel window opens. Open the Power Options Properties dialog box, then...you want to use Hibernate mode: ■ As an automatic power savings mode: Open the Power Options Properties dialog box, then click the Power Schemes tab. Setting up an uninterruptible power supply To install an uninterruptible power supply (UPS): 1 Click Start, then click Control Panel. If...
...click Turn Off Computer. The Power Options Properties dialog box opens. 136 www.gateway.com Hibernate is in Category View, click Performance and Maintenance. 2 Click/Double-click the Power Options icon. The Control Panel window opens. Open the Power Options Properties dialog box, then...you want to use Hibernate mode: ■ As an automatic power savings mode: Open the Power Options Properties dialog box, then click the Power Schemes tab. Setting up an uninterruptible power supply To install an uninterruptible power supply (UPS): 1 Click Start, then click Control Panel. If...
User Guide
Page 145
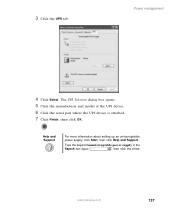
The UPS Selection dialog box opens. 5 Click the manufacturer and model of the UPS device. 6 Click the serial port where the UPS device is attached. 7 Click Finish, then click OK. Help and Support For more information about setting up an uninterruptable power supply, click Start, then click Help and Support. Type the keyword uninterruptable power supply in the Search box , then click the arrow. www.gateway.com 137 Power management 4 Click Select. 3 Click the UPS tab.
The UPS Selection dialog box opens. 5 Click the manufacturer and model of the UPS device. 6 Click the serial port where the UPS device is attached. 7 Click Finish, then click OK. Help and Support For more information about setting up an uninterruptable power supply, click Start, then click Help and Support. Type the keyword uninterruptable power supply in the Search box , then click the arrow. www.gateway.com 137 Power management 4 Click Select. 3 Click the UPS tab.
User Guide
Page 199
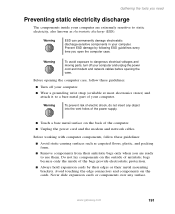
... hold expansion cards by following ESD guidelines every time you are extremely sensitive to use them. Before opening the case. www.gateway.com 191 Prevent ESD damage by their edges or their antistatic bags only when you open the computer case. Before working with...9632; Remove components from their metal mounting brackets. Never slide expansion cards or components over any object into the vent holes of the power supply. ■ Touch a bare metal surface on the cards. Warning ESD can permanently damage electrostatic discharge-sensitive components in your computer....
... hold expansion cards by following ESD guidelines every time you are extremely sensitive to use them. Before opening the case. www.gateway.com 191 Prevent ESD damage by their edges or their antistatic bags only when you open the computer case. Before working with...9632; Remove components from their metal mounting brackets. Never slide expansion cards or components over any object into the vent holes of the power supply. ■ Touch a bare metal surface on the cards. Warning ESD can permanently damage electrostatic discharge-sensitive components in your computer....

User Guide
Page 210
Chapter 11: Upgrading Your Computer 11 Reconnect the drive cables using your notes from Step 3. See the drive documentation for further instructions. 12 Close the case by following the instructions in "Closing the case" on the side closest to the power supply connection). The red-striped edge of the data ribbon cable indicates Pin 1 and corresponds with Pin 1 on the drive (typically on page 196. 202 www.gateway.com
Chapter 11: Upgrading Your Computer 11 Reconnect the drive cables using your notes from Step 3. See the drive documentation for further instructions. 12 Close the case by following the instructions in "Closing the case" on the side closest to the power supply connection). The red-striped edge of the data ribbon cable indicates Pin 1 and corresponds with Pin 1 on the drive (typically on page 196. 202 www.gateway.com
User Guide
Page 213
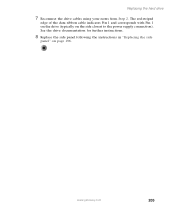
Replacing the hard drive 7 Reconnect the drive cables using your notes from Step 2. The red-striped edge of the data ribbon cable indicates Pin 1 and corresponds with Pin 1 on the drive (typically on page 196. www.gateway.com 205 See the drive documentation for further instructions. 8 Replace the side panel following the instructions in "Replacing the side panel" on the side closest to the power supply connection).
Replacing the hard drive 7 Reconnect the drive cables using your notes from Step 2. The red-striped edge of the data ribbon cable indicates Pin 1 and corresponds with Pin 1 on the drive (typically on page 196. www.gateway.com 205 See the drive documentation for further instructions. 8 Replace the side panel following the instructions in "Replacing the side panel" on the side closest to the power supply connection).
User Guide
Page 222
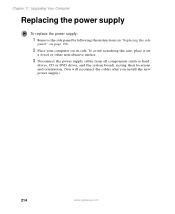
To avoid scratching the case, place it on its side. Chapter 11: Upgrading Your Computer Replacing the power supply To replace the power supply: 1 Remove the side panel by following the instructions in "Replacing the side panel" on page 196. 2 Place your computer on a towel or other non-abrasive surface. 3 Disconnect the power supply cables from all components (such as hard drives, CD or DVD drives, and the system board), noting their locations and orientation. (You will reconnect the cables after you install the new power supply.) 214 www.gateway.com
To avoid scratching the case, place it on its side. Chapter 11: Upgrading Your Computer Replacing the power supply To replace the power supply: 1 Remove the side panel by following the instructions in "Replacing the side panel" on page 196. 2 Place your computer on a towel or other non-abrasive surface. 3 Disconnect the power supply cables from all components (such as hard drives, CD or DVD drives, and the system board), noting their locations and orientation. (You will reconnect the cables after you install the new power supply.) 214 www.gateway.com
User Guide
Page 223
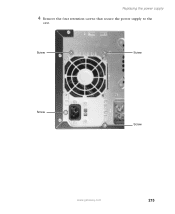
Screw Screw Screw Screw www.gateway.com 215 Replacing the power supply 4 Remove the four retention screws that secure the power supply to the case.
Screw Screw Screw Screw www.gateway.com 215 Replacing the power supply 4 Remove the four retention screws that secure the power supply to the case.
User Guide
Page 224
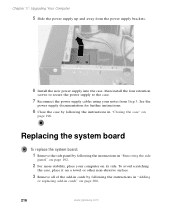
...the case" on its side. Chapter 11: Upgrading Your Computer 5 Slide the power supply up and away from the power supply brackets. 6 Install the new power supply into the case, then install the four retention screws to secure the power supply to the case. 7 Reconnect the power supply cables using your computer on page ...196. Replacing the system board To replace the system board: 1 Remove the side panel by following the instructions in cards" on page 206. 216 www.gateway.com To avoid ...
...the case" on its side. Chapter 11: Upgrading Your Computer 5 Slide the power supply up and away from the power supply brackets. 6 Install the new power supply into the case, then install the four retention screws to secure the power supply to the case. 7 Reconnect the power supply cables using your computer on page ...196. Replacing the system board To replace the system board: 1 Remove the side panel by following the instructions in cards" on page 206. 216 www.gateway.com To avoid ...
User Guide
Page 232
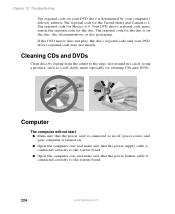
... on your computer is turned on. ■ Open the computer case and make sure that the power supply cable is connected correctly to the system board. ■ Open the computer case and make sure that the power button cable is connected correctly to the edge, not around in a circle, using a product, ...code for Mexico is determined by wiping from the center to the system board. 224 www.gateway.com Computer The computer will not start ■ Make sure that the power cord is connected to an AC power source and your DVD drive is 4. The regional code for cleaning CDs and DVDs. Cleaning...
... on your computer is turned on. ■ Open the computer case and make sure that the power supply cable is connected correctly to the system board. ■ Open the computer case and make sure that the power button cable is connected correctly to the edge, not around in a circle, using a product, ...code for Mexico is determined by wiping from the center to the system board. 224 www.gateway.com Computer The computer will not start ■ Make sure that the power cord is connected to an AC power source and your DVD drive is 4. The regional code for cleaning CDs and DVDs. Cleaning...

User Guide
Page 268
... office network 139 hot-swapping 24 hyperlinks 59 I i.Link port 114 IEEE 1394 port 3, 114 IEEE 802.11 creating a network 142 speed and frequency 146 using a network 146 indicators Caps Lock 19 CD drive 85 CD...drive 85 DVD/CD-RW drive 85 hard drive 3 Num Lock 19 numeric keypad 19 Pad Lock 19 power 3 Scroll Lock 19 inkjet printer 8 installing add-in cards 206 battery 212 camera 113 cards 117,... bezel 195 hard drive 203 memory 208 Microsoft Fax 66 peripheral devices 24, 158 Pinnacle Expression 114 power supply 214 printer 24, 158 programs 160, 184 scanner 24, 158 side panel 192 system battery 212 ...
... office network 139 hot-swapping 24 hyperlinks 59 I i.Link port 114 IEEE 1394 port 3, 114 IEEE 802.11 creating a network 142 speed and frequency 146 using a network 146 indicators Caps Lock 19 CD drive 85 CD...drive 85 DVD/CD-RW drive 85 hard drive 3 Num Lock 19 numeric keypad 19 Pad Lock 19 power 3 Scroll Lock 19 inkjet printer 8 installing add-in cards 206 battery 212 camera 113 cards 117,... bezel 195 hard drive 203 memory 208 Microsoft Fax 66 peripheral devices 24, 158 Pinnacle Expression 114 power supply 214 printer 24, 158 programs 160, 184 scanner 24, 158 side panel 192 system battery 212 ...

User Guide
Page 272
turning on computer 16 using UPS 136 power button 3 power supply replacing 214 uninterruptible 136 previous button 20 printer default 236 inkjet 8 installing 24, 158 laser 8 parallel port 5 sharing 141 troubleshooting 236 USB port 3, 5 printing ... shortcut buttons 20 programs closing 53 closing unresponsive 18 opening 23, 34 reinstalling 160, 184 PS/2 port keyboard 5 mouse 5 R radio listening with MusicMatch 95 RAM See memory rebooting computer 18 recordable drive 3, 9, 85 activity indicator 85 adding 198 eject button 85 identifying drive 84 locating 3 replacing 198 troubleshooting 222 264...
turning on computer 16 using UPS 136 power button 3 power supply replacing 214 uninterruptible 136 previous button 20 printer default 236 inkjet 8 installing 24, 158 laser 8 parallel port 5 sharing 141 troubleshooting 236 USB port 3, 5 printing ... shortcut buttons 20 programs closing 53 closing unresponsive 18 opening 23, 34 reinstalling 160, 184 PS/2 port keyboard 5 mouse 5 R radio listening with MusicMatch 95 RAM See memory rebooting computer 18 recordable drive 3, 9, 85 activity indicator 85 adding 198 eject button 85 identifying drive 84 locating 3 replacing 198 troubleshooting 222 264...
User Guide
Page 275
turning off computer 3, 17, 18 turning on computer 3, 16 tutoring fee-based 242 U uninterruptible power supply (UPS) 9, 15, 136 updating device drivers 28 updating Norton AntiVirus 166 upgrading 189 UPS 9, 15, 136 USB port 3, 5, 24 user accounts adding 129 switching 130 V ... 20, 78 troubleshooting 237 W WAV file 82 Web browser 57, 59 button 21 Web page 59 Web site 59 connecting to 60 downloading files 61 Gateway 28 window 36 close button 37 closing 37, 53 maximize button 37 menu bar 37 minimize button 37 title bar 37 Windows clipboard 41 desktop...
turning off computer 3, 17, 18 turning on computer 3, 16 tutoring fee-based 242 U uninterruptible power supply (UPS) 9, 15, 136 updating device drivers 28 updating Norton AntiVirus 166 upgrading 189 UPS 9, 15, 136 USB port 3, 5, 24 user accounts adding 129 switching 130 V ... 20, 78 troubleshooting 237 W WAV file 82 Web browser 57, 59 button 21 Web page 59 Web site 59 connecting to 60 downloading files 61 Gateway 28 window 36 close button 37 closing 37, 53 maximize button 37 menu bar 37 minimize button 37 title bar 37 Windows clipboard 41 desktop...

