Gateway Desktop User's Guide
Page 4
... since improper adjustment of used batteries according to dangerous voltage points or other controls may result in performance, indicating a need to replace the power cord set . If you to the manufacturer's instructions. Product servicing Do not attempt to qualified service personnel. Telephone line safety &#... or equivalent type recommended by a qualified technician to restore the product to this product. • Use the product only with the supplied power supply cord set , make sure that may result in use and/or before servicing. • To avoid the remote risk of this...
... since improper adjustment of used batteries according to dangerous voltage points or other controls may result in performance, indicating a need to replace the power cord set . If you to the manufacturer's instructions. Product servicing Do not attempt to qualified service personnel. Telephone line safety &#... or equivalent type recommended by a qualified technician to restore the product to this product. • Use the product only with the supplied power supply cord set , make sure that may result in use and/or before servicing. • To avoid the remote risk of this...
User Guide
Page 7
11 Maintaining Your Computer 161 Caring for your computer 162 Protecting your computer from viruses 164 Managing hard drive space 167 Checking hard drive space 167 ... panel 192 Removing the front bezel 195 Closing the case 196 Replacing the side panel 196 Replacing the front bezel 197 Adding or replacing a CD, DVD, or diskette drive 198 Replacing the hard drive 203 Adding or replacing add-in cards 206 Installing memory 208 Replacing the system battery 212 Replacing the power supply 214 Replacing the system board 216 v
11 Maintaining Your Computer 161 Caring for your computer 162 Protecting your computer from viruses 164 Managing hard drive space 167 Checking hard drive space 167 ... panel 192 Removing the front bezel 195 Closing the case 196 Replacing the side panel 196 Replacing the front bezel 197 Adding or replacing a CD, DVD, or diskette drive 198 Replacing the hard drive 203 Adding or replacing add-in cards 206 Installing memory 208 Replacing the system battery 212 Replacing the power supply 214 Replacing the system board 216 v

User Guide
Page 17
... cartridges can add storage devices to increase your hard drive. Uninterruptible power supplies A standby, uninterruptible power supply (UPS) protects your computer running more slowly than you can store 2 GB, 20 GB, 40 GB, 130 GB, or more expensive, but usually they should, try replacing your files, you think they print much faster than inkjet printers when...and shut down your entire system, you probably need additional storage space or you want to you are printing large documents. www.gateway.com 9 For more information about setting up your computer correctly.
... cartridges can add storage devices to increase your hard drive. Uninterruptible power supplies A standby, uninterruptible power supply (UPS) protects your computer running more slowly than you can store 2 GB, 20 GB, 40 GB, 130 GB, or more expensive, but usually they should, try replacing your files, you think they print much faster than inkjet printers when...and shut down your entire system, you probably need additional storage space or you want to you are printing large documents. www.gateway.com 9 For more information about setting up your computer correctly.
User Guide
Page 213
www.gateway.com 205 See the drive documentation for further instructions. 8 Replace the side panel following the instructions in "Replacing the side panel" on the side closest to the power supply connection). Replacing the hard drive 7 Reconnect the drive cables using your notes from Step 2. The red-striped edge of the data ribbon cable indicates Pin 1 and corresponds with Pin 1 on the drive (typically on page 196.
www.gateway.com 205 See the drive documentation for further instructions. 8 Replace the side panel following the instructions in "Replacing the side panel" on the side closest to the power supply connection). Replacing the hard drive 7 Reconnect the drive cables using your notes from Step 2. The red-striped edge of the data ribbon cable indicates Pin 1 and corresponds with Pin 1 on the drive (typically on page 196.
User Guide
Page 222
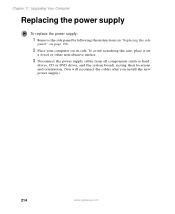
To avoid scratching the case, place it on its side. Chapter 11: Upgrading Your Computer Replacing the power supply To replace the power supply: 1 Remove the side panel by following the instructions in "Replacing the side panel" on page 196. 2 Place your computer on a towel or other non-abrasive surface. 3 Disconnect the power supply cables from all components (such as hard drives, CD or DVD drives, and the system board), noting their locations and orientation. (You will reconnect the cables after you install the new power supply.) 214 www.gateway.com
To avoid scratching the case, place it on its side. Chapter 11: Upgrading Your Computer Replacing the power supply To replace the power supply: 1 Remove the side panel by following the instructions in "Replacing the side panel" on page 196. 2 Place your computer on a towel or other non-abrasive surface. 3 Disconnect the power supply cables from all components (such as hard drives, CD or DVD drives, and the system board), noting their locations and orientation. (You will reconnect the cables after you install the new power supply.) 214 www.gateway.com
User Guide
Page 223
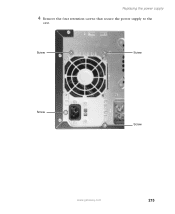
Screw Screw Screw Screw www.gateway.com 215 Replacing the power supply 4 Remove the four retention screws that secure the power supply to the case.
Screw Screw Screw Screw www.gateway.com 215 Replacing the power supply 4 Remove the four retention screws that secure the power supply to the case.
User Guide
Page 224
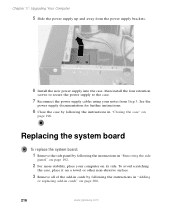
... page 196. Replacing the system board To replace the system board: 1 Remove the side panel by following the instructions in "Removing the side panel" on page 192. 2 For more stability, place your notes from Step 3. Chapter 11: Upgrading Your Computer 5 Slide the power supply up and away from the power supply brackets. 6 Install the new power supply into the...
... page 196. Replacing the system board To replace the system board: 1 Remove the side panel by following the instructions in "Removing the side panel" on page 192. 2 For more stability, place your notes from Step 3. Chapter 11: Upgrading Your Computer 5 Slide the power supply up and away from the power supply brackets. 6 Install the new power supply into the...
User Guide
Page 272
turning on computer 16 using UPS 136 power button 3 power supply replacing 214 uninterruptible 136 previous button 20 printer default 236 inkjet 8 installing 24, 158 laser 8 parallel port 5 sharing 141 troubleshooting 236 USB port 3, 5 printing documents 52 ... opening 23, 34 reinstalling 160, 184 PS/2 port keyboard 5 mouse 5 R radio listening with MusicMatch 95 RAM See memory rebooting computer 18 recordable drive 3, 9, 85 activity indicator 85 adding 198 eject button 85 identifying drive 84 locating 3 replacing 198 troubleshooting 222 264 using 84 recording audio file 80 CD tracks 90 video DVD...
turning on computer 16 using UPS 136 power button 3 power supply replacing 214 uninterruptible 136 previous button 20 printer default 236 inkjet 8 installing 24, 158 laser 8 parallel port 5 sharing 141 troubleshooting 236 USB port 3, 5 printing documents 52 ... opening 23, 34 reinstalling 160, 184 PS/2 port keyboard 5 mouse 5 R radio listening with MusicMatch 95 RAM See memory rebooting computer 18 recordable drive 3, 9, 85 activity indicator 85 adding 198 eject button 85 identifying drive 84 locating 3 replacing 198 troubleshooting 222 264 using 84 recording audio file 80 CD tracks 90 video DVD...


