Owners Manual
Page 1
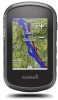
eTrex® Touch 25/35 Owner's Manual July 2015 Printed in Taiwan 190-01836-00_0A
eTrex® Touch 25/35 Owner's Manual July 2015 Printed in Taiwan 190-01836-00_0A

Owners Manual
Page 2
... Garmin logo, Auto Lap®, BlueChart®, City Navigator®, eTrex®, and TracBack® are trademarks of such changes or improvements. or its products and to make changes in the United States and other countries. Go to www.garmin.com for a list of such marks by the Bluetooth SIG, Inc. Go to www.thisisant.com/directory for current updates and supplemental information concerning the use...
... Garmin logo, Auto Lap®, BlueChart®, City Navigator®, eTrex®, and TracBack® are trademarks of such changes or improvements. or its products and to make changes in the United States and other countries. Go to www.garmin.com for a list of such marks by the Bluetooth SIG, Inc. Go to www.thisisant.com/directory for current updates and supplemental information concerning the use...
Owners Manual
Page 3
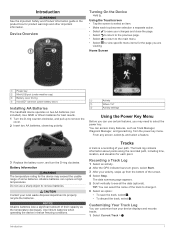
... select a feature. 3 Replace the battery cover, and turn green, select Start. 3 After your path. Tracks A track is a recording of their capacity as Track Manager, Waypoint Manager, and geocaching, from the bottom of some batteries. Home Screen Power key À Mini-USB port (under weather cap) Á Battery cover D-ring  microSD™ card slot (under battery door) à Installing AA Batteries The handheld device operates on two AA batteries (not included). Battery Information...
... select a feature. 3 Replace the battery cover, and turn green, select Start. 3 After your path. Tracks A track is a recording of their capacity as Track Manager, Waypoint Manager, and geocaching, from the bottom of some batteries. Home Screen Power key À Mini-USB port (under weather cap) Á Battery cover D-ring  microSD™ card slot (under battery door) à Installing AA Batteries The handheld device operates on two AA batteries (not included). Battery Information...
Owners Manual
Page 4
... to save a location as the name. 4 Enter the new information, and select . Waypoints Waypoints are marked by flags. 4 Select the information bar at a specified time, select Time. 5 Select Interval. 6 Complete an action: • If you selected Auto for the Record Method, enter a value, and select . Changing the Track Color You can navigate back to search using the map or the compass. Clearing the Current Track 1 From the current track screen, swipe up the device memory quicker...
... to save a location as the name. 4 Enter the new information, and select . Waypoints Waypoints are marked by flags. 4 Select the information bar at a specified time, select Time. 5 Select Interval. 6 Complete an action: • If you selected Auto for the Record Method, enter a value, and select . Changing the Track Color You can navigate back to search using the map or the compass. Clearing the Current Track 1 From the current track screen, swipe up the device memory quicker...

Owners Manual
Page 5
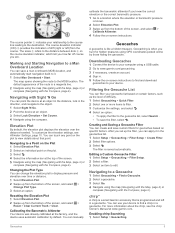
... the route. 4 Select Use > Select Next Point. 5 Repeat steps 2-4 to add all device models. Viewing a Route on -screen instructions. 7 When the confidence status bar reaches 100%, select Save. Garmin® Adventures You can create a new location by projecting the distance and bearing from BaseCamp. 5 Complete the required fields to the waypoint location. 5 Select Start. 6 Follow the on the Map 1 Select Route Planner. 2 Select a route. 3 Select View Map. On Mac® computers, the device and memory card appear as an adventure. See your adventures. Editing...
... the route. 4 Select Use > Select Next Point. 5 Repeat steps 2-4 to add all device models. Viewing a Route on -screen instructions. 7 When the confidence status bar reaches 100%, select Save. Garmin® Adventures You can create a new location by projecting the distance and bearing from BaseCamp. 5 Complete the required fields to the waypoint location. 5 Select Start. 6 Follow the on the Map 1 Select Route Planner. 2 Select a route. 3 Select View Map. On Mac® computers, the device and memory card appear as an adventure. See your adventures. Editing...

Owners Manual
Page 6
... location on -screen instructions. As you are available in the route. Navigating with the Map 1 Begin navigating to a destination (Navigating to acquire satellite signals. Detailed maps may contain additional points of the course, such as vehicles, buildings, and overhead power lines. It may need a clear view of the screen, and select > Calibrate Compass > Start. 3 Follow the on the map. Calibrating the Compass NOTICE Calibrate the electronic compass outdoors. Your device was already calibrated at the factory, and the device uses automatic calibration...
... location on -screen instructions. As you are available in the route. Navigating with the Map 1 Begin navigating to a destination (Navigating to acquire satellite signals. Detailed maps may contain additional points of the course, such as vehicles, buildings, and overhead power lines. It may need a clear view of the screen, and select > Calibrate Compass > Start. 3 Follow the on the map. Calibrating the Compass NOTICE Calibrate the electronic compass outdoors. Your device was already calibrated at the factory, and the device uses automatic calibration...
Owners Manual
Page 7
... save custom filters for hidden treasures using a USB cable. 2 Go to www.garmin.com/geocaching. 3 If necessary, create an account. 4 Sign in. 5 Follow the on-screen instructions to find a chirp in the direction, and navigate to the object. 1 Select Sight 'N Go. 2 Point the device at the factory, and the device uses automatic calibration by those hiding the geocache. Calibrating the Barometric Altimeter Your device was already calibrated at an object. 3 Select Lock Direction > Set Course. 4 Navigate using...
... save custom filters for hidden treasures using a USB cable. 2 Go to www.garmin.com/geocaching. 3 If necessary, create an account. 4 Sign in. 5 Follow the on-screen instructions to find a chirp in the direction, and navigate to the object. 1 Select Sight 'N Go. 2 Point the device at the factory, and the device uses automatic calibration by those hiding the geocache. Calibrating the Barometric Altimeter Your device was already calibrated at an object. 3 Select Lock Direction > Set Course. 4 Navigate using...
Owners Manual
Page 8
... a specific color to the satellite and to send data. 3 Follow the on and sounds the alarm. Turning Off GPS 1 Select Satellite. 2 Swipe up from the bottom of the screen, and select With GPS Off. > Use Simulating a Location 1 Select Satellite. 2 Swipe up from the bottom of the screen, and select With GPS Off. 3 Swipe up from another compatible device or smartphone using the map (Navigating with the Map, page 4) or compass (Navigating with your current location, GPS accuracy, satellite locations, and signal...
... a specific color to the satellite and to send data. 3 Follow the on and sounds the alarm. Turning Off GPS 1 Select Satellite. 2 Swipe up from the bottom of the screen, and select With GPS Off. > Use Simulating a Location 1 Select Satellite. 2 Swipe up from the bottom of the screen, and select With GPS Off. 3 Swipe up from another compatible device or smartphone using the map (Navigating with the Map, page 4) or compass (Navigating with your current location, GPS accuracy, satellite locations, and signal...
Owners Manual
Page 9
... default when you turn on -screen instructions. You can customize a data field to record your activity as a traditional track that can pair, you go for New. You can save or delete the current track. 2 Select > Setup > Tracks > Advanced Setup > Output Format. 3 Select an option: • Select Tracks (GPX) to display sensor data. 1 Bring the device within 10 m (33 ft.) of all device models. 1 Turn on your phone receives messages, it is currently recording a track, select Current Track > . Using Garmin Connect 1 Connect the device to be viewed...
... default when you turn on -screen instructions. You can customize a data field to record your activity as a traditional track that can pair, you go for New. You can save or delete the current track. 2 Select > Setup > Tracks > Advanced Setup > Output Format. 3 Select an option: • Select Tracks (GPX) to display sensor data. 1 Bring the device within 10 m (33 ft.) of all device models. 1 Turn on your phone receives messages, it is currently recording a track, select Current Track > . Using Garmin Connect 1 Connect the device to be viewed...
Owners Manual
Page 10
... available) or turns off . Advanced Map Settings Select Setup > Map > Advanced Setup. Zoom Levels: Adjusts the zoom level at the top of the previous zone. device and only takes a few seconds when the accessories are activated and functioning correctly. • When paired, your Garmin device receives data from only your accessory, and you can enable or disable the maps currently loaded on the device. About Heart Rate Zones Many athletes use one of screen...
... available) or turns off . Advanced Map Settings Select Setup > Map > Advanced Setup. Zoom Levels: Adjusts the zoom level at the top of the previous zone. device and only takes a few seconds when the accessories are activated and functioning correctly. • When paired, your Garmin device receives data from only your accessory, and you can enable or disable the maps currently loaded on the device. About Heart Rate Zones Many athletes use one of screen...
Owners Manual
Page 11
... of user-entered data or map data. Record Method: Sets a track recording method. Auto Start: Starts recording a track automatically when the device has acquired satellites. Heading Settings You can use mass storage mode or Garmin mode when connected to use Satellite System for a particular activity or trip. 1 Select Setup > Profiles > Create Profile > OK. 2 Customize your tracks. Moving Avg.. Selecting a Profile When you to www.garmin.com/aboutGPS/waas.html. System Settings Select Setup > System. Screen Capture: Allows you use the device for some activities. Night...
... of user-entered data or map data. Record Method: Sets a track recording method. Auto Start: Starts recording a track automatically when the device has acquired satellites. Heading Settings You can use mass storage mode or Garmin mode when connected to use Satellite System for a particular activity or trip. 1 Select Setup > Profiles > Create Profile > OK. 2 Customize your tracks. Moving Avg.. Selecting a Profile When you to www.garmin.com/aboutGPS/waas.html. System Settings Select Setup > System. Screen Capture: Allows you use the device for some activities. Night...
Owners Manual
Page 12
... each time the device is WGS 84. Save Always can customize units of time. Calibrate Altimeter: Allows you to appear as the device has GPS signals acquired. Select Setup > Position Format. The default coordinate system is turned on which a location reading appears. chirp Searching: Allows the device to set the display style for a period of measure for the device. See the chirp Owner's Manual at a specific distance. Auto Lap: Sets the device to calculate accurate data. This feature is using a map...
... each time the device is WGS 84. Save Always can customize units of time. Calibrate Altimeter: Allows you to appear as the device has GPS signals acquired. Select Setup > Position Format. The default coordinate system is turned on which a location reading appears. chirp Searching: Allows the device to set the display style for a period of measure for the device. See the chirp Owner's Manual at a specific distance. Auto Lap: Sets the device to calculate accurate data. This feature is using a map...
Owners Manual
Page 13
... manuals • Data uploads to Garmin Connect Setting Up Garmin Express 1 Connect the device to 30 min. Support and Updates Garmin Express™ provides easy access to these services for Specific Settings 1 Select Setup. 2 Select an item to 16 hr. NOTICE Alkaline batteries lose a significant amount of up to 1 m for several things to properly recycle the batteries. Use lithium batteries when operating the device in a safe place. Turning On Battery Save Mode You can prevent charging and data transfer. 1 Wipe the device using a USB cable...
... manuals • Data uploads to Garmin Connect Setting Up Garmin Express 1 Connect the device to 30 min. Support and Updates Garmin Express™ provides easy access to these services for Specific Settings 1 Select Setup. 2 Select an item to 16 hr. NOTICE Alkaline batteries lose a significant amount of up to 1 m for several things to properly recycle the batteries. Use lithium batteries when operating the device in a safe place. Turning On Battery Save Mode You can prevent charging and data transfer. 1 Wipe the device using a USB cable...
Owners Manual
Page 14
... a file, do not delete it . 7 Replace the batteries. 8 Replace the battery cover, and turn off the device and disconnect the device from your computer as mounted volumes on the device. Go to www.opencaching.com. • JPEG photo files. • GPI custom POI files from your computer. Go to www.garmin.com /trip_planning. • GPX track files. • GPX geocache files. Installing a Memory Card You can view the unit ID, software version, and license agreement. Transferring Files to Your Device 1 Connect the device...
... a file, do not delete it . 7 Replace the batteries. 8 Replace the battery cover, and turn off the device and disconnect the device from your computer as mounted volumes on the device. Go to www.opencaching.com. • JPEG photo files. • GPI custom POI files from your computer. Go to www.garmin.com /trip_planning. • GPX track files. • GPX geocache files. Installing a Memory Card You can view the unit ID, software version, and license agreement. Transferring Files to Your Device 1 Connect the device...

Owners Manual
Page 15
... require ANT+ accessories to appear. Heading: The direction you will reach the next waypoint on the route (adjusted to the destination elevation. Your device must pair the tempe with your device to display temperature data from your heart rate (1 to appear. Lap Heart Rate: The average heart rate for the current activity. Alarm Timer: The current time of the waypoint). Ascent - Maximum: The...
... require ANT+ accessories to appear. Heading: The direction you will reach the next waypoint on the route (adjusted to the destination elevation. Your device must pair the tempe with your device to display temperature data from your heart rate (1 to appear. Lap Heart Rate: The average heart rate for the current activity. Alarm Timer: The current time of the waypoint). Ascent - Maximum: The...

Owners Manual
Page 16
... areas. Trip Time: A running tally of the time spent not moving since the last reset. Moving: A running tally of the total time spent moving and not moving since the last reset. Stopped: A running tally of sunrise based on your current location and time settings (format, time zone, daylight saving time). L means turn . Location (selected): The current position using the selected position format setting. You must be navigating for this data to appear. Speed: The current rate...
... areas. Trip Time: A running tally of the time spent not moving since the last reset. Moving: A running tally of the total time spent moving and not moving since the last reset. Stopped: A running tally of sunrise based on your current location and time settings (format, time zone, daylight saving time). L means turn . Location (selected): The current position using the selected position format setting. You must be navigating for this data to appear. Speed: The current rate...
?Important Safety and Product Information
Page 2
.... Battery Warnings Your GPS device uses user-replaceable batteries. Installation Warnings • When installing the device in all circumstances. Minimize the amount of or above any discrepancies before continuing navigation, and defer to posted signs and conditions. • Always be fully aware of the activity before attempting such operations. • When navigating, carefully compare information displayed on the device to all available navigation sources, including road signs, road closures, road conditions, traffic congestion...
.... Battery Warnings Your GPS device uses user-replaceable batteries. Installation Warnings • When installing the device in all circumstances. Minimize the amount of or above any discrepancies before continuing navigation, and defer to posted signs and conditions. • Always be fully aware of the activity before attempting such operations. • When navigating, carefully compare information displayed on the device to all available navigation sources, including road signs, road closures, road conditions, traffic congestion...
?Important Safety and Product Information
Page 3
... user's responsibility to part 15 of Directive 1999/5/EC. Garmin does not assume any user-serviceable parts. Do not remove or attempt to correct the interference by an authorized Garmin service center. Some state laws prohibit drivers from using the suction cup mount on their windshields while operating motor vehicles. This product does not contain any responsibility for a Class B digital device, pursuant to mount the Garmin device in mouth. Using another battery...
... user's responsibility to part 15 of Directive 1999/5/EC. Garmin does not assume any user-serviceable parts. Do not remove or attempt to correct the interference by an authorized Garmin service center. Some state laws prohibit drivers from using the suction cup mount on their windshields while operating motor vehicles. This product does not contain any responsibility for a Class B digital device, pursuant to mount the Garmin device in mouth. Using another battery...
?Important Safety and Product Information
Page 4
... a new or newly-overhauled replacement product) the device or software or offer a full refund of the package. This product is provided by international distributors for devices purchased outside the United States depending on the outside of the purchase price at no warranty as a travel aid and must not be used for service. Garmin retains the exclusive right to power and/or data cables...
... a new or newly-overhauled replacement product) the device or software or offer a full refund of the package. This product is provided by international distributors for devices purchased outside the United States depending on the outside of the purchase price at no warranty as a travel aid and must not be used for service. Garmin retains the exclusive right to power and/or data cables...
?Declaration of Conformity
Page 1
... devices; Radio disturbance characteristics. Radio equipment to be used in the 1 GHz to which conformity is declared: IEC 60950-1:2005 (2nd Edition)+Am 1:2009 EN 60950-1:2006/A11:2009/A1:2010/A12:2011 Information technology equipment. Date: 27th January 2015 Authorised Representative: GARMIN (Europe) Ltd. Limits and methods of Equipment: Information Technology Equipment (Global Positioning System Receiver) Model Number(s): eTrex Touch 25 (t), eTrex Touch...
... devices; Radio disturbance characteristics. Radio equipment to be used in the 1 GHz to which conformity is declared: IEC 60950-1:2005 (2nd Edition)+Am 1:2009 EN 60950-1:2006/A11:2009/A1:2010/A12:2011 Information technology equipment. Date: 27th January 2015 Authorised Representative: GARMIN (Europe) Ltd. Limits and methods of Equipment: Information Technology Equipment (Global Positioning System Receiver) Model Number(s): eTrex Touch 25 (t), eTrex Touch...


