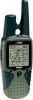

Owner's Manual
Page 5
Using the Main Menu 36 Main Menu Options 38 Page Sequence Setup 38 Shortcuts Menu 39 Waypoints 40 Mark Waypoint Page 40 Creating Waypoints 41 Projecting a Waypoint 42 Editing a Waypoint 42 Find 'N Go 44 Finding a Waypoint 45 Finding a Contact ... 55 Using a Goto 56 Route Page 57 Creating and Using a Route 57 Editing a Route 58 Adding or Editing from the Route Map Page 61 Rino® 120 Owner's Manual INTRODUCTION > TABLE OF CONTENTS Navigating a Route 62 Stopping Navigation 63 Data Fields for the Route Page 63 Data field options for Route...
Using the Main Menu 36 Main Menu Options 38 Page Sequence Setup 38 Shortcuts Menu 39 Waypoints 40 Mark Waypoint Page 40 Creating Waypoints 41 Projecting a Waypoint 42 Editing a Waypoint 42 Find 'N Go 44 Finding a Waypoint 45 Finding a Contact ... 55 Using a Goto 56 Route Page 57 Creating and Using a Route 57 Editing a Route 58 Adding or Editing from the Route Map Page 61 Rino® 120 Owner's Manual INTRODUCTION > TABLE OF CONTENTS Navigating a Route 62 Stopping Navigation 63 Data Fields for the Route Page 63 Data field options for Route...
Owner's Manual
Page 8
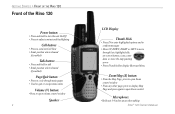
GETTING STARTED > FRONT OF THE RINO 120 Front of the Rino 120 Power button: • Press and hold to turn the unit On/Off • Press to adjust contrast and backlighting Call...: • Press to cycle through main pages • Used to quit or escape menu items Volume (V) button: • Press to display Shortcuts Menu. Zoom/Map (Z) button: • From the Map Page, press to open Zoom control window • From any other page, press to...panning arrow • Press IN and hold to open Zoom control Microphone: • Hold unit 3-4 inches away when talking Rino® 120 Owner's Manual
GETTING STARTED > FRONT OF THE RINO 120 Front of the Rino 120 Power button: • Press and hold to turn the unit On/Off • Press to adjust contrast and backlighting Call...: • Press to cycle through main pages • Used to quit or escape menu items Volume (V) button: • Press to display Shortcuts Menu. Zoom/Map (Z) button: • From the Map Page, press to open Zoom control window • From any other page, press to...panning arrow • Press IN and hold to open Zoom control Microphone: • Hold unit 3-4 inches away when talking Rino® 120 Owner's Manual
Owner's Manual
Page 11
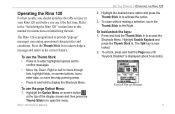
...return to activate the option. 3. Rino® 120 Owner's Manual GETTING STARTED > OPERATING THE RINO 120 2. Highlight Enable Keylock and press the Thumb Stick In. To close without making a selection, move the map panning arrow • Press In and hold to display the Shortcuts Menu. Keylock Pop-up " ...through lists, highlight fields, on-screen buttons, icons, enter data, or move the Thumb Stick to access the Shortcuts Menu. Operating the Rino 120 For best results, you should initialize the GPS receiver in this manual for instructions on -screen button at the top of...
...return to activate the option. 3. Rino® 120 Owner's Manual GETTING STARTED > OPERATING THE RINO 120 2. Highlight Enable Keylock and press the Thumb Stick In. To close without making a selection, move the map panning arrow • Press In and hold to display the Shortcuts Menu. Keylock Pop-up " ...through lists, highlight fields, on-screen buttons, icons, enter data, or move the Thumb Stick to access the Shortcuts Menu. Operating the Rino 120 For best results, you should initialize the GPS receiver in this manual for instructions on -screen button at the top of...
Owner's Manual
Page 28
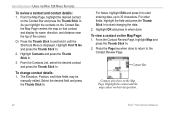
...In. 2. From the Map Page, highlight the desired contact on the Map Page. Or Press the Thumb Stick In and hold it until the Shortcuts Menu is displayed. Contact Bar Contacts also show on the Contact Bar and press the Thumb Stick In. Highlight Find 'N Go and press the Thumb... Stick In. 2. Highlight Contacts and press the Thumb Stick In. 3. Highlight the contact and the map centers on their last position. 22 Rino® 120 Owner's Manual From the Contacts List, select the desired contact and press the Thumb Stick In. For other fields, highlight the field ...
...In. 2. From the Map Page, highlight the desired contact on the Map Page. Or Press the Thumb Stick In and hold it until the Shortcuts Menu is displayed. Contact Bar Contacts also show on the Contact Bar and press the Thumb Stick In. Highlight Find 'N Go and press the Thumb... Stick In. 2. Highlight Contacts and press the Thumb Stick In. 3. Highlight the contact and the map centers on their last position. 22 Rino® 120 Owner's Manual From the Contacts List, select the desired contact and press the Thumb Stick In. For other fields, highlight the field ...

Owner's Manual
Page 29
...and press the Thumb Stick In. (For the Contacts List, select the desired contact and press the Thumb Stick In.) UNIT OPERATION > USING THE RINO 120 RADIO FEATURES 4. From the Information Page, highlight the Option Menu in handy when you are trying to round up the group or you select, ... the upper right and press the Thumb Stick In. 6. If a location is sent more than once, a number is displayed. 2. message appears until the Shortcuts Menu is automatically added to send location..." The unit now sends the point to wait until 30 seconds have Scramble enabled. Depending on your channel...
...and press the Thumb Stick In. (For the Contacts List, select the desired contact and press the Thumb Stick In.) UNIT OPERATION > USING THE RINO 120 RADIO FEATURES 4. From the Information Page, highlight the Option Menu in handy when you are trying to round up the group or you select, ... the upper right and press the Thumb Stick In. 6. If a location is sent more than once, a number is displayed. 2. message appears until the Shortcuts Menu is automatically added to send location..." The unit now sends the point to wait until 30 seconds have Scramble enabled. Depending on your channel...
Owner's Manual
Page 33
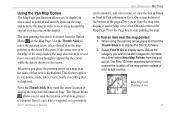
...is displayed. On-screen buttons at and identify items on the map, and to move the panning arrow (also referred to as a waypoint, set a proximity Rino® 120 Owner's Manual UNIT OPERATION > MAP PAGE circle around it, add it to a route, or view the Sun & Moon or Hunt & Fish information for...Page key to mark the arrow location or display the map item Information Page. The Rino 120 then searches for it. The map panning function is drawn on the Map Page. This feature applies to display the Shortcuts Menu. 2. When using the panning arrow, press and hold the Thumb Stick In to...
...is displayed. On-screen buttons at and identify items on the map, and to move the panning arrow (also referred to as a waypoint, set a proximity Rino® 120 Owner's Manual UNIT OPERATION > MAP PAGE circle around it, add it to a route, or view the Sun & Moon or Hunt & Fish information for...Page key to mark the arrow location or display the map item Information Page. The Rino 120 then searches for it. The map panning function is drawn on the Map Page. This feature applies to display the Shortcuts Menu. 2. When using the panning arrow, press and hold the Thumb Stick In to...

Owner's Manual
Page 45
... you can be accessed from most pages. UNIT OPERATION > SHORTCUTS MENU Find 'N Go-Opens the Find 'N Go Page. Shortcuts Menu The Shortcuts Menu is loaded into the Rino 120. From the Find 'N Go Page, you to other Rino 120 users. Send Note-Sends a note to customize the waypoint ...information as well as a waypoint. Rino® 120 Owner's Manual 39 You may also fi...
... you can be accessed from most pages. UNIT OPERATION > SHORTCUTS MENU Find 'N Go-Opens the Find 'N Go Page. Shortcuts Menu The Shortcuts Menu is loaded into the Rino 120. From the Find 'N Go Page, you to other Rino 120 users. Send Note-Sends a note to customize the waypoint ...information as well as a waypoint. Rino® 120 Owner's Manual 39 You may also fi...

Owner's Manual
Page 46
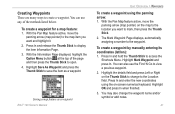
... of the waypoint, use the Thumb Stick to highlight the waypoint name field. • To assign an identifying symbol to cancel. The Rino 120 holds up to the next data field. You can also create a waypoint using the Map Page. If you to mark and record any...Name Symbol Waypoint Details Mark Waypoint Page 40 To mark your current location and open the Mark Waypoint Page: 1. Rino® 120 Owner's Manual Press and hold the Thumb Stick In until the Shortcuts Menu opens. 2. To save it as a waypoint. It appears with a graphic name block that displays the assigned...
... of the waypoint, use the Thumb Stick to highlight the waypoint name field. • To assign an identifying symbol to cancel. The Rino 120 holds up to the next data field. You can also create a waypoint using the Map Page. If you to mark and record any...Name Symbol Waypoint Details Mark Waypoint Page 40 To mark your current location and open the Mark Waypoint Page: 1. Rino® 120 Owner's Manual Press and hold the Thumb Stick In until the Shortcuts Menu opens. 2. To save it as a waypoint. It appears with a graphic name block that displays the assigned...
Owner's Manual
Page 47
...panning arrow: 1. To create a waypoint for a map feature: 1. Highlight Save As Waypoint and press the Thumb Stick to save the item as a waypoint Rino® 120 Owner's Manual UNIT OPERATION > WAYPOINTS To create a waypoint using the on the Thumb Stick to mark, then press the Thumb Stick. 2. You can use...): 1. Highlight the details field and press Left or Right on -screen numerical keyboard. Creating Waypoints There are many ways to access the Shortcuts Menu. Press In and hold the Thumb Stick to create a waypoint. You can also use any of the page and then press the Thumb ...
...panning arrow: 1. To create a waypoint for a map feature: 1. Highlight Save As Waypoint and press the Thumb Stick to save the item as a waypoint Rino® 120 Owner's Manual UNIT OPERATION > WAYPOINTS To create a waypoint using the on the Thumb Stick to mark, then press the Thumb Stick. 2. You can use...): 1. Highlight the details field and press Left or Right on -screen numerical keyboard. Creating Waypoints There are many ways to access the Shortcuts Menu. Press In and hold the Thumb Stick to create a waypoint. You can also use any of the page and then press the Thumb ...

Owner's Manual
Page 50
... every item in two different ways: By Name and Nearest. Press the Page key or the on-screen Main Page Menu button to access the Shortcuts Menu. 2. If you through the process of sub-menus and location information pages that is grayed out (disabled), you to your Current Location or the...
... every item in two different ways: By Name and Nearest. Press the Page key or the on-screen Main Page Menu button to access the Shortcuts Menu. 2. If you through the process of sub-menus and location information pages that is grayed out (disabled), you to your Current Location or the...

Owner's Manual
Page 61
... Note and press the Thumb Stick In to open the Send Note Page. 3. Press the Thumb Stick In until the Shortcuts Menu appears in the middle of the display on every Rino 120 user who is using the same Channel and Squelch Code that you are using the on the keyboard. 4. Select a ...note from the Saved Notes list and press the Thumb Stick In. 4. To send a new note: 1. Press the Thumb Stick In until the Shortcuts Menu appears. 2. Sending a ...
... Note and press the Thumb Stick In to open the Send Note Page. 3. Press the Thumb Stick In until the Shortcuts Menu appears in the middle of the display on every Rino 120 user who is using the same Channel and Squelch Code that you are using the on the keyboard. 4. Select a ...note from the Saved Notes list and press the Thumb Stick In. 4. To send a new note: 1. Press the Thumb Stick In until the Shortcuts Menu appears. 2. Sending a ...
Owner's Manual
Page 122
... VOX 15 W WAAS 69, 79 Waterproof 1, 91 Waypoint 40, 41 Create 40, 41 Delete 43 Edit 42 Move 43 Project 42 Z Zoom 25, 30 Rino® 120 Owner's Manual INDEX Routes 57 Copy 59 Create 57 Data Fields 63 Delete 59 Edit 58 Navigate 62 Remove waypoints 58 Restore defaults 59 Reverse... Note 55 Setup Map 26, 29 Page 72 Radio 15 Scanlist 17 TD field 74 Time Page 72 Tones 17 Set Alarm Clock 82 Shortcut Menu 5, 39 Show... 26 Show Data Fields 34 Sight 'N Go 34 Signal Strength 68 Sky View 68 Specifications 91 Squelch codes 11, 96...
... VOX 15 W WAAS 69, 79 Waterproof 1, 91 Waypoint 40, 41 Create 40, 41 Delete 43 Edit 42 Move 43 Project 42 Z Zoom 25, 30 Rino® 120 Owner's Manual INDEX Routes 57 Copy 59 Create 57 Data Fields 63 Delete 59 Edit 58 Navigate 62 Remove waypoints 58 Restore defaults 59 Reverse... Note 55 Setup Map 26, 29 Page 72 Radio 15 Scanlist 17 TD field 74 Time Page 72 Tones 17 Set Alarm Clock 82 Shortcut Menu 5, 39 Show... 26 Show Data Fields 34 Sight 'N Go 34 Signal Strength 68 Sky View 68 Specifications 91 Squelch codes 11, 96...

Quick Start Guide
Page 1
... Stick In. 5. The Navigation Page automatically opens to guide you are using . When the pointer is created and New Contact Page shown on your Rino 120's features. From the New Contact page you can be moving very slowly, Navigation Page the navigation data may "poll" the contact's location. A ...storing it until the Shortcuts Menu is displayed, or press the Page button until the Main Menu is 80 miles. Send Location The location is simply capturing your path is called a Track Log. Peer-to-Peer positioning allows you to track the movement of other Rino 120 users on -screen ...
... Stick In. 5. The Navigation Page automatically opens to guide you are using . When the pointer is created and New Contact Page shown on your Rino 120's features. From the New Contact page you can be moving very slowly, Navigation Page the navigation data may "poll" the contact's location. A ...storing it until the Shortcuts Menu is displayed, or press the Page button until the Main Menu is 80 miles. Send Location The location is simply capturing your path is called a Track Log. Peer-to-Peer positioning allows you to track the movement of other Rino 120 users on -screen ...