SAR Specific Absorption Rate Statement
Page 1
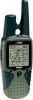
...the Federal Communications Commission (FCC) and Industry Canada. Product Rino 110 Rino 120 Rino 130 Rino 520HCx Rino 530HCx Face-held position and when worn on the body, are based on the body) reported to the FCC and available for review by the public is determined at the highest certified power ...all persons, regardless of safety to give additional protection for the public and to account for any variations in measurements. © 2008 Garmin Ltd. The guidelines are listed in the following table. and Canada, it must be differences between the SAR levels of measurement known...
...the Federal Communications Commission (FCC) and Industry Canada. Product Rino 110 Rino 120 Rino 130 Rino 520HCx Rino 530HCx Face-held position and when worn on the body, are based on the body) reported to the FCC and available for review by the public is determined at the highest certified power ...all persons, regardless of safety to give additional protection for the public and to account for any variations in measurements. © 2008 Garmin Ltd. The guidelines are listed in the following table. and Canada, it must be differences between the SAR levels of measurement known...
Owner's Manual
Page 26
... due to ignore this contact. UNIT OPERATION > USING THE RINO 120 RADIO FEATURES Using the Rino 120 Radio Features Your Rino 120 unit provides many features to enhance your location to other Rino users: 1. Peer-to-Peer Positioning The Rino 120's most unique feature is being able to send its location to...you can show their location. From the New Contact Page you press and release either the Talk or Call key. This section reviews some of the Rino 120. This information is ready to -Peer positioning. Refer to the "Features" section for information on your Map, Goto their ...
... due to ignore this contact. UNIT OPERATION > USING THE RINO 120 RADIO FEATURES Using the Rino 120 Radio Features Your Rino 120 unit provides many features to enhance your location to other Rino users: 1. Peer-to-Peer Positioning The Rino 120's most unique feature is being able to send its location to...you can show their location. From the New Contact Page you press and release either the Talk or Call key. This section reviews some of the Rino 120. This information is ready to -Peer positioning. Refer to the "Features" section for information on your Map, Goto their ...
Owner's Manual
Page 28
...: 1. To view a contact on the Contact Bar and press the Thumb Stick In. Contact Bar Contacts also show on their last position. 22 Rino® 120 Owner's Manual To change contact details: 1. For other fields, highlight the field and press the Thumb Stick In to the Contact... centers the map on that contact and display its name, direction, and distance near the top of the screen. UNIT OPERATION > USING THE RINO 120 RADIO FEATURES To review a contact and contact details: 1. From the Contacts List, select the desired contact and press the Thumb Stick In. From the Contact...
...: 1. To view a contact on the Contact Bar and press the Thumb Stick In. Contact Bar Contacts also show on their last position. 22 Rino® 120 Owner's Manual To change contact details: 1. For other fields, highlight the field and press the Thumb Stick In to the Contact... centers the map on that contact and display its name, direction, and distance near the top of the screen. UNIT OPERATION > USING THE RINO 120 RADIO FEATURES To review a contact and contact details: 1. From the Contacts List, select the desired contact and press the Thumb Stick In. From the Contact...

Owner's Manual
Page 65
... the Route Page, select the on -screen page Option Menu button and press the Thumb Stick In to restore factory settings. Rino® 120 Owner's Manual UNIT OPERATION > ROUTE PAGE 2. Highlight Review and then press the Thumb Stick In to access the Option Menu. 2. Select the row where you really want the new... In to copy. Highlight Insert and press the Thumb Stick In to delete route?", select Yes. The copied route displays on the route list: 1. To review a route point: 1.
... the Route Page, select the on -screen page Option Menu button and press the Thumb Stick In to restore factory settings. Rino® 120 Owner's Manual UNIT OPERATION > ROUTE PAGE 2. Highlight Review and then press the Thumb Stick In to access the Option Menu. 2. Select the row where you really want the new... In to copy. Highlight Insert and press the Thumb Stick In to delete route?", select Yes. The copied route displays on the route list: 1. To review a route point: 1.

Owner's Manual
Page 66
UNIT OPERATION > ROUTE PAGE Route point review options 3. Select the waypoint that you want to remove from the Route Points List and press the Thumb Stick In. 2. To move the point up ... Thumb Stick In to display the Information Page for the new point and then select the on -screen Use button to the points list. 3. Rino® 120 Owner's Manual Highlight the Move option and press the Thumb Stick In to remove the waypoint from the Route Points List and press the Thumb...
UNIT OPERATION > ROUTE PAGE Route point review options 3. Select the waypoint that you want to remove from the Route Points List and press the Thumb Stick In. 2. To move the point up ... Thumb Stick In to display the Information Page for the new point and then select the on -screen Use button to the points list. 3. Rino® 120 Owner's Manual Highlight the Move option and press the Thumb Stick In to remove the waypoint from the Route Points List and press the Thumb...

Owner's Manual
Page 68
... Add Turns to manually add a turn to begin navigating the route. Select a route from the list of routes. UNIT OPERATION > ROUTE PAGE To review or remove a route point: 1. Press the Thumb Stick In to either display the Information Page or remove it from the list of routes and then...route line, and waypoints on the Map Page. Select Next and press In again to review and press In. The Navigation Page shows compass direction and a bearing pointer. 62 To navigate a route: 1. Rino® 120 Owner's Manual The screen changes to view the route and your progress on the route. ...
... Add Turns to manually add a turn to begin navigating the route. Select a route from the list of routes. UNIT OPERATION > ROUTE PAGE To review or remove a route point: 1. Press the Thumb Stick In to either display the Information Page or remove it from the list of routes and then...route line, and waypoints on the Map Page. Select Next and press In again to review and press In. The Navigation Page shows compass direction and a bearing pointer. 62 To navigate a route: 1. Rino® 120 Owner's Manual The screen changes to view the route and your progress on the route. ...

Owner's Manual
Page 73
...press In to enter a distance and press In. Press the Page key or the Menu icon the Main Menu. 2. to open Proximity Waypoints Page Rino® 120 Owner's Manual UNIT OPERATION > PROXIMITY PAGE To add a proximity point: 1. To clear all proximity point(s) from the list and press the Thumb Stick... message appears. Press In again to display the Find 'N Go screen. If leaving a proximity alarm circle, a "Leaving Proximity Point " message appears. From the Review Page, select Use. Up to ten waypoints may be used to help you avoid dangerous areas or to clear and press In. In the Main...
...press In to enter a distance and press In. Press the Page key or the Menu icon the Main Menu. 2. to open Proximity Waypoints Page Rino® 120 Owner's Manual UNIT OPERATION > PROXIMITY PAGE To add a proximity point: 1. To clear all proximity point(s) from the list and press the Thumb Stick... message appears. Press In again to display the Find 'N Go screen. If leaving a proximity alarm circle, a "Leaving Proximity Point " message appears. From the Review Page, select Use. Up to ten waypoints may be used to help you avoid dangerous areas or to clear and press In. In the Main...

Owner's Manual
Page 87
... calendar, select the desired date using the keyboard as shown in the image to view the Hunt & Fish Page for a date: 1. Review the note in the pop-up window. 3. Rino® 120 Owner's Manual 81 To edit or delete a note previously created, highlight the date and press the Thumb Stick In. 2. Choose Delete...
... calendar, select the desired date using the keyboard as shown in the image to view the Hunt & Fish Page for a date: 1. Review the note in the pop-up window. 3. Rino® 120 Owner's Manual 81 To edit or delete a note previously created, highlight the date and press the Thumb Stick In. 2. Choose Delete...
Owner's Manual
Page 93
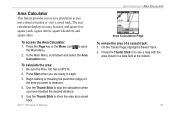
... area calculation displays in a data field at the bottom. 87 Press the Page key or the Menu icon the Main Menu. Be sure the Rino 120 has a GPS fix. 2. Press the Thumb Stick In to open 2. Area Calculator This feature provides you an area calculation as a saved track. ...In the Main Menu, scroll down and select the Area Calculator icon. Use the Thumb Stick to store the area as you want to measure. 4. Rino® 120 Owner's Manual UNIT OPERATION > AREA CALCULATOR Area Calculation Page To review the area of the area you move about a location or view a saved track.
... area calculation displays in a data field at the bottom. 87 Press the Page key or the Menu icon the Main Menu. Be sure the Rino 120 has a GPS fix. 2. Press the Thumb Stick In to open 2. Area Calculator This feature provides you an area calculation as a saved track. ...In the Main Menu, scroll down and select the Area Calculator icon. Use the Thumb Stick to store the area as you want to measure. 4. Rino® 120 Owner's Manual UNIT OPERATION > AREA CALCULATOR Area Calculation Page To review the area of the area you move about a location or view a saved track.
Owner's Manual
Page 117
... adopted RF exposure guidelines with Rino® 120 Owner's Manual 111 Although the Garmin Rino 120 is a low power radio transmitter and receiver. Those guidelines are consistent with safety levels for handheld wireless radios. To reduce the risk of unsafe operation, carefully review and understand all aspects of ...(as always, the user is designed to facilitate the use of Garmin is to some degree. When it receives and also sends out radio frequency (RF) signals. Virtually all GPS equipment. Use the Rino 120 at a reasonable cost. For safety, always resolve any NAVAID can...
... adopted RF exposure guidelines with Rino® 120 Owner's Manual 111 Although the Garmin Rino 120 is a low power radio transmitter and receiver. Those guidelines are consistent with safety levels for handheld wireless radios. To reduce the risk of unsafe operation, carefully review and understand all aspects of ...(as always, the user is designed to facilitate the use of Garmin is to some degree. When it receives and also sends out radio frequency (RF) signals. Virtually all GPS equipment. Use the Rino 120 at a reasonable cost. For safety, always resolve any NAVAID can...

Owner's Manual
Page 118
... For example, over 130 scientists, engineers, and physicians from your device to minimize the potential for this information. 112 Rino® 120 Owner's Manual Use of other personal medical device, consult the manufacturer of your wireless radio. Unauthorized antennas, modifi...a minimum separation of six inches (6") be shielded against the RF signals from universities, government health agencies, and industry reviewed the available body of research to avoid potential interference with your hearing aid manufacturer to suspect that interference is adequately shielded...
... For example, over 130 scientists, engineers, and physicians from your device to minimize the potential for this information. 112 Rino® 120 Owner's Manual Use of other personal medical device, consult the manufacturer of your wireless radio. Unauthorized antennas, modifi...a minimum separation of six inches (6") be shielded against the RF signals from universities, government health agencies, and industry reviewed the available body of research to avoid potential interference with your hearing aid manufacturer to suspect that interference is adequately shielded...

Owner's Manual
Page 121
... Line of Sight 97 Lock Buttons/Keys 5, 39 On Road 30 LORAN TD Format 74 M Main Display Pages 4 Main Menu 36 Rino® 120 Owner's Manual MapSource 1, 24, 52, 57, 78 Map Data 31, 52, 94 Map Detail 30 Map Page 24 Options 26 ... Contact 20 New Location 70, 71 NMEA 0183 105 North Heading 30 North Up 30, 70, 71 Note 55, 80 O Operating the Rino 5 Option Menu 5 Orientation 30 P Page Sequence Setup 38 Pan Map 26, 27 PC 94, 105 PC Interface Cable 94 Peer-to... Repeater Channels 11, 16 Reposition Here 45, 46 Reset 35, 84 Restore Defaults 26, 35 Reverse Route 58 Review Route 59 Ring Tone 17 Roger Tone 17 115
... Line of Sight 97 Lock Buttons/Keys 5, 39 On Road 30 LORAN TD Format 74 M Main Display Pages 4 Main Menu 36 Rino® 120 Owner's Manual MapSource 1, 24, 52, 57, 78 Map Data 31, 52, 94 Map Detail 30 Map Page 24 Options 26 ... Contact 20 New Location 70, 71 NMEA 0183 105 North Heading 30 North Up 30, 70, 71 Note 55, 80 O Operating the Rino 5 Option Menu 5 Orientation 30 P Page Sequence Setup 38 Pan Map 26, 27 PC 94, 105 PC Interface Cable 94 Peer-to... Repeater Channels 11, 16 Reposition Here 45, 46 Reset 35, 84 Restore Defaults 26, 35 Reverse Route 58 Review Route 59 Ring Tone 17 Roger Tone 17 115
Owner's Manual
Page 122
... VOX 15 W WAAS 69, 79 Waterproof 1, 91 Waypoint 40, 41 Create 40, 41 Delete 43 Edit 42 Move 43 Project 42 Z Zoom 25, 30 Rino® 120 Owner's Manual INDEX Routes 57 Copy 59 Create 57 Data Fields 63 Delete 59 Edit 58 Navigate 62 Remove waypoints 58 Restore defaults 59 Reverse... 58 Review 59 S Satellite Fix 8 Satellite Information 8 Satellite Page 67 GPS Off 69 New Location 70 North Up 70 Options 70 Track Up 70 Save as...
... VOX 15 W WAAS 69, 79 Waterproof 1, 91 Waypoint 40, 41 Create 40, 41 Delete 43 Edit 42 Move 43 Project 42 Z Zoom 25, 30 Rino® 120 Owner's Manual INDEX Routes 57 Copy 59 Create 57 Data Fields 63 Delete 59 Edit 58 Navigate 62 Remove waypoints 58 Restore defaults 59 Reverse... 58 Review 59 S Satellite Fix 8 Satellite Information 8 Satellite Page 67 GPS Off 69 New Location 70 North Up 70 Options 70 Track Up 70 Save as...

Quick Start Guide
Page 1
... Stick In. Send Location The location is created and New Contact Page shown on a direct course toward your Rino 120's features. Peer-to display the Waypoint Review page. 4. Your Rino 120 automatically sends out its location. Other Rino users monitoring the same channel and squelch code receive this page and begin navigation. Polling a Location If you...
... Stick In. Send Location The location is created and New Contact Page shown on a direct course toward your Rino 120's features. Peer-to display the Waypoint Review page. 4. Your Rino 120 automatically sends out its location. Other Rino users monitoring the same channel and squelch code receive this page and begin navigation. Polling a Location If you...
