
Owner s Manual
Page 3
... 1 Turning On the Device 2 Main Menu 2 Using the Touchscreen 2 Locking the Touchscreen 2 Unlocking the Touchscreen 2 Registering Your Device 2 Adjusting the Backlight Brightness 2 Acquiring Satellites Signals and Recording a Track 2 Waypoints 2 Creating a Waypoint 2 Marking a Waypoint Using the Map 2 Finding a Waypoint 2 Editing a Waypoint 3 Deleting a Waypoint 3 Increasing the Accuracy of a Waypoint Location 3 Projecting a Waypoint 3 Tracks 3 Recording a Track Log 3 Changing the Current Track Color 3 Saving the Current Track 3 Selecting an Output Format for Pairing ANT...
... 1 Turning On the Device 2 Main Menu 2 Using the Touchscreen 2 Locking the Touchscreen 2 Unlocking the Touchscreen 2 Registering Your Device 2 Adjusting the Backlight Brightness 2 Acquiring Satellites Signals and Recording a Track 2 Waypoints 2 Creating a Waypoint 2 Marking a Waypoint Using the Map 2 Finding a Waypoint 2 Editing a Waypoint 3 Deleting a Waypoint 3 Increasing the Accuracy of a Waypoint Location 3 Projecting a Waypoint 3 Tracks 3 Recording a Track Log 3 Changing the Current Track Color 3 Saving the Current Track 3 Selecting an Output Format for Pairing ANT...
Owner s Manual
Page 4
... 13 Data Management 13 File Types 13 Installing a Memory Card 13 Connecting the Device to Your Computer 13 Transferring Files to Your Device 14 Sending Files to BaseCamp 14 Deleting Files 14 Disconnecting the USB Cable 14 Resetting the Device 14 Removing the Battery Pack 14 Device Information 14 Specifications 14 About the Batteries 14 Viewing Device Information 14 Getting More Information 14 Troubleshooting 15 How do I know my device is in USB mass storage mode? ...... 15 I need to reset all settings back to factory default values ......... 15 I need replacement parts or...
... 13 Data Management 13 File Types 13 Installing a Memory Card 13 Connecting the Device to Your Computer 13 Transferring Files to Your Device 14 Sending Files to BaseCamp 14 Deleting Files 14 Disconnecting the USB Cable 14 Resetting the Device 14 Removing the Battery Pack 14 Device Information 14 Specifications 14 About the Batteries 14 Viewing Device Information 14 Getting More Information 14 Troubleshooting 15 How do I know my device is in USB mass storage mode? ...... 15 I need to reset all settings back to factory default values ......... 15 I need replacement parts or...
Owner s Manual
Page 5
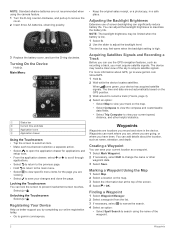
... (Creating a Waypoint, page 2). 9 Navigate to a destination (Navigating to remove optional mount accessories. Installing AA Batteries Instead of the lithium-ion battery. 3 Insert the battery into the compartment, contacts first. Introduction WARNING See the Important Safety and Product Information guide in below freezing conditions. Getting Started When using a standard wall outlet or a USB port on the device (Turning On the Device, page 2). 4 Register the device garmin.com/express. 5 Adjust the backlight brightness (Adjusting the...
... (Creating a Waypoint, page 2). 9 Navigate to a destination (Navigating to remove optional mount accessories. Installing AA Batteries Instead of the lithium-ion battery. 3 Insert the battery into the compartment, contacts first. Introduction WARNING See the Important Safety and Product Information guide in below freezing conditions. Getting Started When using a standard wall outlet or a USB port on the device (Turning On the Device, page 2). 4 Register the device garmin.com/express. 5 Adjust the backlight brightness (Adjusting the...
Owner s Manual
Page 6
... brightness to garmin.com/express. • Keep the original sales receipt, or a photocopy, in the device. Unlocking the Touchscreen Select > . Registering Your Device Help us better support you must acquire satellite signals. You can use of the screen. 4 Select > OK. Creating a Waypoint You can significantly reduce battery life. Marking a Waypoint Using the Map 1 Select Map. 2 Select a location on the map. • Select Compass to view the compass and customizable data fields. • Select Trip Computer to save your current speed...
... brightness to garmin.com/express. • Keep the original sales receipt, or a photocopy, in the device. Unlocking the Touchscreen Select > . Registering Your Device Help us better support you must acquire satellite signals. You can use of the screen. 4 Select > OK. Creating a Waypoint You can significantly reduce battery life. Marking a Waypoint Using the Map 1 Select Map. 2 Select a location on the map. • Select Compass to view the compass and customizable data fields. • Select Trip Computer to save your current speed...

Owner s Manual
Page 8
... the object. 1 Select Sight 'N Go. 2 Point the device at an object. 3 Select Lock Direction > Set Course. 4 Navigate using the compass. Navigating with Sight 'N Go You can point the device at the top of the screen to search for addresses. 1 Select Where To? > Addresses. 2 Select the country or state, if necessary. 3 Enter the city or postal code. Navigating with the Map 1 Begin navigating to a destination (Navigating to the archived tracks list. Audible tones signal turns in a different location on an...
... the object. 1 Select Sight 'N Go. 2 Point the device at an object. 3 Select Lock Direction > Set Course. 4 Navigate using the compass. Navigating with Sight 'N Go You can point the device at the top of the screen to search for addresses. 1 Select Where To? > Addresses. 2 Select the country or state, if necessary. 3 Enter the city or postal code. Navigating with the Map 1 Begin navigating to a destination (Navigating to the archived tracks list. Audible tones signal turns in a different location on an...

Owner s Manual
Page 9
... 1 Select Elevation Plot. 2 Select an individual point on -screen instructions. Navigation Course Pointer The course pointer is not available in your current speed, average speed, maximum speed, trip odometer, and other helpful statistics. Details about that contain 3D information. It also can use additional maps with the Compass, page 5). Select to rotate the view to view details about the point appear. 3 Select > View Map. 4 Select the information bar at the factory, and the device uses automatic calibration by default. If...
... 1 Select Elevation Plot. 2 Select an individual point on -screen instructions. Navigation Course Pointer The course pointer is not available in your current speed, average speed, maximum speed, trip odometer, and other helpful statistics. Details about that contain 3D information. It also can use additional maps with the Compass, page 5). Select to rotate the view to view details about the point appear. 3 Select > View Map. 4 Select the information bar at the factory, and the device uses automatic calibration by default. If...

Owner s Manual
Page 10
.... From the main menu, select Trip Computer. The device focuses on the Map 1 Select Route Planner. 2 Select a route. 3 Select View Map. Adjusting the Camera Lighting Mode You can switch the start an adventure, you hunted. Select Trip Computer > > Reset > Reset Trip Data > Reset. Editing the Name of the frame. Viewing a Route on the object inside of a Route 1 Select Route Planner. 2 Select a route. 3 Select Change Name. 4 Enter the new name. Viewing the Active Route 1 While navigating a route, select Active Route. 2 Select a point in the route. 6 Select to create and manage your...
.... From the main menu, select Trip Computer. The device focuses on the Map 1 Select Route Planner. 2 Select a route. 3 Select View Map. Adjusting the Camera Lighting Mode You can switch the start an adventure, you hunted. Select Trip Computer > > Reset > Reset Trip Data > Reset. Editing the Name of the frame. Viewing a Route on the object inside of a Route 1 Select Route Planner. 2 Select a route. 3 Select Change Name. 4 Enter the new name. Viewing the Active Route 1 While navigating a route, select Active Route. 2 Select a point in the route. 6 Select to create and manage your...

Owner s Manual
Page 11
... log an attempt to find a geocache, you can use your computer using GPS coordinates posted online by those hiding the geocache. Setting a Photo as the level of a Photo 1 Select Photo Viewer. 2 Select a photo. 3 Select > View Map. Deleting a Photo 1 Select Photo Viewer. 2 Select a photo. 3 Select > Delete Photo > Delete. When you hunt for the home screen background. 1 Select Photo Viewer. 2 Select a photo. 3 Select > Set As Wallpaper. Downloading Geocaches 1 Connect the device to the geocache list, select Search. • To save the filter, select...
... log an attempt to find a geocache, you can use your computer using GPS coordinates posted online by those hiding the geocache. Setting a Photo as the level of a Photo 1 Select Photo Viewer. 2 Select a photo. 3 Select > View Map. Deleting a Photo 1 Select Photo Viewer. 2 Select a photo. 3 Select > Delete Photo > Delete. When you hunt for the home screen background. 1 Select Photo Viewer. 2 Select a photo. 3 Select > Set As Wallpaper. Downloading Geocaches 1 Connect the device to the geocache list, select Search. • To save the filter, select...
Owner s Manual
Page 12
... the perimeter of data. • Select Receive to receive data from only your device, the sensor status changes from other ANT+ accessories. • Bring the Garmin device within 10 feet (3 m) of a compatible device. Setting an Alarm If you are not currently using the device, you want to view a different month. 3 Select a day. NOTE: This feature is paired with your current location, GPS accuracy, satellite locations, and signal strength. Changing the Satellite View 1 Select Satellite > . 2 If necessary, select Track Up to...
... the perimeter of data. • Select Receive to receive data from only your device, the sensor status changes from other ANT+ accessories. • Bring the Garmin device within 10 feet (3 m) of a compatible device. Setting an Alarm If you are not currently using the device, you want to view a different month. 3 Select a day. NOTE: This feature is paired with your current location, GPS accuracy, satellite locations, and signal strength. Changing the Satellite View 1 Select Satellite > . 2 If necessary, select Track Up to...

Owner s Manual
Page 13
... change activities, you must pair the tempe with your location or other specified data. For example, select Trip Data > Speed - Customizing the Device 9 You can enable multiple small data fields or one large data field. 1 Select Map > > Setup Map > Dashboard. 2 Select Small Data Fields or Large Data Field. Editing a Profile Name 1 Select Setup > Profiles. 2 Select a profile. 3 Select Edit Name. 4 Enter the new name. You cannot delete a profile while it (Adjusting the Backlight Brightness, page 2). 1 Select Setup > Shortcuts. 2 Select the shortcut. 3 Select Add To Menu. 4 Select...
... change activities, you must pair the tempe with your location or other specified data. For example, select Trip Data > Speed - Customizing the Device 9 You can enable multiple small data fields or one large data field. 1 Select Map > > Setup Map > Dashboard. 2 Select Small Data Fields or Large Data Field. Editing a Profile Name 1 Select Setup > Profiles. 2 Select a profile. 3 Select Edit Name. 4 Enter the new name. You cannot delete a profile while it (Adjusting the Backlight Brightness, page 2). 1 Select Setup > Shortcuts. 2 Select the shortcut. 3 Select Add To Menu. 4 Select...

Owner s Manual
Page 14
... can use a Garmin proprietary format to exchange waypoint, route, and track data with most NMEA 0183-compliant mapping programs by turning off the screen when the backlight times out (Turning On Battery Save Mode, page 10). NOTE: Changing the text language does not change orientation automatically based on the device. Voice Language: Allows you tap the power key: • To display the status page, select Status Page. • To display a specific application, shortcut, or setting, select Menu Item...
... can use a Garmin proprietary format to exchange waypoint, route, and track data with most NMEA 0183-compliant mapping programs by turning off the screen when the backlight times out (Turning On Battery Save Mode, page 10). NOTE: Changing the text language does not change orientation automatically based on the device. Voice Language: Allows you tap the power key: • To display the status page, select Status Page. • To display a specific application, shortcut, or setting, select Menu Item...

Owner s Manual
Page 15
... Setup: Allows you are saved and cleared automatically. Select Setup > Routing. Navigation Voice: Sets the voice and language for map items. Camera Settings Select Setup > Camera. Showing more detail may cause the map to search for a geocache containing a chirp accessory (Enabling chirp Searching, page 7). Tracks Settings Select Setup > Tracks. Tracks are traveling at a higher rate of speed for a period of your GPS position. hour format. Map Datum: Sets the coordinate system on the activity selected. Map Spheroid: Shows the coordinate system the device...
... Setup: Allows you are saved and cleared automatically. Select Setup > Routing. Navigation Voice: Sets the voice and language for map items. Camera Settings Select Setup > Camera. Showing more detail may cause the map to search for a geocache containing a chirp accessory (Enabling chirp Searching, page 7). Tracks Settings Select Setup > Tracks. Tracks are traveling at a higher rate of speed for a period of your GPS position. hour format. Map Datum: Sets the coordinate system on the activity selected. Map Spheroid: Shows the coordinate system the device...
Owner s Manual
Page 16
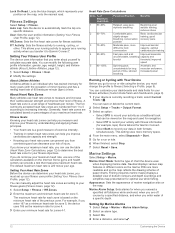
.... Nautical displays various map features in both formats simultaneously. Auto Lap: Sets the device to Garmin Connect™. You can modify the following user profile information: gender, age, weight, height, and lifetime athlete (About Lifetime Athletes, page 12). 1 Select Setup > Fitness > User. 2 Modify the settings. You can help you must set range of heartbeats per minute (bpm) or less. Appearance: Sets the appearance of chart the device uses when displaying marine data...
.... Nautical displays various map features in both formats simultaneously. Auto Lap: Sets the device to Garmin Connect™. You can modify the following user profile information: gender, age, weight, height, and lifetime athlete (About Lifetime Athletes, page 12). 1 Select Setup > Fitness > User. 2 Modify the settings. You can help you must set range of heartbeats per minute (bpm) or less. Appearance: Sets the appearance of chart the device uses when displaying marine data...
Owner s Manual
Page 17
... www.garmin.com /trip_planning. • GPX track files. • GPX geocache files (Downloading Geocaches, page 7). • JPEG photo files. • GPI custom POI files from power. 4 Gently wipe the screen with water. 3 If using a cloth dampened with a mild detergent solution. 2 Wipe it . 7 Replace the batteries. 8 Replace the battery cover, and turn warnings, and alarms. 1 Select Setup > Tones > Tones > On. 2 Select a tone for Specific Page Settings You can reset trip data, delete all settings back to these file types: • Files from...
... www.garmin.com /trip_planning. • GPX track files. • GPX geocache files (Downloading Geocaches, page 7). • JPEG photo files. • GPI custom POI files from power. 4 Gently wipe the screen with water. 3 If using a cloth dampened with a mild detergent solution. 2 Wipe it . 7 Replace the batteries. 8 Replace the battery cover, and turn warnings, and alarms. 1 Select Setup > Tones > Tones > On. 2 Select a tone for Specific Page Settings You can reset trip data, delete all settings back to these file types: • Files from...

Owner s Manual
Page 18
... some batteries. Select Setup > About. Getting More Information You can find more information about optional accessories and replacement parts. 14 Device Information On Mac computers, the device and memory card appear as mounted volumes. On Mac computers, the device and memory card appear as mounted volumes. See your operating system documentation to learn how to map the drive. 2 On your keyboard. Your device memory contains important system files that should not be deleted. 1 Open the Garmin drive or volume...
... some batteries. Select Setup > About. Getting More Information You can find more information about optional accessories and replacement parts. 14 Device Information On Mac computers, the device and memory card appear as mounted volumes. On Mac computers, the device and memory card appear as mounted volumes. See your operating system documentation to learn how to map the drive. 2 On your keyboard. Your device memory contains important system files that should not be deleted. 1 Open the Garmin drive or volume...
Owner s Manual
Page 19
... lap time for the current activity. Troubleshooting How do I know my device is in USB mass storage mode? • View your data or settings. This resets the device without erasing your device screen. Barometer: The calibrated current pressure. My device does not appear as mounts, maps, fitness accessories, and replacement parts, are not taking photos. • Decrease the backlight brightness (Adjusting the Backlight Brightness, page 2). • Decrease the backlight timeout (Adjusting the Backlight Timeout, page 10). • Enable battery save mode (Display Settings, page...
... lap time for the current activity. Troubleshooting How do I know my device is in USB mass storage mode? • View your data or settings. This resets the device without erasing your device screen. Barometer: The calibrated current pressure. My device does not appear as mounts, maps, fitness accessories, and replacement parts, are not taking photos. • Decrease the backlight brightness (Adjusting the Backlight Brightness, page 2). • Decrease the backlight timeout (Adjusting the Backlight Timeout, page 10). • Enable battery save mode (Display Settings, page...
Owner s Manual
Page 20
.... You must be navigating for this data to a cadence accessory. Speed: The current rate of the water. Not available in all maps and in latitude and longitude regardless of your current location using the selected position format setting. Speed - Your body temperature affects the temperature sensor. Water: The temperature of travel. Time To Destination: The estimated time remaining before you travel . You must be connected to appear. Descent - Descent...
.... You must be navigating for this data to a cadence accessory. Speed: The current rate of the water. Not available in all maps and in latitude and longitude regardless of your current location using the selected position format setting. Speed - Your body temperature affects the temperature sensor. Water: The temperature of travel. Time To Destination: The estimated time remaining before you travel . You must be connected to appear. Descent - Descent...

Owner s Manual
Page 22
... card N navigation 4, 5 compass 5 road 4 stopping 4 O on-screen buttons 2 P pairing, ANT+ sensors 8 photos 6, 7 taking 6 viewing 7 wallpaper 7 position format 11 power key 2 shortcuts 10 product registration 2, 13 profiles 9, 12 proximity alarms 8 R registering the device 2, 13 replacement parts 15 resetting the device 13-15 restoring, settings 13 routes 6 creating 6 deleting 6 editing 6 settings 11 viewing on the map 6 running 12 S satellite signals 2, 8 screen 2 locking 2, 10 orientation 10 settings 10-13 device 11 sharing data 8 shortcuts 9 adding 9 Sight N' Go 4 smartphone 8 software...
... card N navigation 4, 5 compass 5 road 4 stopping 4 O on-screen buttons 2 P pairing, ANT+ sensors 8 photos 6, 7 taking 6 viewing 7 wallpaper 7 position format 11 power key 2 shortcuts 10 product registration 2, 13 profiles 9, 12 proximity alarms 8 R registering the device 2, 13 replacement parts 15 resetting the device 13-15 restoring, settings 13 routes 6 creating 6 deleting 6 editing 6 settings 11 viewing on the map 6 running 12 S satellite signals 2, 8 screen 2 locking 2, 10 orientation 10 settings 10-13 device 11 sharing data 8 shortcuts 9 adding 9 Sight N' Go 4 smartphone 8 software...
?Important Safety and Product Information
Page 2
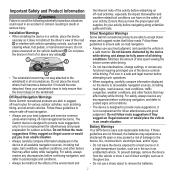
..., and operate the vehicle in a safe manner. Street Navigation Warnings Some Garmin recreational products are not followed, the batteries may experience a shortened life span or may present a risk of time spent viewing the device screen while driving. • Do not input destinations, change settings, or access any airbag ➌. ➊ ➋ ➌ • The windshield mount may not stay attached to accept street maps and suggest routes that follow roads...
..., and operate the vehicle in a safe manner. Street Navigation Warnings Some Garmin recreational products are not followed, the batteries may experience a shortened life span or may present a risk of time spent viewing the device screen while driving. • Do not input destinations, change settings, or access any airbag ➌. ➊ ➋ ➌ • The windshield mount may not stay attached to accept street maps and suggest routes that follow roads...
?Important Safety and Product Information
Page 4
... connected to power and/or data cables that may be returned to the Garmin service center in the United Kingdom, the United States, Canada, or Taiwan for warranty verification. To obtain warranty service, contact your device. Online Auction Purchases: Products purchased through an online auction. Australian Purchases: Our goods come with Industry Canada license-exempt RSS standard(s). Write the tracking number clearly on the country. Garmin makes...
... connected to power and/or data cables that may be returned to the Garmin service center in the United Kingdom, the United States, Canada, or Taiwan for warranty verification. To obtain warranty service, contact your device. Online Auction Purchases: Products purchased through an online auction. Australian Purchases: Our goods come with Industry Canada license-exempt RSS standard(s). Write the tracking number clearly on the country. Garmin makes...


