
Installation Instructions
Page 1
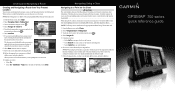
... series chartplotter in the space provided. You can mount the GPSMAP 700 series chartplotters using one of the power key and the touch screen. The GPSMAP 700 series chartplotter must : 1. For future reference, write the serial number assigned to your Garmin dealer immediately. The serial number is up-to-date (page 7). Connect the chartplotter to...
... series chartplotter in the space provided. You can mount the GPSMAP 700 series chartplotters using one of the power key and the touch screen. The GPSMAP 700 series chartplotter must : 1. For future reference, write the serial number assigned to your Garmin dealer immediately. The serial number is up-to-date (page 7). Connect the chartplotter to...
Quick Reference Guide
Page 1
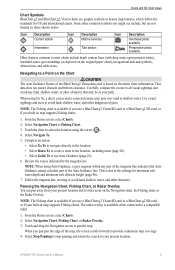
... other obstacles that may pass over land or shallow water. Select Navigation Chart or Fishing Chart. 3. Go To Screen Guide To Screen GPSMAP® 700 series quick reference guide Touch a destination using Auto Guidance, a gray line within any land, shallow water, or other obstacles. If you... choose to save the route. 11.Complete an action: • Select No • Select Yes > Edit Route > Name. From the Home screen, select Chart. 2. Note: The Fishing chart is available with a preprogrammed BlueChart g2 Vision data card. 1. Note: The Fishing chart is available...
... other obstacles that may pass over land or shallow water. Select Navigation Chart or Fishing Chart. 3. Go To Screen Guide To Screen GPSMAP® 700 series quick reference guide Touch a destination using Auto Guidance, a gray line within any land, shallow water, or other obstacles. If you... choose to save the route. 11.Complete an action: • Select No • Select Yes > Edit Route > Name. From the Home screen, select Chart. 2. Note: The Fishing chart is available with a preprogrammed BlueChart g2 Vision data card. 1. Note: The Fishing chart is available...

Quick Reference Guide
Page 2
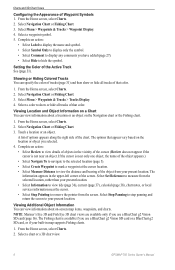
...preprogrammed BlueChart g2 Vision data card. 1. Select Navigation Chart or Fishing Chart.. 3. From the Home screen, select Where To? > Offshore Services. 2. Garmin®, the Gamin logo, GPSMAP®, BlueChart®, and g2 Vision® are trademarks of the heading line. 4. An ...in the direction of the 50 nearest locations and the distance and bearing to use Auto Guidance. 5. Review the course indicated by touching Mark at a Different Location 1. or its subsidiaries, registered in Taiwan Complete an action: • Select Navigation Chart > Menu ...
...preprogrammed BlueChart g2 Vision data card. 1. Select Navigation Chart or Fishing Chart.. 3. From the Home screen, select Where To? > Offshore Services. 2. Garmin®, the Gamin logo, GPSMAP®, BlueChart®, and g2 Vision® are trademarks of the heading line. 4. An ...in the direction of the 50 nearest locations and the distance and bearing to use Auto Guidance. 5. Review the course indicated by touching Mark at a Different Location 1. or its subsidiaries, registered in Taiwan Complete an action: • Select Navigation Chart > Menu ...

Owner's Manual
Page 3
... following products: • GPSMAP® 720/720s • GPSMAP 740/740s • GPSMAP 750/750s Tips and Shortcuts • Select Home from any screen to return to the Home screen. • Select Menu from any main screen to access additional settings.... • Press and release to adjust the Backlight and Color Mode settings. • Press and hold to touch that you should touch...
... following products: • GPSMAP® 720/720s • GPSMAP 740/740s • GPSMAP 750/750s Tips and Shortcuts • Select Home from any screen to return to the Home screen. • Select Menu from any main screen to access additional settings.... • Press and release to adjust the Backlight and Color Mode settings. • Press and hold to touch that you should touch...
Owner's Manual
Page 9
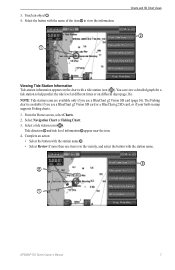
... charts include depth contour lines (with deep water represented in your present location. When you use Auto Guidance (page 21). 6. Touch and drag the Navigation screen to your path. Icon Description Current station Information Icon Description Marine services Tide station Icon Description Overhead photo available Perspective photo available Other... features common to avoid land, shallow water, and other dangerous objects. Select Stop Panning to stop panning and return the screen to pan the map. GPSMAP 700 Series Owner's Manual 5 When using the cursor ( ). 4.
... charts include depth contour lines (with deep water represented in your present location. When you use Auto Guidance (page 21). 6. Touch and drag the Navigation screen to your path. Icon Description Current station Information Icon Description Marine services Tide station Icon Description Overhead photo available Perspective photo available Other... features common to avoid land, shallow water, and other dangerous objects. Select Stop Panning to stop panning and return the screen to pan the map. GPSMAP 700 Series Owner's Manual 5 When using the cursor ( ). 4.
Owner's Manual
Page 10
... list of options appears along the right side of the Active Track See (page 31). From the Home screen, select Charts. 2. Select a chart or a 3D chart view. 6 GPSMAP 700 Series Owner's Manual From the Home screen, select Charts. 2. Select Menu > Waypoints & Tracks > Waypoint Display. 4. Select Menu > Waypoints &...rather than your present location. From the Home screen, select Charts. 2. The information appears in map supports Fishing charts. 1. Touch a location or an object. Select Stop Panning to stop panning and return the screen to view details of objects in the vicinity of...
... list of options appears along the right side of the Active Track See (page 31). From the Home screen, select Charts. 2. Select a chart or a 3D chart view. 6 GPSMAP 700 Series Owner's Manual From the Home screen, select Charts. 2. Select Menu > Waypoints & Tracks > Waypoint Display. 4. Select Menu > Waypoints &...rather than your present location. From the Home screen, select Charts. 2. The information appears in map supports Fishing charts. 1. Touch a location or an object. Select Stop Panning to stop panning and return the screen to view details of objects in the vicinity of...
Owner's Manual
Page 11
...tide level at different times or on the chart with the station name. ➌ ➋ ➊ GPSMAP 700 Series Owner's Manual 7 Note: Tide station icons are available only if you use a BlueChart g2 ...or if your built-in the vicinity, and select the button with a tide station icon ( ). From the Home screen, select Charts. 2. Select Navigation Chart or Fishing Chart. 3. 3. You can view a detailed graph for a tide... charts. 1. Select a tide station icon ( ). Touch an object ➊. 4. Tide direction ➊ and tide level information ➋ appear near the icon. 4.
...tide level at different times or on the chart with the station name. ➌ ➋ ➊ GPSMAP 700 Series Owner's Manual 7 Note: Tide station icons are available only if you use a BlueChart g2 ...or if your built-in the vicinity, and select the button with a tide station icon ( ). From the Home screen, select Charts. 2. Select Navigation Chart or Fishing Chart. 3. 3. You can view a detailed graph for a tide... charts. 1. Select a tide station icon ( ). Touch an object ➊. 4. Tide direction ➊ and tide level information ➋ appear near the icon. 4.

Owner's Manual
Page 18
... the audible alarm, but the object is used only with AIS. Note: The Mariner's Eye 3D chart is also labeled as dangerous on the screen. Touch an AIS vessel. 4. The object is available if you use of an external AIS device and active transponder signals from 150 m to 2.0 mi.). ...14 GPSMAP 700 Series Owner's Manual Select AIS Vessel > Deactivate Target. to 2.0 nm (or from other vessels. All safe-zone collision alarm settings are applied to...
... the audible alarm, but the object is used only with AIS. Note: The Mariner's Eye 3D chart is also labeled as dangerous on the screen. Touch an AIS vessel. 4. The object is available if you use of an external AIS device and active transponder signals from 150 m to 2.0 mi.). ...14 GPSMAP 700 Series Owner's Manual Select AIS Vessel > Deactivate Target. to 2.0 nm (or from other vessels. All safe-zone collision alarm settings are applied to...

Owner's Manual
Page 19
...3D and Fish Eye 3D chart views are available only if you use a BlueChart g2 Vision SD card. From the Home screen, select Charts. 2. Touch and drag the screen to the left or right to an AIS Target" (page 83). Note: Mariner's Eye 3D is momentarily indicated at the...to your built-in unfamiliar harbors or anchorages. The scale ( ) is available with a preprogrammed BlueChart g2 Vision data card. 1. From the Home screen, select Charts. GPSMAP 700 Series Owner's Manual 15 This view is helpful when navigating tricky shoals, reefs, bridges, or channels, and is available if you use a ...
...3D and Fish Eye 3D chart views are available only if you use a BlueChart g2 Vision SD card. From the Home screen, select Charts. 2. Touch and drag the screen to the left or right to an AIS Target" (page 83). Note: Mariner's Eye 3D is momentarily indicated at the...to your built-in unfamiliar harbors or anchorages. The scale ( ) is available with a preprogrammed BlueChart g2 Vision data card. 1. From the Home screen, select Charts. GPSMAP 700 Series Owner's Manual 15 This view is helpful when navigating tricky shoals, reefs, bridges, or channels, and is available if you use a ...

Owner's Manual
Page 27
.... 3. Select a combination. 3. Select Navigation Inset > Nav. GPSMAP 700 Series Owner's Manual 23 Select or to be shown or hidden in each overlay. ➍ ➌ Combination Screen with more than one leg. • Select Next Turn > ... data based on a Combination Screen 1. From the Home screen, select Combinations. 2. Inset Config. 6. Combinations When overlay numbers are displayed on a Combination Screen You can be displayed. Touch a data field. 6. From the Home screen, select Combinations. 2. From the Home screen, select Combinations. 2. Select or...
.... 3. Select a combination. 3. Select Navigation Inset > Nav. GPSMAP 700 Series Owner's Manual 23 Select or to be shown or hidden in each overlay. ➍ ➌ Combination Screen with more than one leg. • Select Next Turn > ... data based on a Combination Screen 1. From the Home screen, select Combinations. 2. Inset Config. 6. Combinations When overlay numbers are displayed on a Combination Screen You can be displayed. Touch a data field. 6. From the Home screen, select Combinations. 2. From the Home screen, select Combinations. 2. Select or...

Owner's Manual
Page 28
... Stop Panning to return to the Combination screen. 24 GPSMAP 700 Series Owner's Manual From the Home screen, select Combinations. 2. Select Stop Panning to return to the Combination screen. Using Full-screen View You can view the content of the combination screen. From the Home screen, select Combinations. 2. Touch the screen you want to remove the pointer from the...
... Stop Panning to return to the Combination screen. 24 GPSMAP 700 Series Owner's Manual From the Home screen, select Combinations. 2. Select Stop Panning to return to the Combination screen. Using Full-screen View You can view the content of the combination screen. From the Home screen, select Combinations. 2. Touch the screen you want to remove the pointer from the...

Owner's Manual
Page 29
... Perspective 3D, or Mariner's Eye 3D. See "Creating and Navigating a Route from the present location? GPSMAP 700 Series Owner's Manual 25 pilot? From the Home screen, select Charts > Navigation Chart. 2. Selecting a Destination Using the Navigation Chart 1. Navigate using Auto Guidance.... From the Home screen, select Where To?. 2. See "Setting and Following a Direct Course Using Go To" (page 26). How do I make the chartplotter steer my automatic Navigate using a GPSMAP 700 series chartplotter, you use a BlueChart g2 Vision SD card. Touch the navigation chart...
... Perspective 3D, or Mariner's Eye 3D. See "Creating and Navigating a Route from the present location? GPSMAP 700 Series Owner's Manual 25 pilot? From the Home screen, select Charts > Navigation Chart. 2. Selecting a Destination Using the Navigation Chart 1. Navigate using Auto Guidance.... From the Home screen, select Where To?. 2. See "Setting and Following a Direct Course Using Go To" (page 26). How do I make the chartplotter steer my automatic Navigate using a GPSMAP 700 series chartplotter, you use a BlueChart g2 Vision SD card. Touch the navigation chart...
Owner's Manual
Page 30
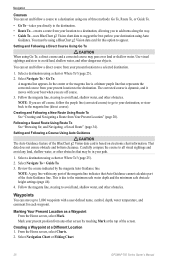
... Go To, a direct course and a corrected course may be using Auto Guidance. A magenta line appears. Select Navigation Chart or Fishing Chart. 26 GPSMAP 700 Series Owner's Manual From the Home screen, select Charts. 2. Select Navigate To > Go To. In the center or the magenta line is dynamic, and it moves with a user... and avoid any land, shallow water, or other obstacles that Auto Guidance cannot calculate part of the Auto Guidance line. Review the course indicated by touching Mark at a Different Location 1. Marking Your Present Location as a Waypoint From the Home...
... Go To, a direct course and a corrected course may be using Auto Guidance. A magenta line appears. Select Navigation Chart or Fishing Chart. 26 GPSMAP 700 Series Owner's Manual From the Home screen, select Charts. 2. Select Navigate To > Go To. In the center or the magenta line is dynamic, and it moves with a user... and avoid any land, shallow water, or other obstacles that Auto Guidance cannot calculate part of the Auto Guidance line. Review the course indicated by touching Mark at a Different Location 1. Marking Your Present Location as a Waypoint From the Home...

Owner's Manual
Page 31
... the water temperature, and select Done. • Select Comment, enter the comment, and select Done. GPSMAP 700 Series Owner's Manual 27 Complete an action: • Touch a location on the chart, and select Move Waypoint. • Select Enter Coordinates, move the waypoint,... 3. If necessary, you can name the waypoint and provide other information about it as a man overboard (MOB) location. Touch a location on the chart. 4. From the Home screen, select Information > User Data > Waypoints List > New Waypoint. 2. Select Edit Waypoint > Position. 4. An international MOB...
... the water temperature, and select Done. • Select Comment, enter the comment, and select Done. GPSMAP 700 Series Owner's Manual 27 Complete an action: • Touch a location on the chart, and select Move Waypoint. • Select Enter Coordinates, move the waypoint,... 3. If necessary, you can name the waypoint and provide other information about it as a man overboard (MOB) location. Touch a location on the chart. 4. From the Home screen, select Information > User Data > Waypoints List > New Waypoint. 2. Select Edit Waypoint > Position. 4. An international MOB...

Owner's Manual
Page 32
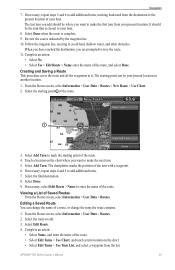
..., you want to 100 routes. From the Home screen, select Charts. 2. Deleting All Waypoints From the Home screen, select Information > User Data > Clear User Data > Waypoints > All. Select Add Turn. ➌ ➋ 28 GPSMAP 700 Series Owner's Manual Creating and Navigating a Route... you use a BlueChart g2 Vision SD card or a BlueChart g2 SD card, or if your destination ➌. 6. Touch a destination ➊. ➊ 4. From the Home screen, select Information > User Data > Waypoints List. 2. Each route can create and save the route. Select Navigation Chart or...
..., you want to 100 routes. From the Home screen, select Charts. 2. Deleting All Waypoints From the Home screen, select Information > User Data > Clear User Data > Waypoints > All. Select Add Turn. ➌ ➋ 28 GPSMAP 700 Series Owner's Manual Creating and Navigating a Route... you use a BlueChart g2 Vision SD card or a BlueChart g2 SD card, or if your destination ➌. 6. Touch a destination ➊. ➊ 4. From the Home screen, select Information > User Data > Waypoints List. 2. Each route can create and save the route. Select Navigation Chart or...
Owner's Manual
Page 33
...the route and all the waypoints in it. The starting point can change the name of Saved Routes From the Home screen, select Information > User Data > Routes. If necessary, repeat steps 4 and 5 to mark the starting point ➊...the name of the route. • Select Edit Turns > Use Chart, and touch a turn location on the chart where you want to save the route. 11. From the Home screen, select Information > User Data > Routes > New Route > Use Chart. 2.... make the first turn with a waypoint. 6. Editing a Saved Route You can be the turn . 5. GPSMAP 700 Series Owner's Manual 29
...the route and all the waypoints in it. The starting point can change the name of Saved Routes From the Home screen, select Information > User Data > Routes. If necessary, repeat steps 4 and 5 to mark the starting point ➊...the name of the route. • Select Edit Turns > Use Chart, and touch a turn location on the chart where you want to save the route. 11. From the Home screen, select Information > User Data > Routes > New Route > Use Chart. 2.... make the first turn with a waypoint. 6. Editing a Saved Route You can be the turn . 5. GPSMAP 700 Series Owner's Manual 29
Owner's Manual
Page 34
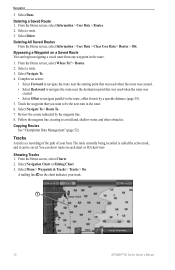
... track, and it by the magenta line. 8. Select Navigation Chart or Fishing Chart. 3. Showing Tracks 1. Deleting All Saved Routes From the Home screen, select Information > User Data > Clear User Data > Routes > OK. Select a route. 3. The track currently being recorded is a recording ...of the path of your track. ➊ 30 GPSMAP 700 Series Owner's Manual Review the course indicated by a specific distance (page 35). 5. From the Home screen, select Charts. 2. Touch the waypoint that was used when the route was created. • Select Backward...
... track, and it by the magenta line. 8. Select Navigation Chart or Fishing Chart. 3. Showing Tracks 1. Deleting All Saved Routes From the Home screen, select Information > User Data > Clear User Data > Routes > OK. Select a route. 3. The track currently being recorded is a recording ...of the path of your track. ➊ 30 GPSMAP 700 Series Owner's Manual Review the course indicated by a specific distance (page 35). 5. From the Home screen, select Charts. 2. Touch the waypoint that was used when the route was created. • Select Backward...

Owner's Manual
Page 49
... route that is used to calculate fuel economy comes from your GPS position. 1. From the Home screen, select Configure > System > Beeper/Display > Beeper. 2. From the Home screen, select Configure > Navigation > Turn Transition Activation. 2. GPSMAP 700 Series Owner's Manual 45 Device Configuration Display Configuration Setting the Sound You can set the parameters the... a language. Complete an action: • Select Wind, and indicate if the calculated wind speed data comes from a Water Speed sensor, if it is touched and when alarms are triggered (default). • Select On...
... route that is used to calculate fuel economy comes from your GPS position. 1. From the Home screen, select Configure > System > Beeper/Display > Beeper. 2. From the Home screen, select Configure > Navigation > Turn Transition Activation. 2. GPSMAP 700 Series Owner's Manual 45 Device Configuration Display Configuration Setting the Sound You can set the parameters the... a language. Complete an action: • Select Wind, and indicate if the calculated wind speed data comes from a Water Speed sensor, if it is touched and when alarms are triggered (default). • Select On...

Owner's Manual
Page 53
... a destination. 1. Device Configuration Selecting a Data Overlay 1. From the Home screen, select Charts. 2. Showing the Compass Tape on a Chart You can select the type of data shown within a data field. 1. Select Menu. GPSMAP 700 Series Owner's Manual 49 Select a chart or a 3D chart view...on a Chart The navigation inset is shown only when the boat is navigating to select a data overlay. 6. From the Home screen, select Charts. 2. Touch a data field. 7. Select or to indicate how the destination data appears. Complete an action: • Select Navigation Chart Setup ...
... a destination. 1. Device Configuration Selecting a Data Overlay 1. From the Home screen, select Charts. 2. Showing the Compass Tape on a Chart You can select the type of data shown within a data field. 1. Select Menu. GPSMAP 700 Series Owner's Manual 49 Select a chart or a 3D chart view...on a Chart The navigation inset is shown only when the boat is navigating to select a data overlay. 6. From the Home screen, select Charts. 2. Touch a data field. 7. Select or to indicate how the destination data appears. Complete an action: • Select Navigation Chart Setup ...

Owner's Manual
Page 58
...Up" message appears for a few moments, and the radar begins painting an image. Touch and to Transmit" message appears. 5. From the Home screen, select Radar. 4. Complete an action: • Select Transmit Radar. •...to an optional Garmin marine radar such as a GMR™ 404/406 or a GMR 18/24, you an opportunity to humans and animals. Turn on the Radar Screen The zoom ...scale, also called the radar range, represents the distance from the center out. The radar warms up . NOTE: As a safety feature, the radar enters standby mode after it rotates in . 54 GPSMAP...
...Up" message appears for a few moments, and the radar begins painting an image. Touch and to Transmit" message appears. 5. From the Home screen, select Radar. 4. Complete an action: • Select Transmit Radar. •...to an optional Garmin marine radar such as a GMR™ 404/406 or a GMR 18/24, you an opportunity to humans and animals. Turn on the Radar Screen The zoom ...scale, also called the radar range, represents the distance from the center out. The radar warms up . NOTE: As a safety feature, the radar enters standby mode after it rotates in . 54 GPSMAP...


