
Owner's Manual
Page 3
...This manual uses the term Caution to configure your Garmin dealer immediately. INTRODUCTION Thank you for more information. See the CANet accessory installation instructions for choosing the Garmin® GPSMAP® 392/398/492/498. If any question about the Main Menu and ...portable GPS receiver. If you with the packing list on using waypoints. i GPSMAP 392/398/492/498 Owner's Manual INTRODUCTION > ABOUT THIS MANUAL The Basic Operation section provides you have any pieces are missing, contact your unit. The Introduction section contains the Table of Garmin GPS ...
...This manual uses the term Caution to configure your Garmin dealer immediately. INTRODUCTION Thank you for more information. See the CANet accessory installation instructions for choosing the Garmin® GPSMAP® 392/398/492/498. If any question about the Main Menu and ...portable GPS receiver. If you with the packing list on using waypoints. i GPSMAP 392/398/492/498 Owner's Manual INTRODUCTION > ABOUT THIS MANUAL The Basic Operation section provides you have any pieces are missing, contact your unit. The Introduction section contains the Table of Garmin GPS ...
Owner's Manual
Page 4
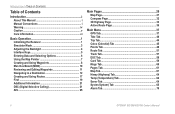
...Table of Contents Introduction i About This Manual i Manual Conventions i Warning iv Caution v Care Information vi Basic Operation 1 Initializing the Receiver 1 Simulator Mode 3 Adjusting the Backlight 4 Interface Keys 5 Entering Data and Selecting Options 6 Using the Map Pointer 7 Creating and ...Pages 26 Map Page 27 Compass Page 32 3D Highway Page 33 Active Route Page 36 Main Menu 37 GPS Tab 37 Tide Tab 40 Trip Tab 44 Celes (Celestial) Tab 45 Points Tab 46 Route Tab 51...) Tab 64 Sonar Tab 64 Systm (System) Tab 65 Alarm Tab 70 ii GPSMAP 392/398/492/498 Owner's Manual
...Table of Contents Introduction i About This Manual i Manual Conventions i Warning iv Caution v Care Information vi Basic Operation 1 Initializing the Receiver 1 Simulator Mode 3 Adjusting the Backlight 4 Interface Keys 5 Entering Data and Selecting Options 6 Using the Map Pointer 7 Creating and ...Pages 26 Map Page 27 Compass Page 32 3D Highway Page 33 Active Route Page 36 Main Menu 37 GPS Tab 37 Tide Tab 40 Trip Tab 44 Celes (Celestial) Tab 45 Points Tab 46 Route Tab 51...) Tab 64 Sonar Tab 64 Systm (System) Tab 65 Alarm Tab 70 ii GPSMAP 392/398/492/498 Owner's Manual
Owner's Manual
Page 5
... Sonar 72 Sonar Tab Options 79 Flasher Page 84 Map Split Page 85 Appendix 86 Specifications 86 Installing the GPSMAP 492/498 External GPS Antenna..... 87 Mounting the GPSMAP 392/398/492/498 88 Installing the Transducer 90 Connecting the Power/Data Cable 92 Interfacing 93 Installing and Removing Data Cards 94... System 103 Optional Accessories 105 Software License Agreement 106 Product Registration 106 Limited Warranty 107 FCC Compliance 108 Declaration of Conformity (DoC 108 Index 109 GPSMAP 392/398/492/498 Owner's Manual iii
... Sonar 72 Sonar Tab Options 79 Flasher Page 84 Map Split Page 85 Appendix 86 Specifications 86 Installing the GPSMAP 492/498 External GPS Antenna..... 87 Mounting the GPSMAP 392/398/492/498 88 Installing the Transducer 90 Connecting the Power/Data Cable 92 Interfacing 93 Installing and Removing Data Cards 94... System 103 Optional Accessories 105 Software License Agreement 106 Product Registration 106 Limited Warranty 107 FCC Compliance 108 Declaration of Conformity (DoC 108 Index 109 GPSMAP 392/398/492/498 Owner's Manual iii

Owner's Manual
Page 6
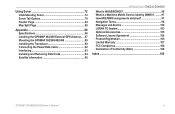
... components contain chemicals known to cause cancer, birth defects, or reproductive harm. iv GPSMAP 392/398/492/498 Owner's Manual This Notice is being provided in death or serious injury. Offi... charts and notices to mariners contain all information needed to all available navigation sources, including information from visual sightings, and maps. Use the electronic chart in the GPSMAP 392/398/492/498 only to ... navigating, carefully compare information displayed on the GPSMAP 392/398/492/498 to navigate safely. INTRODUCTION > WARNINGS Warning Failure to our Web site at http...
... components contain chemicals known to cause cancer, birth defects, or reproductive harm. iv GPSMAP 392/398/492/498 Owner's Manual This Notice is being provided in death or serious injury. Offi... charts and notices to mariners contain all information needed to all available navigation sources, including information from visual sightings, and maps. Use the electronic chart in the GPSMAP 392/398/492/498 only to ... navigating, carefully compare information displayed on the GPSMAP 392/398/492/498 to navigate safely. INTRODUCTION > WARNINGS Warning Failure to our Web site at http...
Owner's Manual
Page 7
... incomplete data to some countries, complete and accurate map information is either not available or is prohibitively expensive. Virtually all GPS equipment, including the GPSMAP 392/398/492/498. For more information on the applicability to us at a reasonable cost. Map Data Information: One of the... 2003 requires the recycling of Garmin is to provide customers with the most complete and accurate cartography that is subject to changes which we identify in injury or property damage. GPSMAP 392/398/492/498 Owner's Manual v Although the GPSMAP 392/398/492/498 is solely responsible ...
... incomplete data to some countries, complete and accurate map information is either not available or is prohibitively expensive. Virtually all GPS equipment, including the GPSMAP 392/398/492/498. For more information on the applicability to us at a reasonable cost. Map Data Information: One of the... 2003 requires the recycling of Garmin is to provide customers with the most complete and accurate cartography that is subject to changes which we identify in injury or property damage. GPSMAP 392/398/492/498 Owner's Manual v Although the GPSMAP 392/398/492/498 is solely responsible ...
Owner's Manual
Page 8
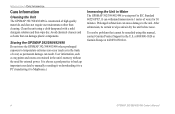
Storing the GPSMAP 392/398/492/498 Do not store the GPSMAP 392/398/492/498 where prolonged exposure to IEC Standard 60529 IPX7. at 800/800-1020 or Garmin Europe at 44/0870-8501241. Avoid chemical cleaners and solvents that cannot be certain to the unit. It is always a good practice to back up ...
Storing the GPSMAP 392/398/492/498 Do not store the GPSMAP 392/398/492/498 where prolonged exposure to IEC Standard 60529 IPX7. at 800/800-1020 or Garmin Europe at 44/0870-8501241. Avoid chemical cleaners and solvents that cannot be certain to the unit. It is always a good practice to back up ...

Owner's Manual
Page 9
... press ENTER to agree and acknowledge the warning. To turn off the GPSMAP 392/398/492/498: 1. GPSMAP 392/398/492/498 Owner's Manual BASIC OPERATION > INITIALIZING THE RECEIVER 3. Before you initialize, make sure the GPSMAP 392/398/492/498 unit and antenna are only asked this the first ... a self-test. 2. When the self-test is blank, release the POWER key. 1 The GPS Information Page appears as the receiver begins acquiring satellites. To ensure proper initialization, the GPSMAP 392/398/492/498 is shown after the unit gets a position fix, or you press ENTER to start...
... press ENTER to agree and acknowledge the warning. To turn off the GPSMAP 392/398/492/498: 1. GPSMAP 392/398/492/498 Owner's Manual BASIC OPERATION > INITIALIZING THE RECEIVER 3. Before you initialize, make sure the GPSMAP 392/398/492/498 unit and antenna are only asked this the first ... a self-test. 2. When the self-test is blank, release the POWER key. 1 The GPS Information Page appears as the receiver begins acquiring satellites. To ensure proper initialization, the GPSMAP 392/398/492/498 is shown after the unit gets a position fix, or you press ENTER to start...
Owner's Manual
Page 10
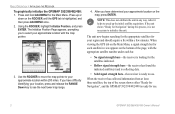
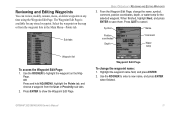
... Page appears, prompting you have determined your approximate location on the ROCKER until the GPS tab is ready for your location, press and release the RANGE Down key to use . 2 GPSMAP 392/398/492/498 Owner's Manual After you have difficulty identifying your region and .... Using the ROCKER, highlight Initialize Position, and press ENTER. If you to initialize the unit. BASIC OPERATION > INITIALIZING THE RECEIVER To graphically initialize the GPSMAP 392/398/492/498: 1. NOTE: This does not calibrate the unit in view appears on the bottom of the screen shows either ...
... Page appears, prompting you have determined your approximate location on the ROCKER until the GPS tab is ready for your location, press and release the RANGE Down key to use . 2 GPSMAP 392/398/492/498 Owner's Manual After you have difficulty identifying your region and .... Using the ROCKER, highlight Initialize Position, and press ENTER. If you to initialize the unit. BASIC OPERATION > INITIALIZING THE RECEIVER To graphically initialize the GPSMAP 392/398/492/498: 1. NOTE: This does not calibrate the unit in view appears on the bottom of the screen shows either ...

Owner's Manual
Page 11
...each of the screen. Keep in Simulator Mode. Press QUIT to Simulator Mode, the GPS receiver is retained in Simulator Mode is turned off. GPSMAP 392/398/492/498 Owner's Manual 3 Simulator Mode Simulator Mode turns the GPS receiver off Simulator Mode, press ADJ/MENU, and select Stop Simulator. Use the ROCKER ... ADJ/MENU to highlight the GPS tab, and then press ADJ/MENU once. 2. All the waypoint and route planning completed in memory for actual navigation. When the unit is set to confirm the Running Simulator message that the GPSMAP 392/398/492/498 does not track ...
...each of the screen. Keep in Simulator Mode. Press QUIT to Simulator Mode, the GPS receiver is retained in Simulator Mode is turned off. GPSMAP 392/398/492/498 Owner's Manual 3 Simulator Mode Simulator Mode turns the GPS receiver off Simulator Mode, press ADJ/MENU, and select Stop Simulator. Use the ROCKER ... ADJ/MENU to highlight the GPS tab, and then press ADJ/MENU once. 2. All the waypoint and route planning completed in memory for actual navigation. When the unit is set to confirm the Running Simulator message that the GPSMAP 392/398/492/498 does not track ...
Owner's Manual
Page 12
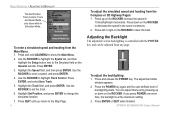
... Map Page. 4 To adjust the simulated speed and heading from the Main Menu: 1. The adjustment slider window appears. 2. Press and release the POWER key. GPSMAP 392/398/492/498 Owner's Manual To enter a simulated speed and heading from the Compass or 3D Highway Pages: 1. Adjusting the Backlight The adjustable screen backlighting is...
... Map Page. 4 To adjust the simulated speed and heading from the Main Menu: 1. The adjustment slider window appears. 2. Press and release the POWER key. GPSMAP 392/398/492/498 Owner's Manual To enter a simulated speed and heading from the Compass or 3D Highway Pages: 1. Adjusting the Backlight The adjustable screen backlighting is...
Owner's Manual
Page 13
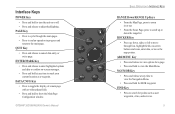
... to turn the unit on -screen messages. • Press and hold at any time to mark your current location as user waypoints, cities, and services. 5 GPSMAP 392/398/492/498 Owner's Manual ��� ���� ��� ��� ���� ���...
... to turn the unit on -screen messages. • Press and hold at any time to mark your current location as user waypoints, cities, and services. 5 GPSMAP 392/398/492/498 Owner's Manual ��� ���� ��� ��� ���� ���...

Owner's Manual
Page 14
... selections. BASIC OPERATION > ENTERING DATA AND SELECTING OPTIONS Entering Data and Selecting Options You can select and start options, and enter data to customize the GPSMAP 392/398/492/498 to start your requirements. To select an option requires movement of optional features that page. On-screen buttons...
... selections. BASIC OPERATION > ENTERING DATA AND SELECTING OPTIONS Entering Data and Selecting Options You can select and start options, and enter data to customize the GPSMAP 392/398/492/498 to start your requirements. To select an option requires movement of optional features that page. On-screen buttons...
Owner's Manual
Page 15
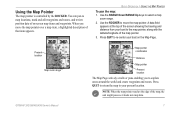
... the map pointer, along with the latitude/longitude of the screen showing the bearing and distance from your boat to re-center your present location. GPSMAP 392/398/492/498 Owner's Manual 7 Using the Map Pointer The map pointer is controlled by the ROCKER. Use the ROCKER to your boat on -screen...
... the map pointer, along with the latitude/longitude of the screen showing the bearing and distance from your boat to re-center your present location. GPSMAP 392/398/492/498 Owner's Manual 7 Using the Map Pointer The map pointer is controlled by the ROCKER. Use the ROCKER to your boat on -screen...
Owner's Manual
Page 16
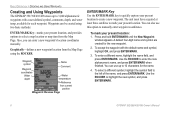
..., depth, and water temp, available for the new waypoint. 2. Use the ROCKER to highlight the new symbol, and press ENTER/MARK. 8 GPSMAP 392/398/492/498 Owner's Manual To select a different symbol, highlight the symbol field to 3,000 alphanumeric waypoints with the default name and symbol..., highlight OK, and press ENTER/MARK. 3. BASIC OPERATION > CREATING AND USING WAYPOINTS Creating and Using Waypoints The GPSMAP 392/398/492/498 stores up to 10 characters for the name. 4. To mark your present location, and provides options to select a map location...
..., depth, and water temp, available for the new waypoint. 2. Use the ROCKER to highlight the new symbol, and press ENTER/MARK. 8 GPSMAP 392/398/492/498 Owner's Manual To select a different symbol, highlight the symbol field to 3,000 alphanumeric waypoints with the default name and symbol..., highlight OK, and press ENTER/MARK. 3. BASIC OPERATION > CREATING AND USING WAYPOINTS Creating and Using Waypoints The GPSMAP 392/398/492/498 stores up to 10 characters for the name. 4. To mark your present location, and provides options to select a map location...
Owner's Manual
Page 17
... press ENTER/MARK when finished. 6. If you are not using a map item to create a waypoint, go to enter a value, and press ENTER/MARK. 6. GPSMAP 392/398/492/498 Owner's Manual 9 Use the ROCKER to create the new waypoint at an on-screen map item, highlight the map item on the screen...
... press ENTER/MARK when finished. 6. If you are not using a map item to create a waypoint, go to enter a value, and press ENTER/MARK. 6. GPSMAP 392/398/492/498 Owner's Manual 9 Use the ROCKER to create the new waypoint at an on-screen map item, highlight the map item on the screen...
Owner's Manual
Page 18
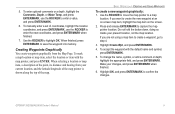
The MOB function allows you back to that point. GPSMAP 392/398/492/498 Owner's Manual The MOB waypoint is on an active navigation to the MOB point. To stop navigation to a location. BASIC OPERATION > MAN OVERBOARD (...
The MOB function allows you back to that point. GPSMAP 392/398/492/498 Owner's Manual The MOB waypoint is on an active navigation to the MOB point. To stop navigation to a location. BASIC OPERATION > MAN OVERBOARD (...
Owner's Manual
Page 19
... Edit Page. Use the ROCKER to cancel. Use the ROCKER to highlight the waypoint on the map or from the User or Proximity sub tabs. 2. GPSMAP 392/398/492/498 Owner's Manual 11 Press QUIT to enter a new name, and press ENTER when finished. Reviewing and Editing Waypoints You can review...
... Edit Page. Use the ROCKER to cancel. Use the ROCKER to highlight the waypoint on the map or from the User or Proximity sub tabs. 2. GPSMAP 392/398/492/498 Owner's Manual 11 Press QUIT to enter a new name, and press ENTER when finished. Reviewing and Editing Waypoints You can review...
Owner's Manual
Page 20
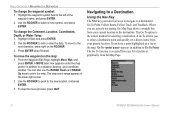
... ROCKER to point to edit or enter the data. When you are actively navigating, the Map Page shows a straight line from the Map Page. 12 GPSMAP 392/398/492/498 Owner's Manual The Go To option is accessed from any list of the waypoint name, and press ENTER. 2. A Go To allows you...
... ROCKER to point to edit or enter the data. When you are actively navigating, the Map Page shows a straight line from the Map Page. 12 GPSMAP 392/398/492/498 Owner's Manual The Go To option is accessed from any list of the waypoint name, and press ENTER. 2. A Go To allows you...

Owner's Manual
Page 80
... applications. You can transmit a narrow or a wide beam. Using Dual Beam Dual beam works best for shallow water (for the GPSMAP 398/498 when used with a transducer and the GPSMAP 392/492 when used with a GSD 22, GSD 21, GSD 20 and tranducer. These objects could be fish, branches, ... the same power. USING SONAR > SONAR PAGE USING SONAR This section covers the additional sonar options for example, inland) applications. The transducer receives the sound wave information and then sends the information to the GSD 22, GSD 21, GSD 20 sounder module 72 and then to properly ...
... applications. You can transmit a narrow or a wide beam. Using Dual Beam Dual beam works best for shallow water (for the GPSMAP 398/498 when used with a transducer and the GPSMAP 392/492 when used with a GSD 22, GSD 21, GSD 20 and tranducer. These objects could be fish, branches, ... the same power. USING SONAR > SONAR PAGE USING SONAR This section covers the additional sonar options for example, inland) applications. The transducer receives the sound wave information and then sends the information to the GSD 22, GSD 21, GSD 20 sounder module 72 and then to properly ...

Owner's Manual
Page 98
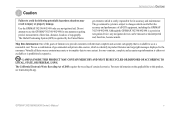
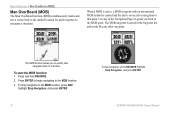
...mount transducer is critical to the operation of both wide and narrow cone angles. The transducer transmits sound waves toward the bottom in the GPSMAP 398 (with transducer) package. Wide cone angle Narrow cone angle Dead zone fish not seen X X A wide cone angle transducer works best ...64257;sh cannot be seen. A narrow cone angle transducer is included in the GPSMAP 498 (with improved bottom resolution and a smaller dead zone. This transducer provides good all-around performance. 90 GPSMAP 392/398/492/498 Owner's Manual The wide cone angle provides a large coverage area, but...
...mount transducer is critical to the operation of both wide and narrow cone angles. The transducer transmits sound waves toward the bottom in the GPSMAP 398 (with transducer) package. Wide cone angle Narrow cone angle Dead zone fish not seen X X A wide cone angle transducer works best ...64257;sh cannot be seen. A narrow cone angle transducer is included in the GPSMAP 498 (with improved bottom resolution and a smaller dead zone. This transducer provides good all-around performance. 90 GPSMAP 392/398/492/498 Owner's Manual The wide cone angle provides a large coverage area, but...


