
Installation Instructions
Page 1
...Garmin Marine Network compatible devices, such as a VHF radio with DSC (Page 6). • Connect the chartplotter to an external alarm (Page 8). • Connect the chartplotter to a video input source (Page 8). • Connect the chartplotter to an external video monitor (Page 8). • Connect the chartplotter to flush mount the chartplotter. Bail Mounting the GPSMAP...Choose mounting hardware that fits the holes in Taiwan GPSMAP® 3000 Series Installation Instructions The GPSMAP 3000 series chartplotter and GPS antenna must be properly installed according to the GPS antenna ...
...Garmin Marine Network compatible devices, such as a VHF radio with DSC (Page 6). • Connect the chartplotter to an external alarm (Page 8). • Connect the chartplotter to a video input source (Page 8). • Connect the chartplotter to an external video monitor (Page 8). • Connect the chartplotter to flush mount the chartplotter. Bail Mounting the GPSMAP...Choose mounting hardware that fits the holes in Taiwan GPSMAP® 3000 Series Installation Instructions The GPSMAP 3000 series chartplotter and GPS antenna must be properly installed according to the GPS antenna ...

Installation Instructions
Page 2
... a template, mark the location of the template to flush mount the chartplotter. 2. To install the GPSMAP 3000 series chartplotter on which you mount the chartplotter has at which you want to flush mount your mounting hardware. 3. Bail mount Flush Mounting the GPSMAP 3000 Series Chartplotter Use the included flush-mount template and hardware to mount the chartplotter. 3. Be sure to leave at which you...
... a template, mark the location of the template to flush mount the chartplotter. 2. To install the GPSMAP 3000 series chartplotter on which you mount the chartplotter has at which you want to flush mount your mounting hardware. 3. Bail mount Flush Mounting the GPSMAP 3000 Series Chartplotter Use the included flush-mount template and hardware to mount the chartplotter. 3. Be sure to leave at which you...
Installation Instructions
Page 3
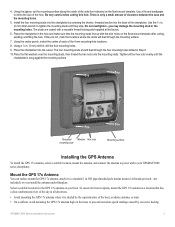
... and the mounting holes. 5. OD pipe-threaded-pole marine mount (14 threads-per-inch-not included), or even install the antenna under fiberglass. Select a suitable location for the GPS 17x antenna on the flush-mount template after ...flush-mount template. Mount the GPS 17x Antenna You can surface mount the GPS 17x antenna, attach it is only a small amount of the hole. Use a file and sandpaper to your boat. The studs are coated with the pilot holes on your GPSMAP 3000 series chartplotter. There is shaded by the superstructure of the 4 mm mounting-hole locations. 8. GPSMAP...
... and the mounting holes. 5. OD pipe-threaded-pole marine mount (14 threads-per-inch-not included), or even install the antenna under fiberglass. Select a suitable location for the GPS 17x antenna on the flush-mount template after ...flush-mount template. Mount the GPS 17x Antenna You can surface mount the GPS 17x antenna, attach it is only a small amount of the hole. Use a file and sandpaper to your boat. The studs are coated with the pilot holes on your GPSMAP 3000 series chartplotter. There is shaded by the superstructure of the 4 mm mounting-hole locations. 8. GPSMAP...

Flush Mount Template
Page 1
... cut out of clearance between the case molding and the mounting holes. 6. Use a .05" Allen wrench to begin cutting the mounting surface. 5. Place washers over the mounting studs, then thread on one in place. 5.91" (150 mm) Garmin International 1200 E. 151st Street, Olathe, KS 66062 190... the case. F April 2006 Printed in the preferred location. 2. To flush mount the GPSMAP 2006/2006C/2106/2206/3006C/3206: 1. Using an 1/8" (3 mm) drill bit, drill the four mounting holes. (Drilling the mounting holes before cutting the hole for the unit allows for an easier installation.)...
... cut out of clearance between the case molding and the mounting holes. 6. Use a .05" Allen wrench to begin cutting the mounting surface. 5. Place washers over the mounting studs, then thread on one in place. 5.91" (150 mm) Garmin International 1200 E. 151st Street, Olathe, KS 66062 190... the case. F April 2006 Printed in the preferred location. 2. To flush mount the GPSMAP 2006/2006C/2106/2206/3006C/3206: 1. Using an 1/8" (3 mm) drill bit, drill the four mounting holes. (Drilling the mounting holes before cutting the hole for the unit allows for an easier installation.)...

Flush Mount Template
Page 2
.... 8. Using the center punch, indent the center of clearance between the unit and the mounting hole. Begin cutting here. To flush mount the GPSMAP 2010/2010C/2110/2210/3010C/3210: 1. Using an 1/8" (3 mm) drill bit, drill the four mounting holes. (Drilling the mounting holes before cutting the hole for the unit allows for an easier installation.) 4. Tighten...
.... 8. Using the center punch, indent the center of clearance between the unit and the mounting hole. Begin cutting here. To flush mount the GPSMAP 2010/2010C/2110/2210/3010C/3210: 1. Using an 1/8" (3 mm) drill bit, drill the four mounting holes. (Drilling the mounting holes before cutting the hole for the unit allows for an easier installation.) 4. Tighten...


