
FlightBook Quick Start Guide
Page 4
... Data window, enter the correct information for instance: • Specifying the Total Time: hr, with the data input, click OK and then click File and Save As to the online help of departure or arrival • Aircraft Model or ID • Single engine, land (SEL) or multiple engine, land (MEL) flight time • Night or daylight time • Distance • Max altitude and Max speed...
... Data window, enter the correct information for instance: • Specifying the Total Time: hr, with the data input, click OK and then click File and Save As to the online help of departure or arrival • Aircraft Model or ID • Single engine, land (SEL) or multiple engine, land (MEL) flight time • Night or daylight time • Distance • Max altitude and Max speed...

Pilot's Guide
Page 4
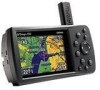
... This Manual i Warning iv Caution v Care Information vi Getting Started 1 Unit Overview 1 Charging the GPSMAP 296 2 Turning On the GPSMAP 296 3 Getting Satellite Signals 4 Learning About the Keypad 7 Using the GPSMAP 296 8 Simulator Mode 11 Basic Operation In Aviation Mode 13 Aviation Mode Page Sequence 13 Creating a Direct To 14 Finding a Nearby Point 17 Selecting an Approach 22 Finding Points on Land 24 Marking a Waypoint 25 Creating a Flight Plan (Route 26 Following your Flight Plan 27 Aviation Mode Pages 28 Map Page 28...
... This Manual i Warning iv Caution v Care Information vi Getting Started 1 Unit Overview 1 Charging the GPSMAP 296 2 Turning On the GPSMAP 296 3 Getting Satellite Signals 4 Learning About the Keypad 7 Using the GPSMAP 296 8 Simulator Mode 11 Basic Operation In Aviation Mode 13 Aviation Mode Page Sequence 13 Creating a Direct To 14 Finding a Nearby Point 17 Selecting an Approach 22 Finding Points on Land 24 Marking a Waypoint 25 Creating a Flight Plan (Route 26 Following your Flight Plan 27 Aviation Mode Pages 28 Map Page 28...
Pilot's Guide
Page 6
.... Do not mount in a safe and legal manner before continuing navigation. Do not become distracted by the GPSMAP 296 while driving, and always be fully aware of all information needed to replace, the use of lithium-ion batteries. Minimize the amount of time spent viewing the screen of the unit's controls while driving. When navigating, carefully compare information shown on the GPSMAP 296 to our Web...
.... Do not mount in a safe and legal manner before continuing navigation. Do not become distracted by the GPSMAP 296 while driving, and always be fully aware of all information needed to replace, the use of lithium-ion batteries. Minimize the amount of time spent viewing the screen of the unit's controls while driving. When navigating, carefully compare information shown on the GPSMAP 296 to our Web...
Pilot's Guide
Page 8
... plastic components. Immersing the Unit in the U.S.A. at 800/800.1020 or Garmin Europe at 44/0870.8501241. Clean the unit using this guide, contact Garmin Product Support in Water The GPSMAP 296 is always a good practice to back up important user data by manually recording it or downloading it to a PC (transferring it to the unit. INTRODUCTION > CARE INFORMATION Care Information To resolve problems that may result. After...
... plastic components. Immersing the Unit in the U.S.A. at 800/800.1020 or Garmin Europe at 44/0870.8501241. Clean the unit using this guide, contact Garmin Product Support in Water The GPSMAP 296 is always a good practice to back up important user data by manually recording it or downloading it to a PC (transferring it to the unit. INTRODUCTION > CARE INFORMATION Care Information To resolve problems that may result. After...
Pilot's Guide
Page 12
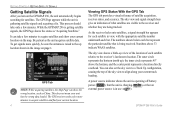
... GPS tab provides a visual reference of the sky view to acquire satellites and find your current location on the map. As the receiver locks onto satellites, a signal strength bar appears for satellites. A power source indicator shows the unit is operating off battery power ( ), that the unit is charging ( ), or that is being tracked. It can also set the sky view to a Track Up configuration, causing the top of satellite acquisition, receiver status, and accuracy...
... GPS tab provides a visual reference of the sky view to acquire satellites and find your current location on the map. As the receiver locks onto satellites, a signal strength bar appears for satellites. A power source indicator shows the unit is operating off battery power ( ), that the unit is charging ( ), or that is being tracked. It can also set the sky view to a Track Up configuration, causing the top of satellite acquisition, receiver status, and accuracy...

Pilot's Guide
Page 34
... you want to select an aviation point. You need to continue adding waypoints. 7. Or, highlight the first blank line, and press ENTER. 5. Use the ROCKER to use at a later time. To navigate a saved route: 1. Press MENU to "Creating Routes" beginning on page 56 and "Editing and Managing Routes" beginning on page 69. 26 GPSMAP 296 Pilot's Guide For more information, refer to show the options menu. You can also create a flight plan...
... you want to select an aviation point. You need to continue adding waypoints. 7. Or, highlight the first blank line, and press ENTER. 5. Use the ROCKER to use at a later time. To navigate a saved route: 1. Press MENU to "Creating Routes" beginning on page 56 and "Editing and Managing Routes" beginning on page 69. 26 GPSMAP 296 Pilot's Guide For more information, refer to show the options menu. You can also create a flight plan...
Pilot's Guide
Page 36
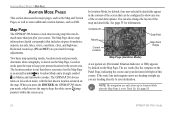
... provided for information. Compass Arc Airports Current Location Data Field Map Zoom Range Map Page (Aviation Mode) A navigation arc (Horizontal Situation Indicator, or HSI) appears by default, four user-selectable data fields appear in the screen area. Map Page The GPSMAP 296 features a real-time moving map that shows your course. Location mode pans the map to Track Up. The GPSMAP 296 always turns on in Marine and Automotive modes. The location marker (icon) that can also change the layout of this course. AVIATION MODE PAGES > MAP PAGE AVIATION MODE PAGES...
... provided for information. Compass Arc Airports Current Location Data Field Map Zoom Range Map Page (Aviation Mode) A navigation arc (Horizontal Situation Indicator, or HSI) appears by default, four user-selectable data fields appear in the screen area. Map Page The GPSMAP 296 features a real-time moving map that shows your course. Location mode pans the map to Track Up. The GPSMAP 296 always turns on in Marine and Automotive modes. The location marker (icon) that can also change the layout of this course. AVIATION MODE PAGES > MAP PAGE AVIATION MODE PAGES...

Pilot's Guide
Page 66
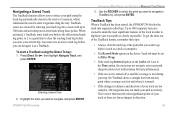
... holding ENTER/MARK. New Waypoint Page 2. To change any information on the Main Menu. Marking Your Present Location The ENTER/MARK key lets you quickly capture your present location: 1. A default four-digit name and symbol are locations or landmarks you record and store in the unit. To accept the waypoint with a user-defined icon, category, comment, altitude, depth, and temperature available for the new waypoint. To mark your present location to quickly mark your GPSMAP 296. Press and hold ENTER/MARK...
... holding ENTER/MARK. New Waypoint Page 2. To change any information on the Main Menu. Marking Your Present Location The ENTER/MARK key lets you quickly capture your present location: 1. A default four-digit name and symbol are locations or landmarks you record and store in the unit. To accept the waypoint with a user-defined icon, category, comment, altitude, depth, and temperature available for the new waypoint. To mark your present location to quickly mark your GPSMAP 296. Press and hold ENTER/MARK...

Pilot's Guide
Page 72
... ROCKER, the GPSMAP 296 enters pan mode, which moves the map to show any one of the screen shows the GPS status or the route leg. Change the page layout and data fields to change the map range. The location marker (icon) that can also add additional data fields to measure the distance between two objects on the Map Page is zoomed in to avoid, such as routes and points. The...
... ROCKER, the GPSMAP 296 enters pan mode, which moves the map to show any one of the screen shows the GPS status or the route leg. Change the page layout and data fields to change the map range. The location marker (icon) that can also add additional data fields to measure the distance between two objects on the Map Page is zoomed in to avoid, such as routes and points. The...

Pilot's Guide
Page 77
... select Manual, you can also set the route leg transition (or waypoint transition). Highlight a route, and press MENU to open the Main Menu. 2. Press MENU twice to open the options menu. You can start routing you to the next point on one easy-to the next waypoint while navigating a route. Press MENU. AUTOMOTIVE MODE PAGES AND FEATURES > EDITING AND MANAGING ROUTES Using the Route Options The Route tab in memory, along with a descriptive name for each route. GPSMAP 296 Pilot's Guide...
... select Manual, you can also set the route leg transition (or waypoint transition). Highlight a route, and press MENU to open the Main Menu. 2. Press MENU twice to open the options menu. You can start routing you to the next point on one easy-to the next waypoint while navigating a route. Press MENU. AUTOMOTIVE MODE PAGES AND FEATURES > EDITING AND MANAGING ROUTES Using the Route Options The Route tab in memory, along with a descriptive name for each route. GPSMAP 296 Pilot's Guide...

Pilot's Guide
Page 79
... MODE PAGES AND FEATURES > EDITING AND MANAGING ROUTES To add points to select Route. 2. Use ROCKER to the route: 1. Use ROCKER to the route. Highlight Insert Waypoint, and press ENTER. This allows you can edit any of the route, and press ENTER. 3. Route Review Page 4. On the point review page, choose Next (highlight the next point on the route list), Show Map (show the point on page 73). GPSMAP 296 Pilot's Guide 71 If the route point is a user waypoint, you to the route. 5. Press MENU...
... MODE PAGES AND FEATURES > EDITING AND MANAGING ROUTES To add points to select Route. 2. Use ROCKER to the route: 1. Use ROCKER to the route. Highlight Insert Waypoint, and press ENTER. This allows you can edit any of the route, and press ENTER. 3. Route Review Page 4. On the point review page, choose Next (highlight the next point on the route list), Show Map (show the point on page 73). GPSMAP 296 Pilot's Guide 71 If the route point is a user waypoint, you to the route. 5. Press MENU...

Pilot's Guide
Page 81
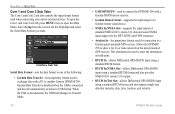
... MANAGING WAYPOINTS Editing and Managing Waypoints When you have created and stored a waypoint, you can edit and manage the waypoint. These pages provide virtually the same information. Use ROCKER to access the Waypoint Page so you can modify, review, rename, move, or delete it is located on a map feature or MapSource or BlueChart feature, the Waypoint Review Page can include additional tabs containing information about the other map features. Waypoint Review Page GPSMAP 296 Pilot's Guide...
... MANAGING WAYPOINTS Editing and Managing Waypoints When you have created and stored a waypoint, you can edit and manage the waypoint. These pages provide virtually the same information. Use ROCKER to access the Waypoint Page so you can modify, review, rename, move, or delete it is located on a map feature or MapSource or BlueChart feature, the Waypoint Review Page can include additional tabs containing information about the other map features. Waypoint Review Page GPSMAP 296 Pilot's Guide...

Pilot's Guide
Page 82
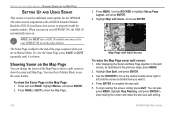
... change the waypoint symbol or other element: 1. Use the ROCKER to view the waypoint on the Map Page and exits the Waypoint Page. 74 GPSMAP 296 Pilot's Guide The Waypoint list appears with an information window at the top that waypoint. Press ENTER to edit that shows the waypoint name, location and distance and bearing from your current location. Use the ROCKER to the highlighted waypoint on the map and measure distance. From the Waypoint Page, highlight Show Map. 2. Press ENTER. Point...
... change the waypoint symbol or other element: 1. Use the ROCKER to view the waypoint on the Map Page and exits the Waypoint Page. 74 GPSMAP 296 Pilot's Guide The Waypoint list appears with an information window at the top that waypoint. Press ENTER to edit that shows the waypoint name, location and distance and bearing from your current location. Use the ROCKER to the highlighted waypoint on the map and measure distance. From the Waypoint Page, highlight Show Map. 2. Press ENTER. Point...

Pilot's Guide
Page 86
... on the New Waypoint Page.) 2. For more information about creating, editing, and deleting waypoints, refer to assign this waypoint. Select the category you edit waypoints and manage a large number of all user waypoints. User Sub Tab 78 GPSMAP 296 Pilot's Guide Select the category to , and press ENTER. Waypoint Page 3. AUTOMOTIVE MODE PAGES AND FEATURES > EDITING AND MANAGING WAYPOINTS To assign a category to open the Main Menu. 2. Press MENU twice to a waypoint: 1. User Sub Tab The User Points tab shows a master list of waypoints quickly and...
... on the New Waypoint Page.) 2. For more information about creating, editing, and deleting waypoints, refer to assign this waypoint. Select the category you edit waypoints and manage a large number of all user waypoints. User Sub Tab 78 GPSMAP 296 Pilot's Guide Select the category to , and press ENTER. Waypoint Page 3. AUTOMOTIVE MODE PAGES AND FEATURES > EDITING AND MANAGING WAYPOINTS To assign a category to open the Main Menu. 2. Press MENU twice to a waypoint: 1. User Sub Tab The User Points tab shows a master list of waypoints quickly and...
Pilot's Guide
Page 93
... ENTER. Up to 300 temporary turns are created to mark the most significant points of your track so there are fewer changes in direction. 85 Navigating a Saved Track The TracBack function allows you to retrace your path using the Direct To key: 1. To start your current trip. The receiver then uses the most significant features of the track in distance and direction of the TracBack feature, remember these tips: • Always clear...
... ENTER. Up to 300 temporary turns are created to mark the most significant points of your track so there are fewer changes in direction. 85 Navigating a Saved Track The TracBack function allows you to retrace your path using the Direct To key: 1. To start your current trip. The receiver then uses the most significant features of the track in distance and direction of the TracBack feature, remember these tips: • Always clear...
Pilot's Guide
Page 124
... Garmin GPSMAP 296. GPSMAP 296 Pilot's Guide Garmin Data Transfer is disabled when the USB is disconnected, the USB field changes to Transfer Mode. 116 • GARMIN DGPS-used to connect the GPSMAP 296 with a Garmin DGPS beacon receiver. • Garmin Remote Sonar-supports the input/output of a Garmin remote sonar device. • NMEA In/NMEA Out-supports the input/output of the following: • Garmin Data Transfer-the proprietary format used for the DPT, MTW, and VHW sentences. • Aviation In-the proprietary format used to USB format. Select Setup...
... Garmin GPSMAP 296. GPSMAP 296 Pilot's Guide Garmin Data Transfer is disabled when the USB is disconnected, the USB field changes to Transfer Mode. 116 • GARMIN DGPS-used to connect the GPSMAP 296 with a Garmin DGPS beacon receiver. • Garmin Remote Sonar-supports the input/output of a Garmin remote sonar device. • NMEA In/NMEA Out-supports the input/output of the following: • Garmin Data Transfer-the proprietary format used for the DPT, MTW, and VHW sentences. • Aviation In-the proprietary format used to USB format. Select Setup...
Pilot's Guide
Page 128
... screen and retain the previous split setting. 120 GPSMAP 296 Pilot's Guide Map Page with Sonar, and press ENTER. NOTE: You MUST have a GSD 20 installed and connected to your GPSMAP 296, the GSD 20 automatically turns on the Map Page You can also press MENU, highlight Stop Resizing, and press ENTER to use the sonar feature. Use the ROCKER to show the sonar and Map Page. When you are in Marine Mode...
... screen and retain the previous split setting. 120 GPSMAP 296 Pilot's Guide Map Page with Sonar, and press ENTER. NOTE: You MUST have a GSD 20 installed and connected to your GPSMAP 296, the GSD 20 automatically turns on the Map Page You can also press MENU, highlight Stop Resizing, and press ENTER to use the sonar feature. Use the ROCKER to show the sonar and Map Page. When you are in Marine Mode...

Pilot's Guide
Page 155
... Working-the speed sensor is full and track recording was completed. No DGPS Position-no differential connection data is available, or not enough data is switching to a change in the Shallow Water Alarm. Contact Garmin Product Support to stay on . Steep Turn-approaching a turn track recording on course. Transfer Complete-data transfer was turned off course by the distance set in the active route. Waypoint Memory Full-the unit has stored the maximum number of two proximity waypoints overlap. Route Calculation Error...
... Working-the speed sensor is full and track recording was completed. No DGPS Position-no differential connection data is available, or not enough data is switching to a change in the Shallow Water Alarm. Contact Garmin Product Support to stay on . Steep Turn-approaching a turn track recording on course. Transfer Complete-data transfer was turned off course by the distance set in the active route. Waypoint Memory Full-the unit has stored the maximum number of two proximity waypoints overlap. Route Calculation Error...
Pilot's Guide
Page 159
... encounter a problem with your warranty and may result in any Garmin warranty service station. Garmin will at its sole option repair or replace any components that the customer shall be sent, freight charges prepaid, to any way will be made at no user-serviceable parts. Tel. 44/0870.8501241 Fax 44/0870.8501251 The Garmin GPSMAP 296 has no charge to the customer for parts or labor...
... encounter a problem with your warranty and may result in any Garmin warranty service station. Garmin will at its sole option repair or replace any components that the customer shall be sent, freight charges prepaid, to any way will be made at no user-serviceable parts. Tel. 44/0870.8501241 Fax 44/0870.8501251 The Garmin GPSMAP 296 has no charge to the customer for parts or labor...
Quick Reference Guide
Page 1
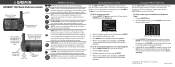
... (as Delete or Show Map. © Copyright 2004, 2005 Garmin Ltd. A course is up , down to open the Find Menu. MENU-press to select menu options, enter data, or move the pointer on -screen buttons to the selected destination. POWER-press and hold to the Nearest Pages. Enter the identifier, facility name, or city. 4. Use the ROCKER to adjust the backlighting and external speaker volume. The corresponding waypoint information page appears...
... (as Delete or Show Map. © Copyright 2004, 2005 Garmin Ltd. A course is up , down to open the Find Menu. MENU-press to select menu options, enter data, or move the pointer on -screen buttons to the selected destination. POWER-press and hold to the Nearest Pages. Enter the identifier, facility name, or city. 4. Use the ROCKER to adjust the backlighting and external speaker volume. The corresponding waypoint information page appears...


