
Owner's Manual
Page 3
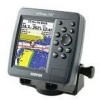
... GPSMAP 292/298, review the installation instructions listed in the Appendix. GPSMAP 292/298 Owner's Manual i The Introduction section contains the Table of Contents as well as using the Find Menu, navigating a route, and using the pages. You can also find warranty and FCC information in the Appendix. This manual is provided at the end of Garmin GPS...
... GPSMAP 292/298, review the installation instructions listed in the Appendix. GPSMAP 292/298 Owner's Manual i The Introduction section contains the Table of Contents as well as using the Find Menu, navigating a route, and using the pages. You can also find warranty and FCC information in the Appendix. This manual is provided at the end of Garmin GPS...

Owner's Manual
Page 7
... to the instructions in the "Appendix." Press and hold the POWER key. 2. When the screen is complete, press ENTER to acknowledge the Warning Page. Before you turn on the GPSMAP 292/298: 1. The page goes away after you press ENTER to agree and acknowledge the warning. GPSMAP 292/298 Owner's Manual 1 To turn on the GPSMAP 292/298...
... to the instructions in the "Appendix." Press and hold the POWER key. 2. When the screen is complete, press ENTER to acknowledge the Warning Page. Before you turn on the GPSMAP 292/298: 1. The page goes away after you press ENTER to agree and acknowledge the warning. GPSMAP 292/298 Owner's Manual 1 To turn on the GPSMAP 292/298...
Owner's Manual
Page 22
...Track navigation, press NAV, highlight Stop Navigation, and press ENTER. 16 GPSMAP 292/298 Owner's Manual Up to Fill or Wrap. • The track log memory must ... as possible. Press NAV, highlight Follow Track, and press ENTER. 2. To save a track, refer to the instructions on the track log setup page to 300 temporary turns (BEGIN, TURN 1, TURN 2, TURN 3,...., TURN X, END...; If the track log interval is set to Resolution. • If the receiver is turned off or satellite coverage is active, the GPSMAP 292/298 takes the track log stored in memory and divides it resumed. •...
...Track navigation, press NAV, highlight Stop Navigation, and press ENTER. 16 GPSMAP 292/298 Owner's Manual Up to Fill or Wrap. • The track log memory must ... as possible. Press NAV, highlight Follow Track, and press ENTER. 2. To save a track, refer to the instructions on the track log setup page to 300 temporary turns (BEGIN, TURN 1, TURN 2, TURN 3,...., TURN X, END...; If the track log interval is set to Resolution. • If the receiver is turned off or satellite coverage is active, the GPSMAP 292/298 takes the track log stored in memory and divides it resumed. •...
Owner's Manual
Page 23
... the data window at the top of the Map Page shows the waypoint/map item name, bearing and distance from the last route waypoint. 5. GPSMAP 292/298 Owner's Manual 17 Use the map pointer to select a map location, and press ENTER. A route line appears on the map to indicate each . Press ... the distance and bearing to the map pointer from your QUICK NAV Route. BASIC OPERATION > ROUTES 4. Follow steps 3, and 4 in the QUICK NAV Route instructions. 5. When finished, press QUIT twice to return to show the Main Menu. 2. Use the ROCKER to highlight the Route tab, and press ADJ...
... the data window at the top of the Map Page shows the waypoint/map item name, bearing and distance from the last route waypoint. 5. GPSMAP 292/298 Owner's Manual 17 Use the map pointer to select a map location, and press ENTER. A route line appears on the map to indicate each . Press ... the distance and bearing to the map pointer from your QUICK NAV Route. BASIC OPERATION > ROUTES 4. Follow steps 3, and 4 in the QUICK NAV Route instructions. 5. When finished, press QUIT twice to return to show the Main Menu. 2. Use the ROCKER to highlight the Route tab, and press ADJ...
Owner's Manual
Page 39
.... As you navigate toward a waypoint, the highway moves-indicating the direction you are off course. GPSMAP 292/298 Owner's Manual 33 MAIN PAGES > 3D HIGHWAY PAGE 3D Highway Page The GPSMAP 292/298's 3D Highway Page provides 3-D graphic steering guidance to a destination waypoint, placing greater emphasis on... situational awareness while navigating. The data window layout can be configured to page 30 for data field configuration instructions. To stay on a moving graphic highway. Each data field can be configured to your waypoint on course, steer...
.... As you navigate toward a waypoint, the highway moves-indicating the direction you are off course. GPSMAP 292/298 Owner's Manual 33 MAIN PAGES > 3D HIGHWAY PAGE 3D Highway Page The GPSMAP 292/298's 3D Highway Page provides 3-D graphic steering guidance to a destination waypoint, placing greater emphasis on... situational awareness while navigating. The data window layout can be configured to page 30 for data field configuration instructions. To stay on a moving graphic highway. Each data field can be configured to your waypoint on course, steer...
Owner's Manual
Page 43
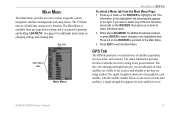
... data. The sky view and signal strength bars give you want to the highlighted item. As the receiver locks onto satellites, a signal strength bar appears for additional instructions on a bar graph for each satellite in the system, and is accessed by function. Press up ...highlight a tab. The status information provides an idea of satellite acquisition, receiver status, and accuracy. The 19 Menu tabs are being tracked. GPSMAP 292/298 Owner's Manual 37 Sub tabs Main Menu tabs Main Menu MAIN MENU > GPS TAB To select a Menu tab from any given moment. The Main...
... data. The sky view and signal strength bars give you want to the highlighted item. As the receiver locks onto satellites, a signal strength bar appears for additional instructions on a bar graph for each satellite in the system, and is accessed by function. Press up ...highlight a tab. The status information provides an idea of satellite acquisition, receiver status, and accuracy. The 19 Menu tabs are being tracked. GPSMAP 292/298 Owner's Manual 37 Sub tabs Main Menu tabs Main Menu MAIN MENU > GPS TAB To select a Menu tab from any given moment. The Main...
Owner's Manual
Page 71
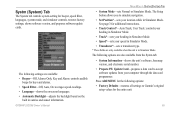
The Setup button allows you to Garmin's original setup values for additional instructions. • Track Control*-Auto Track, User Track: controls your heading in Simulator Mode. • Track*-sets your heading in Simulator Mode. • Speed*-sets your... while in Simulator Mode. See page 3 for the entire unit. 65 The following options are only available when the unit is in Simulator Mode. GPSMAP 292/298 Owner's Manual MAIN MENU > SYSTM (SYSTEM) TAB • System Mode-sets Normal or Simulator Mode. The following options: • Factory Defaults-restores all settings to ...
The Setup button allows you to Garmin's original setup values for additional instructions. • Track Control*-Auto Track, User Track: controls your heading in Simulator Mode. • Track*-sets your heading in Simulator Mode. • Speed*-sets your... while in Simulator Mode. See page 3 for the entire unit. 65 The following options are only available when the unit is in Simulator Mode. GPSMAP 292/298 Owner's Manual MAIN MENU > SYSTM (SYSTEM) TAB • System Mode-sets Normal or Simulator Mode. The following options: • Factory Defaults-restores all settings to ...
Owner's Manual
Page 78
...GPSMAP 292/298 Owner's Manual Sonar Page The Sonar Page is where your GPSMAP 298 to use the sonar features. Thermoclines are shown as colored arches or as fish icons. Typically, the bottom is active). NOTE: You MUST have a GSD 22 or GSD 21 and a transducer installed and connected to your GPSMAP 292.... For more information on understanding sonar and the screen, see page 80. Read the GSD 22 or GSD 21 Installation Instructions to your GPSMAP 292/298 becomes a powerful fishfinder/flasher. The area of strongest sonar return shows as shades of reasonable...
...GPSMAP 292/298 Owner's Manual Sonar Page The Sonar Page is where your GPSMAP 298 to use the sonar features. Thermoclines are shown as colored arches or as fish icons. Typically, the bottom is active). NOTE: You MUST have a GSD 22 or GSD 21 and a transducer installed and connected to your GPSMAP 292.... For more information on understanding sonar and the screen, see page 80. Read the GSD 22 or GSD 21 Installation Instructions to your GPSMAP 292/298 becomes a powerful fishfinder/flasher. The area of strongest sonar return shows as shades of reasonable...

Owner's Manual
Page 93
... THE GPSMAP 292/298 EXTERNAL GPS ANTENNA Suggested locations for mounting the external antenna. GPSMAP 292/298 Owner's Manual 87 Never paint the antenna or clean it must be properly installed according to the following instructions to ensure the best reception. To complete the external antenna installation, you need the appropriate fasteners and a 1" x 14-thread marine antenna mount...
... THE GPSMAP 292/298 EXTERNAL GPS ANTENNA Suggested locations for mounting the external antenna. GPSMAP 292/298 Owner's Manual 87 Never paint the antenna or clean it must be properly installed according to the following instructions to ensure the best reception. To complete the external antenna installation, you need the appropriate fasteners and a 1" x 14-thread marine antenna mount...

Owner's Manual
Page 95
... page 86) and leave 1.25" (32 mm) clearance below the data card slot for drilling starter holes. GPSMAP 292/298 Owner's Manual 89 APPENDIX > MOUNTING THE GPSMAP 292/298 To install the GPSMAP 292/298 swivel base: 1. Secure the swivel base with external antenna can be sure to the mounting surface. 2.... drill three 5/32" (5 mm) holes at panel. When flush mounting the GPSMAP 292/298, be flush mounted on the template to be no deeper than half the screw length. 3. Use the instructions on a flat the locations you risk damaging the Mounting Base. Tools (not ...
... page 86) and leave 1.25" (32 mm) clearance below the data card slot for drilling starter holes. GPSMAP 292/298 Owner's Manual 89 APPENDIX > MOUNTING THE GPSMAP 292/298 To install the GPSMAP 292/298 swivel base: 1. Secure the swivel base with external antenna can be sure to the mounting surface. 2.... drill three 5/32" (5 mm) holes at panel. When flush mounting the GPSMAP 292/298, be flush mounted on the template to be no deeper than half the screw length. 3. Use the instructions on a flat the locations you risk damaging the Mounting Base. Tools (not ...
Owner's Manual
Page 113
... FOR A PARTICULAR PURPOSE, STATUTORY OR OTHERWISE. Write the tracking GPSMAP 292/298 Owner's Manual APPENDIX > LIMITED WARRANTY number clearly on the outside of purchase. This warranty does not cover failures due to the Garmin service center in the United States or Canada must be returned... warranty service, contact your unit. Online auction confirmations are not accepted for shipping instructions and an RMA tracking number. Garmin will not replace missing components from Garmin. Units purchased in the United Kingdom, the United States, Canada, or Taiwan for service....
... FOR A PARTICULAR PURPOSE, STATUTORY OR OTHERWISE. Write the tracking GPSMAP 292/298 Owner's Manual APPENDIX > LIMITED WARRANTY number clearly on the outside of purchase. This warranty does not cover failures due to the Garmin service center in the United States or Canada must be returned... warranty service, contact your unit. Online auction confirmations are not accepted for shipping instructions and an RMA tracking number. Garmin will not replace missing components from Garmin. Units purchased in the United Kingdom, the United States, Canada, or Taiwan for service....
Owner's Manual
Page 114
... Garmin service center. To view the full Declaration of Conformity, see the Garmin Web site for Class B digital devices FOR HOME OR OFFICE USE. This product does not contain any interference received,... correct the interference by turning the equipment off and on a different circuit from the GPS unit. • Consult the dealer or an experienced radio/TV technician for help. However...used in compliance with the instructions. Repairs should only be determined by one of Conformity link. 108 GPSMAP 292/298 Owner's Manual If this device must accept any user-serviceable parts...
... Garmin service center. To view the full Declaration of Conformity, see the Garmin Web site for Class B digital devices FOR HOME OR OFFICE USE. This product does not contain any interference received,... correct the interference by turning the equipment off and on a different circuit from the GPS unit. • Consult the dealer or an experienced radio/TV technician for help. However...used in compliance with the instructions. Repairs should only be determined by one of Conformity link. 108 GPSMAP 292/298 Owner's Manual If this device must accept any user-serviceable parts...


