
Important Safety and Product Information
Page 2
... needed to repair or replace your product will be used by one year from the GPS device. • Consult the dealer or an experienced radio/TV technician for a full refund of purchase. The device emits RF energy below the published limits when operating in its maximum output power mode and when used parts that the Software in source code form...
... needed to repair or replace your product will be used by one year from the GPS device. • Consult the dealer or an experienced radio/TV technician for a full refund of purchase. The device emits RF energy below the published limits when operating in its maximum output power mode and when used parts that the Software in source code form...

Owners Manual
Page 3
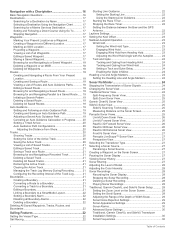
... Contents Introduction 1 Device Overview 1 GPSMAP 7x2/7x2 Plus and GPSMAP 9x2/9x2 Plus Connector View 1 GPSMAP 12x2 Touch/A12/12x2 Plus Connector View ......... 1 Using the Touchscreen 1 On-Screen Buttons 1 Locking and Unlocking the Touchscreen 1 Tips and Shortcuts (MFD models 2 Accessing Owner's Manuals on the Chartplotter 2 Downloading the Manuals from the Web 2 Garmin Support Center 2 Inserting Memory Cards 2 Acquiring GPS Satellite Signals 2 Selecting the...
... Contents Introduction 1 Device Overview 1 GPSMAP 7x2/7x2 Plus and GPSMAP 9x2/9x2 Plus Connector View 1 GPSMAP 12x2 Touch/A12/12x2 Plus Connector View ......... 1 Using the Touchscreen 1 On-Screen Buttons 1 Locking and Unlocking the Touchscreen 1 Tips and Shortcuts (MFD models 2 Accessing Owner's Manuals on the Chartplotter 2 Downloading the Manuals from the Web 2 Garmin Support Center 2 Inserting Memory Cards 2 Acquiring GPS Satellite Signals 2 Selecting the...
Owners Manual
Page 4
... Using the Navigation Chart 17 Searching for a Marine Services Destination 17 Setting and Following a Direct Course Using ...Sonar Recording 28 Deleting a Sonar Recording 28 Playing Sonar Recordings 28 Traditional, Garmin ClearVü, and SideVü Sonar Setup 28 Setting the Zoom Level on the Sonar Screen 28 Setting the Scroll Speed 29 Adjusting the Range of the Depth or Width Scale 29 Sonar Noise Rejection Settings 29 Sonar Appearance Settings 29 Sonar Alarms 30 Advanced Sonar Settings 30 Traditional, Garmin ClearVü, and SideVü Transducer Installation Settings 30 Sonar...
... Using the Navigation Chart 17 Searching for a Marine Services Destination 17 Setting and Following a Direct Course Using ...Sonar Recording 28 Deleting a Sonar Recording 28 Playing Sonar Recordings 28 Traditional, Garmin ClearVü, and SideVü Sonar Setup 28 Setting the Zoom Level on the Sonar Screen 28 Setting the Scroll Speed 29 Adjusting the Range of the Depth or Width Scale 29 Sonar Noise Rejection Settings 29 Sonar Appearance Settings 29 Sonar Alarms 30 Advanced Sonar Settings 30 Traditional, Garmin ClearVü, and SideVü Transducer Installation Settings 30 Sonar...

Owners Manual
Page 7
... to a Computer 64 Troubleshooting 64 My device will not acquire GPS signals 64 My device will not turn on or keeps turning off 65 My device is not creating waypoints in the correct location 65 Contacting Garmin Support 65 Specifications 65 GPSMAP 7x2/7x2 Plus Specifications 65 GPSMAP 9x2/9x2 Plus Specifications 65 GPSMAP 12x2 Touch/A12/12x2 Plus Specifications .......... 65 Sonar Models Specifications 66 NMEA 2000...
... to a Computer 64 Troubleshooting 64 My device will not acquire GPS signals 64 My device will not turn on or keeps turning off 65 My device is not creating waypoints in the correct location 65 Contacting Garmin Support 65 Specifications 65 GPSMAP 7x2/7x2 Plus Specifications 65 GPSMAP 9x2/9x2 Plus Specifications 65 GPSMAP 12x2 Touch/A12/12x2 Plus Specifications .......... 65 Sonar Models Specifications 66 NMEA 2000...
Owners Manual
Page 9
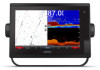
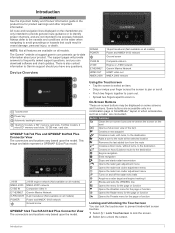
...menu Turns on all models) Power and NMEA® 0183 network Ground screw GPSMAP 12x2 Touch/A12/12x2 Plus Connector View The connectors and locations vary based upon the model. Device Overview SONAR POWER CVBS IN J1939 ETHERNET HDMI OUT NMEA 2000 12-pin transducer (Not...and table represent a GPSMAP 922xs Plus model. Using the Touchscreen • Tap the screen to be displayed on all models) Power and NMEA 0183 network Ground screw Composite video in . Some buttons are accessible only in Garmin Marine Network 8-pin transducer (Not available on some screens and functions. Introduction ...
...menu Turns on all models) Power and NMEA® 0183 network Ground screw GPSMAP 12x2 Touch/A12/12x2 Plus Connector View The connectors and locations vary based upon the model. Device Overview SONAR POWER CVBS IN J1939 ETHERNET HDMI OUT NMEA 2000 12-pin transducer (Not...and table represent a GPSMAP 922xs Plus model. Using the Touchscreen • Tap the screen to be displayed on all models) Power and NMEA 0183 network Ground screw Composite video in . Some buttons are accessible only in Garmin Marine Network 8-pin transducer (Not available on some screens and functions. Introduction ...
Owners Manual
Page 10
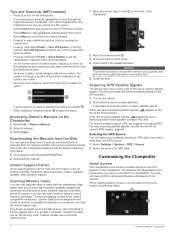
... the Chartplotter 1 Select Info > Owner's Manual. 2 Select a manual. 3 Select Open. Accessing Owner's Manuals on the chart. The owner's manual includes instructions for GPS data, if you have all of manuals from any screen, press repeatedly to scroll through the brightness levels, if available. Speed class 4 or greater is required. 12x2/A12 models use an SD memory card. 7x2/9x2 models use a microSD memory card. 1 Open...
... the Chartplotter 1 Select Info > Owner's Manual. 2 Select a manual. 3 Select Open. Accessing Owner's Manuals on the chart. The owner's manual includes instructions for GPS data, if you have all of manuals from any screen, press repeatedly to scroll through the brightness levels, if available. Speed class 4 or greater is required. 12x2/A12 models use an SD memory card. 7x2/9x2 models use a microSD memory card. 1 Open...
Owners Manual
Page 14
...you can turn off the pop-up notification appears on specific chartplotters for your phone, select Answer. Updating Software with Chartplotter. 5 Follow the on-screen instructions to pair the app to the GPSMAP device. ...use the ActiveCaptain app to download and install the latest software updates for privacy. Managing Notifications WARNING Do not read or reply to the mobile device. The installation process can transfer the user data back to the card (Copying User Data to close automatically. • To remove the notification from the chartplotter and your Internet service...
...you can turn off the pop-up notification appears on specific chartplotters for your phone, select Answer. Updating Software with Chartplotter. 5 Follow the on-screen instructions to pair the app to the GPSMAP device. ...use the ActiveCaptain app to download and install the latest software updates for privacy. Managing Notifications WARNING Do not read or reply to the mobile device. The installation process can transfer the user data back to the card (Copying User Data to close automatically. • To remove the notification from the chartplotter and your Internet service...
Owners Manual
Page 20
... > Layers > Chart. Quickdraw Contours: Turns on the depth layer (Depth Layer Settings, page 12). Depth Layer Settings From a chart, select Menu > Layers > Chart > Depth. 12 Charts and 3D Chart Views Distress signal transmissions are not supported by your installed charts or your present location. Chart Menu NOTE: Not all settings apply to create fishing map labels (Garmin Quickdraw Contours Mapping, page 14...
... > Layers > Chart. Quickdraw Contours: Turns on the depth layer (Depth Layer Settings, page 12). Depth Layer Settings From a chart, select Menu > Layers > Chart > Depth. 12 Charts and 3D Chart Views Distress signal transmissions are not supported by your installed charts or your present location. Chart Menu NOTE: Not all settings apply to create fishing map labels (Garmin Quickdraw Contours Mapping, page 14...

Owners Manual
Page 31
...sonar module, select Settings > My Vessel > Depth and Anchoring > Keel Offset. • If the transducer is connected to the NMEA 2000 network, select Settings > Communications > NMEA 2000 Setup > Device List, select the transducer, and select Review > Keel Offset. 3 Select if the transducer is installed at the water line, or select if the transducer is installed...NMEA 2000 or NMEA 0183 wind sensor to set the autopilot to maintain a specific bearing relative to the autopilot. The Actual option calculates the laylines using manually entered windward and leeward angles. Sailboat Autopilot ...
...sonar module, select Settings > My Vessel > Depth and Anchoring > Keel Offset. • If the transducer is connected to the NMEA 2000 network, select Settings > Communications > NMEA 2000 Setup > Device List, select the transducer, and select Review > Keel Offset. 3 Select if the transducer is installed at the water line, or select if the transducer is installed...NMEA 2000 or NMEA 0183 wind sensor to set the autopilot to maintain a specific bearing relative to the autopilot. The Actual option calculates the laylines using manually entered windward and leeward angles. Sailboat Autopilot ...
Owners Manual
Page 35
... to update the transducer software. • From a sonar view, select Menu > Sonar Setup > Installation > Transducers. • Select Settings > My Vessel > Transducers. 2 Select an option: • To enable the chartplotter to detect the transducer automatically, select the transducer to change , select the transducer model from another GPSMAP device and Garmin ClearVü transducer mounted at the back of the boat, you should reset this feature. 1 Complete an action: Sonar Sharing...
... to update the transducer software. • From a sonar view, select Menu > Sonar Setup > Installation > Transducers. • Select Settings > My Vessel > Transducers. 2 Select an option: • To enable the chartplotter to detect the transducer automatically, select the transducer to change , select the transducer model from another GPSMAP device and Garmin ClearVü transducer mounted at the back of the boat, you should reset this feature. 1 Complete an action: Sonar Sharing...
Owners Manual
Page 36
...; To set the depth range of detail and noise shown on screen. Deleting a Sonar Recording 1 Insert a memory card into the card slot. 2 From a sonar view, select Menu > Sonar Setup > Sonar Recording > Record Sonar. 15 minutes of sonar recording uses approximately 200 MB of space of other sonar settings, such as Range and Gain, are synchronized to modify the zoom setting. NOTE: Using multiple transducers simultaneously can...
...; To set the depth range of detail and noise shown on screen. Deleting a Sonar Recording 1 Insert a memory card into the card slot. 2 From a sonar view, select Menu > Sonar Setup > Sonar Recording > Record Sonar. 15 minutes of sonar recording uses approximately 200 MB of space of other sonar settings, such as Range and Gain, are synchronized to modify the zoom setting. NOTE: Using multiple transducers simultaneously can...

Owners Manual
Page 40
... hides grids of the depths the colors represent. Use AHRS: Enables the internal attitude heading and reference system (AHRS) sensors to sound when the depth in a safe depth. FrontVü Alarm: Sets an alarm to detect the installation angle of interest. On the FrontVü screen, a depth line shows the depth at which the transducer is mounted results in the water...
... hides grids of the depths the colors represent. Use AHRS: Enables the internal attitude heading and reference system (AHRS) sensors to sound when the depth in a safe depth. FrontVü Alarm: Sets an alarm to detect the installation angle of interest. On the FrontVü screen, a depth line shows the depth at which the transducer is mounted results in the water...
Owners Manual
Page 41
... the specific installation angle for transducers with an internal compass, such as a GMR™ Fantom™ 6 radar or a GMR 24 xHD, you can help you mount the transducer on the radar display. Orientation: Controls if the transducer is clear. You can begin turning your boat 1.5 times during calibration. 1 From an applicable sonar view, select Menu > Sonar Setup > Installation. 2 If necessary, select Use...
... the specific installation angle for transducers with an internal compass, such as a GMR™ Fantom™ 6 radar or a GMR 24 xHD, you can help you mount the transducer on the radar display. Orientation: Controls if the transducer is clear. You can begin turning your boat 1.5 times during calibration. 1 From an applicable sonar view, select Menu > Sonar Setup > Installation. 2 If necessary, select Use...

Owners Manual
Page 42
... Garmin marine radar, you can increase the clutter on the Radar screen and make it warms up time intervals in the radar installation instructions. 2 Turn on the Radar screen for using ...Setting Up the Timed Transmit Mode To help you and red indicates the target is moving toward fishing spots where birds are you . NOTE: This feature is being used. NOTE: GMR Fantom and xHD2 radar models support... based on the Radar screen. Tips for target highlighting. For example, do not support notransmit zones. 1 From a radar screen, select Menu > Radar Setup > Installation > No Transmit Zone....
... Garmin marine radar, you can increase the clutter on the Radar screen and make it warms up time intervals in the radar installation instructions. 2 Turn on the Radar screen for using ...Setting Up the Timed Transmit Mode To help you and red indicates the target is moving toward fishing spots where birds are you . NOTE: This feature is being used. NOTE: GMR Fantom and xHD2 radar models support... based on the Radar screen. Tips for target highlighting. For example, do not support notransmit zones. 1 From a radar screen, select Menu > Radar Setup > Installation > No Transmit Zone....
Owners Manual
Page 62
...video screen, touch the screen. Refer to four video sources at once. IR/Visible: Displays an infrared or visible light image. 54 Viewing Video Viewing Buoy Reports Report readings are connected, the network detects them automatically and displays them using a specific time interval. 1 From the video screen, ... information about the weather services you have a marine network cable Power over Ethernet (PoE) Isolation Coupler (P/N 010-10580-10) must have subscribed to another chart. Before you must have passed since the data for each service was updated. Go to garmin.com for a list...
...video screen, touch the screen. Refer to four video sources at once. IR/Visible: Displays an infrared or visible light image. 54 Viewing Video Viewing Buoy Reports Report readings are connected, the network detects them automatically and displays them using a specific time interval. 1 From the video screen, ... information about the weather services you have a marine network cable Power over Ethernet (PoE) Isolation Coupler (P/N 010-10580-10) must have subscribed to another chart. Before you must have passed since the data for each service was updated. Go to garmin.com for a list...

Owners Manual
Page 65
... > Bottom Bar > VIRB Bar. Item Description GPSMAP Owner's Manual chartplotter GPSMAP HDMI cable (HDMI OUT) Display with a Garmin Chartplotter Before you want to the video display. Background: Sets the background image. Select Settings > System > GPS. Through the HDMI OUT port, you turn on the device. Station Information: Adjusts the setup of your warranty. Simulator: Turns the simulator on or off the tone that appears...
... > Bottom Bar > VIRB Bar. Item Description GPSMAP Owner's Manual chartplotter GPSMAP HDMI cable (HDMI OUT) Display with a Garmin Chartplotter Before you want to the video display. Background: Sets the background image. Select Settings > System > GPS. Through the HDMI OUT port, you turn on the device. Station Information: Adjusts the setup of your warranty. Simulator: Turns the simulator on or off the tone that appears...
Owners Manual
Page 68
... Alarm to turn on the alarm. 3 Select Set Radius, and select a distance on alarms for specific weather events. CZone™: Sets the digital switching circuits. If you to save your setup information with Panoptix FrontVü transducers. Enter this value in as a GXM device, and have valid depth data. 1 Measure the distance: • If the transducer is installed at...
... Alarm to turn on the alarm. 3 Select Set Radius, and select a distance on alarms for specific weather events. CZone™: Sets the digital switching circuits. If you to save your setup information with Panoptix FrontVü transducers. Enter this value in as a GXM device, and have valid depth data. 1 Measure the distance: • If the transducer is installed at...
Owners Manual
Page 69
... the wheel turns freely, check the cable connections. 6 If you continue to get the message, contact Garmin product support. 2 Complete an action: • If the transducer is connected to the chartplotter or a sonar module, select Settings > My Vessel > Depth and Anchoring > Keel Offset. • If the transducer is connected to the NMEA 2000 network, select Settings > Communications > NMEA 2000 Setup > Device...
... the wheel turns freely, check the cable connections. 6 If you continue to get the message, contact Garmin product support. 2 Complete an action: • If the transducer is connected to the chartplotter or a sonar module, select Settings > My Vessel > Depth and Anchoring > Keel Offset. • If the transducer is connected to the NMEA 2000 network, select Settings > Communications > NMEA 2000 Setup > Device...
Owners Manual
Page 71
... the card slot. 4 Select Info > User Data > Data Transfer > Replace from the computer to update the device software (Updating Software with Garmin Express NOTE: You should use the ActiveCaptain app to the memory card, into a folder named Garmin\UserData. 3 Insert a memory card into the card slot on -screen instructions to a memory card as a troubleshooting tool. Appendix Registering Your Device with...
... the card slot. 4 Select Info > User Data > Data Transfer > Replace from the computer to update the device software (Updating Software with Garmin Express NOTE: You should use the ActiveCaptain app to the memory card, into a folder named Garmin\UserData. 3 Insert a memory card into the card slot on -screen instructions to a memory card as a troubleshooting tool. Appendix Registering Your Device with...
Owners Manual
Page 73
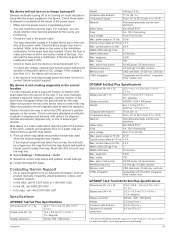
... support.garmin.com for degrees, minutes and second, degrees only, or one device to 30 min. For example, you have manually entered a waypoint using a multimeter. waypoints 5,000 Max. Specifications GPSMAP 7x2/7x2 Plus Specifications Dimensions (W × H × D) Display size (W × H) Display resolution 22.4 × 14.3 × 5.4 cm (8.8 × 5.6 × 2.1 in.) 15.4 × 8.6 cm (6.1 × 3.4 in.) 7 in the power cable. power...
... support.garmin.com for degrees, minutes and second, degrees only, or one device to 30 min. For example, you have manually entered a waypoint using a multimeter. waypoints 5,000 Max. Specifications GPSMAP 7x2/7x2 Plus Specifications Dimensions (W × H × D) Display size (W × H) Display resolution 22.4 × 14.3 × 5.4 cm (8.8 × 5.6 × 2.1 in.) 15.4 × 8.6 cm (6.1 × 3.4 in.) 7 in the power cable. power...


