
Installation Instructions
Page 1
...® technology, you experience difficulty during the installation, go to support.garmin.com. PANOPTIX™LIVESCOPE™ INSTALLATION INSTRUCTIONS Important Safety Information WARNING See the Important Safety and Product Information guide in the chartplotter product box for your selected mode to work properly. • You must install the sonar module in a location with these instructions. NOTICE When drilling or cutting, always...
...® technology, you experience difficulty during the installation, go to support.garmin.com. PANOPTIX™LIVESCOPE™ INSTALLATION INSTRUCTIONS Important Safety Information WARNING See the Important Safety and Product Information guide in the chartplotter product box for your selected mode to work properly. • You must install the sonar module in a location with these instructions. NOTICE When drilling or cutting, always...

Installation Instructions
Page 2
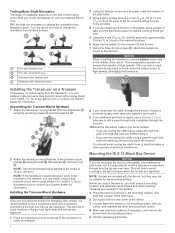
... and 10 cm (4 in .) section between mounting points. 2 Using the included hex wrench, attach the bracket to the transducer with the top of the trolling motor to ensure the cables clear the rotating joint and are centered on a Trolling Motor NOTICE You must secure the transducer cable to the shaft or other secure location during rotation. Installing the Transducer on...
... and 10 cm (4 in .) section between mounting points. 2 Using the included hex wrench, attach the bracket to the transducer with the top of the trolling motor to ensure the cables clear the rotating joint and are centered on a Trolling Motor NOTICE You must secure the transducer cable to the shaft or other secure location during rotation. Installing the Transducer on...

Installation Instructions
Page 3
... You must fully tighten the mount to down . NOTE: You must secure the transducer cable to the trolling shaft bracket with the transducer beam. You should not route the cable close to electrical wires or other secure location. 4 Route the transducer cable to the installation location of the sonar module while taking these precautions. • You should use the included hex wrench to...
... You must fully tighten the mount to down . NOTE: You must secure the transducer cable to the trolling shaft bracket with the transducer beam. You should not route the cable close to electrical wires or other secure location. 4 Route the transducer cable to the installation location of the sonar module while taking these precautions. • You should use the included hex wrench to...
Installation Instructions
Page 4
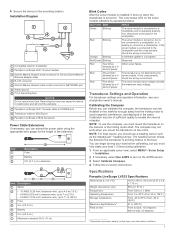
... of the mount. Turn the mount one click to change the orientation from the mounting surface. 5 Drill the remaining pilot holes. Installing the Transom-Mount Hardware NOTICE If you are mounting the bracket on a Transom If necessary, to the screw is recommended to use a countersink bit to drill a clearance counterbore through only the top gel-coat layer. Mounting the GLS 10 Black...
... of the mount. Turn the mount one click to change the orientation from the mounting surface. 5 Drill the remaining pilot holes. Installing the Transom-Mount Hardware NOTICE If you are mounting the bracket on a Transom If necessary, to the screw is recommended to use a countersink bit to drill a clearance counterbore through only the top gel-coat layer. Mounting the GLS 10 Black...
Installation Instructions
Page 5
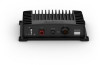
... the transom or the trolling motor shaft. NOTE: To use a heading sensor such as the SteadyCast™ heading sensor. If this code persists, check the wiring connections. Installation Diagram Compatible Garmin chartplotter Panoptix LiveScope GLS 10 sonar module Garmin Marine Network small connector to full-size GarminMarine Network adapter cable RJ-45 connector Garmin Marine Network cable small connector to a chartplotter and is connected to NETWORK...
... the transom or the trolling motor shaft. NOTE: To use a heading sensor such as the SteadyCast™ heading sensor. If this code persists, check the wiring connections. Installation Diagram Compatible Garmin chartplotter Panoptix LiveScope GLS 10 sonar module Garmin Marine Network small connector to full-size GarminMarine Network adapter cable RJ-45 connector Garmin Marine Network cable small connector to a chartplotter and is connected to NETWORK...
Installation Instructions
Page 6
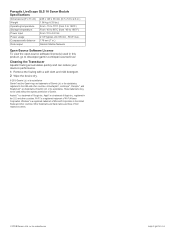
... of their respective owners. © 2018 Garmin Ltd. Wi‑Fi® is a registered trademark of Garmin Ltd. Other trademarks and trade names are trademarks of Microsoft Corporation in the U.S. Panoptix LiveScope GLS 10 Sonar Module Specifications Dimensions (W x H x D) 245 x 149 x 65 mm (9.7 x 5.9 x 2.6 in the USA and other countries. Android™ is a trademark of Garmin. or its subsidiaries support.garmin.com or...
... of their respective owners. © 2018 Garmin Ltd. Wi‑Fi® is a registered trademark of Garmin Ltd. Other trademarks and trade names are trademarks of Microsoft Corporation in the U.S. Panoptix LiveScope GLS 10 Sonar Module Specifications Dimensions (W x H x D) 245 x 149 x 65 mm (9.7 x 5.9 x 2.6 in the USA and other countries. Android™ is a trademark of Garmin. or its subsidiaries support.garmin.com or...


