Declaration of Conformity
Page 1
Marine Radio Apparatus (Marine Sounder) FISHFINDER 140 The undersigned does hereby declare that the equipment complies to which Conformity is Declared: 89/336/EEC EN 60945 Marine Navigational Equipment - GARMIN (Europe) Ltd, The Quadrangle, Abbey Park Ind. Issued: 14/12/2005 Revised: Page: 1 of 1 DECLARATION of CONFORMITY Application of Equipment: Model Number(s): GARMIN International & GARMIN Corporation 1200 E. 151st Street No.68...
Marine Radio Apparatus (Marine Sounder) FISHFINDER 140 The undersigned does hereby declare that the equipment complies to which Conformity is Declared: 89/336/EEC EN 60945 Marine Navigational Equipment - GARMIN (Europe) Ltd, The Quadrangle, Abbey Park Ind. Issued: 14/12/2005 Revised: Page: 1 of 1 DECLARATION of CONFORMITY Application of Equipment: Model Number(s): GARMIN International & GARMIN Corporation 1200 E. 151st Street No.68...
Flush Mount Template
Page 1
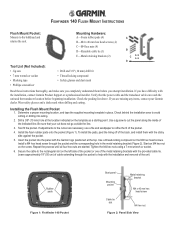
... pads onto the pocket (Figure 1). Insert the pocket into wiring. 2. Mounting Hardware: A-Foam rubber pads (4) A B-M4 x 40 mm hex head screws (4) C-M4 hex nuts (4) D-Reusable cable tie (1) E B E-Metal retaining brackets (2) C D Tool List (Not Included): • Jig saw to help with the installation, contact Garmin Product Support or a professional installer. Use a jig saw • 7 mm wrench or socket • Masking...
... pads onto the pocket (Figure 1). Insert the pocket into wiring. 2. Mounting Hardware: A-Foam rubber pads (4) A B-M4 x 40 mm hex head screws (4) C-M4 hex nuts (4) D-Reusable cable tie (1) E B E-Metal retaining brackets (2) C D Tool List (Not Included): • Jig saw to help with the installation, contact Garmin Product Support or a professional installer. Use a jig saw • 7 mm wrench or socket • Masking...

Flush Mount Template
Page 3
Printed in Taiwan or its subsidiaries Part Number 190-00583-02 Rev. A. Fishfinder 140 Flush Mount Template ���� Garmin Ltd.
Printed in Taiwan or its subsidiaries Part Number 190-00583-02 Rev. A. Fishfinder 140 Flush Mount Template ���� Garmin Ltd.
Owner's Manual
Page 3
... operating procedures for reference. This manual uses the term Caution to avoid unsafe practices. Fishfinder 90/140 Owner's Manual iii If you to indicate a potentially hazardous situation, which , if not avoided, could result in death or serious injury. The Installing Your Fishfinder section provides instruction on installing the Fishfinder and the Transducer. The Appendix contains unit...
... operating procedures for reference. This manual uses the term Caution to avoid unsafe practices. Fishfinder 90/140 Owner's Manual iii If you to indicate a potentially hazardous situation, which , if not avoided, could result in death or serious injury. The Installing Your Fishfinder section provides instruction on installing the Fishfinder and the Transducer. The Appendix contains unit...
Owner's Manual
Page 4
... Contact Garmin v Warning vi Getting Started 1 Understanding the Fishfinder 1 Understanding Sonar 1 Understanding Dual Beam Transducer Coverage ......... 2 Understanding the Fishfinder Screen 3 Using Simulator Mode 4 Installing Your Fishfinder 5 Installing the Transducer 6 Mounting the Transducer on a Transom 7 Installing the Fishfinder Unit 10 Selecting a Fishfinder installation Location 10 Mounting the Bracket Assembly 10 To install the Fishfinder on the mount bracket 11 Installing the Wiring Harness 12 Testing the Transom Mount Installation...
... Contact Garmin v Warning vi Getting Started 1 Understanding the Fishfinder 1 Understanding Sonar 1 Understanding Dual Beam Transducer Coverage ......... 2 Understanding the Fishfinder Screen 3 Using Simulator Mode 4 Installing Your Fishfinder 5 Installing the Transducer 6 Mounting the Transducer on a Transom 7 Installing the Fishfinder Unit 10 Selecting a Fishfinder installation Location 10 Mounting the Bracket Assembly 10 To install the Fishfinder on the mount bracket 11 Installing the Wiring Harness 12 Testing the Transom Mount Installation...

Owner's Manual
Page 7
... a transducer. This manual does not go out on the screen for you to look and function, you can skip this manual. • Assemble and install the hardware (page 5). • Practice using your Fishfinder in Simulator Mode (page 4). • Use the Fishfinder (page 13). If you have not used a Fishfinder before , Fishfinder 90/140 Owner's Manual GETTING STARTED > UNDERSTANDING THE FISHFINDER...
... a transducer. This manual does not go out on the screen for you to look and function, you can skip this manual. • Assemble and install the hardware (page 5). • Practice using your Fishfinder in Simulator Mode (page 4). • Use the Fishfinder (page 13). If you have not used a Fishfinder before , Fishfinder 90/140 Owner's Manual GETTING STARTED > UNDERSTANDING THE FISHFINDER...

Owner's Manual
Page 10
... sonar interference at startup, it were on the Fish Symbols setting if 4 you that the Fishfinder is unable to track the bottom for two minutes, the Fishfinder automatically resets to see a grouping of the Fishfinder. Too much surface clutter can affect water depth return readings. GETTING STARTED > USING SIMULATOR MODE The Fishfinder 90 and 140...
... sonar interference at startup, it were on the Fish Symbols setting if 4 you that the Fishfinder is unable to track the bottom for two minutes, the Fishfinder automatically resets to see a grouping of the Fishfinder. Too much surface clutter can affect water depth return readings. GETTING STARTED > USING SIMULATOR MODE The Fishfinder 90 and 140...
Owner's Manual
Page 11
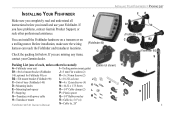
... ring P-Plastic spacer O G-Transducer with power cable Q-1/4" Rubber washer M H-Transducer mount R-Cable tie, 5.6" (4) Fishfinder 90/140 Owner's Manual S-Cable tie, 20" FE B1 D (Fishfinder 140) C B2 (Fishfinder 90) S H I -Trolling motor mount gasket B1-Swivel mount bracket (Fishfinder J-5 mm Flat washers (2) 140; INSTALLING YOUR FISHFINDER > PACKING LIST INSTALLING YOUR FISHFINDER A Make sure you completely read and understand all instructions before you install and use your Garmin dealer. (Fishfinder 90...
... ring P-Plastic spacer O G-Transducer with power cable Q-1/4" Rubber washer M H-Transducer mount R-Cable tie, 5.6" (4) Fishfinder 90/140 Owner's Manual S-Cable tie, 20" FE B1 D (Fishfinder 140) C B2 (Fishfinder 90) S H I -Trolling motor mount gasket B1-Swivel mount bracket (Fishfinder J-5 mm Flat washers (2) 140; INSTALLING YOUR FISHFINDER > PACKING LIST INSTALLING YOUR FISHFINDER A Make sure you completely read and understand all instructions before you install and use your Garmin dealer. (Fishfinder 90...
Owner's Manual
Page 12
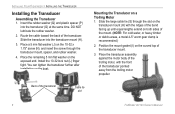
... of the transducer. Insert the rubber washer (Q) and plastic spacer (P) into the transducer mount (H). 3. DO NOT lubricate the rubber washer. 2. Place the transducer assembly against the motor body of the trolling motor, with the ridges of the band facing up until equal lengths extend on both sides of the transducer Cable tie slot 6 Fishfinder 90/140 Owner's Manual
... of the transducer. Insert the rubber washer (Q) and plastic spacer (P) into the transducer mount (H). 3. DO NOT lubricate the rubber washer. 2. Place the transducer assembly against the motor body of the trolling motor, with the ridges of the band facing up until equal lengths extend on both sides of the transducer Cable tie slot 6 Fishfinder 90/140 Owner's Manual

Owner's Manual
Page 13
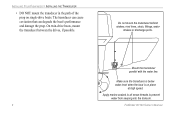
... 10-32 locking nut until it .) 5. Fishfinder 90/140 Owner's Manual 7 4. When selecting a transom mount location, consider the following for optimal performance: • For your warranty.) • DO NOT mount the transducer in calm water. Pull the cable tie end until it might be located in ...use, and make sure the gasket is snug but not tight. (The cable tie clicks when you pull it touches the mounting bracket and then tighten 1/4 turn more. (Do not overtighten.) 6. Place the pointed end of the boat as possible. • DO NOT cut the transducer lead. (This voids your sonar...
... 10-32 locking nut until it .) 5. Fishfinder 90/140 Owner's Manual 7 4. When selecting a transom mount location, consider the following for optimal performance: • For your warranty.) • DO NOT mount the transducer in calm water. Pull the cable tie end until it might be located in ...use, and make sure the gasket is snug but not tight. (The cable tie clicks when you pull it touches the mounting bracket and then tighten 1/4 turn more. (Do not overtighten.) 6. Place the pointed end of the boat as possible. • DO NOT cut the transducer lead. (This voids your sonar...
Owner's Manual
Page 14
... boats. Do not mount the transducer behind strakes, rivet lines, struts, fittings, water intakes or discharge ports. INSTALLING YOUR FISHFINDER > INSTALLING THE TRANSDUCER • DO NOT mount the transducer in the path of the prop on plane at high speed. Apply marine sealant to all screw threads to prevent water from seeping into the transom. 8 Fishfinder 90/140 Owner's Manual
... boats. Do not mount the transducer behind strakes, rivet lines, struts, fittings, water intakes or discharge ports. INSTALLING YOUR FISHFINDER > INSTALLING THE TRANSDUCER • DO NOT mount the transducer in the path of the prop on plane at high speed. Apply marine sealant to all screw threads to prevent water from seeping into the transom. 8 Fishfinder 90/140 Owner's Manual
Owner's Manual
Page 15
... the 10-32 locking nut until it touches the mounting bracket, and then tighten 1/4 turn more. (Do not overtighten.) Fishfinder 90/140 Owner's Manual INSTALLING YOUR FISHFINDER > INSTALLING THE TRANSDUCER 5. Apply marine sealant to the Fishfinder. Adjust the transducer assembly to be aligned parallel with electrical wires or other cable clamp. 7. Position the transducer mount at the selected transom location. Mark the center locations...
... the 10-32 locking nut until it touches the mounting bracket, and then tighten 1/4 turn more. (Do not overtighten.) Fishfinder 90/140 Owner's Manual INSTALLING YOUR FISHFINDER > INSTALLING THE TRANSDUCER 5. Apply marine sealant to the Fishfinder. Adjust the transducer assembly to be aligned parallel with electrical wires or other cable clamp. 7. Position the transducer mount at the selected transom location. Mark the center locations...
Owner's Manual
Page 16
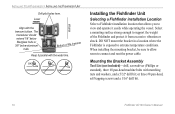
... vessel. DO NOT mount the bracket in a location where the Fishfinder is exposed to connect and rout the power cable. Bottom of the Fishfinder and protect it parallel with the water line. OK Installing the Fishfinder Unit Selecting a Fishfinder installation Location Select a Fishfinder installation location that allows you to support the weight of...
... vessel. DO NOT mount the bracket in a location where the Fishfinder is exposed to connect and rout the power cable. Bottom of the Fishfinder and protect it parallel with the water line. OK Installing the Fishfinder Unit Selecting a Fishfinder installation Location Select a Fishfinder installation location that allows you to support the weight of...
Owner's Manual
Page 17
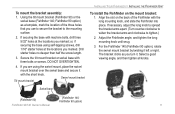
... short knob. If you marked. Swivel mount bracket Tilt mount bracket INSTALLING YOUR FISHFINDER > INSTALLING THE FISHFINDER UNIT To install the Fishfinder on the back of the three holes that you turn it left or right. Select a good viewing angle, and then tighten all knobs. Swivel base (Fishfinder 90) (Fishfinder 140; If securing the base with the long...
... short knob. If you marked. Swivel mount bracket Tilt mount bracket INSTALLING YOUR FISHFINDER > INSTALLING THE FISHFINDER UNIT To install the Fishfinder on the back of the three holes that you turn it left or right. Select a good viewing angle, and then tighten all knobs. Swivel base (Fishfinder 90) (Fishfinder 140; If securing the base with the long...
Owner's Manual
Page 18
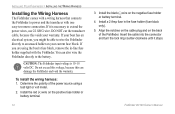
... Fishfinder input voltage is necessary to extend the power wires, use 22 AWG wire. Install the black (-) wire on the positive fuse holder or battery terminal. 12 3. To install the wiring harness: 1. Install a 2 Amp fuse in -line fuse holder supplied with one easy-to-remove connection. Align the notches on the cable plug and on your current fuse block. Insert the cable into the connector and turn the...
... Fishfinder input voltage is necessary to extend the power wires, use 22 AWG wire. Install the black (-) wire on the positive fuse holder or battery terminal. 12 3. To install the wiring harness: 1. Install a 2 Amp fuse in -line fuse holder supplied with one easy-to-remove connection. Align the notches on the cable plug and on your current fuse block. Insert the cable into the connector and turn the...
Owner's Manual
Page 19
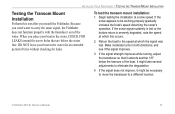
... several adjustments to a different location. Fishfinder 90/140 Owner's Manual 13 To test the transom mount installation: 1. If the sonar signal suddenly is severely degraded, note the speed at a slow speed. INSTALLING YOUR FISHFINDER > TESTING THE TRANSOM MOUNT INSTALLATION Testing the Transom Mount Installation Perform this occurs. 2. If the sonar appears to be necessary to move the transducer to eliminate the degradation. 4. If...
... several adjustments to a different location. Fishfinder 90/140 Owner's Manual 13 To test the transom mount installation: 1. If the sonar signal suddenly is severely degraded, note the speed at a slow speed. INSTALLING YOUR FISHFINDER > TESTING THE TRANSOM MOUNT INSTALLATION Testing the Transom Mount Installation Perform this occurs. 2. If the sonar appears to be necessary to move the transducer to eliminate the degradation. 4. If...
Owner's Manual
Page 25
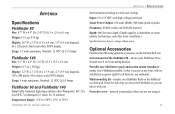
... and swivel on its mounting bracket. Optional Accessories Purchase the following optional accessories on the Garmin Web site: Swivel mount for 30 minutes) Temperature Range: +5°F to 158°F (-15°C to 70°C) Fishfinder 90/140 Owner's Manual Internal memory backup to retain user settings Input: 10 to 18 VDC with high voltage protection Sonar Power Output: 100 watts...
... and swivel on its mounting bracket. Optional Accessories Purchase the following optional accessories on the Garmin Web site: Swivel mount for 30 minutes) Temperature Range: +5°F to 158°F (-15°C to 70°C) Fishfinder 90/140 Owner's Manual Internal memory backup to retain user settings Input: 10 to 18 VDC with high voltage protection Sonar Power Output: 100 watts...
Owner's Manual
Page 28
...22 Fishfinder 90/140 Owner's Manual Garmin will void your warranty and may not apply to you ever encounter a problem with your local Garmin authorized dealer or call Garmin Product Support for repairs. To obtain warranty service, an original or copy of the purchase price at ... service. Distributor warranties are only valid in permanent damage to an authorized Garmin dealer for shipping instructions and an RMA tracking number. Should you . The unit should be returned to any Garmin warranty service station. The Garmin Fishfinder has no user-serviceable parts....
...22 Fishfinder 90/140 Owner's Manual Garmin will void your warranty and may not apply to you ever encounter a problem with your local Garmin authorized dealer or call Garmin Product Support for repairs. To obtain warranty service, an original or copy of the purchase price at ... service. Distributor warranties are only valid in permanent damage to an authorized Garmin dealer for shipping instructions and an RMA tracking number. Should you . The unit should be returned to any Garmin warranty service station. The Garmin Fishfinder has no user-serviceable parts....

Owner's Manual
Page 30
... arrow 14 enter 14 menu 14 L language setting 18 limited warranty 21 location, installation 10 M menu main 15 setup 16 menu key 14 mounting the bracket assembly 10 mounting the transducer on a transom 9 mounting the transducer on a trolling motor 6 N narrow beam 2 numbers 18 battery 18 water temperature 18 O optional accessories 19 P packing list 5 product registration v R range 15 Fishfinder 90/140 Owner's Manual
... arrow 14 enter 14 menu 14 L language setting 18 limited warranty 21 location, installation 10 M menu main 15 setup 16 menu key 14 mounting the bracket assembly 10 mounting the transducer on a transom 9 mounting the transducer on a trolling motor 6 N narrow beam 2 numbers 18 battery 18 water temperature 18 O optional accessories 19 P packing list 5 product registration v R range 15 Fishfinder 90/140 Owner's Manual
Owner's Manual
Page 31
... mount location 7 setting, changing a 14 setup menu 16 setup menu option 14 shallow alarm 16 simulator mode 4 simulator setting 18 size, number 18 software license agreement 21 Sonar 1 sound waves 1 specifications 19 storage 20 strongest sonar returns 3 surface clutter 4 swivel mount bracket 11 T temperature number 18 temperature units 18 testing the transom mount installation 13 transducer 1 assembling 6 installing 6 mounting on a transom 7 mounting on a trolling motor 6 transom mount installation...
... mount location 7 setting, changing a 14 setup menu 16 setup menu option 14 shallow alarm 16 simulator mode 4 simulator setting 18 size, number 18 software license agreement 21 Sonar 1 sound waves 1 specifications 19 storage 20 strongest sonar returns 3 surface clutter 4 swivel mount bracket 11 T temperature number 18 temperature units 18 testing the transom mount installation 13 transducer 1 assembling 6 installing 6 mounting on a transom 7 mounting on a trolling motor 6 transom mount installation...


