User Manual
Page 1
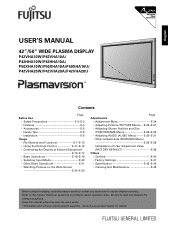
...; Installation E-6 Usage • Part Names and Functions E-7-E-10 • Using the Remote Control E-11-E-12 • Connecting the Display to External Equipment E-13-E-17 • Basic Operations E-18-E-19 • Selecting Input Mode E-20 • Other Basic Operations E-21 • Watching Pictures on the Wide Screen E-22-E-23 Page Adjustments • Adjustment Menu E-24 • Adjusting Pictures (PICTURE Menu) ··· E-25-E-27 • Adjusting Screen Position and Size (POSITION/SIZE Menu E-28-E-29 • Adjusting AUDIO (AUDIO Menu...
...; Installation E-6 Usage • Part Names and Functions E-7-E-10 • Using the Remote Control E-11-E-12 • Connecting the Display to External Equipment E-13-E-17 • Basic Operations E-18-E-19 • Selecting Input Mode E-20 • Other Basic Operations E-21 • Watching Pictures on the Wide Screen E-22-E-23 Page Adjustments • Adjustment Menu E-24 • Adjusting Pictures (PICTURE Menu) ··· E-25-E-27 • Adjusting Screen Position and Size (POSITION/SIZE Menu E-28-E-29 • Adjusting AUDIO (AUDIO Menu...
User Manual
Page 2
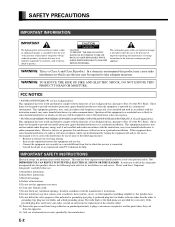
...) Protect the power cord from that may cause harmful interference to assure your outlet, consult an electrician for help. IMPORTANT SAFETY INSTRUCTIONS Electrical energy can radiate radio frequency energy and, if not installed and used in a particular installation. This unit has been engineered and manufactured to radio communications. Install in a commercial environment. A polarized plug has two blades with the instruction manual, may...
...) Protect the power cord from that may cause harmful interference to assure your outlet, consult an electrician for help. IMPORTANT SAFETY INSTRUCTIONS Electrical energy can radiate radio frequency energy and, if not installed and used in a particular installation. This unit has been engineered and manufactured to radio communications. Install in a commercial environment. A polarized plug has two blades with the instruction manual, may...
User Manual
Page 3
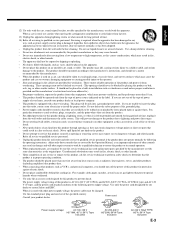
... determine that produce heat. - Slots and openings in installation such as power-supply cord or plug is equipped with other hazards. This product should never be changed. Adjust only those controls that present special hazards when overheated. - The apparatus shall not be sure the service technician has used , use liquid cleaners or aerosol cleaners. These openings must be blocked by items placed upon...
... determine that produce heat. - Slots and openings in installation such as power-supply cord or plug is equipped with other hazards. This product should never be changed. Adjust only those controls that present special hazards when overheated. - The apparatus shall not be sure the service technician has used , use liquid cleaners or aerosol cleaners. These openings must be blocked by items placed upon...

User Manual
Page 4
Convenient power saving setting • When no video signal is input to the display or the remote control is also available for displaying of normal-size (4:3 aspect ratio) pictures. • The display has a Compose mode to switch screen size automatically depending on the contents of software. • Three different screen sizes in RGB input mode (Normal, Wide, and Zoom) are available. * The HDCP (High-bandwidth Digital Content Protection) function ensures that high-vision digital contents (movies, etc...
Convenient power saving setting • When no video signal is input to the display or the remote control is also available for displaying of normal-size (4:3 aspect ratio) pictures. • The display has a Compose mode to switch screen size automatically depending on the contents of software. • Three different screen sizes in RGB input mode (Normal, Wide, and Zoom) are available. * The HDCP (High-bandwidth Digital Content Protection) function ensures that high-vision digital contents (movies, etc...
User Manual
Page 5
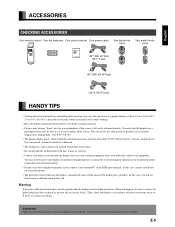
... at least 1.5 m or 5 feet (42")/ 1.9 m or 6.3 feet (50")) from the screen and to function properly when used with the instructions given on P. This will see that the power indicator lamp flashes red. Then, check the display in accordance with other audio-visual equipment. English ACCESSORIES CHECKING ACCESSORIES One remote control Two AA batteries One user's manual One power cable Two big ferrite cores Two small ferrite cores...
... at least 1.5 m or 5 feet (42")/ 1.9 m or 6.3 feet (50")) from the screen and to function properly when used with the instructions given on P. This will see that the power indicator lamp flashes red. Then, check the display in accordance with other audio-visual equipment. English ACCESSORIES CHECKING ACCESSORIES One remote control Two AA batteries One user's manual One power cable Two big ferrite cores Two small ferrite cores...

User Manual
Page 7
....) Flashing (red): Malfunction (Flashes differently depending on the type of the power supply. Warning If the power indicator lamp flashes red, this happens, be sure to a desired wide screen. 8 ON/OFF button Turns the power "ON" and "OFF (standby state)". button Adjusts the sound volume. 7 Wide screen selector button [WIDE] Switches the screen over to remove the power plug from the remote control. 3 Input mode selector button [MODE] 4 Input mode selector button [MODE] Switches between picture input modes. 5 VOL + button 6 VOL - English PART NAMES AND FUNCTIONS DISPLAY SECTION...
....) Flashing (red): Malfunction (Flashes differently depending on the type of the power supply. Warning If the power indicator lamp flashes red, this happens, be sure to a desired wide screen. 8 ON/OFF button Turns the power "ON" and "OFF (standby state)". button Adjusts the sound volume. 7 Wide screen selector button [WIDE] Switches the screen over to remove the power plug from the remote control. 3 Input mode selector button [MODE] 4 Input mode selector button [MODE] Switches between picture input modes. 5 VOL + button 6 VOL - English PART NAMES AND FUNCTIONS DISPLAY SECTION...

User Manual
Page 8
... the control panel of the display. When connecting a cable, attach a ferrite core to the power cable supplied with the display. LOWER PART Bottom (P42VHA10 type) Bottom (P42HHA10 type) Bottom (50") Bottom (P42VHA20 type) 1 /I power switch When pressed while in the "ON " state, and the power can be turned "ON" or "OFF" by molex Inc. E-13.) 3 RGB1 input terminal (RGB1 INPUT/DVI-D) Connect this terminal to the cable. (See P. PART NAMES...
... the control panel of the display. When connecting a cable, attach a ferrite core to the power cable supplied with the display. LOWER PART Bottom (P42VHA10 type) Bottom (P42HHA10 type) Bottom (50") Bottom (P42VHA20 type) 1 /I power switch When pressed while in the "ON " state, and the power can be turned "ON" or "OFF" by molex Inc. E-13.) 3 RGB1 input terminal (RGB1 INPUT/DVI-D) Connect this terminal to the cable. (See P. PART NAMES...
User Manual
Page 9
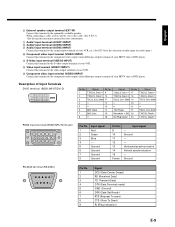
... the video output terminal of Input Terminals DVI-D terminal (RGB1 INPUT/DVI-D) RGB2 input terminal (RGB2 INPUT/mD-sub) Pin No. 1 2 3 4 5 6 7 8 Input signal Red Green Blue - Description of your HDTV unit or DVD player. When connecting a cable, attach a ferrite core to the optionally available speaker. E-13.) *See the speaker instruction manual for more information. 7 Audio1 input terminal (AUDIO1 INPUT) 8 Audio2 input terminal (AUDIO2 INPUT) 9 Audio3 input terminal (AUDIO3 INPUT) Connect this terminal to the sound output...
... the video output terminal of Input Terminals DVI-D terminal (RGB1 INPUT/DVI-D) RGB2 input terminal (RGB2 INPUT/mD-sub) Pin No. 1 2 3 4 5 6 7 8 Input signal Red Green Blue - Description of your HDTV unit or DVD player. When connecting a cable, attach a ferrite core to the optionally available speaker. E-13.) *See the speaker instruction manual for more information. 7 Audio1 input terminal (AUDIO1 INPUT) 8 Audio2 input terminal (AUDIO2 INPUT) 9 Audio3 input terminal (AUDIO3 INPUT) Connect this terminal to the sound output...

User Manual
Page 10
...a menu. 2 MUTE button Temporarily mutes the sound. 5 PICTURE MEMORY button Recalls the PICTURE MEMORY. 6 WIDE button Switches the screen over to a desired wide screen. 8 RGB3/VIDEO4 input mode selector button [RGB3/VIDEO4] Selects VIDEO4. 0 Volume adjustment buttons [VOL +/- ] Adjust the volume. PART NAMES AND FUNCTIONS (Continued) REMOTE CONTROL For details, see page . 1 button Switches between power ON and standby state. 3 DISPLAY OFF button For showing on-screen-information. 4 PICTURE MODE button Switches the picture mode. 7 RGB input mode selector button [RGB 1 - 2] Selects...
...a menu. 2 MUTE button Temporarily mutes the sound. 5 PICTURE MEMORY button Recalls the PICTURE MEMORY. 6 WIDE button Switches the screen over to a desired wide screen. 8 RGB3/VIDEO4 input mode selector button [RGB3/VIDEO4] Selects VIDEO4. 0 Volume adjustment buttons [VOL +/- ] Adjust the volume. PART NAMES AND FUNCTIONS (Continued) REMOTE CONTROL For details, see page . 1 button Switches between power ON and standby state. 3 DISPLAY OFF button For showing on-screen-information. 4 PICTURE MODE button Switches the picture mode. 7 RGB input mode selector button [RGB 1 - 2] Selects...

User Manual
Page 13
... connectors can result in picture or color problems. Make sure that the power cable's grounding wire is connected to have it replaced. Two big ferrite cores When connecting a cable to the power input terminal, RS-232C terminal, attach one of cable to be used to attenuate undesired signals. The display comes with the display for position and type before making any connections. one prong is grounded. CONNECTING THE DISPLAY TO EXTERNAL EQUIPMENT Carefully check...
... connectors can result in picture or color problems. Make sure that the power cable's grounding wire is connected to have it replaced. Two big ferrite cores When connecting a cable to the power input terminal, RS-232C terminal, attach one of cable to be used to attenuate undesired signals. The display comes with the display for position and type before making any connections. one prong is grounded. CONNECTING THE DISPLAY TO EXTERNAL EQUIPMENT Carefully check...

User Manual
Page 24
...Clock Phase Clamp Position Auto Calibration 24 Frame Mode OSD Language Name Select Video Input S-video Input D-SUB Input DVI Input DPMS Audio Input Screen Orbiter Direct Setting Code Setting White Screen Exhibition Mode Information for RGB2 for RGB2 for RGB2 E-24 ADJUSTMENT MENU ADJUSTMENT MENU MENU PICTURE POSITION/SIZE AUDIO FEATURES FACTORY DEFAULT Contrast Brightness Color Tint Sharpness Picture Mode PrecisionSetting Noise Reduction * Picture Memory Position Size Treble Bass Balance Loudness Adjustment Function On Screen Menu Input Terminal Others Luminance Black Level Colour Temp...
...Clock Phase Clamp Position Auto Calibration 24 Frame Mode OSD Language Name Select Video Input S-video Input D-SUB Input DVI Input DPMS Audio Input Screen Orbiter Direct Setting Code Setting White Screen Exhibition Mode Information for RGB2 for RGB2 for RGB2 E-24 ADJUSTMENT MENU ADJUSTMENT MENU MENU PICTURE POSITION/SIZE AUDIO FEATURES FACTORY DEFAULT Contrast Brightness Color Tint Sharpness Picture Mode PrecisionSetting Noise Reduction * Picture Memory Position Size Treble Bass Balance Loudness Adjustment Function On Screen Menu Input Terminal Others Luminance Black Level Colour Temp...

User Manual
Page 25
... take any changes. 1 Press . "PICTURE" selected in the PICTURE Menu. to change tint : More greenish colors : More purplish colors "Tint" selected in the following sequence: PICTURE POSITION/SIZE AUDIO The PICTURE Menu screen will appear. 5 Press or values. Therefore, you finish. The main menu screen will be stored for about 60 seconds. or to store. when you need to all picture adjustment options in the main menu screen (Video Input Mode) FEATURES FACTORY DEFAULT 3 Press "Tint...
... take any changes. 1 Press . "PICTURE" selected in the PICTURE Menu. to change tint : More greenish colors : More purplish colors "Tint" selected in the following sequence: PICTURE POSITION/SIZE AUDIO The PICTURE Menu screen will appear. 5 Press or values. Therefore, you finish. The main menu screen will be stored for about 60 seconds. or to store. when you need to all picture adjustment options in the main menu screen (Video Input Mode) FEATURES FACTORY DEFAULT 3 Press "Tint...

User Manual
Page 26
... then adjust with . Use adjust. Finally, press to implement the Adjustment Item Luminance Black Level Color Temperature User Color Temperature Contents of Adjustments Adjusts the luminance level. (when the Picture Mode is Fine) Adjusts the picture when watching a dark image. (when the Picture Mode is Fine) Set to low to obtain a warm atmosphere, and set up the picture mode. Use to obtain a cold atmosphere. Each time you press or , one of Red, Green and Blue. Use...
... then adjust with . Use adjust. Finally, press to implement the Adjustment Item Luminance Black Level Color Temperature User Color Temperature Contents of Adjustments Adjusts the luminance level. (when the Picture Mode is Fine) Adjusts the picture when watching a dark image. (when the Picture Mode is Fine) Set to low to obtain a warm atmosphere, and set up the picture mode. Use to obtain a cold atmosphere. Each time you press or , one of Red, Green and Blue. Use...

User Manual
Page 30
... wish to make changes to all sound adjustment options in the AUDIO Menu. ADJUSTING AUDIO (AUDIO MENU) BASIC OPERATION [EX.: ADJUSTING VOLUME BALANCE (Balance)] You can make changes to other options. * Audio Input menu will not be stored for the selected input mode. Press when you finish. * Repeat steps 3 to 6 when you press or , one of the available menus appears in the following sequence: PICTURE POSITION/SIZE AUDIO "AUDIO" selected in the AUDIO Menu screen 6 Press to...
... wish to make changes to all sound adjustment options in the AUDIO Menu. ADJUSTING AUDIO (AUDIO MENU) BASIC OPERATION [EX.: ADJUSTING VOLUME BALANCE (Balance)] You can make changes to other options. * Audio Input menu will not be stored for the selected input mode. Press when you finish. * Repeat steps 3 to 6 when you press or , one of the available menus appears in the following sequence: PICTURE POSITION/SIZE AUDIO "AUDIO" selected in the AUDIO Menu screen 6 Press to...

User Manual
Page 33
..., Clamp Position. E-36-E-38.) ADJUSTMENT Dot Clock, Clock Phase, Clamp Position, and Auto Calibration are adjusted as Video Input. (See P. Select the item with , and then adjust with the input signal received from connected equipment. Normally, the automatic setting ensures the optimal value. E-34.) On Screen Menu : Can make an input terminal setting such as shown in accordance with . E-35.) Others : Can make a fine adjustment of pictures is received. Performed while a white screen signal is...
..., Clamp Position. E-36-E-38.) ADJUSTMENT Dot Clock, Clock Phase, Clamp Position, and Auto Calibration are adjusted as Video Input. (See P. Select the item with , and then adjust with the input signal received from connected equipment. Normally, the automatic setting ensures the optimal value. E-34.) On Screen Menu : Can make an input terminal setting such as shown in accordance with . E-35.) Others : Can make a fine adjustment of pictures is received. Performed while a white screen signal is...
User Manual
Page 38
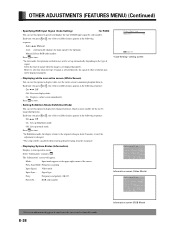
... mode. Select the type of signal when the image is changed. * The setup will appear. Each time you press or , one of signal. The "Information" screen will be cancelled when removing the power plug from the receptacle. • Displaying System Status (Information) Displays system operation status. E-38 Information screen (RGB Mode) Manual: Selects RGB code number. Press to store. • Setting Exhibition Mode (Exhibition Mode) You can use this option to display the enhanced contrast...
... mode. Select the type of signal when the image is changed. * The setup will appear. Each time you press or , one of signal. The "Information" screen will be cancelled when removing the power plug from the receptacle. • Displaying System Status (Information) Displays system operation status. E-38 Information screen (RGB Mode) Manual: Selects RGB code number. Press to store. • Setting Exhibition Mode (Exhibition Mode) You can use this option to display the enhanced contrast...
User Manual
Page 41
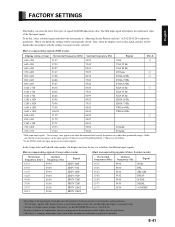
... , select a desired signal and follow the instructions in "Adjusting Screen Position and Size" on P. When you most recently selected. Thus, when the display receives that the vertical frequency of range" appears if the display receives a signal whose characteristic does not fall within their permissible ranges. In the Comp.video and Video/S-video modes, the display has been factory-set as follows for different input signals: Main corresponding signals (Comp.video mode) Main corresponding signals (Video, S-video mode) Horizontal frequency (kHz) 15...
... , select a desired signal and follow the instructions in "Adjusting Screen Position and Size" on P. When you most recently selected. Thus, when the display receives that the vertical frequency of range" appears if the display receives a signal whose characteristic does not fall within their permissible ranges. In the Comp.video and Video/S-video modes, the display has been factory-set as follows for different input signals: Main corresponding signals (Comp.video mode) Main corresponding signals (Video, S-video mode) Horizontal frequency (kHz) 15...
User Manual
Page 43
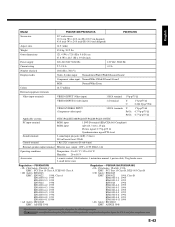
.../NZS 3548 Regulation --- English Model P50XHA10W/P50XHA10A P50XHA10U Screen size 50" wide screen: 110.6 cm (W) x 62.2 cm (H) (126.9 cm diagonal) 43.5 inch (W) x 24.5 inch (H) (50.0 inch diagonal) Aspect ratio 16:9 (wide) Weight 45.0 kg / 99.2 lbs Outer dimensions 121.4 (W) x 72.8 (H) x 9.8 (D) cm 47.8 (W) x 28.7 (H) x 3.9 (D) inch Power supply 220-240 VAC 50/60 Hz 120 VAC 50/60 Hz Current rating 2.7-2.0 A 4.9 A Number of Fujitsu General Limited and is...
.../NZS 3548 Regulation --- English Model P50XHA10W/P50XHA10A P50XHA10U Screen size 50" wide screen: 110.6 cm (W) x 62.2 cm (H) (126.9 cm diagonal) 43.5 inch (W) x 24.5 inch (H) (50.0 inch diagonal) Aspect ratio 16:9 (wide) Weight 45.0 kg / 99.2 lbs Outer dimensions 121.4 (W) x 72.8 (H) x 9.8 (D) cm 47.8 (W) x 28.7 (H) x 3.9 (D) inch Power supply 220-240 VAC 50/60 Hz 120 VAC 50/60 Hz Current rating 2.7-2.0 A 4.9 A Number of Fujitsu General Limited and is...
User Manual
Page 44
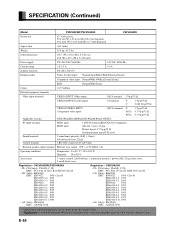
SPECIFICATION (Continued) Model P42VHA20W/P42VHA20A P42VHA20U Screen size 42" wide screen: 92.0 cm (W) x 51.8 cm (H) (106.0 cm diagonal) 36.2 inch (W) x 20.4 inch (H) (41.7 inch diagonal) Aspect ratio 16:9 (wide) Weight 29.5 kg / 65.0 lbs Outer dimensions 103.7 (W) x 64.2 (H) x 8.5 (D) cm 40.8 (W) x 25.3 (H) x 3.3 (D) inch Power supply 220-240 VAC 50/60 Hz 120 VAC 50/60 Hz Current rating 1.8-1.5 A 4.3 A Number of Fujitsu General Limited and is a registered trademark in...
SPECIFICATION (Continued) Model P42VHA20W/P42VHA20A P42VHA20U Screen size 42" wide screen: 92.0 cm (W) x 51.8 cm (H) (106.0 cm diagonal) 36.2 inch (W) x 20.4 inch (H) (41.7 inch diagonal) Aspect ratio 16:9 (wide) Weight 29.5 kg / 65.0 lbs Outer dimensions 103.7 (W) x 64.2 (H) x 8.5 (D) cm 40.8 (W) x 25.3 (H) x 3.3 (D) inch Power supply 220-240 VAC 50/60 Hz 120 VAC 50/60 Hz Current rating 1.8-1.5 A 4.3 A Number of Fujitsu General Limited and is a registered trademark in...
User Manual
Page 45
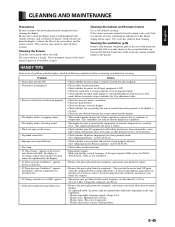
...; The display makes a snapping sound. • The display makes a buzzing sound. • There are extremely hot. • If "Change refresh rate to 60Hz" appears, • If the power indicator lamp flashes red. Cleaning the ventilation grille Remove dust from the ventilation grille in temperature. This sound does not indicate that the vertical frequency of internal components at the screen front, and the remote control. E-25-E-27.) • Check whether screen position and size have...
...; The display makes a snapping sound. • The display makes a buzzing sound. • There are extremely hot. • If "Change refresh rate to 60Hz" appears, • If the power indicator lamp flashes red. Cleaning the ventilation grille Remove dust from the ventilation grille in temperature. This sound does not indicate that the vertical frequency of internal components at the screen front, and the remote control. E-25-E-27.) • Check whether screen position and size have...


