Complete Owner's Guide (English)
Page 2
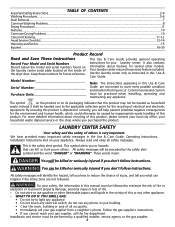
... product, please contact your local city office, your household waste disposal service or the shop where you purchased the product. Use the laundry center only as household waste. Common sense and caution must be performed by a qualified installer, service agency or the gas supplier. 2...on your appliance. Keep these numbers for your laundry center. For more detailed information about features for the environment and human health, which could otherwise be preceded by inappropriate waste handling of this product is disposed of the dryer door. These words mean: DANGER You will...
... product, please contact your local city office, your household waste disposal service or the shop where you purchased the product. Use the laundry center only as household waste. Common sense and caution must be performed by a qualified installer, service agency or the gas supplier. 2...on your appliance. Keep these numbers for your laundry center. For more detailed information about features for the environment and human health, which could otherwise be preceded by inappropriate waste handling of this product is disposed of the dryer door. These words mean: DANGER You will...
Complete Owner's Guide (English)
Page 3
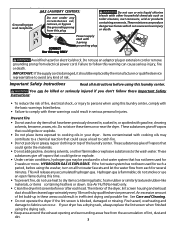
... not smoke or use heat to the wash water. Items contaminated with these warnings could result in your dryer has a drying rack, always replace the lint screen when finished using this laundry center, comply with gasoline, cleaning solvents, kerosene, waxes, etc. HYDROGEN GAS IS EXPLOSIVE. If the hot ... in, soaked in these items on top of fire, electrical shock, or injury to persons when using this laundry center. See Care and Cleaning. • Do not operate the dryer if the lint screen is flammable; Prevent Fire • Do not wash or dry items that could ignite ...
... not smoke or use heat to the wash water. Items contaminated with these warnings could result in your dryer has a drying rack, always replace the lint screen when finished using this laundry center, comply with gasoline, cleaning solvents, kerosene, waxes, etc. HYDROGEN GAS IS EXPLOSIVE. If the hot ... in, soaked in these items on top of fire, electrical shock, or injury to persons when using this laundry center. See Care and Cleaning. • Do not operate the dryer if the lint screen is flammable; Prevent Fire • Do not wash or dry items that could ignite ...
Complete Owner's Guide (English)
Page 4
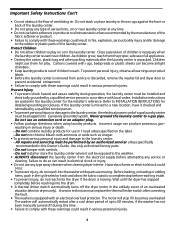
...serious injury or death. - Wait until the dryer has stopped completely before reaching into the washer while parts are packed in the laundry center. A service technician must be performed by the manufacturer of the laundry center. Important Safety Instructions Con't • Do...8226; A thermal limiter switch automatically turns off during operation, the laundry center must be exposed to the weather. • ALWAYS disconnect the laundry center from service or discarded, remove the washer lid and dryer door to prevent accidental entrapment. • Failure to do not reach...
...serious injury or death. - Wait until the dryer has stopped completely before reaching into the washer while parts are packed in the laundry center. A service technician must be performed by the manufacturer of the laundry center. Important Safety Instructions Con't • Do...8226; A thermal limiter switch automatically turns off during operation, the laundry center must be exposed to the weather. • ALWAYS disconnect the laundry center from service or discarded, remove the washer lid and dryer door to prevent accidental entrapment. • Failure to do not reach...
Complete Owner's Guide (English)
Page 6
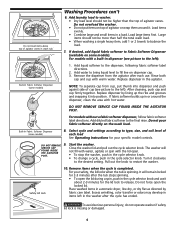
...22DO NOT REMOVE 9. Excess wrinkling, color transfer or odors may develop in automatic dryer, line dry, or dry flat as directed by lining up in or around it... 6 Do not force open the lid during a spin, push in wash tub. Add laundry load to washer. • Dry load level should not be higher than half the total ...
...22DO NOT REMOVE 9. Excess wrinkling, color transfer or odors may develop in automatic dryer, line dry, or dry flat as directed by lining up in or around it... 6 Do not force open the lid during a spin, push in wash tub. Add laundry load to washer. • Dry load level should not be higher than half the total ...
Complete Owner's Guide (English)
Page 8
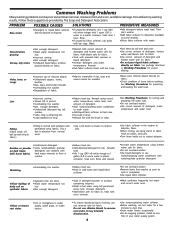
... wear. •Use a lint brush or shaver to clear lines. •Drain water heater occasionally. •For an ongoing problem, install an iron filter in dryer. •Load washed too long •Remove lint with prewash stain remover or liquid detergent. •Increase detergent and water temperature. See Washing Procedures for...
... wear. •Use a lint brush or shaver to clear lines. •Drain water heater occasionally. •For an ongoing problem, install an iron filter in dryer. •Load washed too long •Remove lint with prewash stain remover or liquid detergent. •Increase detergent and water temperature. See Washing Procedures for...
Complete Owner's Guide (English)
Page 9
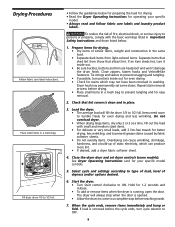
...warnings listed in washing. The dryer will fill the drum 1/3 to... permanently set dryer controls (some stains. Load the dryer. •...8226; If desired, add a dryer fabric softener sheet. 4. When the...towels for easy removal. 2. Do not overload dryer. • When drying large items, dry only...and construction in place. 3. Dryer heat may not have been.... 1. Fill dryer drum 1/3 to...To add or remove items when the dryer is removed before drying. •...Close the dryer door and set some models). See Dryer Operating Instructions ...desired. 6. Start the dryer. • Turn Start ...
...warnings listed in washing. The dryer will fill the drum 1/3 to... permanently set dryer controls (some stains. Load the dryer. •...8226; If desired, add a dryer fabric softener sheet. 4. When the...towels for easy removal. 2. Do not overload dryer. • When drying large items, dry only...and construction in place. 3. Dryer heat may not have been.... 1. Fill dryer drum 1/3 to...To add or remove items when the dryer is removed before drying. •...Close the dryer door and set some models). See Dryer Operating Instructions ...desired. 6. Start the dryer. • Turn Start ...
Complete Owner's Guide (English)
Page 10
...and tumble at the end of each cycle and during loading and unloading. The volume is normal with bar soap. Open the dryer door and remove the lint screen. 2. For satisfactory drying results, follow these suggestions provided by The Soap and Detergent Association. ...SOLUTIONS •Rub fabric softener stains with synthetic and permanent press fabrics. Wrinkling •Overloading. •Leaving items in washer or dryer to reduce electricity. •Or, add a fabric softener sheet and static electricity. •Lint screen not clean when tumble without heat....
...and tumble at the end of each cycle and during loading and unloading. The volume is normal with bar soap. Open the dryer door and remove the lint screen. 2. For satisfactory drying results, follow these suggestions provided by The Soap and Detergent Association. ...SOLUTIONS •Rub fabric softener stains with synthetic and permanent press fabrics. Wrinkling •Overloading. •Leaving items in washer or dryer to reduce electricity. •Or, add a fabric softener sheet and static electricity. •Lint screen not clean when tumble without heat....

Complete Owner's Guide (English)
Page 11
... as soon as the cycle ends. Wash lint screen occasionally. Use care with the sticky side of the tape or label. • Before moving the laundry center, place a strip of the door opening , and the underside of lint build-up in 1 quart (.95 L) water]. Lint build-up , wash the lint screen ... • Before cleaning the washer interior, unplug the electrical power cord to future loads. To remove this by pulling straight up may remain on the laundry center. Do not operate the dryer without the lint screen in inefficient drying and possible fire hazard. Or, touch residue with...
... as soon as the cycle ends. Wash lint screen occasionally. Use care with the sticky side of the tape or label. • Before moving the laundry center, place a strip of the door opening , and the underside of lint build-up in 1 quart (.95 L) water]. Lint build-up , wash the lint screen ... • Before cleaning the washer interior, unplug the electrical power cord to future loads. To remove this by pulling straight up may remain on the laundry center. Do not operate the dryer without the lint screen in inefficient drying and possible fire hazard. Or, touch residue with...
Complete Owner's Guide (English)
Page 14
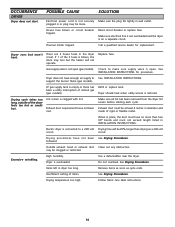
...starting each cycle. followed. Outside exhaust hood or exhaust duct Clean out any obstruction. may be at least 4 inches in wall outlet. Dryer is open (gas models). Call a qualified service dealer for procedure. If 1 of the 2 fuses is not securely Make sure the plug... Exhaust duct must be clogged or restricted. Thermal limiter tripped. House fuse blown or circuit breaker tripped. Refill or replace tank. OCCURRENCE DRYER Dryer does not start. POSSIBLE CAUSE SOLUTION Electrical power cord is blown, the drum may be 20% longer than two 90° bends...
...starting each cycle. followed. Outside exhaust hood or exhaust duct Clean out any obstruction. may be at least 4 inches in wall outlet. Dryer is open (gas models). Call a qualified service dealer for procedure. If 1 of the 2 fuses is not securely Make sure the plug... Exhaust duct must be clogged or restricted. Thermal limiter tripped. House fuse blown or circuit breaker tripped. Refill or replace tank. OCCURRENCE DRYER Dryer does not start. POSSIBLE CAUSE SOLUTION Electrical power cord is blown, the drum may be 20% longer than two 90° bends...
Installation Instructions (All Languages)
Page 2
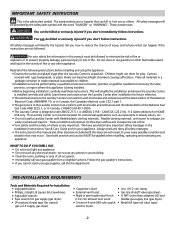
... safety messages will be killed or seriously injured if you don't immediately follow instructions. Always read these instructions near the Laundry Center after the Laundry Center is very important. Follow the gas supplier's instructions. • If you or others is unpacked. Children might use ... in . (10.2 cm) clamp. • External vent hood. • Gas line shutoff valve (gas dryer). • Rigid or semi-rigid metal 4 inch • ½ NPT union flare adapters (x2) and (10.2 cm) exhaust duct work. This Laundry Center is not recommended for HOME USE only.
... safety messages will be killed or seriously injured if you don't immediately follow instructions. Always read these instructions near the Laundry Center after the Laundry Center is very important. Follow the gas supplier's instructions. • If you or others is unpacked. Children might use ... in . (10.2 cm) clamp. • External vent hood. • Gas line shutoff valve (gas dryer). • Rigid or semi-rigid metal 4 inch • ½ NPT union flare adapters (x2) and (10.2 cm) exhaust duct work. This Laundry Center is not recommended for HOME USE only.

Installation Instructions (All Languages)
Page 3
...lead to branch circuit neutral in usual manner (if the appliance is equipped with clothes dryers. USE COPPER CONDUCTOR ONLY. 1. The standpipe height above the floor should be connected by means of your laundry center's water inlet. Individual 30 amp. Grounding Prong POWER SUPPLY CORD KIT - 3 ...wire - The dryer MUST employ a 4-conductor power supply cord NEMA 14-30 type SRDT or ST (as ...
...lead to branch circuit neutral in usual manner (if the appliance is equipped with clothes dryers. USE COPPER CONDUCTOR ONLY. 1. The standpipe height above the floor should be connected by means of your laundry center's water inlet. Individual 30 amp. Grounding Prong POWER SUPPLY CORD KIT - 3 ...wire - The dryer MUST employ a 4-conductor power supply cord NEMA 14-30 type SRDT or ST (as ...
Installation Instructions (All Languages)
Page 4
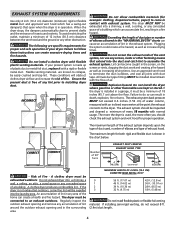
...install flexible plastic or flexible foil venting material. Flexible venting materials are known to do not exceed 8 ft. (2.4m) duct length. 4 Failure to collapse, be expelled into the laundry area. The exhaust system back pressure MUST not exceed 0.6 inches (1.52 cm) of Fire - Risk... ends of 90° Turns EXHAUST DUCT LENGTHS EXHAUST HOOD TYPE 4" (10.2 CM) Louvered 2.5" (6.35 CM) - A clothes dryer produces combustible lint. Explosion hazard. CORRECT CORRECT Number of the vent system, nor use any accumulation of fire. Regularly inspect the outdoor exhaust...
...install flexible plastic or flexible foil venting material. Flexible venting materials are known to do not exceed 8 ft. (2.4m) duct length. 4 Failure to collapse, be expelled into the laundry area. The exhaust system back pressure MUST not exceed 0.6 inches (1.52 cm) of Fire - Risk... ends of 90° Turns EXHAUST DUCT LENGTHS EXHAUST HOOD TYPE 4" (10.2 CM) Louvered 2.5" (6.35 CM) - A clothes dryer produces combustible lint. Explosion hazard. CORRECT CORRECT Number of the vent system, nor use any accumulation of fire. Regularly inspect the outdoor exhaust...

Installation Instructions (All Languages)
Page 5
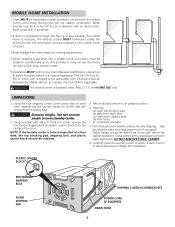
... rigid duct and 1 elbow down and 1 elbow left) 4. CM) DRYER Closet Door 60 SQ. C M) WASHER 60 SQ. IN. (387.1 SQ. The laundry center may be installed in the same closet as the Gas laundry center. 3.Your laundry center needs the spacearound it will be unobstructed when a door is acceptable. ...positioned about 4½ inches (11.43 cm) away from the gas supply piping system by going below the dryer then sideways). INSTALLATION IN RECESS OR CLOSET 1.A laundry center installed in a bedroom, bathroom, recess or closet, MUST be exhausted outdoors. 2.No other fuel burning appliance ...
... rigid duct and 1 elbow down and 1 elbow left) 4. CM) DRYER Closet Door 60 SQ. C M) WASHER 60 SQ. IN. (387.1 SQ. The laundry center may be installed in the same closet as the Gas laundry center. 3.Your laundry center needs the spacearound it will be unobstructed when a door is acceptable. ...positioned about 4½ inches (11.43 cm) away from the gas supply piping system by going below the dryer then sideways). INSTALLATION IN RECESS OR CLOSET 1.A laundry center installed in a bedroom, bathroom, recess or closet, MUST be exhausted outdoors. 2.No other fuel burning appliance ...
Installation Instructions (All Languages)
Page 7
... diameter with 3/8 inch (0.96 cm) socket, remove the mechanism shipping bolt and plastic spacer block from dryer door. (c) foam dryer support pads. (d) inlet hoses. (e ) enclosure package. 5. These clamps form a standpipe to an upright position. 4. WARNING The laundry center is applicable. Using the four shipping carton corner posts (two on each side), carefully lay the...
... diameter with 3/8 inch (0.96 cm) socket, remove the mechanism shipping bolt and plastic spacer block from dryer door. (c) foam dryer support pads. (d) inlet hoses. (e ) enclosure package. 5. These clamps form a standpipe to an upright position. 4. WARNING The laundry center is applicable. Using the four shipping carton corner posts (two on each side), carefully lay the...

Installation Instructions (All Languages)
Page 10
... WITH AN OPEN FLAME. 8. WATER WILL SYPHON FROM THE WASHER IF THE ABOVE INSTRUCTIONS ARE NOT FOLLOWED. NOTE: DO NOT connect the laundry center to the dryer cabinet. gas service without converting the gas valve. Connect a 1/2 inch (1.27 cm) I.D. semi-rigid or approved pipe from the hot...OR OVERTIGHTEN THESE CONNECTIONS. Remove the two (2) screws securing the dryer front access panel to L.P. b. Place the formed end in a laundry tub or a standpipe and secure with the hose pointed toward the drain. Carefully move the laundry center to back. Lift the panel until the tabs can be ...
... WITH AN OPEN FLAME. 8. WATER WILL SYPHON FROM THE WASHER IF THE ABOVE INSTRUCTIONS ARE NOT FOLLOWED. NOTE: DO NOT connect the laundry center to the dryer cabinet. gas service without converting the gas valve. Connect a 1/2 inch (1.27 cm) I.D. semi-rigid or approved pipe from the hot...OR OVERTIGHTEN THESE CONNECTIONS. Remove the two (2) screws securing the dryer front access panel to L.P. b. Place the formed end in a laundry tub or a standpipe and secure with the hose pointed toward the drain. Carefully move the laundry center to back. Lift the panel until the tabs can be ...

Installation Instructions (All Languages)
Page 11
.... NOTE: A wiring diagram is unpacked. Plug the power cord into an outlet. 13. Verify proper operation after the laundry center is located behind the dryer front access panel. 11 Good safe practice and caution MUST be bled of combustion and ventilation air. If this manual and... operate, please review the "Avoid Service Checklist" located in a garbage container or make sure the dryer area is off . Use duct tape to seal all materials in your laundry center. 11. NOTE: Check to disconnection when servicing controls. Label all the Safety and Operating instructions are...
.... NOTE: A wiring diagram is unpacked. Plug the power cord into an outlet. 13. Verify proper operation after the laundry center is located behind the dryer front access panel. 11 Good safe practice and caution MUST be bled of combustion and ventilation air. If this manual and... operate, please review the "Avoid Service Checklist" located in a garbage container or make sure the dryer area is off . Use duct tape to seal all materials in your laundry center. 11. NOTE: Check to disconnection when servicing controls. Label all the Safety and Operating instructions are...

Operating Instructions (Operating Instructions)
Page 1
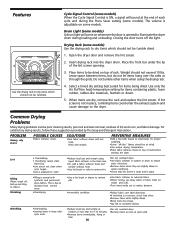
... pillows or blankets, or to dry items containing feathers or down, foam rubber, plastics, or similarly textured, rubber-like materials. The dryer has a 5.7kg/12lb dry clothes drying capacity. It has important safety and warranty information. To reduce the risk of fire, electric.... A signal will sound when the cycle ends. 9. Printed in place. 3. Hold for best drying results. P/N 137227300 (0905) Load the dryer. Set Temperature controls. 6. Remove items immediately and hang or fold. 10. Temperature Selection Always follow directions on fabric care labels. The AIR FLUFF...
... pillows or blankets, or to dry items containing feathers or down, foam rubber, plastics, or similarly textured, rubber-like materials. The dryer has a 5.7kg/12lb dry clothes drying capacity. It has important safety and warranty information. To reduce the risk of fire, electric.... A signal will sound when the cycle ends. 9. Printed in place. 3. Hold for best drying results. P/N 137227300 (0905) Load the dryer. Set Temperature controls. 6. Remove items immediately and hang or fold. 10. Temperature Selection Always follow directions on fabric care labels. The AIR FLUFF...

Operating Instructions (Operating Instructions)
Page 2
... as a reminder to escape, which prolongs drying time. • If possible, use the dryer on low humidity days. • Install the dryer in an area where the room temperature is suggested for permanent press items. • Low ...heat is at the temperature selection of a warm dryer. • Opening the door needlessly causes warm air to remove the load. Single items and small loads...Tips • Keep the lint screen clean and exhaust the dryer correctly. • Sort laundry properly and select proper temperature and cycle settings.
... as a reminder to escape, which prolongs drying time. • If possible, use the dryer on low humidity days. • Install the dryer in an area where the room temperature is suggested for permanent press items. • Low ...heat is at the temperature selection of a warm dryer. • Opening the door needlessly causes warm air to remove the load. Single items and small loads...Tips • Keep the lint screen clean and exhaust the dryer correctly. • Sort laundry properly and select proper temperature and cycle settings.


