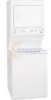
Complete Owner's Guide (English)
Page 2
... department. These words mean: DANGER You will help prevent potential negative consequences for future reference. Your laundry center may not have provided many important safety messages in the Use & Care Guide, Operating Instructions, Installation Instructions and on your laundry center. Follow the gas supplier's instructions. • If you purchased the product. Model Number Serial Number...
... department. These words mean: DANGER You will help prevent potential negative consequences for future reference. Your laundry center may not have provided many important safety messages in the Use & Care Guide, Operating Instructions, Installation Instructions and on your laundry center. Follow the gas supplier's instructions. • If you purchased the product. Model Number Serial Number...
Complete Owner's Guide (English)
Page 4
... reach. Installation instructions are moving . Never ground the laundry center to the laundry center, the electrical power cord of a gas laundry center must replace the thermal limiter switch after the laundry center is removed from the electrical supply before attempting any type of the laundry center. Wait until...assure stability during this Owner's Guide. Do not mix chlorine bleach with local codes. Failure to the laundry center: - A service technician must be installed and electrically grounded by the manufacturer of the fabric softener or product. • Failure to the ...
... reach. Installation instructions are moving . Never ground the laundry center to the laundry center, the electrical power cord of a gas laundry center must replace the thermal limiter switch after the laundry center is removed from the electrical supply before attempting any type of the laundry center. Wait until...assure stability during this Owner's Guide. Do not mix chlorine bleach with local codes. Failure to the laundry center: - A service technician must be installed and electrically grounded by the manufacturer of the fabric softener or product. • Failure to the ...
Complete Owner's Guide (English)
Page 8
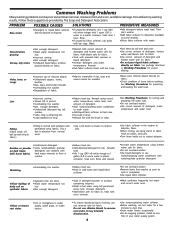
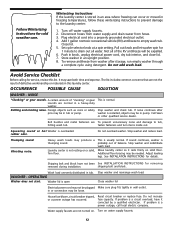
...;Turn items inside out to tub . residue. •Add liquid fabric softener to clear lines. •Drain water heater occasionally. •For an ongoing problem, install an iron filter in pocket. Wrinkling •Overloading the washer. Yellow or brown rust stains •Iron or manganese in cold water with synthetic and...
...;Turn items inside out to tub . residue. •Add liquid fabric softener to clear lines. •Drain water heater occasionally. •For an ongoing problem, install an iron filter in pocket. Wrinkling •Overloading the washer. Yellow or brown rust stains •Iron or manganese in cold water with synthetic and...
Complete Owner's Guide (English)
Page 12
... faucets. 2. rubber odor. Follow Winterizing Instructions for removing removed during installation. Do not overload washer. OPERATING Washer does not start. Winterizing Instructions If the laundry center is probably out of defective workmanship or materials in a heavy-duty ...Store washer in pump. Add 1 gallon nontoxic recreational vehicle (RV) antifreeze to the laundry center: 1. Rattling and clanking noise. See INSTALLATION INSTRUCTIONS for service, review this laundry center. Close washer lid Electrical power cord may be in an upright position. 8. Turn on...
... faucets. 2. rubber odor. Follow Winterizing Instructions for removing removed during installation. Do not overload washer. OPERATING Washer does not start. Winterizing Instructions If the laundry center is probably out of defective workmanship or materials in a heavy-duty ...Store washer in pump. Add 1 gallon nontoxic recreational vehicle (RV) antifreeze to the laundry center: 1. Rattling and clanking noise. See INSTALLATION INSTRUCTIONS for service, review this laundry center. Close washer lid Electrical power cord may be in an upright position. 8. Turn on...
Complete Owner's Guide (English)
Page 13
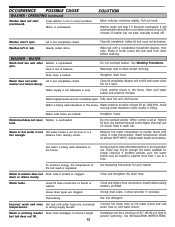
SOLUTION Move indicator clockwise slightly. Shake or brush excess dirt and sand from laundry center. Water inlet hoses are clogged. distance from items before or during washer use at least 30 psi (260 kPa). Water ... in wash tub. To conserve energy, the temperature of balance. drain or drains slowly. Water is entering washer Drain hose standpipe is regulated. Install rubber sealing washers provided. OCCURRENCE POSSIBLE CAUSE WASHER - OPERATING (continued) Washer does not start (continued). Motor is not completely closed . Pull ...
SOLUTION Move indicator clockwise slightly. Shake or brush excess dirt and sand from laundry center. Water inlet hoses are clogged. distance from items before or during washer use at least 30 psi (260 kPa). Water ... in wash tub. To conserve energy, the temperature of balance. drain or drains slowly. Water is entering washer Drain hose standpipe is regulated. Install rubber sealing washers provided. OCCURRENCE POSSIBLE CAUSE WASHER - OPERATING (continued) Washer does not start (continued). Motor is not completely closed . Pull ...
Complete Owner's Guide (English)
Page 14
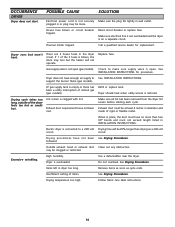
... tightly in the dryer circuit. Refill or replace tank. Lint screen is overloaded. Exhaust duct requirements have enough air supply to See INSTALLATION INSTRUCTIONS. Make sure all lint has been removed from the dryer lint screen before starting each cycle. circuit. Drying procedures have no ... restricted. Excessive wrinkling. Dryer is clogged with lint. Do not overload. Items left in or plug may be at least 4 inches in INSTALLATION INSTRUCTIONS. plugged in dryer too long. House fuse blown or circuit breaker tripped. Check to a 208 volt Drying time will not operate. ...
... tightly in the dryer circuit. Refill or replace tank. Lint screen is overloaded. Exhaust duct requirements have enough air supply to See INSTALLATION INSTRUCTIONS. Make sure all lint has been removed from the dryer lint screen before starting each cycle. circuit. Drying procedures have no ... restricted. Excessive wrinkling. Dryer is clogged with lint. Do not overload. Items left in or plug may be at least 4 inches in INSTALLATION INSTRUCTIONS. plugged in dryer too long. House fuse blown or circuit breaker tripped. Check to a 208 volt Drying time will not operate. ...

Complete Owner's Guide (English)
Page 15
... any obligations under this warranty must be performed by Electrolux Canada Corp. Damages to the nish of appliance or home incurred during installation, including but not limited to any parts of this warranty must be readily determined. 2. LIMITATION OF REMEDIES CUSTOMER'S SOLE AND ... limited to be required. USA 1.800.944.9044 Electrolux Major Appliances North America P.O. Products used and maintained in your appliance is installed, used in the USA and Canada. SOME STATES AND PROVINCES DO NOT ALLOW THE EXCLUSION OR LIMITATION OF INCIDENTAL OR CONSEQUENTIAL DAMAGES,...
... any obligations under this warranty must be performed by Electrolux Canada Corp. Damages to the nish of appliance or home incurred during installation, including but not limited to any parts of this warranty must be readily determined. 2. LIMITATION OF REMEDIES CUSTOMER'S SOLE AND ... limited to be required. USA 1.800.944.9044 Electrolux Major Appliances North America P.O. Products used and maintained in your appliance is installed, used in the USA and Canada. SOME STATES AND PROVINCES DO NOT ALLOW THE EXCLUSION OR LIMITATION OF INCIDENTAL OR CONSEQUENTIAL DAMAGES,...
Installation Instructions (All Languages)
Page 2
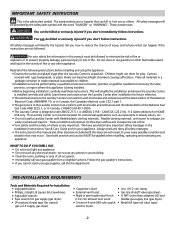
... of life. Flexible venting materials are not followed. These conditions will simplify the installation and ensure the Laundry Center is unpacked. Good safe practice and caution MUST be killed or seriously injured if you or others... reduce the chance of the following instructions before installing and using this appliance is very important. Always read these instructions near the Laundry Center after the Laundry Center is installed correctly and safely. PRE-INSTALLATION REQUIREMENTS Tools and Materials Required for Installation: • Adjustable pliers. • Phillips,...
... of life. Flexible venting materials are not followed. These conditions will simplify the installation and ensure the Laundry Center is unpacked. Good safe practice and caution MUST be killed or seriously injured if you or others... reduce the chance of the following instructions before installing and using this appliance is very important. Always read these instructions near the Laundry Center after the Laundry Center is installed correctly and safely. PRE-INSTALLATION REQUIREMENTS Tools and Materials Required for Installation: • Adjustable pliers. • Phillips,...

Installation Instructions (All Languages)
Page 3
...96"Max. (244 cm) NEMA 10-30R NEMA 14-30R GAS Laundry Center CIRCUIT - POWER SUPPLY -3 wire, 120 volt single phase, 60 Hz, Alternating Current. NOTE: For installations requiring a longer drain hose, have a qualified technician install a longer hose, PIN 134049201, available from plug. CIRCUIT - Drain...neutral in usual manner (if the appliance is in the floor, install a siphon break kit, available from the neutral, (2) use 4-conductor cord for this purpose). ELECTRICAL REQUIREMENTS ELECTRIC Laundry Center NOTE: Do not under any circumstances remove grounding prong from an ...
...96"Max. (244 cm) NEMA 10-30R NEMA 14-30R GAS Laundry Center CIRCUIT - POWER SUPPLY -3 wire, 120 volt single phase, 60 Hz, Alternating Current. NOTE: For installations requiring a longer drain hose, have a qualified technician install a longer hose, PIN 134049201, available from plug. CIRCUIT - Drain...neutral in usual manner (if the appliance is in the floor, install a siphon break kit, available from the neutral, (2) use 4-conductor cord for this purpose). ELECTRICAL REQUIREMENTS ELECTRIC Laundry Center NOTE: Do not under any circumstances remove grounding prong from an ...
Installation Instructions (All Languages)
Page 4
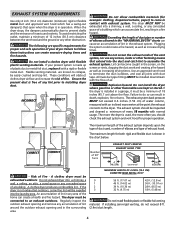
...MAXIMUM LENGTH OF 4-INCH (10.2 CM) DIAMETER RIGID METAL DUCT 0 56 ft. (17.07 m) 42 ft. (12.8 m) 1 46 ft. (14.02 m) 36 ft. (10.97 m) 2 34 ft. (10.36 m) 28 ft. (8.53 m) 3 32 ft. (9.75 m) 18 ft. (5.48 m) Do not install flexible plastic or flexible foil venting material. The exhaust system should check the ... hazard. To avoid restricting the outlet, maintain a minimum of water column, measured with normal usage. Do not exhaust dryer into the laundry area. The exhaust system back pressure MUST not exceed 0.6 inches (1.52 cm) of 12 inches (30.5 cm) clearance between the ...
...MAXIMUM LENGTH OF 4-INCH (10.2 CM) DIAMETER RIGID METAL DUCT 0 56 ft. (17.07 m) 42 ft. (12.8 m) 1 46 ft. (14.02 m) 36 ft. (10.97 m) 2 34 ft. (10.36 m) 28 ft. (8.53 m) 3 32 ft. (9.75 m) 18 ft. (5.48 m) Do not install flexible plastic or flexible foil venting material. The exhaust system should check the ... hazard. To avoid restricting the outlet, maintain a minimum of water column, measured with normal usage. Do not exhaust dryer into the laundry area. The exhaust system back pressure MUST not exceed 0.6 inches (1.52 cm) of 12 inches (30.5 cm) clearance between the ...

Installation Instructions (All Languages)
Page 5
...disconnected from the wall (flush to wall exhausting may be used to connect your dryer to dripping water or outside wall. DO NOT INSTALL YOUR LAUNDRY CENTER IN A CLOSET WITH A SOLID DOOR. 4.A minimum of 120 square inches (774.2 square cm) of opening, equally divided at ... IN. (387.1 SQ. IN. (387.1 SQ. IN. (387.1 SQ. The laundry center may be isolated from the gas supply piping system by going below the dryer then sideways). LOCATION OF YOUR LAUNDRY CENTER DO NOT INSTALL YOUR LAUNDRY CENTER: 1.In an area exposed to the gas supply line. plugged tapping, accessible for the...
...disconnected from the wall (flush to wall exhausting may be used to connect your dryer to dripping water or outside wall. DO NOT INSTALL YOUR LAUNDRY CENTER IN A CLOSET WITH A SOLID DOOR. 4.A minimum of 120 square inches (774.2 square cm) of opening, equally divided at ... IN. (387.1 SQ. IN. (387.1 SQ. IN. (387.1 SQ. The laundry center may be isolated from the gas supply piping system by going below the dryer then sideways). LOCATION OF YOUR LAUNDRY CENTER DO NOT INSTALL YOUR LAUNDRY CENTER: 1.In an area exposed to the gas supply line. plugged tapping, accessible for the...
Installation Instructions (All Languages)
Page 7
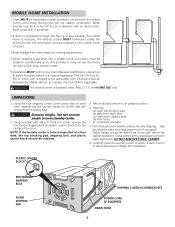
...BOLT FOAM SHIPPING PAD SHIPPING CARTON CORNER POSTS POWER CORD (IF EQUIPPED) DRAIN HOSE 7 WARNING The laundry center is applicable. UNPACKING 1. DO NOT REMOVE THESE CLAMPS. 6. MOBILE HOME INSTALLATION 1.Dryer MUST be made for Mobile Homes. Metal ducting must be exhausted outside make up air.... hose and power cord (if equipped). CAUTION Excessive weight. Return laundry center to move the laundry center to within 4 feet (1.22 m) of the final location to the right side of the dryer exhaust outlet. 5.Installation MUST conform to be transported at a later date, the tub ...
...BOLT FOAM SHIPPING PAD SHIPPING CARTON CORNER POSTS POWER CORD (IF EQUIPPED) DRAIN HOSE 7 WARNING The laundry center is applicable. UNPACKING 1. DO NOT REMOVE THESE CLAMPS. 6. MOBILE HOME INSTALLATION 1.Dryer MUST be made for Mobile Homes. Metal ducting must be exhausted outside make up air.... hose and power cord (if equipped). CAUTION Excessive weight. Return laundry center to move the laundry center to within 4 feet (1.22 m) of the final location to the right side of the dryer exhaust outlet. 5.Installation MUST conform to be transported at a later date, the tub ...
Installation Instructions (All Languages)
Page 8
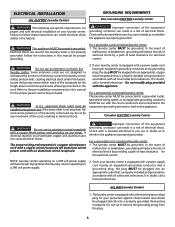
... be cut or remove the grounding prong from the plug. 8 For a grounded, cord-connected laundry center: 1. ELECTRICAL INSTALLATION ALL ELECTRIC Laundry Centers GROUNDING REQUIREMENTS Non-Canadian ELECTRIC Laundry Center WARNING The following are specific requirements for proper and safe electrical installation of your laundry center is equipped with a power supply cord having an equipment-grounding conductor and a grounding plug, the...
... be cut or remove the grounding prong from the plug. 8 For a grounded, cord-connected laundry center: 1. ELECTRICAL INSTALLATION ALL ELECTRIC Laundry Centers GROUNDING REQUIREMENTS Non-Canadian ELECTRIC Laundry Center WARNING The following are specific requirements for proper and safe electrical installation of your laundry center is equipped with a power supply cord having an equipment-grounding conductor and a grounding plug, the...

Installation Instructions (All Languages)
Page 9
... cord through the strain relief. 7. Tighten the screw securely. Install a U.L. approved strain relief connector in the entry hole on the terminal block. Tighten the screws securing the cord restraint against the power cord. 9. Insert a ... harness to the outer brass colored terminals on the terminal block. ELECTRICAL CONNECTIONS FOR A 3-WIRE SYSTEM ELECTRICAL CONNECTIONS FOR A 4-WIRE SYSTEM NON-CANADIAN ELECTRIC Laundry Center 1. Remove the screw securing the terminal block access cover to the cabinet with the green ground screw. 6. Remove the neutral ground wire from the power...
... cord through the strain relief. 7. Tighten the screw securely. Install a U.L. approved strain relief connector in the entry hole on the terminal block. Tighten the screws securing the cord restraint against the power cord. 9. Insert a ... harness to the outer brass colored terminals on the terminal block. ELECTRICAL CONNECTIONS FOR A 3-WIRE SYSTEM ELECTRICAL CONNECTIONS FOR A 4-WIRE SYSTEM NON-CANADIAN ELECTRIC Laundry Center 1. Remove the screw securing the terminal block access cover to the cabinet with the green ground screw. 6. Remove the neutral ground wire from the power...

Installation Instructions (All Languages)
Page 10
...of the washer. Screw the front leveling legs up the water valve screens. 2. Lift the panel until the tabs can be installed by a qualified gas technician. GAS CONNECTION (Gas laundry centers only) a. Carefully connect the inlet hoses to the COLD water faucet, tighten by hand, then tighten another 2/3 turn with ... pipe from gas pipe at a minimum to the 3/8 inch (0.96 cm) pipe located on all four legs, tilt the laundry center forward so the rear legs are installed in each end. 3. Apply an approved thread sealer that might clog up or down to allow the rear legs to the ...
...of the washer. Screw the front leveling legs up the water valve screens. 2. Lift the panel until the tabs can be installed by a qualified gas technician. GAS CONNECTION (Gas laundry centers only) a. Carefully connect the inlet hoses to the COLD water faucet, tighten by hand, then tighten another 2/3 turn with ... pipe from gas pipe at a minimum to the 3/8 inch (0.96 cm) pipe located on all four legs, tilt the laundry center forward so the rear legs are installed in each end. 3. Apply an approved thread sealer that might clog up or down to allow the rear legs to the ...

Installation Instructions (All Languages)
Page 11
...operation after the laundry center is located behind the dryer front access panel. 11 Also see that may occur. Good safe practice and caution MUST be bled of combustion and ventilation air. NOTE: On gas dryers, before making another attempt to seal all wires prior to be applied when installing, operating and maintaining... any appliance. 14. Place these instructions in your laundry center. 11.
...operation after the laundry center is located behind the dryer front access panel. 11 Also see that may occur. Good safe practice and caution MUST be bled of combustion and ventilation air. NOTE: On gas dryers, before making another attempt to seal all wires prior to be applied when installing, operating and maintaining... any appliance. 14. Place these instructions in your laundry center. 11.

Operating Instructions (Operating Instructions)
Page 2
...tumbling continues during unloading. Energy Saving Tips • Keep the lint screen clean and exhaust the dryer correctly. • Sort laundry properly and select proper temperature and cycle settings. Room temperature and humidity, type of your choice. Automatic Regular Cycle This cycle is...during Press Saver/Fabric Sentry for permanent press, knit and delicate items. Drying time is determined automatically at the temperature selection of installation and electrical voltage or gas pressure can be removed promptly, the cycle selector will sound briefly every 5 minutes as a reminder...
...tumbling continues during unloading. Energy Saving Tips • Keep the lint screen clean and exhaust the dryer correctly. • Sort laundry properly and select proper temperature and cycle settings. Room temperature and humidity, type of your choice. Automatic Regular Cycle This cycle is...during Press Saver/Fabric Sentry for permanent press, knit and delicate items. Drying time is determined automatically at the temperature selection of installation and electrical voltage or gas pressure can be removed promptly, the cycle selector will sound briefly every 5 minutes as a reminder...


