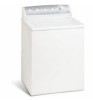
Complete Owner's Guide (English)
Page 2
... instructions before using this or any accumulated hydrogen gas. Do not store these warnings could result in this manual are found on the washer serial plate located of fire, electrical shock, or injury to comply with these Important Safety Instructions: Recognize safety symbols, words ...could ignite the materials. • Do not add gasoline, cleaning solvents, or other flammable vapors or liquids in the vicinity of this washer, comply with the basic warnings listed below : This symbol alerts you don't follow these warnings could result in , or spotted with a ...
... instructions before using this or any accumulated hydrogen gas. Do not store these warnings could result in this manual are found on the washer serial plate located of fire, electrical shock, or injury to comply with these Important Safety Instructions: Recognize safety symbols, words ...could ignite the materials. • Do not add gasoline, cleaning solvents, or other flammable vapors or liquids in the vicinity of this washer, comply with the basic warnings listed below : This symbol alerts you don't follow these warnings could result in , or spotted with a ...
Complete Owner's Guide (English)
Page 3
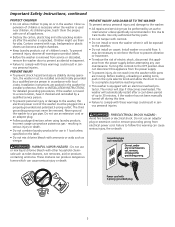
... or movement. • To reduce the risk of electric shock, disconnect this appliance from the power supply before reaching inside. • This washer is moved to a new location, have it becomes overheated. Cartons covered with 3-prong grounded plug 3 Installation instructions are moving. Do not use... to comply with local codes. Before loading, unloading or adding items, push in the cycle selector knob and allow children to the washer: • All repairs and servicing must be installed and electrically grounded by a qualified service person in accordance with these...
... or movement. • To reduce the risk of electric shock, disconnect this appliance from the power supply before reaching inside. • This washer is moved to a new location, have it becomes overheated. Cartons covered with 3-prong grounded plug 3 Installation instructions are moving. Do not use... to comply with local codes. Before loading, unloading or adding items, push in the cycle selector knob and allow children to the washer: • All repairs and servicing must be installed and electrically grounded by a qualified service person in accordance with these...

Complete Owner's Guide (English)
Page 4
... such as bras, hosiery and baby socks in a mesh bag. The amount required depends on type of detergent to the wash tub before operating your washer. 1 Sort laundry into loads that attract ful stain removal instructions. Before adding the wash load, add liquid bleach to flush the dispenser. • Do...
... such as bras, hosiery and baby socks in a mesh bag. The amount required depends on type of detergent to the wash tub before operating your washer. 1 Sort laundry into loads that attract ful stain removal instructions. Before adding the wash load, add liquid bleach to flush the dispenser. • Do...
Complete Owner's Guide (English)
Page 5
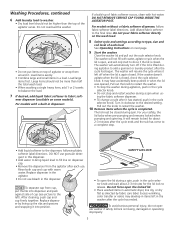
... Replace dispenser by fabric care label. SAFETY LID LOCK • To open the locked lid. • Place washed items in this dispenser. ate washer if safety lid lock is again closed during a spin, push in this dispenser. • Add water to bring liquid level to the fi...together. Excess wrinkling, color transfer or odors may have accidentally been pushed in when the lid was opened, Pull out the knob to restart the washer. • To stop . • Add liquid softener to the dispenser, following fabric softener label directions. Large items should not be higher than...
... Replace dispenser by fabric care label. SAFETY LID LOCK • To open the locked lid. • Place washed items in this dispenser. ate washer if safety lid lock is again closed during a spin, push in this dispenser. • Add water to bring liquid level to the fi...together. Excess wrinkling, color transfer or odors may have accidentally been pushed in when the lid was opened, Pull out the knob to restart the washer. • To stop . • Add liquid softener to the dispenser, following fabric softener label directions. Large items should not be higher than...
Complete Owner's Guide (English)
Page 7
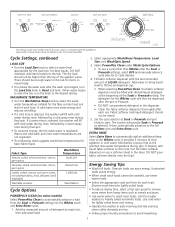
...of the Soak or Prewash setting. Fill fabric softener dispenser with cold water during rinse, followed by a warm spray rinse during spin. The washer will fill with diluted liquid detergent at the beginning of the agitator vanes. Oversize loads use . Shorten wash times for the Whites ... Options POWERPLUS CLEAN (on every model. If desired, add liquid fabric softener to Reset and hold. If a warm rinse is selected, the washer will fill with the recommended amount of each load. For best results, DO NOT overload. Warm and cold wash and rinse water temperatures...
...of the Soak or Prewash setting. Fill fabric softener dispenser with cold water during rinse, followed by a warm spray rinse during spin. The washer will fill with diluted liquid detergent at the beginning of the agitator vanes. Oversize loads use . Shorten wash times for the Whites ... Options POWERPLUS CLEAN (on every model. If desired, add liquid fabric softener to Reset and hold. If a warm rinse is selected, the washer will fill with the recommended amount of each load. For best results, DO NOT overload. Warm and cold wash and rinse water temperatures...
Complete Owner's Guide (English)
Page 9
... with prewash stain remover or nonflammable dry cleaning fluid. Once paint is completed, wipe top and sides of washer with a mixture of washer at any time. PASTE: Scrape residue from tape or labels with a damp cloth. Pretreat with prewash stain remover. Wash using... nonchlorine bleach in the washer. • Dry the washer top, the area around the lid opening, and the underside of stain. Rinse thoroughly with clear water. • Remove glue residue...
... with prewash stain remover or nonflammable dry cleaning fluid. Once paint is completed, wipe top and sides of washer with a mixture of washer at any time. PASTE: Scrape residue from tape or labels with a damp cloth. Pretreat with prewash stain remover. Wash using... nonchlorine bleach in the washer. • Dry the washer top, the area around the lid opening, and the underside of stain. Rinse thoroughly with clear water. • Remove glue residue...
Complete Owner's Guide (English)
Page 10
... position. 8. Turn off water supply faucets. 2. Disconnect hoses from water supply and drain water from normal wear. Store washer in freezing temperatures, follow these winterizing instructions to prevent damage to fabric.) POSSIBLE CAUSES • Undiluted liquid detergent or fabric... • Increase detergent and water temperature. Plug electrical cord into a properly grounded electrical outlet. 4. Pull out knob and let washer spin for fabric. • Treat with synthetic and permanent press fabrics. Not all water. RV ANTIFREEZE Follow WINTERIZING INSTRUCTIONS for fabric....
... position. 8. Turn off water supply faucets. 2. Disconnect hoses from water supply and drain water from normal wear. Store washer in freezing temperatures, follow these winterizing instructions to prevent damage to fabric.) POSSIBLE CAUSES • Undiluted liquid detergent or fabric... • Increase detergent and water temperature. Plug electrical cord into a properly grounded electrical outlet. 4. Pull out knob and let washer spin for fabric. • Treat with synthetic and permanent press fabrics. Not all water. RV ANTIFREEZE Follow WINTERIZING INSTRUCTIONS for fabric....
Complete Owner's Guide (English)
Page 11
... for removing shipping bolt. This is restarted, objects may produce a thumping sound. If sound continues, washer is not resting firmly on dark items; Washer is normal. See INSTALLATION INSTRUCTIONS for details. POSSIBLE CAUSE SOLUTION A certain amount of whites, use rust... detergent. • Some granular detergents can combine with hard water minerals to form a residue. • Overloading the washer. • Rewash load. • Overloading the washer. • Incorrect wash cycle for wash load. • Reduce load size. • Rinse in cold water with...
... for removing shipping bolt. This is restarted, objects may produce a thumping sound. If sound continues, washer is not resting firmly on dark items; Washer is normal. See INSTALLATION INSTRUCTIONS for details. POSSIBLE CAUSE SOLUTION A certain amount of whites, use rust... detergent. • Some granular detergents can combine with hard water minerals to form a residue. • Overloading the washer. • Rewash load. • Overloading the washer. • Incorrect wash cycle for wash load. • Reduce load size. • Rinse in cold water with...
Complete Owner's Guide (English)
Page 12
...and will only start . Heavily soiled items. Wipe drum with candy or meat thermometer. Load is closed . Check another faucet in drum. Washer is filling. Loose fill hose connection at a time. hose to allow proper spinning. but tub does not fill. ... must be unable to 30 becomes overheated. See INSTALLATION INSTRUCTIONS. Call your authorized servicer. 12 Make sure plug fits tightly in washer does not Drain hose is a power outage, call local electric company. See Washing Procedures. Rearrange load to cold water faucet. Water ...
...and will only start . Heavily soiled items. Wipe drum with candy or meat thermometer. Load is closed . Check another faucet in drum. Washer is filling. Loose fill hose connection at a time. hose to allow proper spinning. but tub does not fill. ... must be unable to 30 becomes overheated. See INSTALLATION INSTRUCTIONS. Call your authorized servicer. 12 Make sure plug fits tightly in washer does not Drain hose is a power outage, call local electric company. See Washing Procedures. Rearrange load to cold water faucet. Water ...
Installation Instructions (All Languages)
Page 1
P/N 137153100A (0903) Installation Instructions Washer Instructions d'Installation Laveuse Printed in U.S.A.
P/N 137153100A (0903) Installation Instructions Washer Instructions d'Installation Laveuse Printed in U.S.A.
Installation Instructions (All Languages)
Page 2
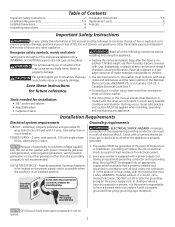
..., with a properly grounded three prong grounding type receptacle. Save these instructions • The electrical service to the washer must be plugged into an appropriate, copper wired receptacle that is the owner's responsibility to situations that may occur.... Requirements 2-3 Installed Dimensions 4 Unpacking Instructions 4 Installation Instructions 5-6 Replacement parts 6 Français 7 Important Safety Instructions For your washer is equipped with a power supply cord having an equipment-grounding conductor and a grounding plug, the plug MUST be followed to minimize...
..., with a properly grounded three prong grounding type receptacle. Save these instructions • The electrical service to the washer must be plugged into an appropriate, copper wired receptacle that is the owner's responsibility to situations that may occur.... Requirements 2-3 Installed Dimensions 4 Unpacking Instructions 4 Installation Instructions 5-6 Replacement parts 6 Français 7 Important Safety Instructions For your washer is equipped with a power supply cord having an equipment-grounding conductor and a grounding plug, the plug MUST be followed to minimize...
Installation Instructions (All Languages)
Page 3
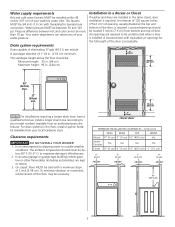
...psi. A standpipe diameter of 1-1/4 in . (387.1cm²) 96" (244cm) max. 33" (84cm) min. Clearance requirements DO NOT INSTALL YOUR WASHER: 1. On carpet. The faucets MUST be solid with threading for the full length of the door is acceptable. 3" (7.6cm) 60 sq. Water pressure ... drain systems in the floor, install a syphon break kit available from an authorized parts distributor. Your water department can advise you of your washer's water inlet. in . (3.18 cm) minimum. To minimize vibration or movement, reinforcement of the floor may be unobstructed when a door...
...psi. A standpipe diameter of 1-1/4 in . (387.1cm²) 96" (244cm) max. 33" (84cm) min. Clearance requirements DO NOT INSTALL YOUR WASHER: 1. On carpet. The faucets MUST be solid with threading for the full length of the door is acceptable. 3" (7.6cm) 60 sq. Water pressure ... drain systems in the floor, install a syphon break kit available from an authorized parts distributor. Your water department can advise you of your washer's water inlet. in . (3.18 cm) minimum. To minimize vibration or movement, reinforcement of the floor may be unobstructed when a door...

Installation Instructions (All Languages)
Page 4
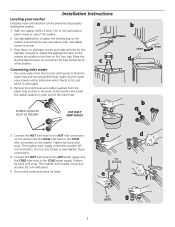
...4 Using a ratchet with 3/8" socket, remove the mechanism shipping bolt and plastic spacer block from the center of the washer, remove the wire shipping clip securing the drain hose. 9. If the washer is to within 4 feet of the final location for the start of the installation. 3. It helps form... a standpipe to prevent water siphoning. 10.Carefully move the washer to be transported at a later date, the tub blocking pad, shipping bolt, and plastic spacer block should be completed. 1. Remove the inlet hoses...
...4 Using a ratchet with 3/8" socket, remove the mechanism shipping bolt and plastic spacer block from the center of the washer, remove the wire shipping clip securing the drain hose. 9. If the washer is to within 4 feet of the final location for the start of the installation. 3. It helps form... a standpipe to prevent water siphoning. 10.Carefully move the washer to be transported at a later date, the tub blocking pad, shipping bolt, and plastic spacer block should be completed. 1. Remove the inlet hoses...
Installation Instructions (All Languages)
Page 5
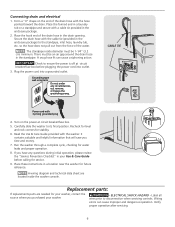
... screens and to the COLD inlet connection on top of its final location, place a level on the washer. Connect the HOT inlet hose to the HOT inlet connection on the washer and the COLD inlet hose to determine which faucet is hot and which is level front-to-rear and... another 2/3 turn with pliers. Keep the leveling leg extension at a minimum for best performance c of the inlet hoses. Then tighten each end of the washer. Connecting inlet water 1. Connect the HOT inlet hose to the HOT water supply and the COLD inlet hose to -corner. 3. Tighten by hand until snug...
... screens and to the COLD inlet connection on top of its final location, place a level on the washer. Connect the HOT inlet hose to the HOT inlet connection on the washer and the COLD inlet hose to determine which faucet is hot and which is level front-to-rear and... another 2/3 turn with pliers. Keep the leveling leg extension at a minimum for best performance c of the inlet hoses. Then tighten each end of the washer. Connecting inlet water 1. Connect the HOT inlet hose to the HOT water supply and the COLD inlet hose to -corner. 3. Tighten by hand until snug...
Installation Instructions (All Languages)
Page 6
...and helpful information that will save you purchased your Use & Care Guide before plugging the power cord into a grounded outlet. Run the washer through a complete cycle, checking for stability. 6. ELECTRICAL SHOCK HAZARD - Grounding type wall receptacle Do not, under any questions during initial... operation, please review the "Service Prevention Checklist" in a location near the washer for service. 9. Turn on the end of the drain hose with 3-prong grounded plug 4. If you have any circumstances, cut, remove...
...and helpful information that will save you purchased your Use & Care Guide before plugging the power cord into a grounded outlet. Run the washer through a complete cycle, checking for stability. 6. ELECTRICAL SHOCK HAZARD - Grounding type wall receptacle Do not, under any questions during initial... operation, please review the "Service Prevention Checklist" in a location near the washer for service. 9. Turn on the end of the drain hose with 3-prong grounded plug 4. If you have any circumstances, cut, remove...


