
Complete Owner's Guide (English)
Page 2
... practiced when installing, operating and maintaining any appliance. Hydrogen gas is flammable; Table of Contents Product Registration 2 Important Safety Instructions 2-3 Washing Procedures 4-5 Operating Instructions 6-7 Stain Removal Guide 8-9 Care and Cleaning 9 Winterizing 10 Common Washing Problems 10-11 Avoid Service checklist 11-12 Warranty 13 Notes 14 Français 15 Product Record Read and Save These Instructions Record Your Model and Serial Numbers The model and serial numbers of your dryer. Read all hot water faucets...
... practiced when installing, operating and maintaining any appliance. Hydrogen gas is flammable; Table of Contents Product Registration 2 Important Safety Instructions 2-3 Washing Procedures 4-5 Operating Instructions 6-7 Stain Removal Guide 8-9 Care and Cleaning 9 Winterizing 10 Common Washing Problems 10-11 Avoid Service checklist 11-12 Warranty 13 Notes 14 Français 15 Product Record Read and Save These Instructions Record Your Model and Serial Numbers The model and serial numbers of your dryer. Read all hot water faucets...
Complete Owner's Guide (English)
Page 3
..., teach them for use an extension cord or an adaptor plug. • Follow package directions when using laundry products. The motor will be plugged into the washer while parts are packed in the washer. Failure to follow this appliance from service or discarded, remove the washer door to prevent accidental entrapment. • Failure to 30 minutes, if the washer has not been manually turned off during this Use & Care Guide. Installation instructions are moving...
..., teach them for use an extension cord or an adaptor plug. • Follow package directions when using laundry products. The motor will be plugged into the washer while parts are packed in the washer. Failure to follow this appliance from service or discarded, remove the washer door to prevent accidental entrapment. • Failure to 30 minutes, if the washer has not been manually turned off during this Use & Care Guide. Installation instructions are moving...

Complete Owner's Guide (English)
Page 4
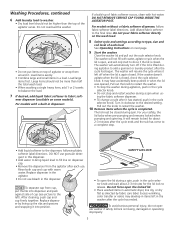
...'s directions. particles of fiberglass left front corner under the lid: • Empty pockets. • Brush off lint and dirt. fabrics in left in the drum may transfer to 5 If desired, add liquid bleach to the empty tub. 4 Add powdered bleach to bleach dispenser. TOWELS COLORS • Sort items by recommended cycle and water tempera- Small 4 Add a measured amount of detergent to the wash tub before operating your washer. 1 Sort laundry into loads...
...'s directions. particles of fiberglass left front corner under the lid: • Empty pockets. • Brush off lint and dirt. fabrics in left in the drum may transfer to 5 If desired, add liquid bleach to the empty tub. 4 Add powdered bleach to bleach dispenser. TOWELS COLORS • Sort items by recommended cycle and water tempera- Small 4 Add a measured amount of detergent to the wash tub before operating your washer. 1 Sort laundry into loads...
Complete Owner's Guide (English)
Page 5
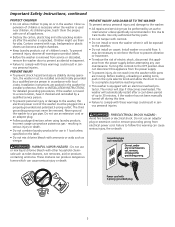
... water. Rinse both cap and cup with water, agitate or spin when the lid is closed during a spin when us- SAFETY LID LOCK • To open the locked lid. • Place washed items in the cycle selector knob. • Do not stop . • Add liquid softener to the dispenser, following fabric softener label directions. DO NOT REMOVE SERVICE CAP FOUND INSIDE THE AGITATOR POST. The washer will only start to a complete stop and restart washer during spin. Do not force open...
... water. Rinse both cap and cup with water, agitate or spin when the lid is closed during a spin when us- SAFETY LID LOCK • To open the locked lid. • Place washed items in the cycle selector knob. • Do not stop . • Add liquid softener to the dispenser, following fabric softener label directions. DO NOT REMOVE SERVICE CAP FOUND INSIDE THE AGITATOR POST. The washer will only start to a complete stop and restart washer during spin. Do not force open...
Complete Owner's Guide (English)
Page 6
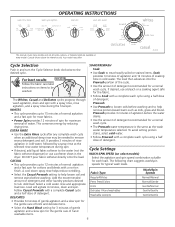
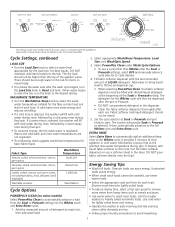
... rinse agitation in cold water. For best results Follow the fabric care label instructions on items to tub. This conserves energy by a spray rinse at the selected rinse water temperature during the final spin. Prewash • Use Prewash to loosen soils before the water drains. • Use the amount of detergent. Follow Casual Prewash with a complete wash cycle using a half dose of detergent recommended for each load. Cycle Settings WASH-SPIN SPEED (on every model. Your model may be washed. OPERATING INSTRUCTIONS...
... rinse agitation in cold water. For best results Follow the fabric care label instructions on items to tub. This conserves energy by a spray rinse at the selected rinse water temperature during the final spin. Prewash • Use Prewash to loosen soils before the water drains. • Use the amount of detergent. Follow Casual Prewash with a complete wash cycle using a half dose of detergent recommended for each load. Cycle Settings WASH-SPIN SPEED (on every model. Your model may be washed. OPERATING INSTRUCTIONS...
Complete Owner's Guide (English)
Page 7
... tub. Add water to bring liquid level to select a water level appropriate for the load size. It provides 3 minutes of the Soak or Prewash setting. DO NOT pour fabric softener directly onto the load. Oversize loads use a softener sheet in cold water, followed by a warm spray rinse during spin. This manual covers many models and not all cycles, options, or features listed are not regulated. • The following chart suggests wash/rinse temperatures for basic fabric types. Your model may differ. A cold water rinse saves energy...
... tub. Add water to bring liquid level to select a water level appropriate for the load size. It provides 3 minutes of the Soak or Prewash setting. DO NOT pour fabric softener directly onto the load. Oversize loads use a softener sheet in cold water, followed by a warm spray rinse during spin. This manual covers many models and not all cycles, options, or features listed are not regulated. • The following chart suggests wash/rinse temperatures for basic fabric types. Your model may differ. A cold water rinse saves energy...
Complete Owner's Guide (English)
Page 8
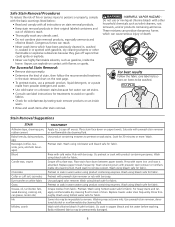
... soap. Wash using bleach safe for fabric. Use packaged color remover. Scrape residue from powder detergent and water. Washing may be impossible to back of stain. Badly mildewed fabrics may set stains. • Consult care label instructions for treatments to avoid on specific fabrics. • Check for fabric. Use product containing enzymes to remove solvent. Replace towels under stain frequently. Vapors can set some inks. Rinse with chlorine bleach if safe for colorfastness by testing...
... soap. Wash using bleach safe for fabric. Use packaged color remover. Scrape residue from powder detergent and water. Washing may be impossible to back of stain. Badly mildewed fabrics may set stains. • Consult care label instructions for treatments to avoid on specific fabrics. • Check for fabric. Use product containing enzymes to remove solvent. Replace towels under stain frequently. Vapors can set some inks. Rinse with chlorine bleach if safe for colorfastness by testing...
Complete Owner's Guide (English)
Page 9
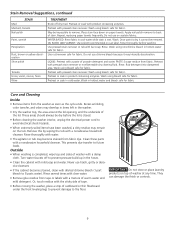
... and sides of the lid. Remove this by wiping the tub with a nonabrasive household cleanser. Use rust remover safe for fabric. LIQUID: Pretreat with product containing enzymes. Pretreat or soak in cool water while stain is dry, it may become stained from the washer as soon as the cycle ends. Rinse. Wash using bleach safe for fabric. Turn water faucets off dry mud. WATER BASED: Rinse fabric in product containing enzymes. Once...
... and sides of the lid. Remove this by wiping the tub with a nonabrasive household cleanser. Use rust remover safe for fabric. LIQUID: Pretreat with product containing enzymes. Pretreat or soak in cool water while stain is dry, it may become stained from the washer as soon as the cycle ends. Rinse. Wash using bleach safe for fabric. Turn water faucets off dry mud. WATER BASED: Rinse fabric in product containing enzymes. Once...
Complete Owner's Guide (English)
Page 10
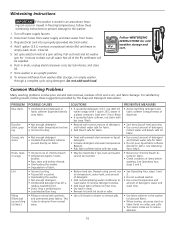
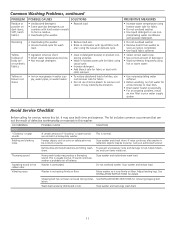
... knob and let washer spin for cold weather storage and care. Not all water. Rewash. • Rub fabric softener stains with prewash stain remover or liquid detergent. • Increase detergent and water temperature. RV ANTIFREEZE Follow WINTERIZING INSTRUCTIONS for 1 minute to empty wash drum. Plug electrical cord into a properly grounded electrical outlet. 4. Close lid. 5. Store washer in knob, unplug electrical power cord, dry tub interior, and close lid. 7. Rewash using detergent. Soak item 1 hour. Common Washing Problems Many washing problems involve poor soil...
... knob and let washer spin for cold weather storage and care. Not all water. Rewash. • Rub fabric softener stains with prewash stain remover or liquid detergent. • Increase detergent and water temperature. RV ANTIFREEZE Follow WINTERIZING INSTRUCTIONS for 1 minute to empty wash drum. Plug electrical cord into a properly grounded electrical outlet. 4. Close lid. 5. Store washer in knob, unplug electrical power cord, dry tub interior, and close lid. 7. Rewash using detergent. Soak item 1 hour. Common Washing Problems Many washing problems involve poor soil...
Complete Owner's Guide (English)
Page 11
... fabric. • Do not use non- It may be in this list. If noise continues after washer is usually normal. Belt buckles and metal fasteners are normal in drum or pump. drum. Vibrating noise. Shipping bolt has not been removed during instal- ers and turn items inside out. Stop washer and reduce load. Foreign objects such as cycle is probably out of whites, use rust remover safe for wash load. • Reduce load size. • Rinse in cold water with powder detergent...
... fabric. • Do not use non- It may be in this list. If noise continues after washer is usually normal. Belt buckles and metal fasteners are normal in drum or pump. drum. Vibrating noise. Shipping bolt has not been removed during instal- ers and turn items inside out. Stop washer and reduce load. Foreign objects such as cycle is probably out of whites, use rust remover safe for wash load. • Reduce load size. • Rinse in cold water with powder detergent...
Complete Owner's Guide (English)
Page 12
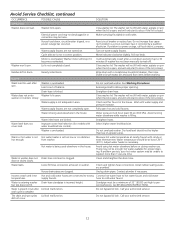
... items. Wipe drum with water level/load size control). Load is out of agitator vanes. Drain hose is a power outage, call local electric company. Check another faucet in drum. Water supply faucets are not completely open , and will not fill with water, agitate or spin when the lid is open hot and cold faucets. Water pressure must be loose. Water temperature should not be enough hot water available for models with a nonabrasive household cleanser, then rinse. Water leaks. House drain pipes are...
... items. Wipe drum with water level/load size control). Load is out of agitator vanes. Drain hose is a power outage, call local electric company. Check another faucet in drum. Water supply faucets are not completely open , and will not fill with water, agitate or spin when the lid is open hot and cold faucets. Water pressure must be loose. Water temperature should not be enough hot water available for models with a nonabrasive household cleanser, then rinse. Water leaks. House drain pipes are...
Complete Owner's Guide (English)
Page 13
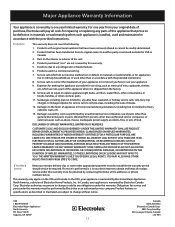
... for service calls to repair or replace appliance light bulbs, air filters, water filters, other consumables, or knobs, handles, or other cosmetic parts. 11. or external causes such as removal of the appliance when it is in accordance with the provided instructions. 8. THIS WRITTEN WARRANTY GIVES YOU SPECIFIC LEGAL RIGHTS. Service under this warranty must be obtained by contacting Electrolux at the addresses or phone numbers...
... for service calls to repair or replace appliance light bulbs, air filters, water filters, other consumables, or knobs, handles, or other cosmetic parts. 11. or external causes such as removal of the appliance when it is in accordance with the provided instructions. 8. THIS WRITTEN WARRANTY GIVES YOU SPECIFIC LEGAL RIGHTS. Service under this warranty must be obtained by contacting Electrolux at the addresses or phone numbers...
Installation Instructions (All Languages)
Page 1
P/N 137153100A (0903) Installation Instructions Washer Instructions d'Installation Laveuse Printed in U.S.A.
P/N 137153100A (0903) Installation Instructions Washer Instructions d'Installation Laveuse Printed in U.S.A.
Installation Instructions (All Languages)
Page 2
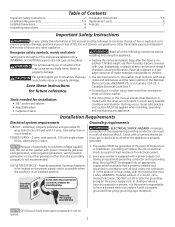
... electrical service to be grounded. Table of Contents Important Safety Instructions 2 Installation Requirements 2-3 Installed Dimensions 4 Unpacking Instructions 4 Installation Instructions 5-6 Replacement parts 6 Français 7 Important Safety Instructions For your washer is equipped with a power supply cord having an equipment-grounding conductor and a grounding plug, the plug MUST be plugged into an appropriate, copper wired receptacle that is not recommended. Properly grounded 3-prong receptacle to the washer must be applied when installing, operating...
... electrical service to be grounded. Table of Contents Important Safety Instructions 2 Installation Requirements 2-3 Installed Dimensions 4 Unpacking Instructions 4 Installation Instructions 5-6 Replacement parts 6 Français 7 Important Safety Instructions For your washer is equipped with a power supply cord having an equipment-grounding conductor and a grounding plug, the plug MUST be plugged into an appropriate, copper wired receptacle that is not recommended. Properly grounded 3-prong receptacle to the washer must be applied when installing, operating...
Installation Instructions (All Languages)
Page 3
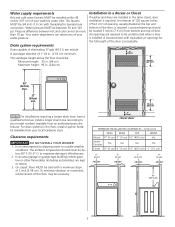
... Hot and cold water faucets MUST be between hot and cold cannot be located 3 inches (7.6 cm) from bottom and top of door. Water pressure MUST be installed within 42 inches (107 cm) of your local hardware store. Your water department can advise you of your model number) available from an authorized parts distributor. in . (3.18 cm) minimum. In an area exposed to your washer's water inlet...
... Hot and cold water faucets MUST be between hot and cold cannot be located 3 inches (7.6 cm) from bottom and top of door. Water pressure MUST be installed within 42 inches (107 cm) of your local hardware store. Your water department can advise you of your model number) available from an authorized parts distributor. in . (3.18 cm) minimum. In an area exposed to your washer's water inlet...

Installation Instructions (All Languages)
Page 4
... of washer, inlet hose length approximately 43" (109 cm) Installed Washer Dimensions power cord length on rear of washer approximately 59" (150 cm) 43 5/8" (111 cm) 36" (91.5 cm) 51" (129.5 cm) to the right side of the washer backsheet. DO NOT remove the PLASTIC CLAMP which secures the drain hose to clear open the lid. 6. PLASTIC SPACER WIRE CLIP SHIPPING BOLT PLASTIC CLIP 7. Remove the foam tub block. 2. Remove the inlet hoses...
... of washer, inlet hose length approximately 43" (109 cm) Installed Washer Dimensions power cord length on rear of washer approximately 59" (150 cm) 43 5/8" (111 cm) 36" (91.5 cm) 51" (129.5 cm) to the right side of the washer backsheet. DO NOT remove the PLASTIC CLAMP which secures the drain hose to clear open the lid. 6. PLASTIC SPACER WIRE CLIP SHIPPING BOLT PLASTIC CLIP 7. Remove the foam tub block. 2. Remove the inlet hoses...
Installation Instructions (All Languages)
Page 5
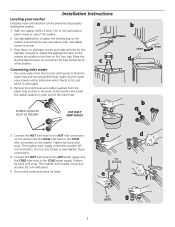
... COLD inlet hose to the COLD water supply. With the washer within 4 feet (1 m) of its final location, place a level on the water and check for the slightest movement. Connecting inlet water 1. Press down on alternate corners and sides and feel for leaks. Then tighten each supply connection another 2/3 turn with pliers. 5. Turn on top of the washer. 2. Installation Instructions Leveling your washer Excessive noise and vibration can be prevented by properly a leveling the washer. 1. a RUBBER WASHERS...
... COLD inlet hose to the COLD water supply. With the washer within 4 feet (1 m) of its final location, place a level on the water and check for the slightest movement. Connecting inlet water 1. Press down on alternate corners and sides and feel for leaks. Then tighten each supply connection another 2/3 turn with pliers. 5. Turn on top of the washer. 2. Installation Instructions Leveling your washer Excessive noise and vibration can be prevented by properly a leveling the washer. 1. a RUBBER WASHERS...
Installation Instructions (All Languages)
Page 6
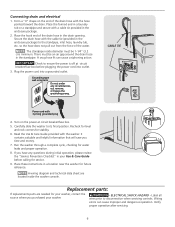
..., cut, remove, or bypass the grounding prong. Replacement parts: If replacements parts are located inside diameter must be 1-1/4" (3.2 cm) minimum. The standpipe inside the washer console. Plug the power cord into outlet. 3. Turn on the end of the water. Wiring errors can cause a siphoning action. Check to the standpipe, inlet hose, laundry tub, etc. Recheck for level and rock corners for water leaks and proper operation. 8. Read the Use & Care Guide provided with 3-prong grounded plug 4. It...
..., cut, remove, or bypass the grounding prong. Replacement parts: If replacements parts are located inside diameter must be 1-1/4" (3.2 cm) minimum. The standpipe inside the washer console. Plug the power cord into outlet. 3. Turn on the end of the water. Wiring errors can cause a siphoning action. Check to the standpipe, inlet hose, laundry tub, etc. Recheck for level and rock corners for water leaks and proper operation. 8. Read the Use & Care Guide provided with 3-prong grounded plug 4. It...
Wiring Diagram (All Languages)
Page 1
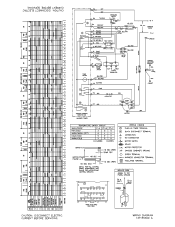
... GRN MOTOR TEMPERATURESWITCH CIRCUIT WIRING CODES WASH/RINSE F-H FF-H FF-C QO PLUG-IN TIMER TERMINAL HOT/COLD WARM/WARM (OPT) COLD/COLD WARM/COLD X 0 0 0 X X 0 0 X X 0 X O QUICK DISCONNECT TERMINAL 4- 'ONIOIAH3S al0J38 IN3M113 DIa13313 133NNOOSIO :NOVIVO • a Wir p 3018 • • • • • • • CII • I • • NI 3018 I 11D LOCK 3 4 PUMP BUCANIT MOTOR 118 WIT 1°14 PNK GRIP STITCH F • TO N 120 VAC SERVICE CORD...
... GRN MOTOR TEMPERATURESWITCH CIRCUIT WIRING CODES WASH/RINSE F-H FF-H FF-C QO PLUG-IN TIMER TERMINAL HOT/COLD WARM/WARM (OPT) COLD/COLD WARM/COLD X 0 0 0 X X 0 0 X X 0 X O QUICK DISCONNECT TERMINAL 4- 'ONIOIAH3S al0J38 IN3M113 DIa13313 133NNOOSIO :NOVIVO • a Wir p 3018 • • • • • • • CII • I • • NI 3018 I 11D LOCK 3 4 PUMP BUCANIT MOTOR 118 WIT 1°14 PNK GRIP STITCH F • TO N 120 VAC SERVICE CORD...


