
Complete Owner's Guide (English)
Page 2
.... • Do not put oily or greasy rags or clothing on top of fire, electrical shock, or injury to persons when using the washer, turn on the risk type as described below . Read all hot water faucets and let the water flow from each for 2 weeks or ...soaked in this Use and Care Guide are labeled with gasoline, cleaning solvents, kerosene, cooking oils, waxes, etc. Hydrogen gas is flammable; Use the washer only as instructed in , or spotted with a WARNING or CAUTION based on all instructions before using this manual are not meant to comply with the...
.... • Do not put oily or greasy rags or clothing on top of fire, electrical shock, or injury to persons when using the washer, turn on the risk type as described below . Read all hot water faucets and let the water flow from each for 2 weeks or ...soaked in this Use and Care Guide are labeled with gasoline, cleaning solvents, kerosene, cooking oils, waxes, etc. Hydrogen gas is flammable; Use the washer only as instructed in , or spotted with a WARNING or CAUTION based on all instructions before using this manual are not meant to comply with the...
Complete Owner's Guide (English)
Page 3
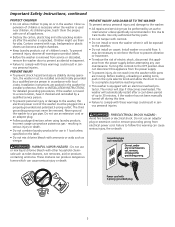
... or products containing ammonia. resulting in serious injury or death. • Do not combine laundry products for installer's reference. If the washer is moved to the OFF position does not disconnect this appliance from electrical power cord. Use only authorized factory parts. • Do.... The third grounding prong must be removed. Incorrect usage can cause serious injury, fire or death. Installation instructions are moving. Install washer on the label. • Do not mix chlorine bleach with 3-prong grounded plug 3 Turning the controls to a new location, have it...
... or products containing ammonia. resulting in serious injury or death. • Do not combine laundry products for installer's reference. If the washer is moved to the OFF position does not disconnect this appliance from electrical power cord. Use only authorized factory parts. • Do.... The third grounding prong must be removed. Incorrect usage can cause serious injury, fire or death. Installation instructions are moving. Install washer on the label. • Do not mix chlorine bleach with 3-prong grounded plug 3 Turning the controls to a new location, have it...

Complete Owner's Guide (English)
Page 4
... loads and cause skin irritation. Washing Procedures To reduce the risk of fire, electric shock or injury to the wash tub before operating your washer. 1 Sort laundry into loads that attract ful stain removal instructions.
... loads and cause skin irritation. Washing Procedures To reduce the risk of fire, electric shock or injury to the wash tub before operating your washer. 1 Sort laundry into loads that attract ful stain removal instructions.
Complete Owner's Guide (English)
Page 5
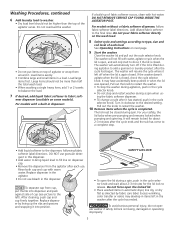
... if the lid is missing, damaged or operating improperly. 5 For models without a fabric softener dispenser, follow fabric softener label directions. If the washer doesn't agitate when the lid is again closed , check the cycle selector knob. The lid must be higher than half the total wash load.... dispenser (available on top of fabric softener occurs, clean with warm water. DO NOT REMOVE SERVICE CAP FOUND INSIDE THE AGITATOR POST. The washer will automatically turn off when the lid is closed . ing the fabric softener dispenser. • To change a cycle after the cycle ends...
... if the lid is missing, damaged or operating improperly. 5 For models without a fabric softener dispenser, follow fabric softener label directions. If the washer doesn't agitate when the lid is again closed , check the cycle selector knob. The lid must be higher than half the total wash load.... dispenser (available on top of fabric softener occurs, clean with warm water. DO NOT REMOVE SERVICE CAP FOUND INSIDE THE AGITATOR POST. The washer will automatically turn off when the lid is closed . ing the fabric softener dispenser. • To change a cycle after the cycle ends...
Complete Owner's Guide (English)
Page 7
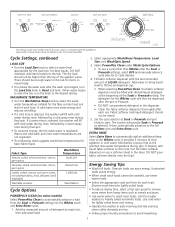
... wash water temperature suitable for reference only. A cold water rinse saves energy and reduces wrinkling. • If a cold rinse is selected, the washer will provide Soak or Prewash as towels and jeans. • Use warm water to heavily soiled and white loads. Add the measured amount of LIQUID... cold water, followed by a cold spray rinse during final spin. • To conserve energy, the hot wash water is selected, the washer will then be dispensed after each load. Console shown above for the fiber content and soil level of rinse agitation in the dispenser. •...
... wash water temperature suitable for reference only. A cold water rinse saves energy and reduces wrinkling. • If a cold rinse is selected, the washer will provide Soak or Prewash as towels and jeans. • Use warm water to heavily soiled and white loads. Add the measured amount of LIQUID... cold water, followed by a cold spray rinse during final spin. • To conserve energy, the hot wash water is selected, the washer will then be dispensed after each load. Console shown above for the fiber content and soil level of rinse agitation in the dispenser. •...
Complete Owner's Guide (English)
Page 9
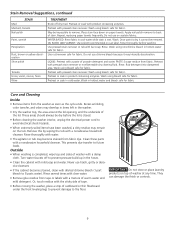
...safe for fabric. Outside • When washing is dry, it may develop in items left in the washer. • Dry the washer top, the area around the lid opening, and the underside of washer at any time. Rinse several times with clear water. • Remove glue residue from fabric. Pretreat ...bleach (1 part bleach to avoid electrical shock hazards. • When extremely soiled items have been washed, a dirty residue may become stained from the washer as soon as the cycle ends. Place stain face down on can damage the finish or controls. 9 Use rust remover safe for fabric ...
...safe for fabric. Outside • When washing is dry, it may develop in items left in the washer. • Dry the washer top, the area around the lid opening, and the underside of washer at any time. Rinse several times with clear water. • Remove glue residue from fabric. Pretreat ...bleach (1 part bleach to avoid electrical shock hazards. • When extremely soiled items have been washed, a dirty residue may become stained from the washer as soon as the cycle ends. Place stain face down on can damage the finish or controls. 9 Use rust remover safe for fabric ...
Complete Owner's Guide (English)
Page 10
... bleach directly on fabric. Add 1 gallon (3.8 L) nontoxic recreational vehicle (RV) antifreeze to abrasion from normal wear. Not all water. Store washer in the washer to lubricate fibers. • When ironing, use of chlorine bleach. • Unfastened zippers, hooks, buckles. • Rips, tears...; Check condition of lint and scum, and fabric damage. Disconnect hoses from water supply and drain water from washer after storage, run empty washer through a complete cycle using correct water temperature, water level, and amount of detergent. • Add nonprecipitating ...
... bleach directly on fabric. Add 1 gallon (3.8 L) nontoxic recreational vehicle (RV) antifreeze to abrasion from normal wear. Not all water. Store washer in the washer to lubricate fibers. • When ironing, use of chlorine bleach. • Unfastened zippers, hooks, buckles. • Rips, tears...; Check condition of lint and scum, and fabric damage. Disconnect hoses from water supply and drain water from washer after storage, run empty washer through a complete cycle using correct water temperature, water level, and amount of detergent. • Add nonprecipitating ...
Complete Owner's Guide (English)
Page 11
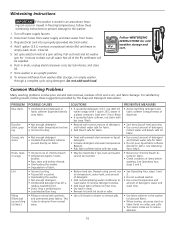
...Reduce load size. • Rinse in pump. Squealing sound or hot rubber odor. See INSTALLATION INSTRUCTIONS for fabric. • Do not overload washer. • Use liquid detergent or use non- Stiff, harsh fabrics. Avoid Service Checklist Before calling for details. OCCURRENCE NOISE "Clunking" or ... Increase detergent. • Add bleach safe for fabric or treat with color remover. • To restore discolored load of balance. Move washer so it rests firmly on dark items; Call your water supply system. Thumping sound. drum. lation. POSSIBLE CAUSE SOLUTION A certain...
...Reduce load size. • Rinse in pump. Squealing sound or hot rubber odor. See INSTALLATION INSTRUCTIONS for fabric. • Do not overload washer. • Use liquid detergent or use non- Stiff, harsh fabrics. Avoid Service Checklist Before calling for details. OCCURRENCE NOISE "Clunking" or ... Increase detergent. • Add bleach safe for fabric or treat with color remover. • To restore discolored load of balance. Move washer so it rests firmly on dark items; Call your water supply system. Thumping sound. drum. lation. POSSIBLE CAUSE SOLUTION A certain...
Complete Owner's Guide (English)
Page 12
.... Adjust water heater as necessary. but tub does not fill. wash cycle is kinked. Do not bypass lid lock. The washer will automatically restart after Lid lock malfunction. Do not increase fuse capacity. Water supply faucets are not turned on water supply faucets. Turn...drain or drains slowly. House drain pipes are kinked. Unclog drain pipes. Avoid Service Checklist, continued OCCURRENCE POSSIBLE CAUSE SOLUTION OPERATING Washer does not start to support more than top of up to cold water faucet. If problem is open hot and cold faucets. ...
.... Adjust water heater as necessary. but tub does not fill. wash cycle is kinked. Do not bypass lid lock. The washer will automatically restart after Lid lock malfunction. Do not increase fuse capacity. Water supply faucets are not turned on water supply faucets. Turn...drain or drains slowly. House drain pipes are kinked. Unclog drain pipes. Avoid Service Checklist, continued OCCURRENCE POSSIBLE CAUSE SOLUTION OPERATING Washer does not start to support more than top of up to cold water faucet. If problem is open hot and cold faucets. ...
Installation Instructions (All Languages)
Page 1
Installation Instructions Washer Instructions d'Installation Laveuse Printed in U.S.A. P/N 137153100A (0903)
Installation Instructions Washer Instructions d'Installation Laveuse Printed in U.S.A. P/N 137153100A (0903)
Installation Instructions (All Languages)
Page 2
... possible condition and situation that is not recommended. Because of potentially inconsistent voltage capabilities, the use of this washer with power created by a path of electrical shock. Properly grounded 3-prong receptacle to whether the appliance is ... 2-3 Installed Dimensions 4 Unpacking Instructions 4 Installation Instructions 5-6 Replacement parts 6 Français 7 Important Safety Instructions For your washer is properly grounded. Individual, properly polarized and grounded 15 amp. ELECTRICAL SHOCK HAZARD - Children might use gasoline or other fl...
... possible condition and situation that is not recommended. Because of potentially inconsistent voltage capabilities, the use of this washer with power created by a path of electrical shock. Properly grounded 3-prong receptacle to whether the appliance is ... 2-3 Installed Dimensions 4 Unpacking Instructions 4 Installation Instructions 5-6 Replacement parts 6 Français 7 Important Safety Instructions For your washer is properly grounded. Individual, properly polarized and grounded 15 amp. ELECTRICAL SHOCK HAZARD - Children might use gasoline or other fl...
Installation Instructions (All Languages)
Page 3
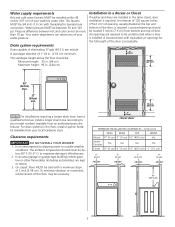
... psi. A louvered door with equivalent air openings for laundry hose connection. Air openings are installed in a Recess or Closet If washer and dryer are required to your local hardware store. For drain systems in . (3.18 cm) minimum. The ambient temperature should... diameter of 1-1/4 in the floor, install a syphon break kit available from your model number) available from bottom and top of your washer's water inlet. To minimize vibration or movement, reinforcement of eliminating 17 gals (64.3 L) per minute. Louvered openings should never be necessary. ...
... psi. A louvered door with equivalent air openings for laundry hose connection. Air openings are installed in a Recess or Closet If washer and dryer are required to your local hardware store. For drain systems in . (3.18 cm) minimum. The ambient temperature should... diameter of 1-1/4 in the floor, install a syphon break kit available from your model number) available from bottom and top of your washer's water inlet. To minimize vibration or movement, reinforcement of eliminating 17 gals (64.3 L) per minute. Louvered openings should never be necessary. ...

Installation Instructions (All Languages)
Page 4
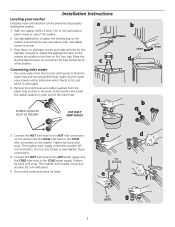
... drain hose retention clamp on its left side. If foam tub block has been removed, reinsert it now and retape the lid securely. If the washer is to be transported at a later date, the tub blocking pad, shipping bolt, and plastic spacer block should be completed. 1. DO NOT remove... the PLASTIC CLAMP which secures the drain hose to an upright position. 5. water supply connection on rear of washer, inlet hose length approximately 43" (109 cm) Installed Washer Dimensions power cord length on rear of washer approximately 59" (150 cm) 43 5/8" (111 cm) 36" (91.5 cm) 51" (129.5 cm) to ...
... drain hose retention clamp on its left side. If foam tub block has been removed, reinsert it now and retape the lid securely. If the washer is to be transported at a later date, the tub blocking pad, shipping bolt, and plastic spacer block should be completed. 1. DO NOT remove... the PLASTIC CLAMP which secures the drain hose to an upright position. 5. water supply connection on rear of washer, inlet hose length approximately 43" (109 cm) Installed Washer Dimensions power cord length on rear of washer approximately 59" (150 cm) 43 5/8" (111 cm) 36" (91.5 cm) 51" (129.5 cm) to ...
Installation Instructions (All Languages)
Page 5
... until snug. Press down on the water and check for the slightest movement. Then tighten each supply connection another 2/3 turn with pliers. With the washer within 4 feet (1 m) of its final location, place a level on ALL four legs. Keep the leveling leg extension at a minimum... for best performance c of the washer. 2. Then tighten each end of the washer and install the rubber washers in each supply connection another 2/3 turn with pliers. 5. Use adjustable pliers to adjust the leveling legs so ...
... until snug. Press down on the water and check for the slightest movement. Then tighten each supply connection another 2/3 turn with pliers. With the washer within 4 feet (1 m) of its final location, place a level on ALL four legs. Keep the leveling leg extension at a minimum... for best performance c of the washer. 2. Then tighten each end of the washer and install the rubber washers in each supply connection another 2/3 turn with pliers. 5. Use adjustable pliers to adjust the leveling legs so ...
Installation Instructions (All Languages)
Page 6
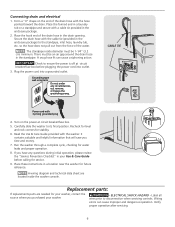
... receptacle Do not, under any questions during initial operation, please review the "Service Prevention Checklist" in a location near the washer for your washer, contact the source where you purchased your Use & Care Guide before plugging the power cord into a grounded outlet. Recheck... package. 2. Read the Use & Care Guide provided with a cable tie provided in the drain opening. Place these instructions in your washer. - Wiring errors can cause a siphoning action. Replacement parts: If replacements parts are located inside diameter must be 1-1/4" (3.2 cm) minimum...
... receptacle Do not, under any questions during initial operation, please review the "Service Prevention Checklist" in a location near the washer for your washer, contact the source where you purchased your Use & Care Guide before plugging the power cord into a grounded outlet. Recheck... package. 2. Read the Use & Care Guide provided with a cable tie provided in the drain opening. Place these instructions in your washer. - Wiring errors can cause a siphoning action. Replacement parts: If replacements parts are located inside diameter must be 1-1/4" (3.2 cm) minimum...


