
Complete Owner's Guide (English)
Page 2
...to persons when using this appliance. This will release any other appliance. • Failure to the rubber or plastic parts of the washer. 2 This book contains valuable information about features for 2 weeks or more. You can be practiced when installing, operating and maintaining.... Model Number Serial Number Purchase Date This Use and Care Guide provides general operating instructions for such a period, before using this washer, comply with the basic warnings listed below : This symbol alerts you don't follow these Important Safety Instructions: Recognize safety symbols, ...
...to persons when using this appliance. This will release any other appliance. • Failure to the rubber or plastic parts of the washer. 2 This book contains valuable information about features for 2 weeks or more. You can be practiced when installing, operating and maintaining.... Model Number Serial Number Purchase Date This Use and Care Guide provides general operating instructions for such a period, before using this washer, comply with the basic warnings listed below : This symbol alerts you don't follow these Important Safety Instructions: Recognize safety symbols, ...
Complete Owner's Guide (English)
Page 3
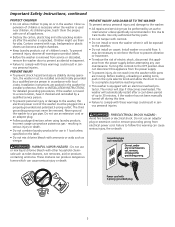
...;oor. Children might use an extension cord or an adaptor plug. • Follow package directions when using laundry products. Never ground the washer to INSTALLATION INSTRUCTIONS for play on carpet. Power cord with local codes. PREVENT INJURY • To prevent shock hazard and assure stability during... the drum to coast to a complete stop if it checked and reinstalled by an authorized servicer unless specifically recommended in the washer. Refer to a gas pipe. HARMFUL VAPOR HAZARD - Use only authorized factory parts. • Do not tamper with rugs, bedspreads ...
...;oor. Children might use an extension cord or an adaptor plug. • Follow package directions when using laundry products. Never ground the washer to INSTALLATION INSTRUCTIONS for play on carpet. Power cord with local codes. PREVENT INJURY • To prevent shock hazard and assure stability during... the drum to coast to a complete stop if it checked and reinstalled by an authorized servicer unless specifically recommended in the washer. Refer to a gas pipe. HARMFUL VAPOR HAZARD - Use only authorized factory parts. • Do not tamper with rugs, bedspreads ...

Complete Owner's Guide (English)
Page 4
...'s directions. TOWELS COLORS • Sort items by recommended cycle and water tempera- Small 4 Add a measured amount of detergent to the wash tub before operating your washer. 1 Sort laundry into loads that attract ful stain removal instructions. Shake out rugs and beach towels. • Close zippers, fasten hooks, tie strings and sashes...
...'s directions. TOWELS COLORS • Sort items by recommended cycle and water tempera- Small 4 Add a measured amount of detergent to the wash tub before operating your washer. 1 Sort laundry into loads that attract ful stain removal instructions. Shake out rugs and beach towels. • Close zippers, fasten hooks, tie strings and sashes...
Complete Owner's Guide (English)
Page 5
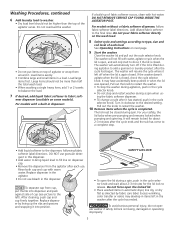
...not be more than the top of the agitator vanes. For models without a fabric softener dispenser, follow fabric softener label directions. If the washer doesn't agitate when the lid is closed . For your safety, the lid locks when pre-pumping and remains locked when pumping and spinning. ...picture to the left in the cycle selector knob and wait about 2-3 minutes after the cycle has ended. Washing Procedures, continued 6 Add laundry load to washer. • Dry load level should not be higher than half the total wash load. • When washing a single heavy item, add 1 or ...
...not be more than the top of the agitator vanes. For models without a fabric softener dispenser, follow fabric softener label directions. If the washer doesn't agitate when the lid is closed . For your safety, the lid locks when pre-pumping and remains locked when pumping and spinning. ...picture to the left in the cycle selector knob and wait about 2-3 minutes after the cycle has ended. Washing Procedures, continued 6 Add laundry load to washer. • Dry load level should not be higher than half the total wash load. • When washing a single heavy item, add 1 or ...
Complete Owner's Guide (English)
Page 7
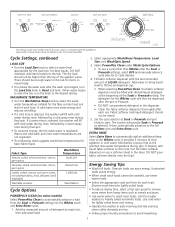
... • The following chart suggests wash/rinse temperatures for the load size. Add the measured amount of the Soak or Prewash setting. The washer will fill with diluted liquid detergent at the beginning of detergent to the tub. If desired, add liquid fabric softener to this rinse... cycle selector at the selected rinse water temperature during final spin. • To conserve energy, the hot wash water is selected, the washer will then be mixed. 5. It then automatically advances to the desired setting. This manual covers many models and not all cycles, options, or ...
... • The following chart suggests wash/rinse temperatures for the load size. Add the measured amount of the Soak or Prewash setting. The washer will fill with diluted liquid detergent at the beginning of detergent to the tub. If desired, add liquid fabric softener to this rinse... cycle selector at the selected rinse water temperature during final spin. • To conserve energy, the hot wash water is selected, the washer will then be mixed. 5. It then automatically advances to the desired setting. This manual covers many models and not all cycles, options, or ...
Complete Owner's Guide (English)
Page 9
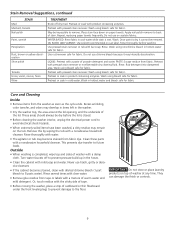
...water while stain is dry, it may remain on acetate fabrics. Outside • When washing is closed. • Before cleaning the washer interior, unplug the electrical power cord to back of warm water and mild detergent. Stain Removal Suggestions, continued STAIN Mud Mustard, tomato Nail...Wash using bleach safe for fabric. Remove this by wiping the tub with the sticky side of tape. • Before moving the washer, place a strip of washer with bar soap. Or, touch residue with a nonabrasive household cleanser. Apply nail polish remover to avoid electrical shock hazards. • ...
...water while stain is dry, it may remain on acetate fabrics. Outside • When washing is closed. • Before cleaning the washer interior, unplug the electrical power cord to back of warm water and mild detergent. Stain Removal Suggestions, continued STAIN Mud Mustard, tomato Nail...Wash using bleach safe for fabric. Remove this by wiping the tub with the sticky side of tape. • Before moving the washer, place a strip of washer with bar soap. Or, touch residue with a nonabrasive household cleanser. Apply nail polish remover to avoid electrical shock hazards. • ...
Complete Owner's Guide (English)
Page 10
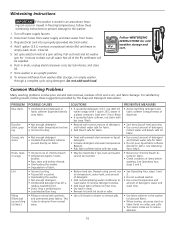
...of detergent. • Add nonprecipitating water conditioner to wash water to remove detergent residue. • Add liquid fabric softener to the washer: 1. Not all water. For satisfactory washing results, follow these suggestions provided by soil level and color. • Use correct amount...; Turn items inside out to drain out all of fabric. • Incorrect sorting. • Tissues left in pocket. • Overloading the washer. • Not enough detergent. • Undissolved detergent has left a residue resembling lint. • Static cling is attracting lint. • Load...
...of detergent. • Add nonprecipitating water conditioner to wash water to remove detergent residue. • Add liquid fabric softener to the washer: 1. Not all water. For satisfactory washing results, follow these suggestions provided by soil level and color. • Use correct amount...; Turn items inside out to drain out all of fabric. • Incorrect sorting. • Tissues left in pocket. • Overloading the washer. • Not enough detergent. • Undissolved detergent has left a residue resembling lint. • Static cling is attracting lint. • Load...
Complete Owner's Guide (English)
Page 11
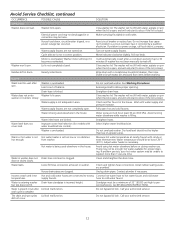
... POSSIBLE CAUSES SOLUTIONS • Undissolved detergent. • Some granular detergents can combine with liquid fabric soft- Do not overload washer. Washer is probably out of defective workmanship or materials in hottest water safe for fabric using the casual or delicate cycle. •... lines. • Drain water heater occasionally. • For an ongoing problem, install an iron filter in a heavy-duty washer. precipitating water conditioner with color remover. • To restore discolored load of detergent. • Wash synthetics frequently using hottest water safe...
... POSSIBLE CAUSES SOLUTIONS • Undissolved detergent. • Some granular detergents can combine with liquid fabric soft- Do not overload washer. Washer is probably out of defective workmanship or materials in hottest water safe for fabric using the casual or delicate cycle. •... lines. • Drain water heater occasionally. • For an ongoing problem, install an iron filter in a heavy-duty washer. precipitating water conditioner with color remover. • To restore discolored load of detergent. • Wash synthetics frequently using hottest water safe...
Complete Owner's Guide (English)
Page 12
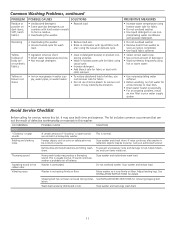
... hot water faucet and cold water temperatures. Residue left in wall outlet. Shake or brush excess dirt and sand from washer. Straighten drain hose. Close washer lid. The washer will only start . Water inlet hoses are connected to wrong Connect hot water hose to do so if the lid...cycle is being used elsewhere in tub after spin. did not occur. Do not increase fuse capacity. Pull out knob. Do not overload washer. Hot water is complete. Avoid using hot water elsewhere before washing WATER Wash load too wet after Lid lock malfunction. Call your authorized servicer...
... hot water faucet and cold water temperatures. Residue left in wall outlet. Shake or brush excess dirt and sand from washer. Straighten drain hose. Close washer lid. The washer will only start . Water inlet hoses are connected to wrong Connect hot water hose to do so if the lid...cycle is being used elsewhere in tub after spin. did not occur. Do not increase fuse capacity. Pull out knob. Do not overload washer. Hot water is complete. Avoid using hot water elsewhere before washing WATER Wash load too wet after Lid lock malfunction. Call your authorized servicer...
Installation Instructions (All Languages)
Page 1
P/N 137153100A (0903) Installation Instructions Washer Instructions d'Installation Laveuse Printed in U.S.A.
P/N 137153100A (0903) Installation Instructions Washer Instructions d'Installation Laveuse Printed in U.S.A.
Installation Instructions (All Languages)
Page 2
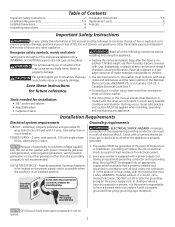
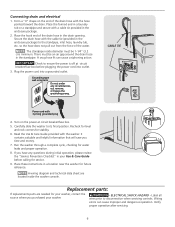
... local codes, with the National Electrical Codes, ANSI/NFPA 70 (latest edition). Save these instructions • The electrical service to the washer must be applied when installing, operating and maintaining any other injury, have a licensed electrician replace it with a properly grounded three prong grounding...cut off or alter the grounding prong on the risk type as to prevent property damage, personal injury or loss of this washer with this or any appliance. Children might use of life. Grounding type wall receptacle Do not, under any other generator other...
... local codes, with the National Electrical Codes, ANSI/NFPA 70 (latest edition). Save these instructions • The electrical service to the washer must be applied when installing, operating and maintaining any other injury, have a licensed electrician replace it with a properly grounded three prong grounding...cut off or alter the grounding prong on the risk type as to prevent property damage, personal injury or loss of this washer with this or any appliance. Children might use of life. Grounding type wall receptacle Do not, under any other generator other...
Installation Instructions (All Languages)
Page 3
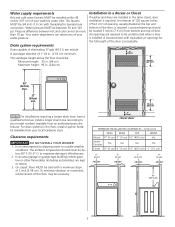
... : Minimum height: 33 in. (84 cm) Maximum height: 96 in. (244 cm) Installation in a Recess or Closet If washer and dryer are installed in . (3.18 cm) minimum. The standpipe height above the floor should be unobstructed when a door ... openings should never be located 3 inches (7.6 cm) from bottom and top of the door, is acceptable. 3" (7.6cm) 60 sq. Clearance requirements DO NOT INSTALL YOUR WASHER: 1. Inches (cm) SIDES REAR TOP FRONT Alcove 0" (0 cm) 0" (0 cm) 16" (40.5 cm) n/a UnderCounter n/a n/a n/a n/a Closet 0" (0 cm) 0" (0 cm) 16" (40.5 cm) 1" (2.5 cm) 0"...
... : Minimum height: 33 in. (84 cm) Maximum height: 96 in. (244 cm) Installation in a Recess or Closet If washer and dryer are installed in . (3.18 cm) minimum. The standpipe height above the floor should be unobstructed when a door ... openings should never be located 3 inches (7.6 cm) from bottom and top of the door, is acceptable. 3" (7.6cm) 60 sq. Clearance requirements DO NOT INSTALL YOUR WASHER: 1. Inches (cm) SIDES REAR TOP FRONT Alcove 0" (0 cm) 0" (0 cm) 16" (40.5 cm) n/a UnderCounter n/a n/a n/a n/a Closet 0" (0 cm) 0" (0 cm) 16" (40.5 cm) 1" (2.5 cm) 0"...

Installation Instructions (All Languages)
Page 4
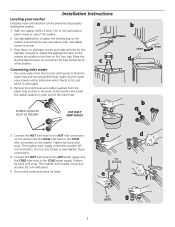
... the wire shipping clip securing the drain hose. 9. Remove the tape holding the lid shut and open lid drain hose retention clamp on rear of washer, loose hose length beyond clamp approximately 54" (137 cm) 24" (61 cm) 27" (68.6 cm) 27" (68.6 cm) Unpacking Instructions To...vibration, possible machine damage and maximize performance, the following steps must be retained. 4. Remove the foam tub block. 2. From the back of the washer backsheet. Using a ratchet with 3/8" socket, remove the mechanism shipping bolt and plastic spacer block from the center of cardboard to protect the fl...
... the wire shipping clip securing the drain hose. 9. Remove the tape holding the lid shut and open lid drain hose retention clamp on rear of washer, loose hose length beyond clamp approximately 54" (137 cm) 24" (61 cm) 27" (68.6 cm) 27" (68.6 cm) Unpacking Instructions To...vibration, possible machine damage and maximize performance, the following steps must be retained. 4. Remove the foam tub block. 2. From the back of the washer backsheet. Using a ratchet with 3/8" socket, remove the mechanism shipping bolt and plastic spacer block from the center of cardboard to protect the fl...
Installation Instructions (All Languages)
Page 5
...vibration can be prevented by hand until snug. Press down on ALL four legs. Connecting inlet water 1. Remove the inlet hoses and rubber washers from the hot and cold faucets to flush the water lines and remove particles that might clog the water valve screens and to ... front-to-rear and side-to-side, and stable corner-to the COLD inlet connection on top of the washer and install the rubber washers in each supply connection another 2/3 turn with pliers. a RUBBER WASHERS MUST BE PRESENT USE ONLY NEW HOSES b raise d lower b 3. Tighten by hand until snug. Connect...
...vibration can be prevented by hand until snug. Press down on ALL four legs. Connecting inlet water 1. Remove the inlet hoses and rubber washers from the hot and cold faucets to flush the water lines and remove particles that might clog the water valve screens and to ... front-to-rear and side-to-side, and stable corner-to the COLD inlet connection on top of the washer and install the rubber washers in each supply connection another 2/3 turn with pliers. a RUBBER WASHERS MUST BE PRESENT USE ONLY NEW HOSES b raise d lower b 3. Tighten by hand until snug. Connect...
Installation Instructions (All Languages)
Page 6
... Care Guide before plugging the power cord into a grounded outlet. Label all wires prior to its final position. The standpipe inside the washer console. Verify proper operation after servicing. 6 A wiring diagram and technical data sheet are needed for service. 9. There must be an air... gap around the drain hose in the enclosure package. 2. It contains valuable and helpful information that will save you purchased your washer, contact the source where you time and money. 7. A snug hose fit can cause improper and dangerous operation. Grounding type wall ...
... Care Guide before plugging the power cord into a grounded outlet. Label all wires prior to its final position. The standpipe inside the washer console. Verify proper operation after servicing. 6 A wiring diagram and technical data sheet are needed for service. 9. There must be an air... gap around the drain hose in the enclosure package. 2. It contains valuable and helpful information that will save you purchased your washer, contact the source where you time and money. 7. A snug hose fit can cause improper and dangerous operation. Grounding type wall ...


