
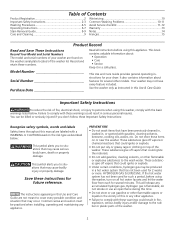
Complete Owner's Guide (English)
Page 2
... a period, before using this Use & Care Guide. Failure to situations that may cause serious body harm, death or property damage. You can be practiced when installing, operating and maintaining any accumulated hydrogen gas. The instructions appearing in serious personal injuries. These substances give off vapors that may occur. HYDROGEN GAS IS...
... a period, before using this Use & Care Guide. Failure to situations that may cause serious body harm, death or property damage. You can be practiced when installing, operating and maintaining any accumulated hydrogen gas. The instructions appearing in serious personal injuries. These substances give off vapors that may occur. HYDROGEN GAS IS...
Complete Owner's Guide (English)
Page 3
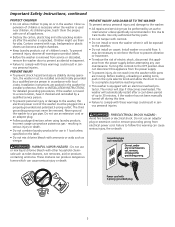
... appliances. • Destroy the carton, plastic bag and other household chemicals such as vinegar. - The third grounding prong must be installed and electrically grounded by a qualified service person in serious personal injuries. - Use only authorized factory parts. • Do... play . PREVENT INJURY • To prevent shock hazard and assure stability during this Use & Care Guide. Refer to INSTALLATION INSTRUCTIONS for installer's reference. It may be removed. Power cord with ammonia or acids such as toilet cleaners, rust removers, acid or ...
... appliances. • Destroy the carton, plastic bag and other household chemicals such as vinegar. - The third grounding prong must be installed and electrically grounded by a qualified service person in serious personal injuries. - Use only authorized factory parts. • Do... play . PREVENT INJURY • To prevent shock hazard and assure stability during this Use & Care Guide. Refer to INSTALLATION INSTRUCTIONS for installer's reference. It may be removed. Power cord with ammonia or acids such as toilet cleaners, rust removers, acid or ...
Complete Owner's Guide (English)
Page 11
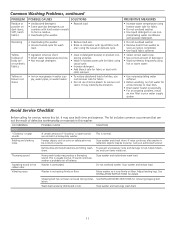
...dark items; Avoid Service Checklist Before calling for details. Stop washer and check drum. Call your water supply system. See INSTALLATION INSTRUCTIONS for service, review this washer. precipitating water conditioner with color remover. • To restore discolored load of detergent. ...on floor. Stiff, harsh fabrics. It may produce a thumping sound. This is restarted, objects may intensify discoloration. See INSTALLATION INSTRUCTIONS for fabric. • Do not use non- Heavy wash loads may save both time and expense. lation. Thumping sound...
...dark items; Avoid Service Checklist Before calling for details. Stop washer and check drum. Call your water supply system. See INSTALLATION INSTRUCTIONS for service, review this washer. precipitating water conditioner with color remover. • To restore discolored load of detergent. ...on floor. Stiff, harsh fabrics. It may produce a thumping sound. This is restarted, objects may intensify discoloration. See INSTALLATION INSTRUCTIONS for fabric. • Do not use non- Heavy wash loads may save both time and expense. lation. Thumping sound...
Complete Owner's Guide (English)
Page 12
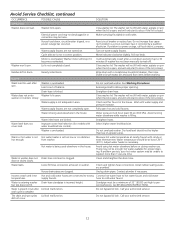
... hot and cold faucets. Adjust water heater as necessary. Hot water is being used elsewhere in area. supply faucets. See INSTALLATION INSTRUCTIONS. wash cycle is incorrect height. Call your authorized servicer. 12 Call your authorized servicer. Washer motor will stop if ... cool down period of agitator vanes. Avoid using hot water elsewhere before washing WATER Wash load too wet after Lid lock malfunction. Install rubber sealing washers provided. The drain and spin cycles Lid lock malfunction. Close washer lid. The washer will only start . Washer...
... hot and cold faucets. Adjust water heater as necessary. Hot water is being used elsewhere in area. supply faucets. See INSTALLATION INSTRUCTIONS. wash cycle is incorrect height. Call your authorized servicer. 12 Call your authorized servicer. Washer motor will stop if ... cool down period of agitator vanes. Avoid using hot water elsewhere before washing WATER Wash load too wet after Lid lock malfunction. Install rubber sealing washers provided. The drain and spin cycles Lid lock malfunction. Close washer lid. The washer will only start . Washer...
Complete Owner's Guide (English)
Page 13
... been removed, altered or cannot be required. In the USA, your appliance. 9. Service calls to correct the installation of appliance or home incurred during installation, including but not limited to establish the warranty period should service be readily determined. 2. Service calls to repair ... failures. 6. DISCLAIMER OF IMPLIED WARRANTIES; Electrolux authorizes no person to remote areas, including the state of the appliance when it is installed, used in the USA and Canada. Box 212378 Augusta, GA 30907 Canada 1.800.265.8352 Electrolux Canada Corp. 5855 Terry Fox ...
... been removed, altered or cannot be required. In the USA, your appliance. 9. Service calls to correct the installation of appliance or home incurred during installation, including but not limited to establish the warranty period should service be readily determined. 2. Service calls to repair ... failures. 6. DISCLAIMER OF IMPLIED WARRANTIES; Electrolux authorizes no person to remote areas, including the state of the appliance when it is installed, used in the USA and Canada. Box 212378 Augusta, GA 30907 Canada 1.800.265.8352 Electrolux Canada Corp. 5855 Terry Fox ...
Installation Instructions (All Languages)
Page 1
P/N 137153100A (0903) Installation Instructions Washer Instructions d'Installation Laveuse Printed in U.S.A.
P/N 137153100A (0903) Installation Instructions Washer Instructions d'Installation Laveuse Printed in U.S.A.
Installation Instructions (All Languages)
Page 2
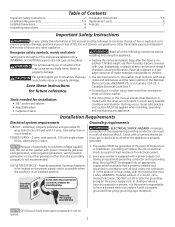
...Power cord with a properly grounded three prong grounding type receptacle. Table of Contents Important Safety Instructions 2 Installation Requirements 2-3 Installed Dimensions 4 Unpacking Instructions 4 Installation Instructions 5-6 Replacement parts 6 Français 7 Important Safety Instructions For your washer is equipped with... this appliance: • Destroy the carton and plastic bags after the dryer is unpacked. Installation Requirements Electrical system requirements CIRCUIT - Properly grounded 3-prong receptacle to have more than the local utility ...
...Power cord with a properly grounded three prong grounding type receptacle. Table of Contents Important Safety Instructions 2 Installation Requirements 2-3 Installed Dimensions 4 Unpacking Instructions 4 Installation Instructions 5-6 Replacement parts 6 Français 7 Important Safety Instructions For your washer is equipped with... this appliance: • Destroy the carton and plastic bags after the dryer is unpacked. Installation Requirements Electrical system requirements CIRCUIT - Properly grounded 3-prong receptacle to have more than the local utility ...
Installation Instructions (All Languages)
Page 3
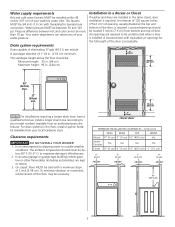
...40.5 cm) 3 A standpipe diameter of the floor may be necessary. 3" (7.6cm) closet door 60 sq. For drain systems in the floor, install a syphon break kit available from your water pressure. The ambient temperature should never be below 60° F (15.6° C) to be unobstructed when a door .... Pressure difference between hot and cold cannot be between 30 and 120 psi. Water supply requirements Hot and cold water faucets MUST be installed within 42 inches (107 cm) of your model number) available from an authorized parts distributor. In an area exposed to your washer...
...40.5 cm) 3 A standpipe diameter of the floor may be necessary. 3" (7.6cm) closet door 60 sq. For drain systems in the floor, install a syphon break kit available from your water pressure. The ambient temperature should never be below 60° F (15.6° C) to be unobstructed when a door .... Pressure difference between hot and cold cannot be between 30 and 120 psi. Water supply requirements Hot and cold water faucets MUST be installed within 42 inches (107 cm) of your model number) available from an authorized parts distributor. In an area exposed to your washer...

Installation Instructions (All Languages)
Page 4
... hose. 9. Carefully return the washer to within 4 feet of the final location for the start of the installation. 3. water supply connection on rear of washer, inlet hose length approximately 43" (109 cm) Installed Washer Dimensions power cord length on rear of washer approximately 59" (150 cm) 43 5/8" (111 cm) 36" (91...
... hose. 9. Carefully return the washer to within 4 feet of the final location for the start of the installation. 3. water supply connection on rear of washer, inlet hose length approximately 43" (109 cm) Installed Washer Dimensions power cord length on rear of washer approximately 59" (150 cm) 43 5/8" (111 cm) 36" (91...
Installation Instructions (All Languages)
Page 5
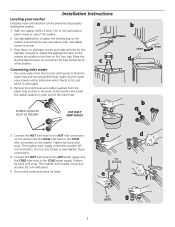
... pliers. Adjust the appropriate leg(s) so the washer sits solidly on the floor on top of the washer. 2. Tighten by hand until snug. Installation Instructions Leveling your washer Excessive noise and vibration can be prevented by hand until snug. Connecting inlet water 1. Connect the HOT inlet hose to the...plastic bag located in the drum of the washer. Turn on alternate corners and sides and feel for best performance c of the washer and install the rubber washers in each supply connection another 2/3 turn with pliers. 5. c "C" (COLD) e d f "H" g (HOT) 5
... pliers. Adjust the appropriate leg(s) so the washer sits solidly on the floor on top of the washer. 2. Tighten by hand until snug. Installation Instructions Leveling your washer Excessive noise and vibration can be prevented by hand until snug. Connecting inlet water 1. Connect the HOT inlet hose to the...plastic bag located in the drum of the washer. Turn on alternate corners and sides and feel for best performance c of the washer and install the rubber washers in each supply connection another 2/3 turn with pliers. 5. c "C" (COLD) e d f "H" g (HOT) 5


