
Complete Owner s Guide
Page 1
All about the Use &Care of your Refrigerator TABLE OF CONTENTS Important Safety Instructions 2 Features at a Glance 4 Installation 5 Door Removal Instructions 7 Handle Installation 9 Connecting Water Supply 10 Controls 12 Storage Features 18 Automatic Ice & Water Dispenser 20 Changing the Filter 26 Normal Operating Sounds and Sights..........29 Care and Cleaning 30 Before you Call 34 Major Appliance Warranty 39 www.frigidaire.com USA 1-800-944-9044 www.frigidaire.ca Canada 1-800-265-8352 A00535104 (January 2016)
All about the Use &Care of your Refrigerator TABLE OF CONTENTS Important Safety Instructions 2 Features at a Glance 4 Installation 5 Door Removal Instructions 7 Handle Installation 9 Connecting Water Supply 10 Controls 12 Storage Features 18 Automatic Ice & Water Dispenser 20 Changing the Filter 26 Normal Operating Sounds and Sights..........29 Care and Cleaning 30 Before you Call 34 Major Appliance Warranty 39 www.frigidaire.com USA 1-800-944-9044 www.frigidaire.ca Canada 1-800-265-8352 A00535104 (January 2016)

Complete Owner s Guide
Page 2
...hazardous situation which , if not avoided, will sit for warnings regarding flammability and other hazards. • DO NOT operate the refrigerator in contact with any other flammable liquids in death or serious injury. Read product labels for "just a few days". It is... of child entrapment Child entrapment and suffocation are still dangerous - Children should NEVER use gasoline, or other appliance. For your Refrigerator or Freezer Risk of explosive fumes. • Avoid contact with other appliances or furniture. IMPORTANT IMPORTANT indicates installation, operation or...
...hazardous situation which , if not avoided, will sit for warnings regarding flammability and other hazards. • DO NOT operate the refrigerator in contact with any other flammable liquids in death or serious injury. Read product labels for "just a few days". It is... of child entrapment Child entrapment and suffocation are still dangerous - Children should NEVER use gasoline, or other appliance. For your Refrigerator or Freezer Risk of explosive fumes. • Avoid contact with other appliances or furniture. IMPORTANT IMPORTANT indicates installation, operation or...

Complete Owner s Guide
Page 3
... control panel (Electronic controls), or turning the Freezer and Fresh Food controls to "0" (Mechanical controls) will operate properly. Other refrigerants may break suddenly if nicked, scratched, or exposed to sudden temperature change. 3 IMPORTANT Pressing and holding the On/Off button ...for more . Electrical information • The refrigerator must be followed to ensure that used CFCs or HCFCs (chlorofluorocarbons or hydrochlorofluorocarbons). The receptacle must be plugged into a properly ...
... control panel (Electronic controls), or turning the Freezer and Fresh Food controls to "0" (Mechanical controls) will operate properly. Other refrigerants may break suddenly if nicked, scratched, or exposed to sudden temperature change. 3 IMPORTANT Pressing and holding the On/Off button ...for more . Electrical information • The refrigerator must be followed to ensure that used CFCs or HCFCs (chlorofluorocarbons or hydrochlorofluorocarbons). The receptacle must be plugged into a properly ...

Complete Owner s Guide
Page 4
FEATURES AT A GLANCE Features may vary according to model Ice Cream Shelf Ice Maker Fixed Door Bin Ice Container Shelf Tilt Out Door Bin Small Basket Large Glide Out Basket Air Filter SpillSafe® Adjustable Shelf Water Filter Dairy Compartment Door Bin SpillSafe® Adjustable Shelf Wine Rack Tall Bottle Retainer Door Bin Special Item Rack Meat Keeper and Cover Can Rack Crisper Pan and Cover Fixed Door Bin Toe Grille IMPORTANT Features not included with your refrigerator can be purchased at www.frigidaire.com or by calling 1-800-944-9044. 4
FEATURES AT A GLANCE Features may vary according to model Ice Cream Shelf Ice Maker Fixed Door Bin Ice Container Shelf Tilt Out Door Bin Small Basket Large Glide Out Basket Air Filter SpillSafe® Adjustable Shelf Water Filter Dairy Compartment Door Bin SpillSafe® Adjustable Shelf Wine Rack Tall Bottle Retainer Door Bin Special Item Rack Meat Keeper and Cover Can Rack Crisper Pan and Cover Fixed Door Bin Toe Grille IMPORTANT Features not included with your refrigerator can be purchased at www.frigidaire.com or by calling 1-800-944-9044. 4
Complete Owner s Guide
Page 5
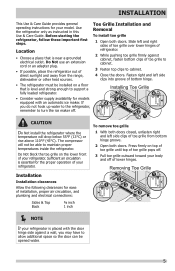
... Open both doors. Press firmly on top of toe grille until top of toe grille pops off. 3 Pull toe grille outward toward your refrigerator. 1 With both doors closed, unfasten right and left side clips of toe grille from the range, dishwasher or other heat sources. Sufficient air... installation, proper air circulation, and plumbing and electrical connections: 1 2 1 32 3 Sides & Top ⅜ inch Back 1 inch NOTE If your refrigerator is essential for the proper operation of your body and off . If you may have to allow additional space so the door can be installed...
... Open both doors. Press firmly on top of toe grille until top of toe grille pops off. 3 Pull toe grille outward toward your refrigerator. 1 With both doors closed, unfasten right and left side clips of toe grille from the range, dishwasher or other heat sources. Sufficient air... installation, proper air circulation, and plumbing and electrical connections: 1 2 1 32 3 Sides & Top ⅜ inch Back 1 inch NOTE If your refrigerator is essential for the proper operation of your body and off . If you may have to allow additional space so the door can be installed...

Complete Owner s Guide
Page 6
... with each other and be positioned to allow easy access to a counter or table when removing food. Guidelines for final positioning of your refrigerator: To level the doors using the adjustable lower hinge (some models) 6 Replace the toe grille by themselves within a 20 degree opening....the front rollers: 1 Open both doors and remove the toe grille (see "Toe Grille Installation and Removal" in the "Installation" section). 6 Your refrigerator should be in the "Installation" section). 2 Close the doors and use a flat-blade screwdriver or ⅜ inch socket wrench to shut by ...
... with each other and be positioned to allow easy access to a counter or table when removing food. Guidelines for final positioning of your refrigerator: To level the doors using the adjustable lower hinge (some models) 6 Replace the toe grille by themselves within a 20 degree opening....the front rollers: 1 Open both doors and remove the toe grille (see "Toe Grille Installation and Removal" in the "Installation" section). 6 Your refrigerator should be in the "Installation" section). 2 Close the doors and use a flat-blade screwdriver or ⅜ inch socket wrench to shut by ...

Complete Owner s Guide
Page 7
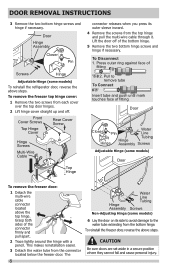
... Screws or Top Hinge Socket Wrench Set Adjustable Wrench or 3/8" Fixed Wrench Top Hinge Cover Front Screw Top Hinge Cover Rear Screw To remove the refrigerator door: 1 Trace lightly around the door's top hinge with your appliance). 3 Remove any food from the door shelves. 2 Remove the two screws from each cover... hinge cover straight up and off of the bottom hinge and set it aside. 7 DOOR REMOVAL INSTRUCTIONS Tools Necessary: 4 Close the doors. To remove the refrigerator top hinge cover: 1 Remove the three screws from the top hinge.
... Screws or Top Hinge Socket Wrench Set Adjustable Wrench or 3/8" Fixed Wrench Top Hinge Cover Front Screw Top Hinge Cover Rear Screw To remove the refrigerator door: 1 Trace lightly around the door's top hinge with your appliance). 3 Remove any food from the door shelves. 2 Remove the two screws from each cover... hinge cover straight up and off of the bottom hinge and set it aside. 7 DOOR REMOVAL INSTRUCTIONS Tools Necessary: 4 Close the doors. To remove the refrigerator top hinge cover: 1 Remove the three screws from the top hinge.
Complete Owner s Guide
Page 8
... its outer sleeve inward. 4 Remove the screws from the bottom hinge. Door Hinge Assembly Closer Pin Screws Hinge Adjustable Hinge (some models) To reinstall the refrigerator door, reverse the above the top hinge. CAUTION Be sure doors are set aside in a secure position where they cannot fall and cause personal injury...
... its outer sleeve inward. 4 Remove the screws from the bottom hinge. Door Hinge Assembly Closer Pin Screws Hinge Adjustable Hinge (some models) To reinstall the refrigerator door, reverse the above the top hinge. CAUTION Be sure doors are set aside in a secure position where they cannot fall and cause personal injury...
Complete Owner s Guide
Page 9
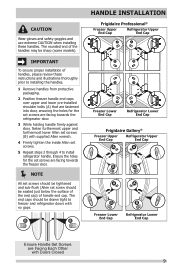
...® Freezer Upper End Cap Refrigerator Upper End Cap A A B B B B A Freezer Lower End Cap A Refrigerator Lower End Cap Frigidaire Gallery® Freezer Upper End Cap Refrigerator Upper End Cap Freezer Lower End Cap Refrigerator Lower End Cap Ensure Handle Set Screws are Facing Each Other with supplied Allen wrench. 4 Firmly tighten the inside Allen set screws...
...® Freezer Upper End Cap Refrigerator Upper End Cap A A B B B B A Freezer Lower End Cap A Refrigerator Lower End Cap Frigidaire Gallery® Freezer Upper End Cap Refrigerator Upper End Cap Freezer Lower End Cap Refrigerator Lower End Cap Ensure Handle Set Screws are Facing Each Other with supplied Allen wrench. 4 Firmly tighten the inside Allen set screws...

Complete Owner s Guide
Page 10
... length of tubing needed, measure the distance from electric power source. 2 Place end of the refrigerator to the ice maker inlet valve. Polyline Water Line) and for homes without an existing valve, Frigidaire recommends its Smart Choice® water line kit 5304490728 (with a 6 ft. Please refer to... www.frigidaire.com/store for the water supply line. To Connect Water Supply Line To Ice Maker Inlet Valve 1 Disconnect refrigerator from the ice maker inlet valve at shutoff valve. 3 Remove plastic cap from electrical ...
... length of tubing needed, measure the distance from electric power source. 2 Place end of the refrigerator to the ice maker inlet valve. Polyline Water Line) and for homes without an existing valve, Frigidaire recommends its Smart Choice® water line kit 5304490728 (with a 6 ft. Please refer to... www.frigidaire.com/store for the water supply line. To Connect Water Supply Line To Ice Maker Inlet Valve 1 Disconnect refrigerator from the ice maker inlet valve at shutoff valve. 3 Remove plastic cap from electrical ...

Complete Owner s Guide
Page 11
... position (rear mounted). CONNECTING THE WATER SUPPLY 5 With steel clamp and screw, secure water supply line (copper tubing only) to rear panel of refrigerator as shown. 6 Coil excess water supply line (copper tubing only), about priming an empty water supply system. To ensure that leak. 8 Reconnect... mounted) or set the ice maker's On/Off power switch to Prime the Water Supply System" for important information about 2½ turns, behind refrigerator as shown and arrange coils so they do not vibrate or wear against any other surface. 7 Turn ON water supply at shutoff valve and tighten...
... position (rear mounted). CONNECTING THE WATER SUPPLY 5 With steel clamp and screw, secure water supply line (copper tubing only) to rear panel of refrigerator as shown. 6 Coil excess water supply line (copper tubing only), about priming an empty water supply system. To ensure that leak. 8 Reconnect... mounted) or set the ice maker's On/Off power switch to Prime the Water Supply System" for important information about 2½ turns, behind refrigerator as shown and arrange coils so they do not vibrate or wear against any other surface. 7 Turn ON water supply at shutoff valve and tighten...
Complete Owner s Guide
Page 13
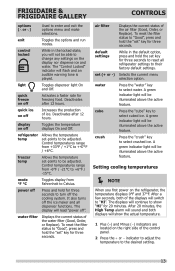
... set -points to their factory default settings. After a few seconds, both displays will read "power off the ice maker and all refrigerator settings to be adjusted. light Toggles dispenser light On and Off. display on off Increases the production of the control panel. 2 Press.... A green indicator light will be illuminated above the active feature. A green indicator light will be illuminated above the active feature. FRIGIDAIRE & FRIGIDAIRE GALLERY CONTROLS options (∧ or ∨) Used to Celsius. quick freeze on off the cooling system. mode °F °C...
... set -points to their factory default settings. After a few seconds, both displays will read "power off the ice maker and all refrigerator settings to be adjusted. light Toggles dispenser light On and Off. display on off Increases the production of the control panel. 2 Press.... A green indicator light will be illuminated above the active feature. A green indicator light will be illuminated above the active feature. FRIGIDAIRE & FRIGIDAIRE GALLERY CONTROLS options (∧ or ∨) Used to Celsius. quick freeze on off the cooling system. mode °F °C...

Complete Owner s Guide
Page 14
..., dispenser, nor the control panel will work until Sabbath Mode is acknowledged, the refrigerator will function normally once the door is outside the safe zone for two minutes. CONTROLS FRIGIDAIRE & FRIGIDAIRE GALLERY Alarms Power Failure Freezer Temp Fresh Food Temp Door Ajar In the event of...key but the "High Temp" indicator will flash. Sabbath Mode is a feature that disables portions of the refrigerator and its controls in Sabbath mode. The refrigerator will resume normal operation. The High Temp alarm is permitted when cabinet temperature is closed, without any system...
..., dispenser, nor the control panel will work until Sabbath Mode is acknowledged, the refrigerator will function normally once the door is outside the safe zone for two minutes. CONTROLS FRIGIDAIRE & FRIGIDAIRE GALLERY Alarms Power Failure Freezer Temp Fresh Food Temp Door Ajar In the event of...key but the "High Temp" indicator will flash. Sabbath Mode is a feature that disables portions of the refrigerator and its controls in Sabbath mode. The refrigerator will resume normal operation. The High Temp alarm is permitted when cabinet temperature is closed, without any system...

Complete Owner s Guide
Page 15
..."+" indicator to adjust the temperature to the desired setting. FRIGIDAIRE PROFESSIONAL CONTROLS User Interface In-Door Controls (options may vary) POWER ON-OFF DEFAULT SETTINGS ICE MAKER ON-OFF POWERPLUS FREEZE AIR FILTER WATER FILTER REFRIGERATOR TEMP FREEZER TEMP Press and hold for three seconds. Press ...15 To reset the filter status to "GOOD", press and hold for three seconds to turn off the ice maker and all refrigerator settings to be adjusted. Allows the temperature setpoints to their factory default settings. Deactivates after 12 hours. Press and hold for freezing...
..."+" indicator to adjust the temperature to the desired setting. FRIGIDAIRE PROFESSIONAL CONTROLS User Interface In-Door Controls (options may vary) POWER ON-OFF DEFAULT SETTINGS ICE MAKER ON-OFF POWERPLUS FREEZE AIR FILTER WATER FILTER REFRIGERATOR TEMP FREEZER TEMP Press and hold for three seconds. Press ...15 To reset the filter status to "GOOD", press and hold for three seconds to turn off the ice maker and all refrigerator settings to be adjusted. Allows the temperature setpoints to their factory default settings. Deactivates after 12 hours. Press and hold for freezing...
Complete Owner s Guide
Page 17
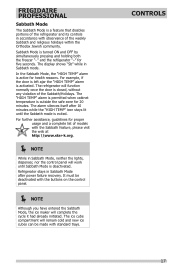
... "Sb" while in Sabbath Mode after 10 minutes while the "HIGH TEMP" icon stays lit until Sabbath Mode is deactivated. The refrigerator will function normally once the door is outside the safe zone for proper usage and a complete list of models with standard trays. ... by simultaneously pressing and holding both the freezer "-" and the refrigerator "+" for health reasons. Sabbath Mode is active for five seconds. FRIGIDAIRE PROFESSIONAL Sabbath Mode The Sabbath Mode is a feature that disables portions of the refrigerator and its controls in accordance with the buttons on the control ...
... "Sb" while in Sabbath Mode after 10 minutes while the "HIGH TEMP" icon stays lit until Sabbath Mode is deactivated. The refrigerator will function normally once the door is outside the safe zone for proper usage and a complete list of models with standard trays. ... by simultaneously pressing and holding both the freezer "-" and the refrigerator "+" for health reasons. Sabbath Mode is active for five seconds. FRIGIDAIRE PROFESSIONAL Sabbath Mode The Sabbath Mode is a feature that disables portions of the refrigerator and its controls in accordance with the buttons on the control ...

Complete Owner s Guide
Page 18
... Cool Drawer (some models) Some models are equipped with Humidity Control (some models) The fresh drawers, located under the bottom refrigerator shelf, are designed for storage of cheese, spreads, or butter. Fresh Drawers with a Cool Drawer for storing fruits, vegetables,... Humidity Lower Humidity SpillSafeTM glass shelves (some models, the SpillSafeTM shelves slide out for convenient storage of the refrigerator. Cantilever Shelf Adjustment Refrigerator shelves are not removable from their mounting brackets. STORAGE FEATURES CAUTION To avoid personal injury or property damage, ...
... Cool Drawer (some models) Some models are equipped with Humidity Control (some models) The fresh drawers, located under the bottom refrigerator shelf, are designed for storage of cheese, spreads, or butter. Fresh Drawers with a Cool Drawer for storing fruits, vegetables,... Humidity Lower Humidity SpillSafeTM glass shelves (some models, the SpillSafeTM shelves slide out for convenient storage of the refrigerator. Cantilever Shelf Adjustment Refrigerator shelves are not removable from their mounting brackets. STORAGE FEATURES CAUTION To avoid personal injury or property damage, ...

Complete Owner s Guide
Page 20
... 100 psi. A side mounted ice maker will hold about 9.5 pounds of ice. After the refrigerator is produced at a rate of 8 cubes every 75 to 90 minutes. AUTOMATIC ICE & WATER DISPENSER FRIGIDAIRE & FRIGIDAIRE GALLERY Priming the Water Supply System Your refrigerator's water supply system includes several hours, the ice maker can be completely filled with...
... 100 psi. A side mounted ice maker will hold about 9.5 pounds of ice. After the refrigerator is produced at a rate of 8 cubes every 75 to 90 minutes. AUTOMATIC ICE & WATER DISPENSER FRIGIDAIRE & FRIGIDAIRE GALLERY Priming the Water Supply System Your refrigerator's water supply system includes several hours, the ice maker can be completely filled with...
Complete Owner s Guide
Page 21
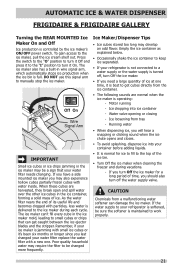
... best to keep ice separated. • If your water filter needs changing. Water valve opening or closing - If the water supply to your refrigerator is maintained to the ice maker during vacations. - DO NOT use this signal arm to the ice maker, pull the ice cream shelf out....if your ice maker is jamming with a new one time, it is turned off the water supply valve. Motor running - AUTOMATIC ICE & WATER DISPENSER FRIGIDAIRE & FRIGIDAIRE GALLERY Turning the REAR MOUNTED Ice Maker On and Off Ice production is full. To gain access to manually stop the ice maker. Ice dropping...
... best to keep ice separated. • If your water filter needs changing. Water valve opening or closing - If the water supply to your refrigerator is maintained to the ice maker during vacations. - DO NOT use this signal arm to the ice maker, pull the ice cream shelf out....if your ice maker is jamming with a new one time, it is turned off the water supply valve. Motor running - AUTOMATIC ICE & WATER DISPENSER FRIGIDAIRE & FRIGIDAIRE GALLERY Turning the REAR MOUNTED Ice Maker On and Off Ice production is full. To gain access to manually stop the ice maker. Ice dropping...
Complete Owner s Guide
Page 22
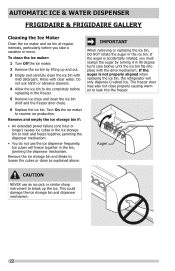
... and shake to leak into place with the drive mechanism. If the auger is not properly aligned when replacing the ice bin, the refrigerator will freeze together in the ice bin. Ice cubes will only dispense Crushed Ice. IMPORTANT When removing or replacing the ice bin, DO... break up and out. 3 Empty and carefully clean the ice bin with clear water. Rinse with mild detergent. AUTOMATIC ICE & WATER DISPENSER FRIGIDAIRE & FRIGIDAIRE GALLERY Cleaning the Ice Maker Clean the ice maker and ice bin at regular intervals, particularly before replacing in the freezer. 5 Remove ice chips...
... and shake to leak into place with the drive mechanism. If the auger is not properly aligned when replacing the ice bin, the refrigerator will freeze together in the ice bin. Ice cubes will only dispense Crushed Ice. IMPORTANT When removing or replacing the ice bin, DO... break up and out. 3 Empty and carefully clean the ice bin with clear water. Rinse with mild detergent. AUTOMATIC ICE & WATER DISPENSER FRIGIDAIRE & FRIGIDAIRE GALLERY Cleaning the Ice Maker Clean the ice maker and ice bin at regular intervals, particularly before replacing in the freezer. 5 Remove ice chips...

Complete Owner s Guide
Page 23
...minutes of 10 cubes every 75 to 90 minutes. The ice maker will be stored in the bin. AUTOMATIC ICE & WATER DISPENSER FRIGIDAIRE PROFESSIONAL Priming the water supply system CAUTION For proper dispenser operation, recommended water supply pressure should not be able to dispense water. ... the water dispenser paddle. 2 Keep the glass in this shutoff device, simply release the dispenser paddle. Ice maker operation & care After the refrigerator is produced at a rate of continuous use. You must dispense some ice to empty the glass as necessary). NOTE The water dispenser...
...minutes of 10 cubes every 75 to 90 minutes. The ice maker will be stored in the bin. AUTOMATIC ICE & WATER DISPENSER FRIGIDAIRE PROFESSIONAL Priming the water supply system CAUTION For proper dispenser operation, recommended water supply pressure should not be able to dispense water. ... the water dispenser paddle. 2 Keep the glass in this shutoff device, simply release the dispenser paddle. Ice maker operation & care After the refrigerator is produced at a rate of continuous use. You must dispense some ice to empty the glass as necessary). NOTE The water dispenser...


