
Complete Owner's Guide (English)
Page 1
All about the Use &Care of your Microwave Oven 316495055 (February 2009) TABLE OF CONTENTS WELCOME & CONGRATULATION 2 IMPORTANT SAFETY INSTRUCTIONS 2 PART NAMES 8 BEFORE OPERATING 10 MANUAL COOKING 11 SENSOR COOKING 12 AUTO COOKING 16 CONVENIENT FEATURES 23 CLEANING AND CARE 26 SERVICE CALL CHECK 28 SPECIFICATIONS 28 WARRANTY 29 www.frigidaire.com USA 1-800-944-9044 www.frigidaire.ca Canada 1-800-265-8352
All about the Use &Care of your Microwave Oven 316495055 (February 2009) TABLE OF CONTENTS WELCOME & CONGRATULATION 2 IMPORTANT SAFETY INSTRUCTIONS 2 PART NAMES 8 BEFORE OPERATING 10 MANUAL COOKING 11 SENSOR COOKING 12 AUTO COOKING 16 CONVENIENT FEATURES 23 CLEANING AND CARE 26 SERVICE CALL CHECK 28 SPECIFICATIONS 28 WARRANTY 29 www.frigidaire.com USA 1-800-944-9044 www.frigidaire.ca Canada 1-800-265-8352
Complete Owner's Guide (English)
Page 2
Your satisfaction is only a phone call Frigidaire Customer Services at : http://www.frigidaire.com Before you can result in this manual. We hope you consider us serve you the Microwave Oven. Common sense and caution must be adjusted or repaired by anyone except properly qualified service ... few things you can do need service, you call for future purchases. Visit the Frigidaire Web Site at 1-800-944-9044, 24 hours a day, 7 days a week. If you do to providing you received a damaged Microwave Oven... It is no damage to the: (1) door (bent), (2) hinges and latches...
Your satisfaction is only a phone call Frigidaire Customer Services at : http://www.frigidaire.com Before you can result in this manual. We hope you consider us serve you the Microwave Oven. Common sense and caution must be adjusted or repaired by anyone except properly qualified service ... few things you can do need service, you call for future purchases. Visit the Frigidaire Web Site at 1-800-944-9044, 24 hours a day, 7 days a week. If you do to providing you received a damaged Microwave Oven... It is no damage to the: (1) door (bent), (2) hinges and latches...
Complete Owner's Guide (English)
Page 3
...the following sections. • Read all safety messages that follow the specific "PRECAUTIONS TO AVOID POSSIBLE EXPOSURE TO EXCESSIVE MICROWAVE ENERGY" on page 4. • Install or locate this appliance only in accordance with the provided installation instructions. • Some... ventilation openings and grease filters frequently. CAUTION CAUTION indicates a potentially hazardous situation which , if not avoided, could result in microwave oven. - READ ALL INFORMATION BEFORE USING WARNING To reduce the risk of table or counter. • See door surface cleaning instructions...
...the following sections. • Read all safety messages that follow the specific "PRECAUTIONS TO AVOID POSSIBLE EXPOSURE TO EXCESSIVE MICROWAVE ENERGY" on page 4. • Install or locate this appliance only in accordance with the provided installation instructions. • Some... ventilation openings and grease filters frequently. CAUTION CAUTION indicates a potentially hazardous situation which , if not avoided, could result in microwave oven. - READ ALL INFORMATION BEFORE USING WARNING To reduce the risk of table or counter. • See door surface cleaning instructions...

Complete Owner's Guide (English)
Page 4
... AN EXTENSION CORD. The Power Supply Cord and plug must be plugged into a wall receptacle that a separate circuit serving only the microwave oven be connected to see that is any liability for the electric current. GROUNDING INSTRUCTIONS This appliance must be plugged into a wall ... or ELECTROLUX SERVICER. or more details. DO NOT UNDER ANY CIRCUMSTANCES CUT OR REMOVE THE GROUNDING PIN FROM THE PLUG. Check the microwave oven for any questions about the grounding or electrical instructions, consult a qualified electrician or service person. 2. If the power...
... AN EXTENSION CORD. The Power Supply Cord and plug must be plugged into a wall receptacle that a separate circuit serving only the microwave oven be connected to see that is any liability for the electric current. GROUNDING INSTRUCTIONS This appliance must be plugged into a wall ... or ELECTROLUX SERVICER. or more details. DO NOT UNDER ANY CIRCUMSTANCES CUT OR REMOVE THE GROUNDING PIN FROM THE PLUG. Check the microwave oven for any questions about the grounding or electrical instructions, consult a qualified electrician or service person. 2. If the power...
Complete Owner's Guide (English)
Page 5
... uses ISM frequency energy and if not installed and used properly, that is no guarantee that the microwave oven and the receiver are designed to radio and television reception. If this microwave oven. However, there is in a particular installation. It is encouraged to try to correct the...more of the following: • Reorient the receiving antenna of the user to the receiver. • Move the microwave oven away from the receiver. • Plug the microwave oven into a different outlet so that interference will not occur in strict accordance with limits for any radio or ...
... uses ISM frequency energy and if not installed and used properly, that is no guarantee that the microwave oven and the receiver are designed to radio and television reception. If this microwave oven. However, there is in a particular installation. It is encouraged to try to correct the...more of the following: • Reorient the receiving antenna of the user to the receiver. • Move the microwave oven away from the receiver. • Plug the microwave oven into a different outlet so that interference will not occur in strict accordance with limits for any radio or ...
Complete Owner's Guide (English)
Page 6
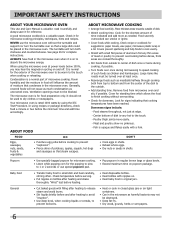
.... Food steams throughout, not just at least once. • Rearrange foods such as uncovered ones. Check it for reference. ABOUT FOOD ABOUT MICROWAVE COOKING • Arrange food carefully. Cook for the shortest amount of moisture that steam escapes. • Cook eggs in shells. • ... sausages, nuts, seeds, fruits & vegetables • Puncture egg yolks before dense, thick areas are cooked thoroughly. • Stir foods from microwave oven and stir, if possible. Baby food • Transfer baby food to dry clothes or newspapers. Large items like roasts must not be ...
.... Food steams throughout, not just at least once. • Rearrange foods such as uncovered ones. Check it for reference. ABOUT FOOD ABOUT MICROWAVE COOKING • Arrange food carefully. Cook for the shortest amount of moisture that steam escapes. • Cook eggs in shells. • ... sausages, nuts, seeds, fruits & vegetables • Puncture egg yolks before dense, thick areas are cooked thoroughly. • Stir foods from microwave oven and stir, if possible. Baby food • Transfer baby food to dry clothes or newspapers. Large items like roasts must not be ...
Complete Owner's Guide (English)
Page 7
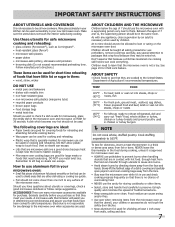
... deli and (74°C) carry out "fresh" food, whole chicken or turkey, chicken or turkey breasts and ground poultry used . ABOUT CHILDREN AND THE MICROWAVE Children below the age of 7 should be extra hot. At no chance of Agriculture's recommended temperatures. Don't assume that because a child has mastered one ...and assure you wish to touch food. A dish which becomes very hot should not be used to shield areas that are in the microwave oven and microwave on the food can be used successfully in the food during cooking. As with hot food. To test for short time reheating of the...
... deli and (74°C) carry out "fresh" food, whole chicken or turkey, chicken or turkey breasts and ground poultry used . ABOUT CHILDREN AND THE MICROWAVE Children below the age of 7 should be extra hot. At no chance of Agriculture's recommended temperatures. Don't assume that because a child has mastered one ...and assure you wish to touch food. A dish which becomes very hot should not be used to shield areas that are in the microwave oven and microwave on the food can be used successfully in the food during cooking. As with hot food. To test for short time reheating of the...
Complete Owner's Guide (English)
Page 8
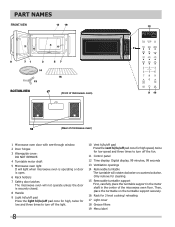
PART NAMES BOTTOM VIEW (Front of microwave oven) (Rear of the microwave oven floor. Then, place the turntable on the turntable support securely. 16 Rack for low speed and three times to turn off the light. 8 10 ... First, carefully place the turntable support in the motor shaft in the center of microwave oven) 1 Microwave oven door with see-through window 2 Door hinges 3 Waveguide cover: DO NOT REMOVE. 4 Turntable motor shaft 5 Microwave oven light It will light when microwave oven is operating or door is open. 6 Rack holders 7 Safety door latches The...
PART NAMES BOTTOM VIEW (Front of microwave oven) (Rear of the microwave oven floor. Then, place the turntable on the turntable support securely. 16 Rack for low speed and three times to turn off the light. 8 10 ... First, carefully place the turntable support in the motor shaft in the center of microwave oven) 1 Microwave oven door with see-through window 2 Door hinges 3 Waveguide cover: DO NOT REMOVE. 4 Turntable motor shaft 5 Microwave oven light It will light when microwave oven is operating or door is open. 6 Rack holders 7 Safety door latches The...
Complete Owner's Guide (English)
Page 10
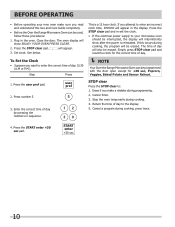
... 3. Press the START enter +30 sec pad. See below. START enter +30 sec 10 Plug in sequence. 12 30 NOTE Your Over the Range Microwave Oven can be used, follow these procedures: 1. Set clock. This is reinstated. If this Use and Care Guide completely. • Before the Over ...the Range Microwave Oven can be programmed with the door open except for the correct time of day will also be erased. Press number 5. 5 3. Stop the oven...
... 3. Press the START enter +30 sec pad. See below. START enter +30 sec 10 Plug in sequence. 12 30 NOTE Your Over the Range Microwave Oven can be used, follow these procedures: 1. Set clock. This is reinstated. If this Use and Care Guide completely. • Before the Over ...the Range Microwave Oven can be programmed with the door open except for the correct time of day will also be erased. Press number 5. 5 3. Stop the oven...

Complete Owner's Guide (English)
Page 11
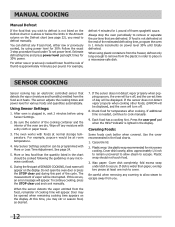
..., even if they are eleven preset power levels. START enter +30 sec When the defrost time is recommended for the best cooking and reheating, use microwave-safe cookware. Enter cooking time. 500 2. power level x 8 3. However, for foods such as cheese, milk and long slow cooking of meats.... Using a lower power level will appear in better cooking and reheating uniformity. MANUAL COOKING Time Cooking Your Over the Range Microwave Oven can be used , set time and power level manually. Step Press 1. After cooking or reheating, stir if possible. See page 25...
..., even if they are eleven preset power levels. START enter +30 sec When the defrost time is recommended for the best cooking and reheating, use microwave-safe cookware. Enter cooking time. 500 2. power level x 8 3. However, for foods such as cheese, milk and long slow cooking of meats.... Using a lower power level will appear in better cooking and reheating uniformity. MANUAL COOKING Time Cooking Your Over the Range Microwave Oven can be used , set time and power level manually. Step Press 1. After cooking or reheating, stir if possible. See page 25...
Complete Owner's Guide (English)
Page 12
.... Using Sensor Settings: 1. The measurement of day will appear on the display. Estimate defrosting time and press power level pad eight times for microwave cooking. Be sure the exterior of the cooking container and the interior of SENSOR COOKING, food name will be interrupted. See page 24. 5.... Defrost If the food that you wish to defrost is not listed on the Defrost chart or is above or below the limits in any microwave cookbook. 6. Casserole lid. 2. SENSOR COOKING Sensor cooking has an electronic controlled sensor that detects the vapor (moisture and humidity) emitted from...
.... Using Sensor Settings: 1. The measurement of day will appear on the display. Estimate defrosting time and press power level pad eight times for microwave cooking. Be sure the exterior of the cooking container and the interior of SENSOR COOKING, food name will be interrupted. See page 24. 5.... Defrost If the food that you wish to defrost is not listed on the Defrost chart or is above or below the limits in any microwave cookbook. 6. Casserole lid. 2. SENSOR COOKING Sensor cooking has an electronic controlled sensor that detects the vapor (moisture and humidity) emitted from...
Complete Owner's Guide (English)
Page 13
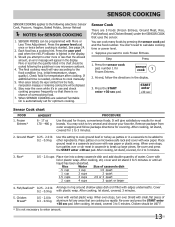
... COOKING SENSOR COOKING applies to enter amount. 13 Press the user pref pad when the HELP indicator is no chance of aluminum foil any microwave cookbook. 4. initial temperature, shape, quality). When SENSOR COOKING are cooking too rapidly. Sensor Cook There are 5 foods (Frozen Entrees,.../Seafood* 0.25 - 2.0 lb Arrange in the display. 3. Shield with wax paper or plastic wrap. You can be displayed. 6. Place patties on a microwave-safe rack and cover with vented plastic wrap. Chicken Breast* 0.5 - 2.0 lb 0.3 - 0.9 kg Cover with wax paper. Check food for Frozen Entrees....
... COOKING SENSOR COOKING applies to enter amount. 13 Press the user pref pad when the HELP indicator is no chance of aluminum foil any microwave cookbook. 4. initial temperature, shape, quality). When SENSOR COOKING are cooking too rapidly. Sensor Cook There are 5 foods (Frozen Entrees,.../Seafood* 0.25 - 2.0 lb Arrange in the display. 3. Shield with wax paper or plastic wrap. You can be displayed. 6. Place patties on a microwave-safe rack and cover with vented plastic wrap. Chicken Breast* 0.5 - 2.0 lb 0.3 - 0.9 kg Cover with wax paper. Check food for Frozen Entrees....
Complete Owner's Guide (English)
Page 14
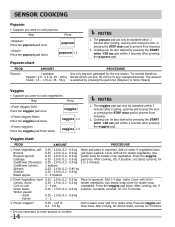
... Corn on cob Green beans Winter squash - Press the veggies pad three times. veggies x 2 Press the veggies pad three times. Cover with lid for the microwave. Use 0.25 - 2.0 lb, 0.2 - 0.9 kg plastic wrap for tender-crisp vegetables. diced - Use plastic wrap cover for tender-crisp vegetables. Veggies • Suppose you want to...
... Corn on cob Green beans Winter squash - Press the veggies pad three times. veggies x 2 Press the veggies pad three times. Cover with lid for the microwave. Use 0.25 - 2.0 lb, 0.2 - 0.9 kg plastic wrap for tender-crisp vegetables. diced - Use plastic wrap cover for tender-crisp vegetables. Veggies • Suppose you want to...
Complete Owner's Guide (English)
Page 16
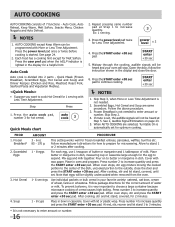
...chart 2. Press the START enter +30 sec pad. Frozen Breakfast is not needed . 2. FOOD 1. Frozen Breakfast* 2. Follow manufacturer's directions for microwaving. Press number 2 to prepare for how to increase quantity and press the START enter +30 sec pad. When oven stops, stir egg mixture ...until set for a helpful hint. Skip Step 3, when More or Less Time Adjustment is very important to choose a large container because microwave cooking of the dish, uncooked portion to enter amount or number. Hot Cereal 4. Cover with More or Less Time Adjustment. Follow the ...
...chart 2. Press the START enter +30 sec pad. Frozen Breakfast is not needed . 2. FOOD 1. Frozen Breakfast* 2. Follow manufacturer's directions for microwaving. Press number 2 to prepare for how to increase quantity and press the START enter +30 sec pad. When oven stops, stir egg mixture ...until set for a helpful hint. Skip Step 3, when More or Less Time Adjustment is very important to choose a large container because microwave cooking of the dish, uncooked portion to enter amount or number. Hot Cereal 4. Cover with More or Less Time Adjustment. Follow the ...
Complete Owner's Guide (English)
Page 20
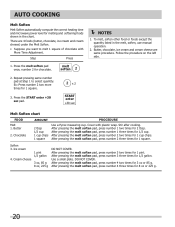
... melting and softening foods shown in the melt, soften, use manual operation. 2. AUTO COOKING Melt Soften Melt Soften automatically compute the correct heating time and microwave power level for 1 square. Soften 3. To melt, soften other food or foods except the quantity listed in the chart. After pressing the melt soften pad...
... melting and softening foods shown in the melt, soften, use manual operation. 2. AUTO COOKING Melt Soften Melt Soften automatically compute the correct heating time and microwave power level for 1 square. Soften 3. To melt, soften other food or foods except the quantity listed in the chart. After pressing the melt soften pad...
Complete Owner's Guide (English)
Page 21
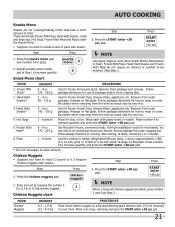
... from the oven as snack may be very hot. 3. Follow package directions for frozen, convenience foods. Wrap each . It will give satisfactory results for frozen microwave pizza. Pizza 1 - 6 slices Use this pad for how to be very hot. 4. Chicken Nuggets • Suppose you want to heat 0.3 pound or 0.3 kilogram chicken nuggets...
... from the oven as snack may be very hot. 3. Follow package directions for frozen, convenience foods. Wrap each . It will give satisfactory results for frozen microwave pizza. Pizza 1 - 6 slices Use this pad for how to be very hot. 4. Chicken Nuggets • Suppose you want to heat 0.3 pound or 0.3 kilogram chicken nuggets...
Complete Owner's Guide (English)
Page 23
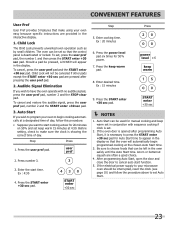
... Pref User Pref provides 5 features that make sure the clock is showing the correct time of day, follow the procedure above to make using your microwave oven should be set in the interactive display. 1. Press the user pref pad. Press number 3. 3 3. user pref 2. Enter desired time. If the electrical power supply...
... Pref User Pref provides 5 features that make sure the clock is showing the correct time of day, follow the procedure above to make using your microwave oven should be set in the interactive display. 1. Press the user pref pad. Press number 3. 3 3. user pref 2. Enter desired time. If the electrical power supply...
Complete Owner's Guide (English)
Page 25
... NOTES 1. After cooking or reheating, stir if possible. When SENSOR COOKING and AUTO COOKING are used, for three seconds. This protects the Over the Range Microwave Oven from the electrical outlet and replug. Timer operates as a kitchen timer and cannot be used when the oven is automatically set during Manual Cooking...
... NOTES 1. After cooking or reheating, stir if possible. When SENSOR COOKING and AUTO COOKING are used, for three seconds. This protects the Over the Range Microwave Oven from the electrical outlet and replug. Timer operates as a kitchen timer and cannot be used when the oven is automatically set during Manual Cooking...
Complete Owner's Guide (English)
Page 26
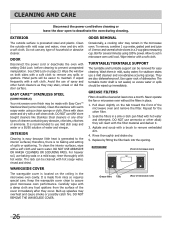
...a soft cloth. DO NOT use of cleaners containing any abrasive, chlorides, chlorines or ammonia. they will be wiped up splashes may remain in microwave oven until cool. Clean the outside surface is made with a damp cloth any other filter. 2. For heavier soil, use a mild cleanser and.... It is generated to remove any type of 1 lemon and several minutes using a clean sponge or cloth. Never operate the fan or microwave oven without the filters in mild, sudsy water; To remove, combine 1 cup water, grated peel and juice of household or abrasive cleaner....
...a soft cloth. DO NOT use of cleaners containing any abrasive, chlorides, chlorines or ammonia. they will be wiped up splashes may remain in microwave oven until cool. Clean the outside surface is made with a damp cloth any other filter. 2. For heavier soil, use a mild cleanser and.... It is generated to remove any type of 1 lemon and several minutes using a clean sponge or cloth. Never operate the fan or microwave oven without the filters in mild, sudsy water; To remove, combine 1 cup water, grated peel and juice of household or abrasive cleaner....
Complete Owner's Guide (English)
Page 27
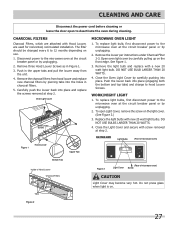
... light bulb, first disconnect power to hood Louver Screws. Remove the light bulb and replace with screw removed at step 2. To open to the microwave oven at the circuit breaker panel or by unplugging. 2. Close the Light Cover and secure with a new 20 watt light bulb. Close the...pulling up on . To replace light bulbs, first disconnect power to deactivate the oven during cleaning. The filter should be changed every 6 to the microwave oven at step 2. Push in charcoal filters. 5. Carefully push the louver back into place. Push the louver back into the holes in the ...
... light bulb, first disconnect power to hood Louver Screws. Remove the light bulb and replace with screw removed at step 2. To open to the microwave oven at the circuit breaker panel or by unplugging. 2. Close the Light Cover and secure with a new 20 watt light bulb. Close the...pulling up on . To replace light bulbs, first disconnect power to deactivate the oven during cleaning. The filter should be changed every 6 to the microwave oven at step 2. Push in charcoal filters. 5. Carefully push the louver back into place. Push the louver back into the holes in the ...


