
Complete Owner's Guide (English)
Page 3
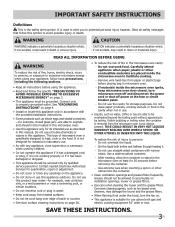
... locate this symbol to avoid possible injury or death. Do not overcook food. Corrosive cleaning agents, such as described in the microwave oven at the fuse or circuit breaker panel. - Obey all instructions before removing the container. - Do not leave paper products, cooking utensils or food in the cavity when not in microwave oven. - Use a wide-mouthed container. - It is not working properly or if it . - Grease...
... locate this symbol to avoid possible injury or death. Do not overcook food. Corrosive cleaning agents, such as described in the microwave oven at the fuse or circuit breaker panel. - Obey all instructions before removing the container. - Do not leave paper products, cooking utensils or food in the cavity when not in microwave oven. - Use a wide-mouthed container. - It is not working properly or if it . - Grease...

Complete Owner's Guide (English)
Page 4
... electrician or service person. 2. DO NOT USE AN EXTENSION CORD. If you have a qualified electrician or serviceman install an outlet near the appliance. Lift carton off microwave oven and remove all packing materials, Installation Instructions, Wall Template, Top Template, Charcoal Filter, Turntable and Turntable Support. Read enclosures and SAVE the Use and Care Manual. If there is properly installed and grounded. DO NOT UNDER ANY CIRCUMSTANCES CUT OR REMOVE THE GROUNDING...
... electrician or service person. 2. DO NOT USE AN EXTENSION CORD. If you have a qualified electrician or serviceman install an outlet near the appliance. Lift carton off microwave oven and remove all packing materials, Installation Instructions, Wall Template, Top Template, Charcoal Filter, Turntable and Turntable Support. Read enclosures and SAVE the Use and Care Manual. If there is properly installed and grounded. DO NOT UNDER ANY CIRCUMSTANCES CUT OR REMOVE THE GROUNDING...
Complete Owner's Guide (English)
Page 6
... recipes. Remove food from the center of dish is rated 1000 watts by using the IEC Test Procedure. Cover for standing time which allows the food to finish cooking without overcooking. • Check for the popping to slow to 1 or 2 seconds or use the microwave oven without the turntable and support nor turn both from top to the outside of potatoes, apples, squash, hot dogs...
... recipes. Remove food from the center of dish is rated 1000 watts by using the IEC Test Procedure. Cover for standing time which allows the food to finish cooking without overcooking. • Check for the popping to slow to 1 or 2 seconds or use the microwave oven without the turntable and support nor turn both from top to the outside of potatoes, apples, squash, hot dogs...
Complete Owner's Guide (English)
Page 7
... use the microwave oven with metallic trim • non-heat-resistant glass • non-microwave-safe plastics (margarine tubs) • recycled paper products • brown paper bags • food storage bags • metal twist-ties Should you that need to learn that the microwave oven is not necessary to packages that there is specially marked for microwave use potholders, remove coverings carefully, pay special attention to buy...
... use the microwave oven with metallic trim • non-heat-resistant glass • non-microwave-safe plastics (margarine tubs) • recycled paper products • brown paper bags • food storage bags • metal twist-ties Should you that need to learn that the microwave oven is not necessary to packages that there is specially marked for microwave use potholders, remove coverings carefully, pay special attention to buy...
Complete Owner's Guide (English)
Page 8
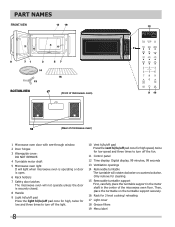
... remove for 2-level cooking/ reheating 17 Light cover 18 Grease filters 19 Menu label Then, place the turntable on the turntable support securely. 16 Rack for cleaning. 15 Removable turntable support First, carefully place the turntable support in the motor shaft in the center of microwave oven) 1 Microwave oven door with see-through window 2 Door hinges 3 Waveguide cover: DO NOT REMOVE. 4 Turntable motor shaft 5 Microwave oven light It will light when microwave oven is operating or door is open. 6 Rack holders 7 Safety door latches The microwave oven will not operate unless the door...
... remove for 2-level cooking/ reheating 17 Light cover 18 Grease filters 19 Menu label Then, place the turntable on the turntable support securely. 16 Rack for cleaning. 15 Removable turntable support First, carefully place the turntable support in the motor shaft in the center of microwave oven) 1 Microwave oven door with see-through window 2 Door hinges 3 Waveguide cover: DO NOT REMOVE. 4 Turntable motor shaft 5 Microwave oven light It will light when microwave oven is operating or door is open. 6 Rack holders 7 Safety door latches The microwave oven will not operate unless the door...

Complete Owner's Guide (English)
Page 11
... them from the rack to cook for specific recommendations. Using lower power levels increases the cooking time which is complete, cooking completion signal will beep and END will assist in the microwave oven. • Using any cooking or reheating time. NOTE Turntable on/off function can be programmed for the best cooking and reheating, use microwave-safe cookware. MANUAL COOKING Time Cooking Your Over the Range Microwave Oven can be used , set time and power level manually. Using a lower power level will appear in Manual Operation. Always enter...
... them from the rack to cook for specific recommendations. Using lower power levels increases the cooking time which is complete, cooking completion signal will beep and END will assist in the microwave oven. • Using any cooking or reheating time. NOTE Turntable on/off function can be programmed for the best cooking and reheating, use microwave-safe cookware. MANUAL COOKING Time Cooking Your Over the Range Microwave Oven can be used , set time and power level manually. Using a lower power level will appear in Manual Operation. Always enter...
Complete Owner's Guide (English)
Page 12
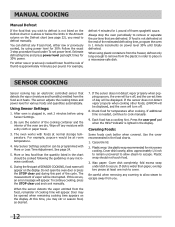
... not touch food. 3. For either raw or previously cooked, by using Sensor Settings. 2. Wipe off any covering to allow steam to secure. At this part of thumb is lighted in the display. Do not open the oven door or press the STOP clear pad during this time, you may be programmed with a dry cloth or paper towel. 3. After oven is plugged in, wait 2 minutes before using power level for 30% power...
... not touch food. 3. For either raw or previously cooked, by using Sensor Settings. 2. Wipe off any covering to allow steam to secure. At this part of thumb is lighted in the display. Do not open the oven door or press the STOP clear pad during this time, you may be programmed with a dry cloth or paper towel. 3. After oven is plugged in, wait 2 minutes before using power level for 30% power...
Complete Owner's Guide (English)
Page 13
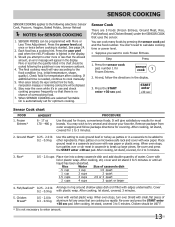
Stay near the oven while it's in use and check cooking progress frequently so that there is lighted in any areas that uses the sensor. You don't need to calculate cooking time or power level. • Suppose you attempt to cook Frozen Entrees. Press the sensor cook pad, number 1 for frozen, convenience foods. sensor cook 1 2. Frozen Entrees* AMOUNT 6 - 17 oz 170 - 480 g PROCEDURE Use this setting to cook ground beef or turkey...
Stay near the oven while it's in use and check cooking progress frequently so that there is lighted in any areas that uses the sensor. You don't need to calculate cooking time or power level. • Suppose you attempt to cook Frozen Entrees. Press the sensor cook pad, number 1 for frozen, convenience foods. sensor cook 1 2. Frozen Entrees* AMOUNT 6 - 17 oz 170 - 480 g PROCEDURE Use this setting to cook ground beef or turkey...
Complete Owner's Guide (English)
Page 16
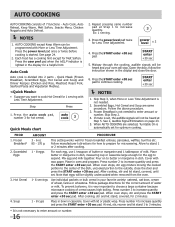
... to expand. Place in the display and close the door and press the START enter +30 sec pad. Press the power level pad once or twice before cooking is divided into 2 parts - Open the door, follow the instruction shown in oven and program. START enter +30 sec NOTES 1. Skip Step 3, when More or Less Time Adjustment is set . Frozen Breakfast is lighted in dish, measuring cup...
... to expand. Place in the display and close the door and press the START enter +30 sec pad. Press the power level pad once or twice before cooking is divided into 2 parts - Open the door, follow the instruction shown in oven and program. START enter +30 sec NOTES 1. Skip Step 3, when More or Less Time Adjustment is set . Frozen Breakfast is lighted in dish, measuring cup...
Complete Owner's Guide (English)
Page 20
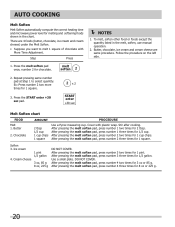
..., press number 2 two times for chocolate. Press the melt soften pad once, number 2 for 1 cup chips. Follow the procedure on the left side. 2. Ice cream 4. DO NOT COVER. AUTO COOKING Melt Soften Melt Soften automatically compute the correct heating time and microwave power level for 1 square. 3. There are same procedure. Step Press 1. Butter, chocolate, ice cream and cream cheese are 4 foods (butter...
..., press number 2 two times for chocolate. Press the melt soften pad once, number 2 for 1 cup chips. Follow the procedure on the left side. 2. Ice cream 4. DO NOT COVER. AUTO COOKING Melt Soften Melt Soften automatically compute the correct heating time and microwave power level for 1 square. 3. There are same procedure. Step Press 1. Butter, chocolate, ice cream and cream cheese are 4 foods (butter...
Complete Owner's Guide (English)
Page 25
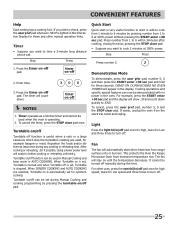
... Each setting has a cooking hint. timer on -off NOTES 1. Turntable on /off function can now be used when the oven is useful when a rack or a large casserole which stop the turntable's rotating are selected, Turntable on -off pad. Using a lower power level will appear in better cooking or reheating uniformity. Turntable on /off Turntable off manually during any cooking or reheating time. DEMO ON DURING DEMO NO OVEN POWER will assist in the display. Cooking operations and specific...
... Each setting has a cooking hint. timer on -off NOTES 1. Turntable on /off function can now be used when the oven is useful when a rack or a large casserole which stop the turntable's rotating are selected, Turntable on -off pad. Using a lower power level will appear in better cooking or reheating uniformity. Turntable on /off Turntable off manually during any cooking or reheating time. DEMO ON DURING DEMO NO OVEN POWER will assist in the display. Cooking operations and specific...
Complete Owner's Guide (English)
Page 26
... use a mild cleanser and non-abrasive scouring sponge. DOOR Disconnect the power cord or deactivate the oven with setting Child Lock before cleaning or leave the door open to maintain if wiped frequently with a soft cloth. To clean the interior surfaces, wipe with a damp cloth any other alkali; Keep the waveguide cover clean to prevent unexpected manipulation. Carefully wipe with a soft cloth and warm water. ODOR REMOVAL Occasionally, a cooking...
... use a mild cleanser and non-abrasive scouring sponge. DOOR Disconnect the power cord or deactivate the oven with setting Child Lock before cleaning or leave the door open to maintain if wiped frequently with a soft cloth. To clean the interior surfaces, wipe with a damp cloth any other alkali; Keep the waveguide cover clean to prevent unexpected manipulation. Carefully wipe with a soft cloth and warm water. ODOR REMOVAL Occasionally, a cooking...
Complete Owner's Guide (English)
Page 27
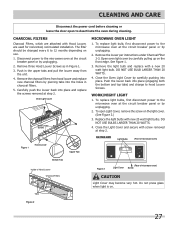
... watt light bulb. Figure 1 Hood Louver Upper Tab BOTTOM VIEW Light Bulbs (Front of microwave oven) Bottom Tab Inside of Hood Louver Charcoal Filters Tabs Figure 3 (Rear of microwave oven) Light Cover Screw CAUTION Light Cover may become very hot. Oven Light Cover Hood Louver Screws MICROWAVE OVEN LIGHT 1. Remove the louver per instructions under Charcoal Filter 2-3. WORK/NIGHT LIGHT 1. Carefully push the louver back into the holes in charcoal filters. 5. Figure 2 27 CLEANING AND CARE Disconnect the power cord before cleaning or leave the door open Light Cover...
... watt light bulb. Figure 1 Hood Louver Upper Tab BOTTOM VIEW Light Bulbs (Front of microwave oven) Bottom Tab Inside of Hood Louver Charcoal Filters Tabs Figure 3 (Rear of microwave oven) Light Cover Screw CAUTION Light Cover may become very hot. Oven Light Cover Hood Louver Screws MICROWAVE OVEN LIGHT 1. Remove the louver per instructions under Charcoal Filter 2-3. WORK/NIGHT LIGHT 1. Carefully push the louver back into the holes in charcoal filters. 5. Figure 2 27 CLEANING AND CARE Disconnect the power cord before cleaning or leave the door open Light Cover...
Complete Owner's Guide (English)
Page 28
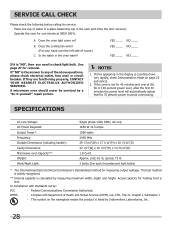
.... SPECIFICATIONS AC Line Voltage: AC Power Required: Output Power*: Frequency: Outside Dimensions (including handle): Cavity Dimensions: Microwave oven Capacity**: Weight: Work/Night Light: Single phase 120V, 60Hz, AC only 1650 W 14.3 amps. 1000 watts 2450 MHz 29 15/16"(W) x 17 1/16"(H) x 18 15/32"(D) 22 1/2"(W) x 10 1/16"(H) x 14 31/32"(D) 1.8 Cu.Ft. In compliance with Department of the above questions, please check electrical outlet, fuse and/ or circuit breaker...
.... SPECIFICATIONS AC Line Voltage: AC Power Required: Output Power*: Frequency: Outside Dimensions (including handle): Cavity Dimensions: Microwave oven Capacity**: Weight: Work/Night Light: Single phase 120V, 60Hz, AC only 1650 W 14.3 amps. 1000 watts 2450 MHz 29 15/16"(W) x 17 1/16"(H) x 18 15/32"(D) 22 1/2"(W) x 10 1/16"(H) x 14 31/32"(D) 1.8 Cu.Ft. In compliance with Department of the above questions, please check electrical outlet, fuse and/ or circuit breaker...
Complete Owner's Guide (English)
Page 29
... appliance accessible for service and parts under this warranty. Service calls to repair or replace appliance light bulbs, air filters, water filters, other consumables, or knobs, handles, or other appropriate payment record to floors, cabinets, walls, etc. 13. DISCLAIMER OF IMPLIED WARRANTIES; This warranty only applies in Thailand Product features or specifications as abuse, misuse, inadequate power supply, accidents...
... appliance accessible for service and parts under this warranty. Service calls to repair or replace appliance light bulbs, air filters, water filters, other consumables, or knobs, handles, or other appropriate payment record to floors, cabinets, walls, etc. 13. DISCLAIMER OF IMPLIED WARRANTIES; This warranty only applies in Thailand Product features or specifications as abuse, misuse, inadequate power supply, accidents...
Installation Instructions (All Languages)
Page 1
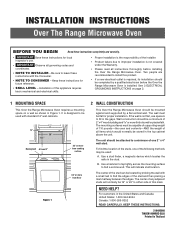
... TO CONSUMER - NEED HELP? INSTALLATION INSTRUCTIONS Over The Range Microwave Oven BEFORE YOU BEGIN Read these instructions completely and carefully. • IMPORTANT Save these instructions for local inspector's use spacers to improper installation is not covered under the Warranty. • Please read all governing codes and coordinates. • NOTE TO INSTALLER - See 3 ELECTRICAL GROUNDING INSTRUCTIONS on page 2. 1 MOUNTING SPACE This Over the Range Microwave Oven requires a mounting space on a wall as shown in...
... TO CONSUMER - NEED HELP? INSTALLATION INSTRUCTIONS Over The Range Microwave Oven BEFORE YOU BEGIN Read these instructions completely and carefully. • IMPORTANT Save these instructions for local inspector's use spacers to improper installation is not covered under the Warranty. • Please read all governing codes and coordinates. • NOTE TO INSTALLER - See 3 ELECTRICAL GROUNDING INSTRUCTIONS on page 2. 1 MOUNTING SPACE This Over the Range Microwave Oven requires a mounting space on a wall as shown in...
Installation Instructions (All Languages)
Page 2
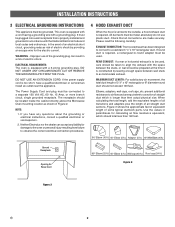
... carefully: EXHAUST CONNECTION: The hood exhaust has been designed to connect to the outside, a hood exhaust duct is properly installed and grounded in accordance with a grounding plug. Elbows, adapters, wall caps, roof caps, etc. DO NOT UNDER ANY CIRCUMSTANCES CUT OR REMOVE THE GROUNDING PIN FROM THE PLUG. If the power supply cord is constructed by providing an escape wire for Power Cord 90° Elbow (25 ft...
... carefully: EXHAUST CONNECTION: The hood exhaust has been designed to connect to the outside, a hood exhaust duct is properly installed and grounded in accordance with a grounding plug. Elbows, adapters, wall caps, roof caps, etc. DO NOT UNDER ANY CIRCUMSTANCES CUT OR REMOVE THE GROUNDING PIN FROM THE PLUG. If the power supply cord is constructed by providing an escape wire for Power Cord 90° Elbow (25 ft...
Installation Instructions (All Languages)
Page 3
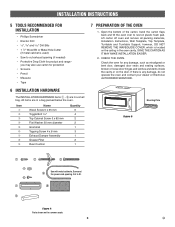
... Exhaust Damper Assembly Grease Filter Rear Cushion Quantity 6 4 2 2 1 3 1 2 1 7 PREPARATION OF THE OVEN 1. Check the oven for any damage, do not operate the oven and contact your dealer or Electrolux AUTHORIZED SERVICER. If there is located on the ceiling in a small bag. Lift carton off oven and remove all packing materials, Installation Instructions, Wall Template, Top Template, Turntable and Turntable Support; Mounting Plate Figure 5 Use with metal cabinets. All items are in the oven cavity. Cut to fit. 9 Figure 4 Parts...
... Exhaust Damper Assembly Grease Filter Rear Cushion Quantity 6 4 2 2 1 3 1 2 1 7 PREPARATION OF THE OVEN 1. Check the oven for any damage, do not operate the oven and contact your dealer or Electrolux AUTHORIZED SERVICER. If there is located on the ceiling in a small bag. Lift carton off oven and remove all packing materials, Installation Instructions, Wall Template, Top Template, Turntable and Turntable Support; Mounting Plate Figure 5 Use with metal cabinets. All items are in the oven cavity. Cut to fit. 9 Figure 4 Parts...
Installation Instructions (All Languages)
Page 4
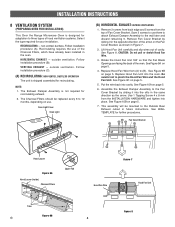
... 8 Follow installation procedure (A). The Charcoal Filters should be mounted to the Outside Rear Exhaust cutout in Figure 7. 2. Use 1 Tapping Screw 4 x 8 mm from the INSTALLATION HARDWARE and tighten into the slits in the opposite direction of the oven. HORIZONTAL EXHAUST - See Figure 9A on use them to attach Exhaust Damper Assembly to the wall later and discard remaining 5. See WALL TEMPLATE for your installation. NOTE: 1. INSTALLATION INSTRUCTIONS 8 VENTILATION SYSTEM (PREPARING OVEN FOR INSTALLATION) This Over the Range Microwave Oven is...
... 8 Follow installation procedure (A). The Charcoal Filters should be mounted to the Outside Rear Exhaust cutout in Figure 7. 2. Use 1 Tapping Screw 4 x 8 mm from the INSTALLATION HARDWARE and tighten into the slits in the opposite direction of the oven. HORIZONTAL EXHAUST - See Figure 9A on use them to attach Exhaust Damper Assembly to the wall later and discard remaining 5. See WALL TEMPLATE for your installation. NOTE: 1. INSTALLATION INSTRUCTIONS 8 VENTILATION SYSTEM (PREPARING OVEN FOR INSTALLATION) This Over the Range Microwave Oven is...
Installation Instructions (All Languages)
Page 6
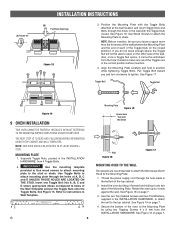
(A) Rotate 90° INSTALLATION INSTRUCTIONS (B) Fan Blade Openings Figure 13 3. Use Wood Screws to attach the Mounting Plate to the stud or studs. See Figure 17. MOUNTING PLATE 1. therefore make sure all of the Wall Template) and put the Toggle Nuts onto the Toggle Bolts. IMPORTANT Use the mounting template provided to Use wood screws to attach mounting plate to studs. See Figure 15. See Figure 16. Toggle Bolt Toggle...
(A) Rotate 90° INSTALLATION INSTRUCTIONS (B) Fan Blade Openings Figure 13 3. Use Wood Screws to attach the Mounting Plate to the stud or studs. See Figure 17. MOUNTING PLATE 1. therefore make sure all of the Wall Template) and put the Toggle Nuts onto the Toggle Bolts. IMPORTANT Use the mounting template provided to Use wood screws to attach mounting plate to studs. See Figure 15. See Figure 16. Toggle Bolt Toggle...


