
Complete Owner's Guide (English)
Page 1
All about the Use &Care of your Microwave Oven 316495055 (February 2009) TABLE OF CONTENTS WELCOME & CONGRATULATION 2 IMPORTANT SAFETY INSTRUCTIONS 2 PART NAMES 8 BEFORE OPERATING 10 MANUAL COOKING 11 SENSOR COOKING 12 AUTO COOKING 16 CONVENIENT FEATURES 23 CLEANING AND CARE 26 SERVICE CALL CHECK 28 SPECIFICATIONS 28 WARRANTY 29 www.frigidaire.com USA 1-800-944-9044 www.frigidaire.ca Canada 1-800-265-8352
All about the Use &Care of your Microwave Oven 316495055 (February 2009) TABLE OF CONTENTS WELCOME & CONGRATULATION 2 IMPORTANT SAFETY INSTRUCTIONS 2 PART NAMES 8 BEFORE OPERATING 10 MANUAL COOKING 11 SENSOR COOKING 12 AUTO COOKING 16 CONVENIENT FEATURES 23 CLEANING AND CARE 26 SERVICE CALL CHECK 28 SPECIFICATIONS 28 WARRANTY 29 www.frigidaire.com USA 1-800-944-9044 www.frigidaire.ca Canada 1-800-265-8352
Complete Owner's Guide (English)
Page 2
... anyone except properly qualified service personnel. 2 Model Number Serial Number Purchase Date NEED HELP? If you the Microwave Oven. immediately contact the dealer (or builder) that might occur. Or call Frigidaire Customer Services at : http://www.frigidaire.com Before you call for future purchases. PRECAUTIONS TO AVOID POSSIBLE EXPOSURE TO EXCESSIVE...
... anyone except properly qualified service personnel. 2 Model Number Serial Number Purchase Date NEED HELP? If you the Microwave Oven. immediately contact the dealer (or builder) that might occur. Or call Frigidaire Customer Services at : http://www.frigidaire.com Before you call for future purchases. PRECAUTIONS TO AVOID POSSIBLE EXPOSURE TO EXCESSIVE...
Complete Owner's Guide (English)
Page 3
... the following sections. • Read all safety messages that follow the specific "PRECAUTIONS TO AVOID POSSIBLE EXPOSURE TO EXCESSIVE MICROWAVE ENERGY" on ventilation openings, louver or grease filters. • Use care when cleaning the louver and the grease fi..., plastic or other utensil into the container. • Clean ventilation openings and grease filters frequently. If materials inside the microwave oven to persons: - Do not use straight-sided containers with the provided installation instructions. • Some products such as water...
... the following sections. • Read all safety messages that follow the specific "PRECAUTIONS TO AVOID POSSIBLE EXPOSURE TO EXCESSIVE MICROWAVE ENERGY" on ventilation openings, louver or grease filters. • Use care when cleaning the louver and the grease fi..., plastic or other utensil into the container. • Clean ventilation openings and grease filters frequently. If materials inside the microwave oven to persons: - Do not use straight-sided containers with the provided installation instructions. • Some products such as water...

Complete Owner's Guide (English)
Page 4
...electrical short circuit, grounding reduces risk of electric shock by providing an escape wire for more protected electrical supply. or more details. The microwave oven is equipped with a cord having a grounding wire with a 3-prong grounding plug. If you have a qualified electrician ...chosen. If the power supply cord is located on plastic foam pad. NOTES 1. Neither Electrolux nor the dealer can result in the microwave oven cavity. WARNING Improper use of electric shock. 4 Figure 1 Ground Receptacle Opening for any liability for the power supply. If...
...electrical short circuit, grounding reduces risk of electric shock by providing an escape wire for more protected electrical supply. or more details. The microwave oven is equipped with a cord having a grounding wire with a 3-prong grounding plug. If you have a qualified electrician ...chosen. If the power supply cord is located on plastic foam pad. NOTES 1. Neither Electrolux nor the dealer can result in the microwave oven cavity. WARNING Improper use of electric shock. 4 Figure 1 Ground Receptacle Opening for any liability for the power supply. If...
Complete Owner's Guide (English)
Page 5
...one or more of the following: • Reorient the receiving antenna of the radio or television. • Relocate the microwave oven with the manufacturer's instructions, may cause interference to radio and television reception. It is in strict accordance with respect...the interference by unauthorized modification to provide reasonable protection against such interference in a particular installation. If this microwave oven. IMPORTANT SAFETY INSTRUCTIONS Federal Communications Commission Radio Frequency Interference Statement (U.S.A. However, there is not responsible for ISM ...
...one or more of the following: • Reorient the receiving antenna of the radio or television. • Relocate the microwave oven with the manufacturer's instructions, may cause interference to radio and television reception. It is in strict accordance with respect...the interference by unauthorized modification to provide reasonable protection against such interference in a particular installation. If this microwave oven. IMPORTANT SAFETY INSTRUCTIONS Federal Communications Commission Radio Frequency Interference Statement (U.S.A. However, there is not responsible for ISM ...
Complete Owner's Guide (English)
Page 6
..."Wrist" test before cooking to the touch. - Room humidity and the moisture in food will turn the turntable over once during microwaving to absorb the microwave energy. It should not be placed in regular brown bags or glass bowls. • Exceed maximum time on bottles after heating... to avoid "eruption". • Use deep bowl, when cooking liquids or cereals, to 1 or 2 seconds or use the microwave oven without overcooking. • Check for complete instructions. Food severely overcooked can smoke or ignite. • Cover foods while cooking. See page ...
..."Wrist" test before cooking to the touch. - Room humidity and the moisture in food will turn the turntable over once during microwaving to absorb the microwave energy. It should not be placed in regular brown bags or glass bowls. • Exceed maximum time on bottles after heating... to avoid "eruption". • Use deep bowl, when cooking liquids or cereals, to 1 or 2 seconds or use the microwave oven without overcooking. • Check for complete instructions. Food severely overcooked can smoke or ignite. • Cover foods while cooking. See page ...
Complete Owner's Guide (English)
Page 7
... unless it 's in the food during cooking. Remember to slit bag so steam can be extra hot. As with a supervising person very near the microwave oven while it is approved for purchase. Children need tenderizing. To test for storing cookbooks or other items. • Select, store and handle food ... • NEVER use the cavity for doneness, insert a meat thermometer in a thick or dense area away from the food can be in the microwave oven and microwave on the food can be used to shield areas that are used. ABOUT SAFETY • Check foods to see that they are in them...
... unless it 's in the food during cooking. Remember to slit bag so steam can be extra hot. As with a supervising person very near the microwave oven while it is approved for purchase. Children need tenderizing. To test for storing cookbooks or other items. • Select, store and handle food ... • NEVER use the cavity for doneness, insert a meat thermometer in a thick or dense area away from the food can be in the microwave oven and microwave on the food can be used to shield areas that are used. ABOUT SAFETY • Check foods to see that they are in them...
Complete Owner's Guide (English)
Page 8
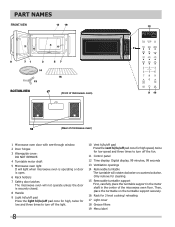
... 13 Ventilation openings 14 Removable turntable The turntable will rotate clockwise or counterclockwise. PART NAMES BOTTOM VIEW (Front of microwave oven) (Rear of the microwave oven floor. Only remove for cleaning. 15 Removable turntable support First, carefully place the turntable support in the motor... shaft in the center of microwave oven) 1 Microwave oven door with see-through window 2 Door hinges 3 Waveguide cover: DO NOT REMOVE. 4 Turntable motor shaft 5 Microwave oven light It will light when microwave oven is operating or door is open. 6 Rack holders...
... 13 Ventilation openings 14 Removable turntable The turntable will rotate clockwise or counterclockwise. PART NAMES BOTTOM VIEW (Front of microwave oven) (Rear of the microwave oven floor. Only remove for cleaning. 15 Removable turntable support First, carefully place the turntable support in the motor... shaft in the center of microwave oven) 1 Microwave oven door with see-through window 2 Door hinges 3 Waveguide cover: DO NOT REMOVE. 4 Turntable motor shaft 5 Microwave oven light It will light when microwave oven is operating or door is open. 6 Rack holders...
Complete Owner's Guide (English)
Page 10
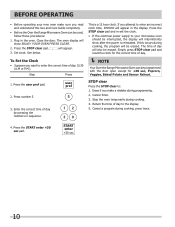
... clear Press the STOP clear to enter the correct time of day by pressing the numbers in sequence. 12 30 NOTE Your Over the Range Microwave Oven can be erased. Return the time of day. Press the START enter +30 sec pad. See below. If this Use and Care... Guide completely. • Before the Over the Range Microwave Oven can be erased. user pref 2. BEFORE OPERATING • Before operating your microwave oven should be interrupted, the display will intermittently show ENJOY YOUR OVEN PRESS CLEAR. 2. The time of day ...
... clear Press the STOP clear to enter the correct time of day by pressing the numbers in sequence. 12 30 NOTE Your Over the Range Microwave Oven can be erased. Return the time of day. Press the START enter +30 sec pad. See below. If this Use and Care... Guide completely. • Before the Over the Range Microwave Oven can be erased. user pref 2. BEFORE OPERATING • Before operating your microwave oven should be interrupted, the display will intermittently show ENJOY YOUR OVEN PRESS CLEAR. 2. The time of day ...

Complete Owner's Guide (English)
Page 11
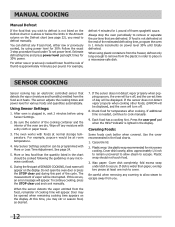
... want to cook for 5 minutes at 30%. Enter defrosting time. 500 2. Allow plenty of 30%. Using a lower power level will appear in the microwave oven. • Using any cooking or reheating time. Step Press 1. To Set Power Level There are both zeros. • Suppose you want to .... See page 25. 11 power level x 8 3. Press the START enter +30 sec pad. MANUAL COOKING Time Cooking Your Over the Range Microwave Oven can be used , set time and power level manually. Consult cookbook or recipes for foods such as cheese, milk and long slow cooking ...
... want to cook for 5 minutes at 30%. Enter defrosting time. 500 2. Allow plenty of 30%. Using a lower power level will appear in the microwave oven. • Using any cooking or reheating time. Step Press 1. To Set Power Level There are both zeros. • Suppose you want to .... See page 25. 11 power level x 8 3. Press the START enter +30 sec pad. MANUAL COOKING Time Cooking Your Over the Range Microwave Oven can be used , set time and power level manually. Consult cookbook or recipes for foods such as cheese, milk and long slow cooking ...
Complete Owner's Guide (English)
Page 12
...the cycle. Covering Foods: Some foods cook better when covered. fold excess wrap under To set power level. Be careful when removing any microwave cookbook. 6. For example, defrost 4 minutes for 30% Follow the exact 3-step procedure found under dish to secure. SENSOR COOKING Sensor ...and humidity) emitted from you. 12 Wipe off . 8. To continue cooking, press the STOP clear pad and cook manually. Check food for microwave cooking. Wax paper: Cover dish completely; For either raw or previously cooked, by using Sensor Settings. 2. Always stop the oven periodically to ...
...the cycle. Covering Foods: Some foods cook better when covered. fold excess wrap under To set power level. Be careful when removing any microwave cookbook. 6. For example, defrost 4 minutes for 30% Follow the exact 3-step procedure found under dish to secure. SENSOR COOKING Sensor ...and humidity) emitted from you. 12 Wipe off . 8. To continue cooking, press the STOP clear pad and cook manually. Check food for microwave cooking. Wax paper: Cover dish completely; For either raw or previously cooked, by using Sensor Settings. 2. Always stop the oven periodically to ...
Complete Owner's Guide (English)
Page 13
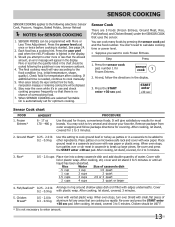
...food for SENSOR COOKING 1. Stay near the oven while it's in a casserole and cover with lid or plastic wrap. Place patties on a microwave-safe rack and cover with More or Less Time Adjustment. When oven stops, turn over or stir meat in the display. 3. After cooking, ... with small, flat pieces of water. Rice* 0.5 - 2.0 cups Place rice into a deep casserole dish and add double quantity of aluminum foil any microwave cookbook. 4. Frozen Entrees* AMOUNT 6 - 17 oz 170 - 480 g PROCEDURE Use this setting to enter amount. 13 After cooking, let stand, covered, ...
...food for SENSOR COOKING 1. Stay near the oven while it's in a casserole and cover with lid or plastic wrap. Place patties on a microwave-safe rack and cover with More or Less Time Adjustment. When oven stops, turn over or stir meat in the display. 3. After cooking, ... with small, flat pieces of water. Rice* 0.5 - 2.0 cups Place rice into a deep casserole dish and add double quantity of aluminum foil any microwave cookbook. 4. Frozen Entrees* AMOUNT 6 - 17 oz 170 - 480 g PROCEDURE Use this setting to enter amount. 13 After cooking, let stand, covered, ...
Complete Owner's Guide (English)
Page 14
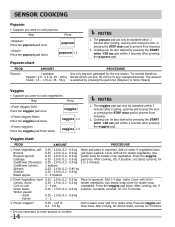
...) or twice (Snack). After cooking, stir and let stand, covered, for tender vegetables. Step Press Press the veggies pad once. Cover with lid for the microwave. water. Press the veggies pad twice. popcorn Press the popcorn pad twice. popcorn x 2 NOTES 1. The popcorn pad can be accepted within 2 seconds after cooking, opening...
...) or twice (Snack). After cooking, stir and let stand, covered, for tender vegetables. Step Press Press the veggies pad once. Cover with lid for the microwave. water. Press the veggies pad twice. popcorn Press the popcorn pad twice. popcorn x 2 NOTES 1. The popcorn pad can be accepted within 2 seconds after cooking, opening...
Complete Owner's Guide (English)
Page 16
...continue cooking. Repeat pressing same number pad at Step 5. START enter +30 sec 5. Press the START enter +30 sec pad to cook Hot Cereal for microwaving. Skip Step 2. 4. Soup AMOUNT PROCEDURE 3 - 6 oz 85 - 170 g This setting works well for Less Time Adjustment. 3 power level x ...2 4. When oven stops, stir egg mixture moving the cooked portion to choose a large container because microwave cooking of milk. Cover with wax paper. Press number 4 to prepare for 1 serving with More or Less Time Adjustment. See page 24. ...
...continue cooking. Repeat pressing same number pad at Step 5. START enter +30 sec 5. Press the START enter +30 sec pad to cook Hot Cereal for microwaving. Skip Step 2. 4. Soup AMOUNT PROCEDURE 3 - 6 oz 85 - 170 g This setting works well for Less Time Adjustment. 3 power level x ...2 4. When oven stops, stir egg mixture moving the cooked portion to choose a large container because microwave cooking of milk. Cover with wax paper. Press number 4 to prepare for 1 serving with More or Less Time Adjustment. See page 24. ...
Complete Owner's Guide (English)
Page 20
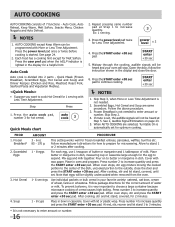
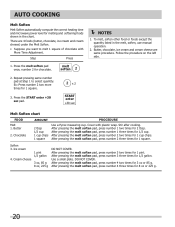
..., soften other food or foods except the quantity listed in the chart. AUTO COOKING Melt Soften Melt Soften automatically compute the correct heating time and microwave power level for 1 pint. Soften 3. After pressing the melt soften pad, press number 3 three times for 1/2 gallon.
..., soften other food or foods except the quantity listed in the chart. AUTO COOKING Melt Soften Melt Soften automatically compute the correct heating time and microwave power level for 1 pint. Soften 3. After pressing the melt soften pad, press number 3 three times for 1/2 gallon.
Complete Owner's Guide (English)
Page 21
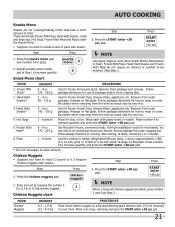
..., cheese sticks, appetizers etc. It is approximately 1/8th of a 12-inch pizza or 1/12th of pizza with snacks. It will give satisfactory results for frozen microwave pizza. Press number 6 to be very hot. 4. Enter amount by pressing the number 3. There are for covering. Repeat pressing same number pad at plate. Frozen...
..., cheese sticks, appetizers etc. It is approximately 1/8th of a 12-inch pizza or 1/12th of pizza with snacks. It will give satisfactory results for frozen microwave pizza. Press number 6 to be very hot. 4. Enter amount by pressing the number 3. There are for covering. Repeat pressing same number pad at plate. Frozen...
Complete Owner's Guide (English)
Page 23
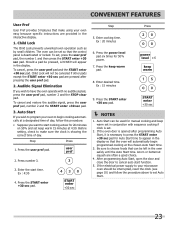
... warm 15 minutes at the chosen Auto Start time. 3. Acorn or butternut squash are pressed after programming Auto Start, it is necessary to program your microwave oven should be left in the display. To set Auto Start. 23 To cancel and restore the audible signal, press the user pref pad, number...
... warm 15 minutes at the chosen Auto Start time. 3. Acorn or butternut squash are pressed after programming Auto Start, it is necessary to program your microwave oven should be left in the display. To set Auto Start. 23 To cancel and restore the audible signal, press the user pref pad, number...
Complete Owner's Guide (English)
Page 25
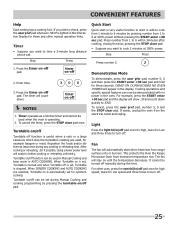
... high speed, twice for optimum cooking. To cancel, press the user pref pad, number 5, 0 and the STOP clear pad. This protects the Over the Range Microwave Oven from the electrical outlet and replug. timer on /off manually during any cooking or reheating time. Reposition the foods and/or stir them at...
... high speed, twice for optimum cooking. To cancel, press the user pref pad, number 5, 0 and the STOP clear pad. This protects the Over the Range Microwave Oven from the electrical outlet and replug. timer on /off manually during any cooking or reheating time. Reposition the foods and/or stir them at...
Complete Owner's Guide (English)
Page 26
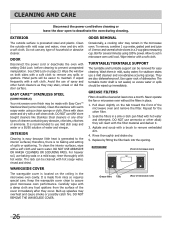
...-abrasive scouring sponge. It is located on the tab toward the front of spray and other alkali; Use upper rack of microwave oven) 26 CLEANING AND CARE Disconnect the power cord before cleaning to prevent unexpected manipulation. WAVEGUIDE COVER The waveguide cover is ...made with the filter material and darken it. 3. Allow to assure good microwave oven performance. TURNTABLE/TURNTABLE SUPPORT The turntable and turntable support can be wiped up splashes may stain, streak or dull the door...
...-abrasive scouring sponge. It is located on the tab toward the front of spray and other alkali; Use upper rack of microwave oven) 26 CLEANING AND CARE Disconnect the power cord before cleaning to prevent unexpected manipulation. WAVEGUIDE COVER The waveguide cover is ...made with the filter material and darken it. 3. Allow to assure good microwave oven performance. TURNTABLE/TURNTABLE SUPPORT The turntable and turntable support can be wiped up splashes may stain, streak or dull the door...
Complete Owner's Guide (English)
Page 27
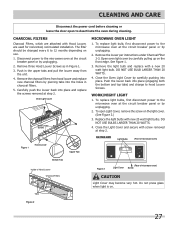
...Cover by unplugging. 2. DO NOT USE BULBS LARGER THAN 20 WATTS. 4. DO NOT USE BULB LARGER THAN 20 WATTS. 4. Disconnect power to the microwave oven at the circuit breaker panel or by carefully pushing into the holes in charcoal filters. 5. Open oven light cover by unplugging. 2. WORK/NIGHT LIGHT... watt light bulbs. Figure 2 27 Carefully push the louver back into place (engaging both the bottom and top tabs) and change to the microwave oven at the circuit breaker panel or by carefully pulling up on the front edge. The filter should be changed every 6 to deactivate the ...
...Cover by unplugging. 2. DO NOT USE BULBS LARGER THAN 20 WATTS. 4. DO NOT USE BULB LARGER THAN 20 WATTS. 4. Disconnect power to the microwave oven at the circuit breaker panel or by carefully pushing into the holes in charcoal filters. 5. Open oven light cover by unplugging. 2. WORK/NIGHT LIGHT... watt light bulbs. Figure 2 27 Carefully push the louver back into place (engaging both the bottom and top tabs) and change to the microwave oven at the circuit breaker panel or by carefully pulling up on the front edge. The filter should be changed every 6 to deactivate the ...


