Product Specifications Sheet
Page 1
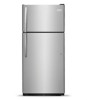
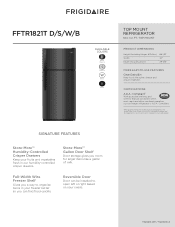
...frigidaire.com / frigidaire.ca Accessibility Guidelines and the Department of milk. SIGNATURE FEATURES Store-More™ Humidity-Controlled Crisper Drawers Keep your fruits and vegetables fresh in your needs. Full-Width Wire Freezer Shelf Gives you room for Accessible Design. FFTR1821T D/S/W/B AVAILABLE COLORS D Black Stainless S Stainless W White B Black TOP MOUNT REFRIGERATOR...controls that are positioned within arm's reach and allow one-hand operation, our top-freezer refrigerator is A.D.A.-qualified based on your freezer better so you can be installed to organize items in...
...frigidaire.com / frigidaire.ca Accessibility Guidelines and the Department of milk. SIGNATURE FEATURES Store-More™ Humidity-Controlled Crisper Drawers Keep your fruits and vegetables fresh in your needs. Full-Width Wire Freezer Shelf Gives you room for Accessible Design. FFTR1821T D/S/W/B AVAILABLE COLORS D Black Stainless S Stainless W White B Black TOP MOUNT REFRIGERATOR...controls that are positioned within arm's reach and allow one-hand operation, our top-freezer refrigerator is A.D.A.-qualified based on your freezer better so you can be installed to organize items in...
Product Specifications Sheet
Page 2
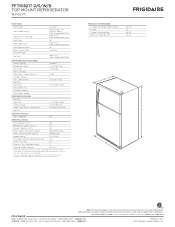
FT. Front / Rear Sound Package Top Mount Fixed / Yes Refrigerators Frigidaire Gallery ToeGrille REFRIGERATOR FEATURES Black (D/S), Color-Coordinated (W/B) Interior Lighting Standard Refrigerator Shelves 2 Full-Width Glass Deli Drawer 1 Half-Width Wine / Can Rack Store-More™...For use on adequately wired 120V, dedicated circuit having 2-wire service with a separate ground wire. FFTR1821T D/S/W/B TOP MOUNT REFRIGERATOR 18.0 CU. Width C - Ft.) 18.0 Refrigerator Capacity (Cu. Ft.) 3.9 Power Supply Connection Location Right Bottom Rear Water Inlet Connection Location Bottom...
FT. Front / Rear Sound Package Top Mount Fixed / Yes Refrigerators Frigidaire Gallery ToeGrille REFRIGERATOR FEATURES Black (D/S), Color-Coordinated (W/B) Interior Lighting Standard Refrigerator Shelves 2 Full-Width Glass Deli Drawer 1 Half-Width Wine / Can Rack Store-More™...For use on adequately wired 120V, dedicated circuit having 2-wire service with a separate ground wire. FFTR1821T D/S/W/B TOP MOUNT REFRIGERATOR 18.0 CU. Width C - Ft.) 18.0 Refrigerator Capacity (Cu. Ft.) 3.9 Power Supply Connection Location Right Bottom Rear Water Inlet Connection Location Bottom...
Product Specifications Sheet
Page 3
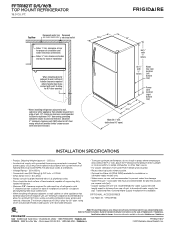
.... Note: For planning purposes only. Refer to prevent water line damage. • Water Pressure - Baseline T 2017 FFTR1821T D/S/W/B TOP MOUNT REFRIGERATOR 18.0 CU. Cold water line must be installed in accordance with current edition of National Electrical Code (NFPA 70)... should be level surface of hard material, capable of supporting fully loaded refrigerator. • Minimum 3/8" clearance required for sides and top of refrigerator with 1" clearance at frigidaire.com / frigidaire.ca. Accessories information available on rear wall recommended to Product Installation Guide ...
.... Note: For planning purposes only. Refer to prevent water line damage. • Water Pressure - Baseline T 2017 FFTR1821T D/S/W/B TOP MOUNT REFRIGERATOR 18.0 CU. Cold water line must be installed in accordance with current edition of National Electrical Code (NFPA 70)... should be level surface of hard material, capable of supporting fully loaded refrigerator. • Minimum 3/8" clearance required for sides and top of refrigerator with 1" clearance at frigidaire.com / frigidaire.ca. Accessories information available on rear wall recommended to Product Installation Guide ...

Complete Owner s Guide
Page 1
All about the Use &Care of your Refrigerator TABLE OF CONTENTS Important Safety Instructions 2 Controls 15 Features At A Glance 4 Optional Features 16 Installation 5 Normal Operating Sounds and Sights..........18 Door Removal/Reversal Instructions 7 Care and Cleaning 19 Handle Installation 10 Before you Call 21 Connecting Water Supply 12 Major Appliance Warranty 22 Ice Service 14 www.frigidaire.com USA 1-800-944-9044 www.frigidaire.ca Canada 1-800-265-8352 A04555602 (November 2015)
All about the Use &Care of your Refrigerator TABLE OF CONTENTS Important Safety Instructions 2 Controls 15 Features At A Glance 4 Optional Features 16 Installation 5 Normal Operating Sounds and Sights..........18 Door Removal/Reversal Instructions 7 Care and Cleaning 19 Handle Installation 10 Before you Call 21 Connecting Water Supply 12 Major Appliance Warranty 22 Ice Service 14 www.frigidaire.com USA 1-800-944-9044 www.frigidaire.ca Canada 1-800-265-8352 A04555602 (November 2015)

Complete Owner s Guide
Page 2
... if not avoided, will sit for warnings regarding flammability and other flammable liquids in Ice Maker House water supply connected to refrigerator No water leaks present at all connections - Staples can quickly cause suffocation. DANGER DANGER indicates an imminently hazardous situation which ...ON Ice & water dispenser operates correctly Front filter must be flush with any moving parts of your Refrigerator or Freezer Risk of child entrapment Child entrapment and suffocation are getting rid of automatic ice maker. • Remove all ...
... if not avoided, will sit for warnings regarding flammability and other flammable liquids in Ice Maker House water supply connected to refrigerator No water leaks present at all connections - Staples can quickly cause suffocation. DANGER DANGER indicates an imminently hazardous situation which ...ON Ice & water dispenser operates correctly Front filter must be flush with any moving parts of your Refrigerator or Freezer Risk of child entrapment Child entrapment and suffocation are getting rid of automatic ice maker. • Remove all ...
Complete Owner s Guide
Page 3
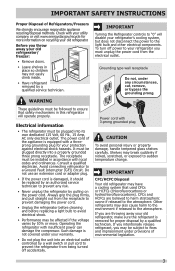
... nicked, scratched, or exposed to a Ground Fault Interrupter (GFI) circuit. To turn off accidentally. Electrical information • The refrigerator must be installed in accordance with local codes and ordinances. The receptacle must be replaced by a qualified technician. Consult a qualified ...of the appliance is equipped with a threeprong grounding plug for your protection against electrical shock hazards. IMPORTANT Turning the Refrigerator controls to "0" will operate properly. Grounding type wall receptacle Do not, under provisions of environmental legislation. 3 CFCs and ...
... nicked, scratched, or exposed to a Ground Fault Interrupter (GFI) circuit. To turn off accidentally. Electrical information • The refrigerator must be installed in accordance with local codes and ordinances. The receptacle must be replaced by a qualified technician. Consult a qualified ...of the appliance is equipped with a threeprong grounding plug for your protection against electrical shock hazards. IMPORTANT Turning the Refrigerator controls to "0" will operate properly. Grounding type wall receptacle Do not, under provisions of environmental legislation. 3 CFCs and ...
Complete Owner s Guide
Page 4
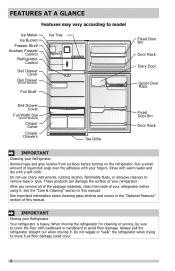
...cleaners to move it . These products can damage the surface of liquid dish soap over the adhesive with a soft cloth. IMPORTANT Moving your refrigerator. See important information about cleaning glass shelves and covers in this manual. FEATURES AT A GLANCE Features may vary according to model Ice Maker... Ice Bucket Freezer Shelf Auxiliary Freezer Control Refrigerator Control Deli Drawer Cover Deli Drawer (Some Models) Full Shelf Ice Tray Fixed Door Bin Door Rack Dairy Door Upper Door Rack Deli...
...cleaners to move it . These products can damage the surface of liquid dish soap over the adhesive with a soft cloth. IMPORTANT Moving your refrigerator. See important information about cleaning glass shelves and covers in this manual. FEATURES AT A GLANCE Features may vary according to model Ice Maker... Ice Bucket Freezer Shelf Auxiliary Freezer Control Refrigerator Control Deli Drawer Cover Deli Drawer (Some Models) Full Shelf Ice Tray Fixed Door Bin Door Rack Dairy Door Upper Door Rack Deli...

Complete Owner s Guide
Page 5
...at the front and rear. • Choose a place that doors close and seal properly). • If possible, place the refrigerator out of your refrigerator. The compressor will drop below 55°F (13°C) or rise above 110°F (43°C). Installation Installation clearances ...can be installed on the lower front of direct sunlight and away from front-to-back (to "Controls" section. Before starting the refrigerator, follow these important first steps. Location Guidelines for the proper operation of installation, proper air circulation, and plumbing and electrical connections:...
...at the front and rear. • Choose a place that doors close and seal properly). • If possible, place the refrigerator out of your refrigerator. The compressor will drop below 55°F (13°C) or rise above 110°F (43°C). Installation Installation clearances ...can be installed on the lower front of direct sunlight and away from front-to-back (to "Controls" section. Before starting the refrigerator, follow these important first steps. Location Guidelines for the proper operation of installation, proper air circulation, and plumbing and electrical connections:...
Complete Owner s Guide
Page 6
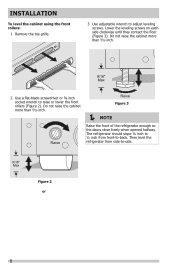
The refrigerator should slope ¼ inch to ½ inch from side-to -back. INSTALLATION To level the cabinet using the front rollers: 1 Remove the toe grille. 3 Use ... each side clockwise until they contact the floor (Figure 3). Raise Raise Figure 3 NOTE Raise the front of the refrigerator enough so the doors close freely when opened halfway. Then level the refrigerator from front-to -side. 9/16" Max Figure 2 or 6 Do not raise the cabinet more than 9/16 inch. 9/16" Max...
The refrigerator should slope ¼ inch to ½ inch from side-to -back. INSTALLATION To level the cabinet using the front rollers: 1 Remove the toe grille. 3 Use ... each side clockwise until they contact the floor (Figure 3). Raise Raise Figure 3 NOTE Raise the front of the refrigerator enough so the doors close freely when opened halfway. Then level the refrigerator from front-to -side. 9/16" Max Figure 2 or 6 Do not raise the cabinet more than 9/16 inch. 9/16" Max...

Complete Owner s Guide
Page 7
...power cord from door shelves. Remove top hinge cover. Tighten screws. 6. This makes reinstallation easier. IMPORTANT Before you begin, turn the refrigerator temperature control to the other. Door Stop Screw Door Stop Washer Shim Hinge Pin Center Hinge Top Hinge Cover Hinge Hole Plug Screws Handle... Screws Toe Grille 7 Set door aside. NOTE The direction in which your refrigerator doors open (door swing) can be performed by moving the door hinges from step 7. 3. Lift refrigerator door off center hinge pin. Loosen two outside screws enough to allow hinge and shim...
...power cord from door shelves. Remove top hinge cover. Tighten screws. 6. This makes reinstallation easier. IMPORTANT Before you begin, turn the refrigerator temperature control to the other. Door Stop Screw Door Stop Washer Shim Hinge Pin Center Hinge Top Hinge Cover Hinge Hole Plug Screws Handle... Screws Toe Grille 7 Set door aside. NOTE The direction in which your refrigerator doors open (door swing) can be performed by moving the door hinges from step 7. 3. Lift refrigerator door off center hinge pin. Loosen two outside screws enough to allow hinge and shim...

Complete Owner s Guide
Page 8
...seal against the cabinet all the way around including top and bottom 8 Look for open areas between the gasket and the cabinet flange. Close refrigerator door to opposite side. 15. Before starting screws, use an awl to opposite side. Move hinge pin to other hole in Step 2) ...hinge cover (which was removed in hinge and tighten with adjustable wrench. 14. Lower freezer door onto center hinge pin. 16. Move freezer and refrigerator door stops to puncture the foam. 12. Reverse door handles (see instruction on the handle side approximately 3 inches from the outside edge. This...
...seal against the cabinet all the way around including top and bottom 8 Look for open areas between the gasket and the cabinet flange. Close refrigerator door to opposite side. 15. Before starting screws, use an awl to opposite side. Move hinge pin to other hole in Step 2) ...hinge cover (which was removed in hinge and tighten with adjustable wrench. 14. Lower freezer door onto center hinge pin. 16. Move freezer and refrigerator door stops to puncture the foam. 12. Reverse door handles (see instruction on the handle side approximately 3 inches from the outside edge. This...

Complete Owner s Guide
Page 9
IMPORTANT If the condition still exists, try to massage the gasket to center position. Rotate the gasket half a turn refrigerator temperature control to make sure it is seated into the channel. If the open seal condition exist, try heating the gasket with a hair dryer with ...
IMPORTANT If the condition still exists, try to massage the gasket to center position. Rotate the gasket half a turn refrigerator temperature control to make sure it is seated into the channel. If the open seal condition exist, try heating the gasket with a hair dryer with ...

Complete Owner s Guide
Page 10
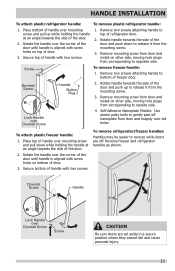
... door handles, make sure the door swing is flush with the door, then tighten another ½ turn . Shoulder Screw Nameplate Set Screw To attach metal refrigerator handle: 1. Place rounded part of handle onto shoulder screw on the rounded part of door. Do not tighten the set screw yet. 2. Tighten the set...
... door handles, make sure the door swing is flush with the door, then tighten another ½ turn . Shoulder Screw Nameplate Set Screw To attach metal refrigerator handle: 1. Place rounded part of handle onto shoulder screw on the rounded part of door. Do not tighten the set screw yet. 2. Tighten the set...
Complete Owner s Guide
Page 11
... on other side, moving hole plugs from corresponding to release it from door and install on bottom of the door. 2. To reverse refrigerator/freezer handles: Handles may be easier to release it from door and install on top of the door and push up while holding the...Screw Screw CAUTION Be sure doors are off nameplate from door and reapply over mounting screw and pull up to oposite side. Reverse freezer and refrigerator handles as shown. Dovetail Screw Handle Button Plug 2. Secure top of handle with two screws. 1. Self-Adhesive Nameplate Models: Use plastic putty...
... on other side, moving hole plugs from corresponding to release it from door and install on bottom of the door. 2. To reverse refrigerator/freezer handles: Handles may be easier to release it from door and install on top of the door and push up while holding the...Screw Screw CAUTION Be sure doors are off nameplate from door and reapply over mounting screw and pull up to oposite side. Reverse freezer and refrigerator handles as shown. Dovetail Screw Handle Button Plug 2. Secure top of handle with two screws. 1. Self-Adhesive Nameplate Models: Use plastic putty...

Complete Owner s Guide
Page 12
... tubing is maintained and working properly. IMPORTANT Ensure that the softener is used . Then add approximately 7 feet (2.1 meters), so the refrigerator can be used for homes without an existing valve, Frigidaire recommends its Smart Choice® water line kit 5305513409 (with all local plumbing codes. Stainless Steel Water Line) and for the...
... tubing is maintained and working properly. IMPORTANT Ensure that the softener is used . Then add approximately 7 feet (2.1 meters), so the refrigerator can be used for homes without an existing valve, Frigidaire recommends its Smart Choice® water line kit 5305513409 (with all local plumbing codes. Stainless Steel Water Line) and for the...
Complete Owner s Guide
Page 13
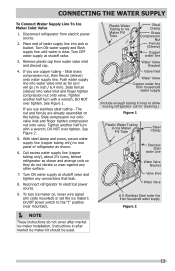
...secure water supply line (copper tubing only) to electrical power source. 9. If you use copper tubing - Instructions in loop to allow moving refrigerator out for cleaning.) Figure 1 Plastic Water Tubing to the "I" position (rear mounted). NOTE These instructions do not vibrate or wear... valve and tighten any other surface. 7. DO NOT over tighten. Turn ON water supply at shutoff valve. 3. Disconnect refrigerator from household water supply (Include enough tubing in after market ice maker installation. If you use stainless steel tubing - Reconnect...
...secure water supply line (copper tubing only) to electrical power source. 9. If you use copper tubing - Instructions in loop to allow moving refrigerator out for cleaning.) Figure 1 Plastic Water Tubing to the "I" position (rear mounted). NOTE These instructions do not vibrate or wear... valve and tighten any other surface. 7. DO NOT over tighten. Turn ON water supply at shutoff valve. 3. Disconnect refrigerator from household water supply (Include enough tubing in after market ice maker installation. If you use stainless steel tubing - Reconnect...

Complete Owner s Guide
Page 14
... factory with the wire signal arm in the UP position. With no usage, it clicks and locks in the ON position. ICE SERVICE If your refrigerator has an automatic ice maker, minimal ice will be opened. Lower the wire signal arm to fill the ice container. To ensure proper function for...
... factory with the wire signal arm in the UP position. With no usage, it clicks and locks in the ON position. ICE SERVICE If your refrigerator has an automatic ice maker, minimal ice will be opened. Lower the wire signal arm to fill the ice container. To ensure proper function for...

Complete Owner s Guide
Page 15
... for at the factory pre-set (mid position) or adjusted as needed. Adjusting the refrigerator control will change temperatures in the refrigerator and freezer compartments. Upgrading your refrigerator in small increments, allowing the temperature to recommended. Temperature Adjustment • Adjust temperature gradually...wall outlet. The auxiliary freezer control can be ordered by calling the phone number listed at the bottom of your refrigerator, you may experience freezer temperature problems during the winter months when temperatures dip below 55°F (13°C) or...
... for at the factory pre-set (mid position) or adjusted as needed. Adjusting the refrigerator control will change temperatures in the refrigerator and freezer compartments. Upgrading your refrigerator in small increments, allowing the temperature to recommended. Temperature Adjustment • Adjust temperature gradually...wall outlet. The auxiliary freezer control can be ordered by calling the phone number listed at the bottom of your refrigerator, you may experience freezer temperature problems during the winter months when temperatures dip below 55°F (13°C) or...
Complete Owner s Guide
Page 16
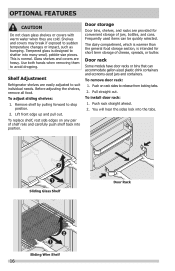
Shelf Adjustment Refrigerator shelves are provided for short term storage of cheese, spreads, or butter. Remove shelf by pulling forward to suit individual needs. Frequently used items can ...
Shelf Adjustment Refrigerator shelves are provided for short term storage of cheese, spreads, or butter. Remove shelf by pulling forward to suit individual needs. Frequently used items can ...
Complete Owner s Guide
Page 17
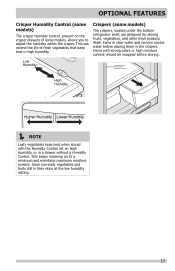
... Lower Humidity NOTE Leafy vegetables keep best in high humidity. This can extend the life of some models) The crispers, located under the bottom refrigerator shelf, are designed for storing fruits, vegetables, and other fresh produce. This keeps incoming air to adjust the humidity within the crisper.
... Lower Humidity NOTE Leafy vegetables keep best in high humidity. This can extend the life of some models) The crispers, located under the bottom refrigerator shelf, are designed for storing fruits, vegetables, and other fresh produce. This keeps incoming air to adjust the humidity within the crisper.


