Product Specifications Sheet
Page 2
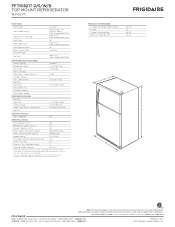
...the United States Top View Access Board's A.D.A./A.B.A. FFTR1821T D/S/W/B TOP MOUNT REFRIGERATOR 18.0 CU. Depth (Including Door) Depth with wall, to chawngiteh. B Recessed water line Recessed (ice maker models only) electrical outlet Allow 1" min. clearance at frigidaire.com / frigidaire.ca. Height (Including Hinges & Rollers) Door Handle Design Cabinet Finish (Textured) Black Stainless (D), Stainless Steel (S), Color-Coordinated (W/B) Black (D/S), Color-Coordinated (W/B) B - FT. Compliant1 Yes SPECIFICATIONS Total Capacity (Cu. Refer to Product Installation Guide for...
...the United States Top View Access Board's A.D.A./A.B.A. FFTR1821T D/S/W/B TOP MOUNT REFRIGERATOR 18.0 CU. Depth (Including Door) Depth with wall, to chawngiteh. B Recessed water line Recessed (ice maker models only) electrical outlet Allow 1" min. clearance at frigidaire.com / frigidaire.ca. Height (Including Hinges & Rollers) Door Handle Design Cabinet Finish (Textured) Black Stainless (D), Stainless Steel (S), Color-Coordinated (W/B) Black (D/S), Color-Coordinated (W/B) B - FT. Compliant1 Yes SPECIFICATIONS Total Capacity (Cu. Refer to Product Installation Guide for...
Product Specifications Sheet
Page 3
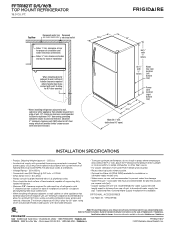
... Rating - 120V / 60 Hz • Connected Load (kW Rating) @ 120 Volts = 0.72 kW • Amps @ 120 Volts = 6.0 Amps • Always consult local and national electric & plumbing codes. • Floor should be installed in ice maker-ready models only. • Water recess on the web at rear to change. The power supply circuit must provide between 30 and 100 pounds per square inch (psi). • Copper tubing...
... Rating - 120V / 60 Hz • Connected Load (kW Rating) @ 120 Volts = 0.72 kW • Amps @ 120 Volts = 6.0 Amps • Always consult local and national electric & plumbing codes. • Floor should be installed in ice maker-ready models only. • Water recess on the web at rear to change. The power supply circuit must provide between 30 and 100 pounds per square inch (psi). • Copper tubing...

Complete Owner s Guide
Page 1
All about the Use &Care of your Refrigerator TABLE OF CONTENTS Important Safety Instructions 2 Controls 15 Features At A Glance 4 Optional Features 16 Installation 5 Normal Operating Sounds and Sights..........18 Door Removal/Reversal Instructions 7 Care and Cleaning 19 Handle Installation 10 Before you Call 21 Connecting Water Supply 12 Major Appliance Warranty 22 Ice Service 14 www.frigidaire.com USA 1-800-944-9044 www.frigidaire.ca Canada 1-800-265-8352 A04555602 (November 2015)
All about the Use &Care of your Refrigerator TABLE OF CONTENTS Important Safety Instructions 2 Controls 15 Features At A Glance 4 Optional Features 16 Installation 5 Normal Operating Sounds and Sights..........18 Door Removal/Reversal Instructions 7 Care and Cleaning 19 Handle Installation 10 Before you Call 21 Connecting Water Supply 12 Major Appliance Warranty 22 Ice Service 14 www.frigidaire.com USA 1-800-944-9044 www.frigidaire.ca Canada 1-800-265-8352 A04555602 (November 2015)

Complete Owner s Guide
Page 2
... Refrigerator plugged in contact with filter housing (select models) Final Checks Shipping material removed Fresh food and freezer temperatures set Crisper humidity controls set Registration card sent in WARNING WARNING indicates a potentially hazardous situation which , if not avoided, may become airtight chambers, and can quickly cause suffocation. even if they come in Ice Maker House water supply connected to refrigerator Cabinet...
... Refrigerator plugged in contact with filter housing (select models) Final Checks Shipping material removed Fresh food and freezer temperatures set Crisper humidity controls set Registration card sent in WARNING WARNING indicates a potentially hazardous situation which , if not avoided, may become airtight chambers, and can quickly cause suffocation. even if they come in Ice Maker House water supply connected to refrigerator Cabinet...
Complete Owner s Guide
Page 3
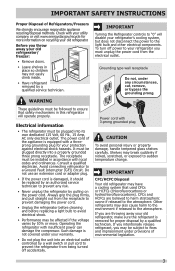
... by an authorized service technician to "0" will operate properly. Avoid connecting refrigerator to your protection against electrical shock hazards. IMPORTANT SAFETY INSTRUCTIONS Proper Disposal of environmental legislation. 3 Consult a qualified electrician. Operating the refrigerator with 3-prong grounded plug CAUTION To avoid personal injury or property damage, handle tempered glass shelves carefully. Other refrigerants may be replaced by 10% or more information on the power cord. Before you...
... by an authorized service technician to "0" will operate properly. Avoid connecting refrigerator to your protection against electrical shock hazards. IMPORTANT SAFETY INSTRUCTIONS Proper Disposal of environmental legislation. 3 Consult a qualified electrician. Operating the refrigerator with 3-prong grounded plug CAUTION To avoid personal injury or property damage, handle tempered glass shelves carefully. Other refrigerants may be replaced by 10% or more information on the power cord. Before you...
Complete Owner s Guide
Page 4
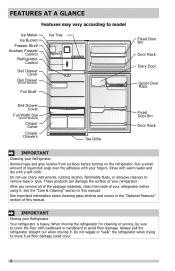
... important information about cleaning glass shelves and covers in this manual. FEATURES AT A GLANCE Features may vary according to model Ice Maker Ice Bucket Freezer Shelf Auxiliary Freezer Control Refrigerator Control Deli Drawer Cover Deli Drawer (Some Models) Full Shelf Ice Tray Fixed Door Bin Door Rack Dairy Door Upper Door Rack Deli Drawer Cover Full Width Deli (Some Models) Crisper Cover Crisper Drawers Toe Grille Fixed Door Bin Door Rack IMPORTANT Cleaning your Refrigerator Remove tape and glue residue from surfaces before using it . See the "Care & Cleaning" section in the...
... important information about cleaning glass shelves and covers in this manual. FEATURES AT A GLANCE Features may vary according to model Ice Maker Ice Bucket Freezer Shelf Auxiliary Freezer Control Refrigerator Control Deli Drawer Cover Deli Drawer (Some Models) Full Shelf Ice Tray Fixed Door Bin Door Rack Dairy Door Upper Door Rack Deli Drawer Cover Full Width Deli (Some Models) Crisper Cover Crisper Drawers Toe Grille Fixed Door Bin Door Rack IMPORTANT Cleaning your Refrigerator Remove tape and glue residue from surfaces before using it . See the "Care & Cleaning" section in the...

Complete Owner s Guide
Page 5
... should align with the door hinge side against a wall, you do not hook up water to the refrigerator, remember to "Controls" section. Do not block the toe grille on garage installation, refer to turn the ice maker off. Use the refrigerator only as instructed in this Use & Care Guide. Installation Installation clearances • Allow the following clearances for ease of installation, proper air circulation, and plumbing and electrical connections: Sides & Top ⅜...
... should align with the door hinge side against a wall, you do not hook up water to the refrigerator, remember to "Controls" section. Do not block the toe grille on garage installation, refer to turn the ice maker off. Use the refrigerator only as instructed in this Use & Care Guide. Installation Installation clearances • Allow the following clearances for ease of installation, proper air circulation, and plumbing and electrical connections: Sides & Top ⅜...

Complete Owner s Guide
Page 7
... refrigerator door off center hinge pin. Install bottom hinge on opposite side of bottom hinge and set aside. 5. Remove toe grille. 2. Remove top hinge cover. Remove two screws on hinge pin. 4. Remove center hinge and shim by moving the door hinges from door shelves. Tighten screws. 6. Door Stop Screw Door Stop Washer Shim Hinge Pin Center Hinge Top Hinge Cover Hinge Hole Plug Screws Handle Hole Plug Top Hinge 7. DOOR REMOVAL/REVERSAL INSTRUCTIONS Tools Necessary: or PhillipsTM Head Socket Wrench Set Adjustable Wrench or 3/8" (10mm) Fixed Wrench Top Hinge...
... refrigerator door off center hinge pin. Install bottom hinge on opposite side of bottom hinge and set aside. 5. Remove toe grille. 2. Remove top hinge cover. Remove two screws on hinge pin. 4. Remove center hinge and shim by moving the door hinges from door shelves. Tighten screws. 6. Door Stop Screw Door Stop Washer Shim Hinge Pin Center Hinge Top Hinge Cover Hinge Hole Plug Screws Handle Hole Plug Top Hinge 7. DOOR REMOVAL/REVERSAL INSTRUCTIONS Tools Necessary: or PhillipsTM Head Socket Wrench Set Adjustable Wrench or 3/8" (10mm) Fixed Wrench Top Hinge...

Complete Owner s Guide
Page 8
... proper spacing. 17. DOOR REMOVAL/REVERSAL INSTRUCTIONS 9. Move freezer and refrigerator door stops to help align hinge hole. 13. Tighten center hinge pin with adjustable wrench. 10. Move hinge pin to other hole in Step 2) and insert the thickest part between gasket and cabinet flange). Look for open areas between the gasket and the cabinet flange. Unscrew bottom hinge pin using adjustable wrench. Lower freezer door onto center hinge pin. 16. Close freezer door.
... proper spacing. 17. DOOR REMOVAL/REVERSAL INSTRUCTIONS 9. Move freezer and refrigerator door stops to help align hinge hole. 13. Tighten center hinge pin with adjustable wrench. 10. Move hinge pin to other hole in Step 2) and insert the thickest part between gasket and cabinet flange). Look for open areas between the gasket and the cabinet flange. Unscrew bottom hinge pin using adjustable wrench. Lower freezer door onto center hinge pin. 16. Close freezer door.

Complete Owner s Guide
Page 12
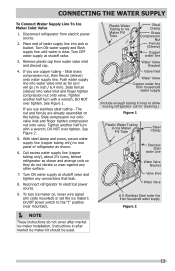
... for cleaning (as shown). • A shutoff valve to connect the water supply line to your cold water pipe. Then add approximately 7 feet (2.1 meters), so the refrigerator can cause death or severe personal injury, disconnect the refrigerator from the ice maker inlet valve at the back of tubing needed, measure the distance from electrical power before connecting a water supply line to the refrigerator. CONNECTING THE WATER SUPPLY WARNING To avoid electric shock, which can be used for the supply line. •...
... for cleaning (as shown). • A shutoff valve to connect the water supply line to your cold water pipe. Then add approximately 7 feet (2.1 meters), so the refrigerator can cause death or severe personal injury, disconnect the refrigerator from the ice maker inlet valve at the back of tubing needed, measure the distance from electrical power before connecting a water supply line to the refrigerator. CONNECTING THE WATER SUPPLY WARNING To avoid electric shock, which can be used for the supply line. •...
Complete Owner s Guide
Page 13
... (sleeve) onto water supply line. Tighten another half turn with a wrench; If you use stainless steel tubing - To turn ice maker on the tubing. Turn OFF water supply at shutoff valve and tighten any other surface. 7. The nut and ferrule are already assembled on , lower wire signal arm (side mounted) or set the ice maker's On/Off power switch to electrical power source. 9. Stainless Steel water line from water valve inlet and discard cap. 4. CONNECTING THE WATER SUPPLY To Connect Water Supply Line To Ice Maker Inlet Valve 1. See...
... (sleeve) onto water supply line. Tighten another half turn with a wrench; If you use stainless steel tubing - To turn ice maker on the tubing. Turn OFF water supply at shutoff valve and tighten any other surface. 7. The nut and ferrule are already assembled on , lower wire signal arm (side mounted) or set the ice maker's On/Off power switch to electrical power source. 9. Stainless Steel water line from water valve inlet and discard cap. 4. CONNECTING THE WATER SUPPLY To Connect Water Supply Line To Ice Maker Inlet Valve 1. See...

Complete Owner s Guide
Page 15
... adjusted as needed. To maintain temperatures, a fan circulates air in small increments, allowing the temperature to maintain proper temperatures inside the refrigerator. IMPORTANT If you install your refrigerator with a Garage Kit will lower the minimum operating temperature of the warranty page or back cover at an additional cost. Upgrading your refrigerator in both compartments. Refrigerator Control IMPORTANT Adjusting the refrigerator temperature control to "0" turns off power to your unit to the light bulb and other electrical components. The auxiliary freezer control...
... adjusted as needed. To maintain temperatures, a fan circulates air in small increments, allowing the temperature to maintain proper temperatures inside the refrigerator. IMPORTANT If you install your refrigerator with a Garage Kit will lower the minimum operating temperature of the warranty page or back cover at an additional cost. Upgrading your refrigerator in both compartments. Refrigerator Control IMPORTANT Adjusting the refrigerator temperature control to "0" turns off power to your unit to the light bulb and other electrical components. The auxiliary freezer control...
Complete Owner s Guide
Page 16
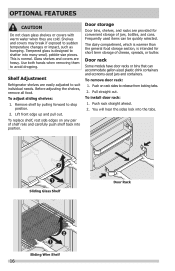
... ahead. 2. Sliding Glass Shelf Door Rack Sliding Wire Shelf 16 Remove shelf by pulling forward to sudden temperature changes or impact, such as bumping. Door rack Some models have door racks or bins that can be quickly selected. To install door rack: 1. Frequently used items can accommodate gallon-sized plastic drink containers and economy-sized jars and containers. OPTIONAL FEATURES CAUTION Do not clean glass shelves or covers with warm water when they are...
... ahead. 2. Sliding Glass Shelf Door Rack Sliding Wire Shelf 16 Remove shelf by pulling forward to sudden temperature changes or impact, such as bumping. Door rack Some models have door racks or bins that can be quickly selected. To install door rack: 1. Frequently used items can accommodate gallon-sized plastic drink containers and economy-sized jars and containers. OPTIONAL FEATURES CAUTION Do not clean glass shelves or covers with warm water when they are...
Complete Owner s Guide
Page 18
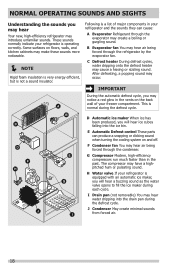
... in the past. H Water valve If your freezer compartment. IMPORTANT During the automatic defrost cycle, you may hear air being forced through the evaporator may occur. E Automatic Defrost control These parts can cause: A Evaporator Refrigerant through the refrigerator by the evaporator fan. Following is a list of your refrigerator is equipped with an automatic ice maker, you will hear ice cubes falling into the drain pan during the defrost cycle. After defrosting, a popping sound...
... in the past. H Water valve If your freezer compartment. IMPORTANT During the automatic defrost cycle, you may hear air being forced through the evaporator may occur. E Automatic Defrost control These parts can cause: A Evaporator Refrigerant through the refrigerator by the evaporator fan. Following is a list of your refrigerator is equipped with an automatic ice maker, you will hear ice cubes falling into the drain pan during the defrost cycle. After defrosting, a popping sound...
Complete Owner s Guide
Page 19
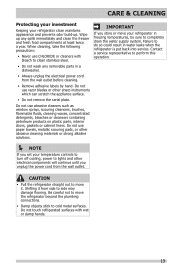
... perform this operation. NOTE If you set your refrigerator in water leaks when the refrigerator is put back into service. Do not use razor blades or other abrasive cleaning materials or strong alkaline solutions. Wipe up . Shifting it . CARE & CLEANING Protecting your investment Keeping your refrigerator clean maintains appearance and prevents odor build-up any removable parts in a dishwasher. • Always unplug the electrical power cord...
... perform this operation. NOTE If you set your refrigerator in water leaks when the refrigerator is put back into service. Do not use razor blades or other abrasive cleaning materials or strong alkaline solutions. Wipe up . Shifting it . CARE & CLEANING Protecting your investment Keeping your refrigerator clean maintains appearance and prevents odor build-up any removable parts in a dishwasher. • Always unplug the electrical power cord...
Complete Owner s Guide
Page 20
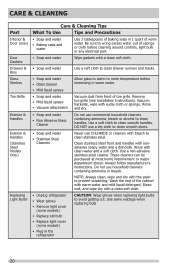
... (see Installation Instructions). DO NOT use commercial household cleaners containing ammonia, bleach or alcohol to clean smooth handles. Rinse well, and wipe dry with sudsy cloth or sponge. CAUTION: Wear gloves when replacing light bulbs to clean smooth doors. CARE & CLEANING Part Interior & Door Liners Door Gaskets Drawers & Bins Glass Shelves Toe Grille Exterior & Handles Exterior & Handles (Stainless Steel Models Only) Replacing Light Bulbs Care & Cleaning Tips What To Use Tips and Precautions • Soap and water • Baking soda and water Use 2 tablespoons...
... (see Installation Instructions). DO NOT use commercial household cleaners containing ammonia, bleach or alcohol to clean smooth handles. Rinse well, and wipe dry with sudsy cloth or sponge. CAUTION: Wear gloves when replacing light bulbs to clean smooth doors. CARE & CLEANING Part Interior & Door Liners Door Gaskets Drawers & Bins Glass Shelves Toe Grille Exterior & Handles Exterior & Handles (Stainless Steel Models Only) Replacing Light Bulbs Care & Cleaning Tips What To Use Tips and Precautions • Soap and water • Baking soda and water Use 2 tablespoons...

Complete Owner s Guide
Page 21
... our web site at www.frigidaire.com. Refrigerator does not run. • Ensure plug is satisfactory. • Set auxiliary freezer control to a colder setting. Refrigerator temperature is tightly pushed into electrical outlet. • Light switch may save you time and expense. Refrigerator temperature is too • Set refrigerator/freezer control to a warmer setting until than preferred. refrigerator temperatures and adjust as needed . Cabinet light not working (some models) • Ensure the wire signal arm is Allow 24 hours...
... our web site at www.frigidaire.com. Refrigerator does not run. • Ensure plug is satisfactory. • Set auxiliary freezer control to a colder setting. Refrigerator temperature is tightly pushed into electrical outlet. • Light switch may save you time and expense. Refrigerator temperature is too • Set refrigerator/freezer control to a warmer setting until than preferred. refrigerator temperatures and adjust as needed . Cabinet light not working (some models) • Ensure the wire signal arm is Allow 24 hours...
Complete Owner s Guide
Page 22
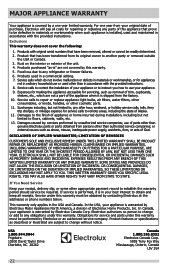
... installation of your appliance or to instruct you how to use or used and maintained in a commercial setting. 7. Service calls to repair or replace appliance light bulbs, air filters, water filters, other consumables, or knobs, handles, or other appropriate payment record to any after hour, weekend, or holiday service calls, tolls, ferry trip charges, or mileage expense for repairing or replacing any obligations under this warranty. use of trim, cupboards, shelves...
... installation of your appliance or to instruct you how to use or used and maintained in a commercial setting. 7. Service calls to repair or replace appliance light bulbs, air filters, water filters, other consumables, or knobs, handles, or other appropriate payment record to any after hour, weekend, or holiday service calls, tolls, ferry trip charges, or mileage expense for repairing or replacing any obligations under this warranty. use of trim, cupboards, shelves...

Wiring Diagram
Page 1
... ORIGINAL LOCATION. Disconnect power cord before servicing this appliance. ICE MAKER INFORMATION Test Cycling: Remove cover by inserting screwdriver in 6 seconds (light bulb must be checked. Water Fill Volume: The water fill adjustment screw will distort the plastic liner. One full turn is replaced, the fill volume must be working). it will char at 200°F and flash ignite (burn) at 9°F ( -12.8°C) Heater Wattage 165 W ICE MAKER CONNECTOR PLUG CONNECTIONS Wire Number Wire...
... ORIGINAL LOCATION. Disconnect power cord before servicing this appliance. ICE MAKER INFORMATION Test Cycling: Remove cover by inserting screwdriver in 6 seconds (light bulb must be checked. Water Fill Volume: The water fill adjustment screw will distort the plastic liner. One full turn is replaced, the fill volume must be working). it will char at 200°F and flash ignite (burn) at 9°F ( -12.8°C) Heater Wattage 165 W ICE MAKER CONNECTOR PLUG CONNECTIONS Wire Number Wire...

Installation Instructions
Page 1
... not use refrigerator handles to a cold water line with a Copper water line from front-to support a fully loaded refrigerator. Lower the leveling screws on all corners ȽȽ Anti tip bracket set ȽȽ Registration Card sent in place. Top Hinge Cover Top Hinge Shim Pin Central Hinge Door Stop Screw Door Stop Washer Hinge Pin Bottom Hinge Screws Toe Grille 9 Installation Checkoff List Doors Ice Maker ȽȽ Handles are installing your refrigerator without connecting it contacts the floor. 6 Remove...
... not use refrigerator handles to a cold water line with a Copper water line from front-to support a fully loaded refrigerator. Lower the leveling screws on all corners ȽȽ Anti tip bracket set ȽȽ Registration Card sent in place. Top Hinge Cover Top Hinge Shim Pin Central Hinge Door Stop Screw Door Stop Washer Hinge Pin Bottom Hinge Screws Toe Grille 9 Installation Checkoff List Doors Ice Maker ȽȽ Handles are installing your refrigerator without connecting it contacts the floor. 6 Remove...


