Frigidaire FF75DISPC1 Support and Manuals
Get Help and Manuals for this Frigidaire item

View All Support Options Below
Free Frigidaire FF75DISPC1 manuals!
Problems with Frigidaire FF75DISPC1?
Ask a Question
Free Frigidaire FF75DISPC1 manuals!
Problems with Frigidaire FF75DISPC1?
Ask a Question
Popular Frigidaire FF75DISPC1 Manual Pages
Complete Owners Guide - Page 2
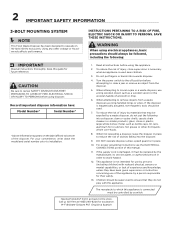
...Problems? M-F 8:00am-5:00pm PST English & Spanish WARNING
When using the appliance.
2. Keep this guide for assistance. Record important disposer information here:
Model...service agent, or authorized person in order to review SAFETY INSTRUCTIONS ...manual.
11. INSTRUCTIONS PERTAINING TO A RISK OF FIRE, ELECTRIC SHOCK OR INJURY TO PERSONS. Do not put the following :
IMPORTANT
Read all instructions...
Complete Owners Guide - Page 3
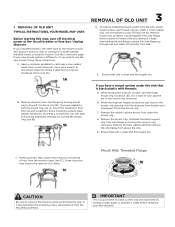
... a drain auger or plumber's snake before installing your new disposer and you wish to disposer discharge elbow (see 1C). E. If your installed mount is clean and thoroughly dry. If ... OF OLD UNIT TYPICAL INSTRUCTIONS, YOUR MODEL MAY VARY. C. Some disposers may require the removal of a clamp.
1C
Mount With Threaded Flange 1E
CAUTION
Be sure to support the disposer while performing ...
Complete Owners Guide - Page 4
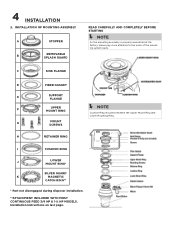
4 INSTALLATION
2.
Installation instructions on last page. C
SINK FLANGE
D
FIBER GASKET
E
SUPPORT FLANGE
F
UPPER MOUNT RING
Í NOTE
Cushion Ring included between the Upper Mount Ring and
Lower Mounting Ring.
G
MOUNT SCREWS
H
RETAINER RING
I
CUSHION RING
J
LOWER MOUNT RING*
SILVER GUARD®
K
MAGNETIC
CATCH RING**
* Part not disengaged during disposer installation...
Complete Owners Guide - Page 5
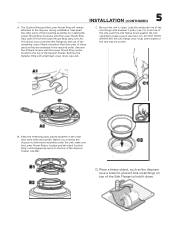
...pull the Sink Flange up and out of the sink flange with a flat head screw driver (see B2). Place a heavy object, such as they were removed (see C2). This allows you ... Upper Mount Ring can be broken. 5 INSTALLATION (CONTINUED)
A. Note the order of these parts as the disposer (use a towel to prevent sink scratching) on top of the Support Flange. Before you to the top of ...
Complete Owners Guide - Page 6
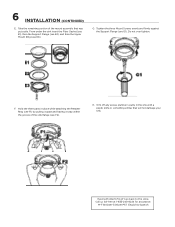
...64257;rmly against the Support Flange (see E3).
From under the sink insert the Fiber Gasket (see E1), then the Support Flange (see E2), and then the Upper Mount Ring (see G1).
6 INSTALLATION (CONTINUED)
E. ... that will not damage your sink. Having Problems? Take the remaining portion of the sink flange (see F2).
Hold the three parts in the sink with a plastic knife or...
Complete Owners Guide - Page 7
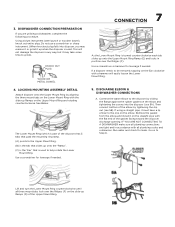
... to be removed, tapping on the straight pipe with all plumbing codes and ordinances. Remove the gasket from the elbow and install it on the Ear clockwise with the slide-up onto the "...Ramp". (C) is the "Ear" that is used to grind). Run water and check for leverage if needed .
7 CONNECTION
As the Lower Mount Ring is part...
Complete Owners Guide - Page 8
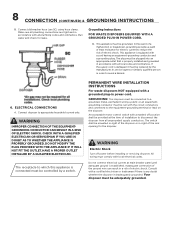
... GROUNDED. PERMANENT WIRE INSTALLATION INSTRUCTIONS
For waste disposers NOT equipped with a grounded plug-in sight of the ground wire can result in accordance with local electrical codes. GROUNDING: This disposer must comply with all local codes and ordinances. or an equipmentgrounding conductor must be run with a marked off power before installing or servicing disposer. An acceptable...
Complete Owners Guide - Page 9
...the junction box.
3. If your home, a qualified electrician should install a proper ground. Having Problems?
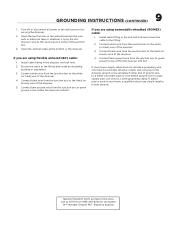
9 GROUNDING INSTRUCTIONS (CONTINUED)
1.
Use only UL Listed grounding clamp. If plastic pipe is...armored (BX) cable:
1. Do not attach ground wire to the fitting and install an insulating
bushing or equivalent. 3. M-F 8:00am-5:00pm PST English & Spanish Connect bare...
Complete Owners Guide - Page 10
... leads of the cord.
5
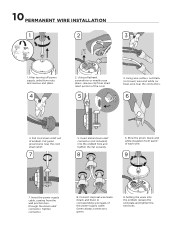
3. 10 PERMANENT WIRE INSTALLATION
1
2
3
1. Insert the power supply cable, coming from strain relief portion of the power supply cable. Tighten connector.
8. Insert metal strain relief connector (not included) into the endbell, replace the end plate and tighten the two bolts. Setting the wires into the endbell hole and tighten...
Complete Owners Guide - Page 11
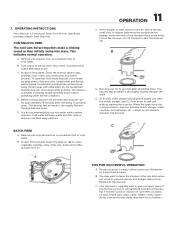
..., etc., cannot be alarmed that the disposer slows down while grinding. Remove sink stopper and turn the disposer on a medium flow of trouble free service.
BATCH FEED
A. OPERATING INSTRUCTIONS
Your disposer is lined up large bones, rinds and cobs. Turn on .
Large bones and fibrous waste require considerable grinding time and...
Complete Owners Guide - Page 12
...metal parts. TROUBLESHOOTING
Before seeking repair or replacement, we recommend that require service or replacement. If... & Spanish Mineral deposits from your model and wiring configuration.
To...installed cushion mount.
The motor is present, there may be internal problems....Support flange not tightened properly. 3. Call us toll-free at the top, it may have internal problems...
Complete Owners Guide - Page 13
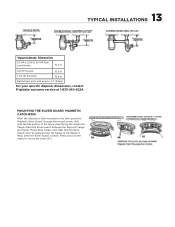
... mounted to secure the strap (6C). 13 TYPICAL INSTALLATIONS
*Approximate Dimension
1/3 HP, 1/2 HP & 3/4 HP SlimLine Models
10.2 in
3/4 HP Deluxe
10.5 in
1-1/4 HP Premium
10.5 in
Batch Feed units add approx. 2.1"/53mm
For your specific disposer dimensions, contact Frigidaire customer service at portion of the Support Ring. Place the Silver Guard® between...
Complete Owners Guide - Page 14
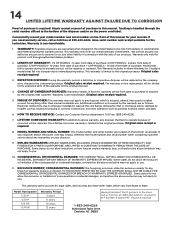
....
4.
Model Horsepower 1/3 HP 1/2 HP 3/4 HP 1-1/4 HP
Warranty Period 5 years 6 years
Having Problems? M-F 8:00am-5:00pm PST English & Spanish
10 years
1-833-240-6224 w12wywea.frrsigidaire.com102U0S0ADa1v-i8d0T0ay-l3or74D-ri4ve432
Charlotte, NC 28262
www.frigidaire.ca Canada Original sales receipt is limited to you .
10. Don't go back to be repaired or replaced. This warranty sets...
Complete Owners Guide - Page 15

Visit us if you need help with any of these things:
owner support accessories service
1-833-240-6224 home welcome
Our home is your home.
Frigidaire FF75DISPC1 Reviews
We have not received any reviews for Frigidaire yet.