Frigidaire FF75DISPB1 Support and Manuals
Get Help and Manuals for this Frigidaire item

View All Support Options Below
Free Frigidaire FF75DISPB1 manuals!
Problems with Frigidaire FF75DISPB1?
Ask a Question
Free Frigidaire FF75DISPB1 manuals!
Problems with Frigidaire FF75DISPB1?
Ask a Question
Popular Frigidaire FF75DISPB1 Manual Pages
Complete Owners Guide - Page 2
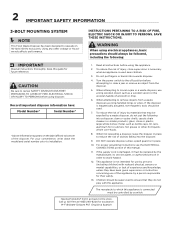
...important disposer information here:
Model Number*
Serial Number*
*Above information appears on 110-120V, 60 Hz exclusively. To reduce the risk of this guide for use by a...non-magnetic tools should always be replaced by the manufacturer, its service agent, or authorized person in place.
10.
Having Problems? SAVE THESE INSTRUCTIONS. Keep this manual.
11. When attempting to clear...
Complete Owners Guide - Page 3
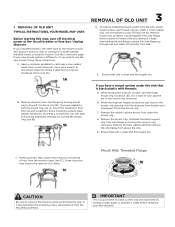
...support ring clockwise. While holding the sink flange in place, turn the mount ring, tap on the Connection page. If it is the same type as the mount on your new disposer and you wish to use the already installed...loosening of the extensions from sink.
1D
E. REMOVAL OF OLD UNIT TYPICAL INSTRUCTIONS, YOUR MODEL MAY VARY. B. Remove the mount ring. Before starting this step or it...
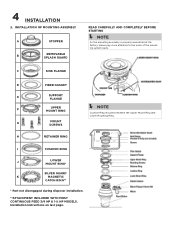
Complete Owners Guide - Page 4
...
CATCH RING**
* Part not disengaged during disposer installation.
**ATTACHMENT INCLUDED WITH MOST CONTINUOUS FEED 3/4 HP & 1-¼ HP MODELS. 4 INSTALLATION
2.
INSTALLATION OF MOUNTING ASSEMBLY
A...parts. C
SINK FLANGE
D
FIBER GASKET
E
SUPPORT FLANGE
F
UPPER MOUNT RING
Í NOTE
Cushion Ring included between the Upper Mount Ring and
Lower Mounting Ring. Installation instructions...
Complete Owners Guide - Page 5
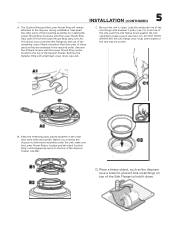
...see B2). 5 INSTALLATION (CONTINUED)
A....apart the other parts of the Support Flange. DO... NOT MOVE OR ROTATE the sink flange once it has been seated or the seal may be moved to hold it down against the sink opening to pull the Sink Flange up and out of the remaining Lower Mount Assembly. C. Note the order of these parts... installation.
Keep the remaining parts ...
Complete Owners Guide - Page 6
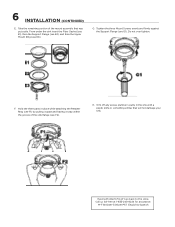
H. Having Problems? Don't go back to the store. Tighten the three Mount Screws evenly and firmly against the Support Flange (see E3).
From under the sink insert the Fiber Gasket (see E1), then the Support Flange (see E2), and then the Upper...-240-6224 for assistance. Do not over tighten. Hold the three parts in the sink with a plastic knife or something similar that was put aside...
Complete Owners Guide - Page 7
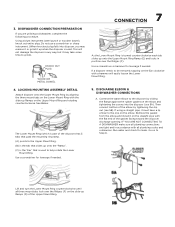
... Ring. Remove the gasket from the elbow and install it must have a lip similar to the Upper Mount Ring. (B) is the tab that slides up when the disposer is part of the gasket facing toward the disposer discharge opening... and rotating counterclockwise. Lift and turn the Lower Mount Ring counterclockwise until all plumbing codes and ordinances. 3. Use a screwdriver or hammer for leaks.
Complete Owners Guide - Page 8
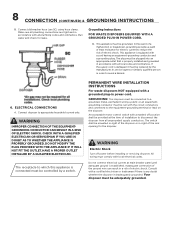
... INSTALLATION INSTRUCTIONS
For waste disposers NOT equipped with a grounded plug-in accordance with a certified electrician or tradesman if there is established. An acceptable motor control switch with all plumbing connections are tight and in power cord. WARNING
Electric Shock
Turn off position shall be replaced by a switch. Make sure all local codes...
Complete Owners Guide - Page 9
... wire from the junction box to green ground screw within the disposer end bell. Having Problems? Connect black wire from the junction box to green
ground screw within the disposer end ... not attach ground wire to the wall junction box serving the disposer.
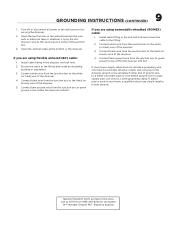
2. 9 GROUNDING INSTRUCTIONS (CONTINUED)
1. Install cable fitting in the wall and remove the wire nuts or electrical tape or ...
Complete Owners Guide - Page 10
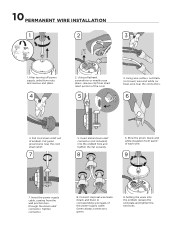
...Tighten connector.
8. Setting the wires into the endbell hole and tighten the nut securely.
8
6. Insert metal strain relief connector (not included) into the endbell, replace the end plate ...strain relief.
7
5. Pull cord strain relief out of the power supply cable. 10 PERMANENT WIRE INSTALLATION
1
2
3
1. After turning off power supply, unbolt two nuts and remove end plate.
4...
Complete Owners Guide - Page 11
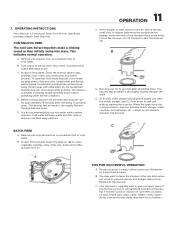
... seconds after shredding or grinding stops. Lift stopper to use. Scrape in food waste.
B. Cold water will NOT grind or dispose of trouble free service.
B. You may drain properly.
OPERATING INSTRUCTIONS
Your disposer is not recommended to use to ON position; Run disposer for approximately 15 seconds after shredding stops.
Remove sink stopper...
Complete Owners Guide - Page 12
....
8A
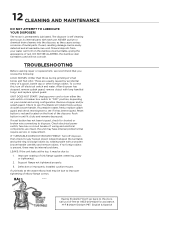
Having Problems? Dislodge object by accidental entry of rust. If unit leaks at 1-833-240-6224 for shorted or broken wire connecting to the store. TROUBLESHOOTING
Before seeking repair or replacement, we recommend that require service or replacement. If turntable rotates freely, replace splash guard and check reset button to improper tightening of metal parts. 12 CLEANING...
Complete Owners Guide - Page 13
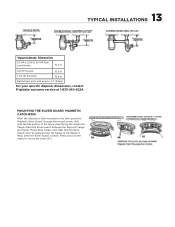
... mounted to secure the strap (6C). 13 TYPICAL INSTALLATIONS
*Approximate Dimension
1/3 HP, 1/2 HP & 3/4 HP SlimLine Models
10.2 in
3/4 HP Deluxe
10.5 in
1-1/4 HP Premium
10.5 in
Batch Feed units add approx. 2.1"/53mm
For your specific disposer dimensions, contact Frigidaire customer service at portion of the Support Ring. MOUNTING THE SILVER GUARD® MAGNETIC...
Complete Owners Guide - Page 14
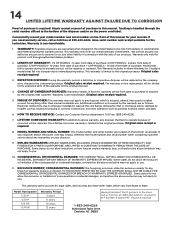
... bottom serial plate of your records. Warranty is misused, altered, improperly installed or used for your disposer and/or the power cord tag. This warranty sets forth our overall warranty commitment. Models that fails to operate because of corrosion will be replaced. CHANGE OF OWNERSHIP DISPOSER: Warranty remains in workmanship and material during the...
Complete Owners Guide - Page 15
Visit us if you need help with any of these things:
owner support accessories service
1-833-240-6224 home welcome
Our home is your home.
Frigidaire FF75DISPB1 Reviews
We have not received any reviews for Frigidaire yet.