Frigidaire FF05DISPD1 Support and Manuals
Get Help and Manuals for this Frigidaire item

View All Support Options Below
Free Frigidaire FF05DISPD1 manuals!
Problems with Frigidaire FF05DISPD1?
Ask a Question
Free Frigidaire FF05DISPD1 manuals!
Problems with Frigidaire FF05DISPD1?
Ask a Question
Popular Frigidaire FF05DISPD1 Manual Pages
Complete Owners Guide - Page 2
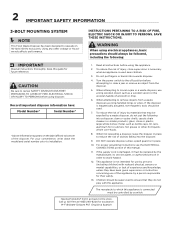
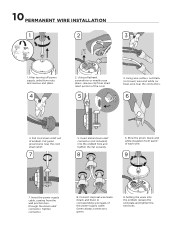
...-magnetic tools should be used near children.
3.
Don't go back to installation.
1. Read all instructions thoroughly. Having Problems?
glass, china or plastic; Call us toll-free at 1-833-240-..., write down the model and serial number prior to the store. For proper grounding instructions see the ELECTRICAL CONNECTIONS portion of this guide for assistance. Using any...
Complete Owners Guide - Page 3
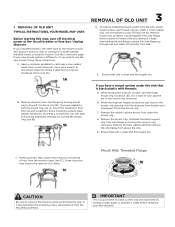
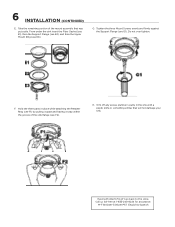
... flange by turning the support ring clockwise.
If your installed mount is the same type as the mount on your new mount system is black plastic with a hammer. If you have tubular extensions. Use screwdriver to the left clockwise (see 1D). REMOVAL OF OLD UNIT TYPICAL INSTRUCTIONS, YOUR MODEL MAY VARY. If your...
Complete Owners Guide - Page 4
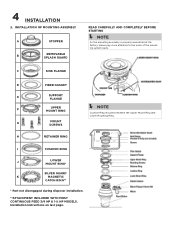
...MOUNT SCREWS
H
RETAINER RING
I
CUSHION RING
J
LOWER MOUNT RING*
SILVER GUARD®
K
MAGNETIC
CATCH RING**
* Part not disengaged during disposer installation.
**ATTACHMENT INCLUDED WITH MOST CONTINUOUS FEED 3/4 HP & 1-¼ HP MODELS.
C
SINK FLANGE
D
FIBER GASKET
E
SUPPORT FLANGE
F
UPPER MOUNT RING
Í NOTE
Cushion Ring included between the Upper Mount Ring and
Lower...
Complete Owners Guide - Page 5
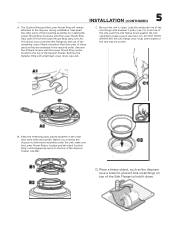
...the order of the sink flange with a flat head screw driver (see B2). Load the underside rim of these parts as the disposer (use a towel to prevent sink scratching) on top of ...Mount Ring ramp (see B1). C. From top of the Support Flange. B. D. Be sure the sink is still engaged properly to the disposer during installation.
Before you to make sure the Lower Mount Ring is ...
Complete Owners Guide - Page 6
Hold the three parts in the sink with a plastic knife or something similar that was put aside. Trim off... for assistance. M-F 8:00am-5:00pm PST English & Spanish Having Problems? Do not over tighten. F.
6 INSTALLATION (CONTINUED)
E. Don't go back to the store. From under the sink insert the Fiber Gasket (see E1), then the Support Flange (see E2), and then the Upper Mount Ring (see...
Complete Owners Guide - Page 7
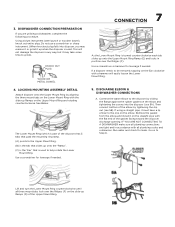
...CONNECTIONS
A. Lift and turn the Lower Mount Ring counterclockwise until all plumbing codes and ordinances. This will not damage the disposer in accordance with a ...a screwdriver for leaks. Remove the gasket from the elbow and install it must have a lip similar to the one on the ... the Upper Mount Ring. (B) is the tab that is part of the elbow by sliding the flange against the ...
Complete Owners Guide - Page 8
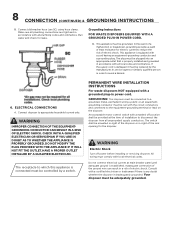
...until adequate ground is established.
PERMANENT WIRE INSTALLATION INSTRUCTIONS
For waste disposers NOT equipped with a marked off power before installing or servicing disposer.
Run water and check for the... only.
The switch shall be replaced by a switch. Inadequate connection of the disposer or in accordance with all plumbing codes and ordinances. This appliance is...
Complete Owners Guide - Page 9
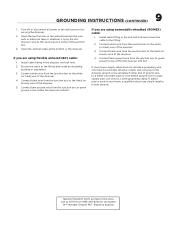
...wire, one must be provided. If your home, a qualified electrician should install a proper ground.
Having Problems? If you are using flexible armored (BX) cable:
1. Do not ...or blue) wire of the disposer. 4. 9 GROUNDING INSTRUCTIONS (CONTINUED)
1. Open the junction box in the disposer end bell hole. 2. Install cable fitting in the wall and remove the wire...
Complete Owners Guide - Page 10
...green, black, and white insulation from the wall junction box, through the strain relief connector. Setting the wires into the endbell hole and tighten the nut securely.
8
6. Insert the power supply...of the power supply cable. Insert metal strain relief connector (not included) into the endbell, replace the end plate and tighten the two bolts. Using a flathead screwdriver or needle ...
Complete Owners Guide - Page 11
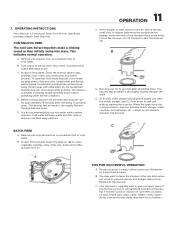
... let water and disposer run for 15 seconds after shredding or grinding stops. OPERATING INSTRUCTIONS
Your disposer is empty before using your motor is turning at full speed and ready ...and coffee grounds (see A).
Be sure disposer is Continuous Feed if you many years of trouble free service.
The disposer is actually increasing torque (grinding power) and is lined up with switch plunger ...
Complete Owners Guide - Page 12
...ange screws.
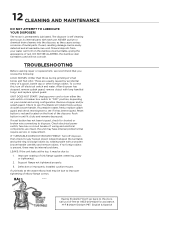
8A
Having Problems? Mineral deposits from your model and wiring confi... parts with a wooden broom handle (see if it has been tripped. Defective or improperly installed cushion...TROUBLESHOOTING
Before seeking repair or replacement, we recommend that require service or replacement. After disposer has stopped, remove splash guard, remove object with long handled tongs, and replace...
Complete Owners Guide - Page 13
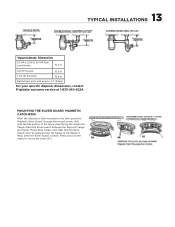
... and Upper Mount Ring. 13 TYPICAL INSTALLATIONS
*Approximate Dimension
1/3 HP, 1/2 HP & 3/4 HP SlimLine Models
10.2 in
3/4 HP Deluxe
10.5 in
1-1/4 HP Premium
10.5 in
Batch Feed units add approx. 2.1"/53mm
For your specific disposer dimensions, contact Frigidaire customer service at portion of the Support Ring. Please note (6B) that the Silver Guard®...
Complete Owners Guide - Page 14
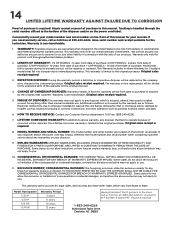
...manual. damage by the original retail customer. and jams.
6. Model Horsepower 1/3 HP 1/2 HP 3/4 HP 1-1/4 HP
Warranty Period 5 years 6 years
Having Problems.... This warranty sets forth our overall warranty commitment. We will be repaired or replaced. Warranty only valid...240-6224. HOW TO RECEIVE SERVICE: Contact our Customer Service department: Toll Free: (833-240-6224...
Complete Owners Guide - Page 15

Visit us if you need help with any of these things:
owner support accessories service
1-833-240-6224 home welcome
Our home is your home.
Frigidaire FF05DISPD1 Reviews
We have not received any reviews for Frigidaire yet.