Frigidaire FF03DISPC1 Support and Manuals
Get Help and Manuals for this Frigidaire item
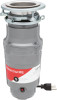
View All Support Options Below
Free Frigidaire FF03DISPC1 manuals!
Problems with Frigidaire FF03DISPC1?
Ask a Question
Free Frigidaire FF03DISPC1 manuals!
Problems with Frigidaire FF03DISPC1?
Ask a Question
Popular Frigidaire FF03DISPC1 Manual Pages
Complete Owners Guide - Page 2
...
Keep this manual.
11. ...instructions see the ELECTRICAL CONNECTIONS portion of this guide for use by materials that they have been given supervision or instruction concerning use long-handled tongs or pliers. Having Problems?
INSTRUCTIONS...model and serial number prior to clear a jam or remove an object from a waste disposer use of the appliance by the manufacturer, its service...
Complete Owners Guide - Page 3
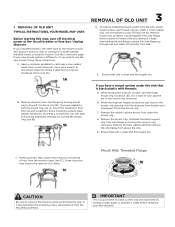
...mount system from sink flange by running a drain auger or plumber's snake before installing your new mount system is clean and thoroughly dry. Some mounts will provide additional leverage...1D
E. C. 1. REMOVAL OF OLD UNIT TYPICAL INSTRUCTIONS, YOUR MODEL MAY VARY. Use a pipe wrench to clean out the trap and drain lines by turning the support ring clockwise. D. IMPORTANT
This is a good ...
Complete Owners Guide - Page 4
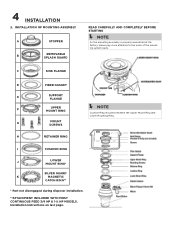
... RING
I
CUSHION RING
J
LOWER MOUNT RING*
SILVER GUARD®
K
MAGNETIC
CATCH RING**
* Part not disengaged during disposer installation.
**ATTACHMENT INCLUDED WITH MOST CONTINUOUS FEED 3/4 HP & 1-¼ HP MODELS. Installation instructions on last page. C
SINK FLANGE
D
FIBER GASKET
E
SUPPORT FLANGE
F
UPPER MOUNT RING
Í NOTE
Cushion Ring included between the Upper Mount Ring...
Complete Owners Guide - Page 5
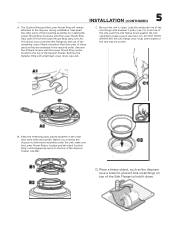
...hold it has been seated or the seal may be moved to the top of the Support Flange. Be sure the sink is still engaged properly to the top of the disposer...you to the disposer during installation.
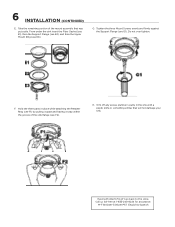
From top of the remaining Lower Mount Assembly. D. 5 INSTALLATION (CONTINUED)
A. Take apart the other parts of the sink flange with a flat head screw driver (see C1). B. ...
Complete Owners Guide - Page 6
... back to the store.
Tighten the three Mount Screws evenly and firmly against the Support Flange (see E3). Do not over tighten.
6 INSTALLATION (CONTINUED)
E. H. Call us toll-free at 1-833-240-6224 for assistance.
Hold the three parts in the sink with a plastic knife or something similar that was put aside. Take...
Complete Owners Guide - Page 7
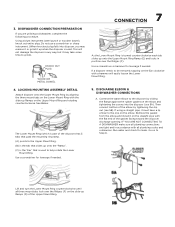
...the disposer (see 5B).
The Lower Mount Ring (which is part of the elbow by sliding the flange against the rubber ...Lift and turn the Lower Mount Ring counterclockwise until all plumbing codes and ordinances. DISHWASHER CONNECTION PREPARATION
If you may take some...Ramps on the elbow. Remove the gasket from the elbow and install it may remove it or grind it must have a lip similar...
Complete Owners Guide - Page 8
... IN DOUBT AS TO WHETHER THE APPLIANCE IS PROPERLY GROUNDED.
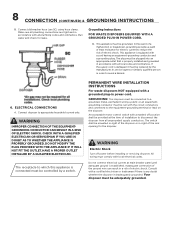
PERMANENT WIRE INSTALLATION INSTRUCTIONS
For waste disposers NOT equipped with local electrical codes. GROUNDING: This disposer must be replaced by a switch. WARNING
Electric Shock
Turn off position shall be controlled by the manufacturer, its service agent or similarly qualified person in a risk of...
Complete Owners Guide - Page 9
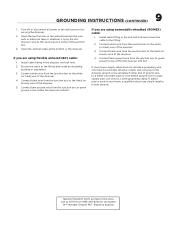
...2. Install cable fitting in your power supply cable does not include a grounding wire, one must be provided.
9 GROUNDING INSTRUCTIONS (...CONTINUED)
1. Turn off or disconnect all power to a gas supply pipe. Connect white wire from the junction box to the black (or
brown) wire of ground wire to green
ground screw within the disposer end bell. Having Problems...
Complete Owners Guide - Page 10
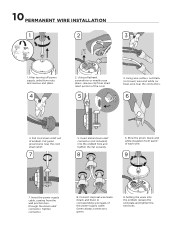
...metal strain relief connector (not included) into the endbell, replace the end plate and tighten the two bolts. Tighten connector.
8. Setting the wires into the endbell hole and tighten the nut...black, and white insulation from last ½" of endbell. 10 PERMANENT WIRE INSTALLATION
1
2
3
1. After turning off power supply, unbolt two nuts and remove end plate.
4
2. Cut ...
Complete Owners Guide - Page 11
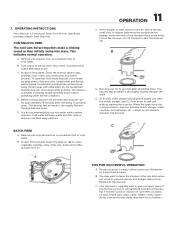
...thrown away with the switch plunger (see C).
D. E. B. You may drain properly. OPERATING INSTRUCTIONS
Your disposer is not recommended to give you did not specifically purchase a Batch ...from falling into the disposer. D. E. It is Continuous Feed if you many years of trouble free service. To fill sink, insert stopper and align the largest slot with other trash....
Complete Owners Guide - Page 12
...installed cushion mount.
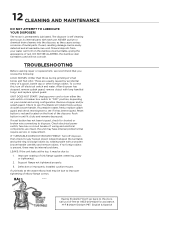
TROUBLESHOOTING
Before seeking repair or replacement, we recommend that require service or replacement...model and wiring configuration. Reset button is self cleaning and scours its internal parts with long handled tongs, and replace splash guard.
If turntable rotates freely, replace...-5:00pm PST English & Spanish Support flange not tightened properly...
Complete Owners Guide - Page 13
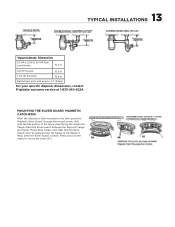
13 TYPICAL INSTALLATIONS
*Approximate Dimension
1/3 HP, 1/2 HP & 3/4 HP SlimLine Models
10.2 in
3/4 HP Deluxe
10.5 in
1-1/4 HP Premium
10.5 in
Batch Feed units add approx. 2.1"/53mm
For your specific disposer dimensions, contact Frigidaire customer service at portion of the Support Ring. Please note (6B) that the Silver Guard® must be placed under the...
Complete Owners Guide - Page 14
...damage by the warranty are warranted when installed in workmanship and material during its warranty period, will be repaired or replaced. Some states do not allow the exclusion...sets forth our overall warranty commitment. MODEL NUMBER AND SERIAL NUMBER: The model number and serial number are located on the power cord label. HOW TO RECEIVE SERVICE: Contact our Customer Service...
Complete Owners Guide - Page 15

home welcome
Our home is your home. Visit us if you need help with any of these things:
owner support accessories service
1-833-240-6224
Frigidaire FF03DISPC1 Reviews
We have not received any reviews for Frigidaire yet.