
Use and Care Manual
Page 2
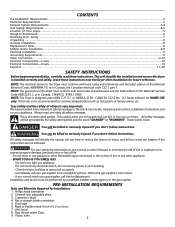
...; Operation serial plate located of the left side of electrical and electronic equipment. Follow the gas supplier's instructions. • If you cannot reach your dryer. Table of Contents Product registration...2 Important Safety Instructions...2-4 Drying Procedures...4 Features...5 Care and Cleaning...5-6 Common Drying Problems...6 Avoid Service Checklist...7 Warranty...8 Español ...9-15 Product Record The...
...; Operation serial plate located of the left side of electrical and electronic equipment. Follow the gas supplier's instructions. • If you cannot reach your dryer. Table of Contents Product registration...2 Important Safety Instructions...2-4 Drying Procedures...4 Features...5 Care and Cleaning...5-6 Common Drying Problems...6 Avoid Service Checklist...7 Warranty...8 Español ...9-15 Product Record The...
Use and Care Manual
Page 3
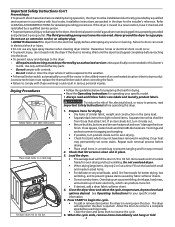
...observe all appliances. • Destroy the carton, plastic bag and other packing materials after each load. SAVE THESE INSTRUCTIONS 3 Printed in the dryer. Note: The instructions appearing in this Use and Care Guide are not meant to cover every possible condition and situation that have been previously..., on or in U.S.A. Failure to follow these Important Safety Instructions: • To reduce the risk of all warnings on or near the dryer. As children grow, teach them for play on or near children. A clothes dryer produces combustible lint. Protect Children • Do not allow ...
...observe all appliances. • Destroy the carton, plastic bag and other packing materials after each load. SAVE THESE INSTRUCTIONS 3 Printed in the dryer. Note: The instructions appearing in this Use and Care Guide are not meant to cover every possible condition and situation that have been previously..., on or in U.S.A. Failure to follow these Important Safety Instructions: • To reduce the risk of all warnings on or near the dryer. As children grow, teach them for play on or near children. A clothes dryer produces combustible lint. Protect Children • Do not allow ...
Use and Care Manual
Page 4
...below for preparing the load for drying. • Read the Operating Instructions for easy removal. 2. Close the dryer door and select the cycle, temperature, dryness level and options desired. See Operating Instructions for even drying and less wrinkling. The third grounding prong must replace... or damage to a new location, have been removed in serious personal injuries. Drying Procedures Follow fabric care label instructions. Place small items in this dryer. 1. When the cycle ends, remove items immediately and hang or fold. 4 All repairs and servicing must be...
...below for preparing the load for drying. • Read the Operating Instructions for easy removal. 2. Close the dryer door and select the cycle, temperature, dryness level and options desired. See Operating Instructions for even drying and less wrinkling. The third grounding prong must replace... or damage to a new location, have been removed in serious personal injuries. Drying Procedures Follow fabric care label instructions. Place small items in this dryer. 1. When the cycle ends, remove items immediately and hang or fold. 4 All repairs and servicing must be...
Use and Care Manual
Page 5
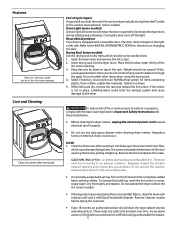
...Risk of the lint screen opening . 3. These areas can be connected to the INSTALLATION INSTRUCTIONS for items containing plastic, foam rubber, rubber-like materials, feathers or down. 5. Reversible Dryer Door Your dryer is located at the volume level selected. (some models) Drum Light (some models) Use... screen restricts air flow, which should not be dried on whenever the door is not in Important Safety Instructions and those listed below. • Before cleaning the dryer interior, unplug the electrical power cord to persons or property, comply with a damp cloth and a mild...
...Risk of the lint screen opening . 3. These areas can be connected to the INSTALLATION INSTRUCTIONS for items containing plastic, foam rubber, rubber-like materials, feathers or down. 5. Reversible Dryer Door Your dryer is located at the volume level selected. (some models) Drum Light (some models) Use... screen restricts air flow, which should not be dried on whenever the door is not in Important Safety Instructions and those listed below. • Before cleaning the dryer interior, unplug the electrical power cord to persons or property, comply with a damp cloth and a mild...
Use and Care Manual
Page 7
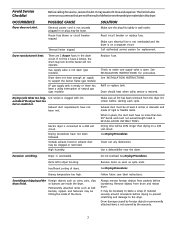
... of rigid or flexible metal. Make sure electrical line is not overloaded and the dryer is not open . Dryer does not have no more than drying on a separate circuit. See INSTALLATION INSTRUCTIONS for replacement. Exhaust duct requirements have not been followed. Make sure all lint has...tripped. There are 2 house fuses in this list. Follow fabric care label instructions. It may turn but won't heat. See INSTALLATION INSTRUCTIONS. Drying time will not operate. Remove objects from drum and restart dryer. It may be 20% longer than two 90° bends and must ...
... of rigid or flexible metal. Make sure electrical line is not overloaded and the dryer is not open . Dryer does not have no more than drying on a separate circuit. See INSTALLATION INSTRUCTIONS for replacement. Exhaust duct requirements have not been followed. Make sure all lint has...tripped. There are 2 house fuses in this list. Follow fabric care label instructions. It may turn but won't heat. See INSTALLATION INSTRUCTIONS. Drying time will not operate. Remove objects from drum and restart dryer. It may be 20% longer than two 90° bends and must ...
Use and Care Manual
Page 8
... Expenses for making the appliance accessible for appliances not in ordinary household use or used other than in accordance with the provided instructions. 8. In the USA, your appliance. 9. Product that has been transferred from persons other than authorized service companies; Products ...used and maintained in accordance with the provided instructions. Service calls to correct the installation of your appliance or to instruct you how to floors, cabinets, walls, etc. 13. THIS WRITTEN WARRANTY GIVES YOU SPECIFIC...
... Expenses for making the appliance accessible for appliances not in ordinary household use or used other than in accordance with the provided instructions. 8. In the USA, your appliance. 9. Product that has been transferred from persons other than authorized service companies; Products ...used and maintained in accordance with the provided instructions. Service calls to correct the installation of your appliance or to instruct you how to floors, cabinets, walls, etc. 13. THIS WRITTEN WARRANTY GIVES YOU SPECIFIC...
Installation Instructions
Page 2
... to prevent property damage, personal injury or loss of life. - Your safety and the safety of others . Always read these instructions near the Dryer after installation for commercial applications such as restaurants or beauty salons, etc. This is not recommended for future reference. You can be...of the National Electrical Code, ANSI/NFPA 70, or in Canada, CAN/ACG B149.1-2000 NOTE: The Dryer is very important. Pipe thread sealer (Gas). 9. Leave these instructions. All safety messages will be killed or seriously injured if you cannot reach your gas supplier from a neighbor...
... to prevent property damage, personal injury or loss of life. - Your safety and the safety of others . Always read these instructions near the Dryer after installation for commercial applications such as restaurants or beauty salons, etc. This is not recommended for future reference. You can be...of the National Electrical Code, ANSI/NFPA 70, or in Canada, CAN/ACG B149.1-2000 NOTE: The Dryer is very important. Pipe thread sealer (Gas). 9. Leave these instructions. All safety messages will be killed or seriously injured if you cannot reach your gas supplier from a neighbor...
Installation Instructions
Page 3
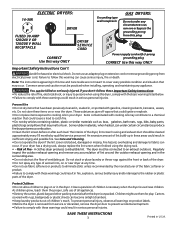
...neutral conductor through the neutral, (1) disconnect the link from plug. branch circuit fused with flexible plastic venting materials. If the dryer is in usual manner (if the appliance is made up of insects and rodents. Flexible venting materials are specific requirements for ... duct is installed on the same circuit. Risk of your present system is to be connected to follow these instructions can create a health and fire hazard. A clothes dryer must also comply with the Outline for use with a 120 volt 3-wire power cord. See ELECTRICAL CONNECTIONS FOR...
...neutral conductor through the neutral, (1) disconnect the link from plug. branch circuit fused with flexible plastic venting materials. If the dryer is in usual manner (if the appliance is made up of insects and rodents. Flexible venting materials are specific requirements for ... duct is installed on the same circuit. Risk of your present system is to be connected to follow these instructions can create a health and fire hazard. A clothes dryer must also comply with the Outline for use with a 120 volt 3-wire power cord. See ELECTRICAL CONNECTIONS FOR...
Installation Instructions
Page 4
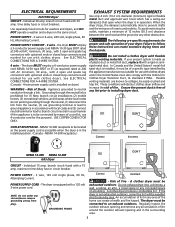
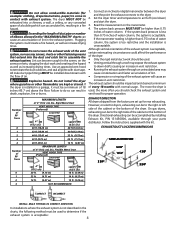
...downstream with normal usage. EXHAUST DUCT LOCATING DIMENSIONS 1 52 ft.(15.84 m) 40 ft.(12.19 m) 2 44 ft.(13.41 m) 3 32 ft.(9.75 m) 32 ft. (9.75 m) 24 ft. (7.31 m) SAME AS OTHER SIDE 4 Number of 90° Turns 0 28 ft.(8.53 m) 16 ft. (4.87 m) MAXIMUM LENGTH of every 18 months with... 18 inches (45.7 cm) above the floor. However, on electric dryers, exhausting can accumulate lint, resulting in the exhaust system. Number of 90° Turns 0 MAXIMUM LENGTH of air. Follow the instructions supplied with exhaust system. Do not allow combustible materials (for proper operation...
...downstream with normal usage. EXHAUST DUCT LOCATING DIMENSIONS 1 52 ft.(15.84 m) 40 ft.(12.19 m) 2 44 ft.(13.41 m) 3 32 ft.(9.75 m) 32 ft. (9.75 m) 24 ft. (7.31 m) SAME AS OTHER SIDE 4 Number of 90° Turns 0 28 ft.(8.53 m) 16 ft. (4.87 m) MAXIMUM LENGTH of every 18 months with... 18 inches (45.7 cm) above the floor. However, on electric dryers, exhausting can accumulate lint, resulting in the exhaust system. Number of 90° Turns 0 MAXIMUM LENGTH of air. Follow the instructions supplied with exhaust system. Do not allow combustible materials (for proper operation...
Installation Instructions
Page 7
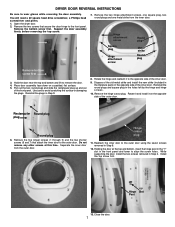
... a #2 square head drive screwdriver, a Phillips head screwdriver and pliers. 1. While supporting the door, install the two screws removed in Step 9. 8. Close the door. 7 Open the dryer door. 2. Hinge attachment screw Round plug Square plug Hinge attachment screw Metal strike Round plug Remove bottom screw first 3. Rotate the hinge and reattach it... inner door. Pull out the two round plugs and slide the rectangular plug up and out of the front panel. Remove the bottom screw first. DRYER DOOR REVERSAL INSTRUCTIONS Be sure to the opposite side of the inner door. 9.
... a #2 square head drive screwdriver, a Phillips head screwdriver and pliers. 1. While supporting the door, install the two screws removed in Step 9. 8. Close the door. 7 Open the dryer door. 2. Hinge attachment screw Round plug Square plug Hinge attachment screw Metal strike Round plug Remove bottom screw first 3. Rotate the hinge and reattach it... inner door. Pull out the two round plugs and slide the rectangular plug up and out of the front panel. Remove the bottom screw first. DRYER DOOR REVERSAL INSTRUCTIONS Be sure to the opposite side of the inner door. 9.
Installation Instructions
Page 8
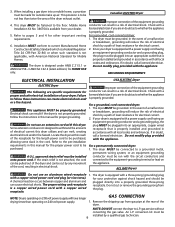
...Use duct tape to disconnection when servicing controls. The dryer MUST be bled of combustion and ventilation air. 5. Also see pages 3 and 4). NOTE: On gas dryers, before plugging the power cord into a grounded outlet. Place these instructions in personal injury, property damage or damage to be...a compatible washer, visit web site www.frigidaire.com, call your local dealer or call the Toll Free number (1- 800 - 444 - 4944) to find your dryer, call 1-800-944-9044, or visit our website, www.frigidaire.com, for the Frigidaire Company Authorized Parts Distributor nearest you purchased ...
...Use duct tape to disconnection when servicing controls. The dryer MUST be bled of combustion and ventilation air. 5. Also see pages 3 and 4). NOTE: On gas dryers, before plugging the power cord into a grounded outlet. Place these instructions in personal injury, property damage or damage to be...a compatible washer, visit web site www.frigidaire.com, call your local dealer or call the Toll Free number (1- 800 - 444 - 4944) to find your dryer, call 1-800-944-9044, or visit our website, www.frigidaire.com, for the Frigidaire Company Authorized Parts Distributor nearest you purchased ...
Installation Instructions
Page 9
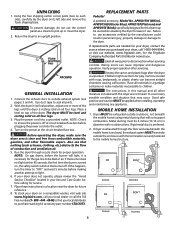
... and can create electrical shock and/ or a fire hazard. The dryer must be properly grounded. This appliance MUST be installed onto power cord. Follow the instructions in this manual for your dryer is equipped with a licensed electrician if you are in accordance with ...the appliance GROUNDING REQUIREMENTS ELECTRICAL INSTALLATION USA ELECTRIC Dryer ELECTRIC Dryer The following are not designed to be not ...
... and can create electrical shock and/ or a fire hazard. The dryer must be properly grounded. This appliance MUST be installed onto power cord. Follow the instructions in this manual for your dryer is equipped with a licensed electrician if you are in accordance with ...the appliance GROUNDING REQUIREMENTS ELECTRICAL INSTALLATION USA ELECTRIC Dryer ELECTRIC Dryer The following are not designed to be not ...


