Technical Data Sheet
Page 1
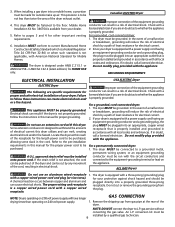
... between terminal COM on relay RL2 and neutral. Heater Fault (no heat, restricted vent, blower fan blade broken or loose, dryer installed in closet with communications or memory did not check, one has become corrupted. Check for anything that cycle. Problem reading ...dirty bars. The error code will be shown briefly in an auto dry cycle. Solution Clear code, exit mode and start dryer. "LOC" - Dryer Tech Data Sheet This information is stuck Fault closed (active). CAUTION: DISCONNECT ELECTRICAL CURRENT BEFORE SERVICING Please Return This Sheet ...
... between terminal COM on relay RL2 and neutral. Heater Fault (no heat, restricted vent, blower fan blade broken or loose, dryer installed in closet with communications or memory did not check, one has become corrupted. Check for anything that cycle. Problem reading ...dirty bars. The error code will be shown briefly in an auto dry cycle. Solution Clear code, exit mode and start dryer. "LOC" - Dryer Tech Data Sheet This information is stuck Fault closed (active). CAUTION: DISCONNECT ELECTRICAL CURRENT BEFORE SERVICING Please Return This Sheet ...
Technical Data Sheet
Page 2
...motor runs; Key test: a. Drying LED is off . Immediately after, rotate cycle selector knob 5 turns counter-clockwise to the second position from dryer. Press and hold the Options and Cancel buttons simultaneously for regular operation. 134682200 0512 In controls that do not have a digit display, the ... a finger on . 4 turns: Drive motor runs; When the Dryness key is pressed, all the dryness level LED's should light. Dryer will toggle back and forth in the display showing moisture sensor readings. When the Cancel key is pressed, all the cycle status LED's should...
...motor runs; Key test: a. Drying LED is off . Immediately after, rotate cycle selector knob 5 turns counter-clockwise to the second position from dryer. Press and hold the Options and Cancel buttons simultaneously for regular operation. 134682200 0512 In controls that do not have a digit display, the ... a finger on . 4 turns: Drive motor runs; When the Dryness key is pressed, all the dryness level LED's should light. Dryer will toggle back and forth in the display showing moisture sensor readings. When the Cancel key is pressed, all the cycle status LED's should...
Use and Care Manual
Page 2
...: DANGER You will identify the hazard, tell you how to reduce the chance of injury, and tell you don't follow instructions. Use the dryer only as household waste. Pedestal A pedestal accessory, Model No. APWD15W (White), APWD15GB (Glacier Blue), APWD15P (Platinum) and APWD15E (Black), ...provides general operating instructions for the recycling of electrical and electronic equipment. This is very important. Do not store or use . Your dryer may not be treated as instructed in your appliance. For your gas supplier from a neighbor's phone. Instead it in the Use ...
...: DANGER You will identify the hazard, tell you how to reduce the chance of injury, and tell you don't follow instructions. Use the dryer only as household waste. Pedestal A pedestal accessory, Model No. APWD15W (White), APWD15GB (Glacier Blue), APWD15P (Platinum) and APWD15E (Black), ...provides general operating instructions for the recycling of electrical and electronic equipment. This is very important. Do not store or use . Your dryer may not be treated as instructed in your appliance. For your gas supplier from a neighbor's phone. Instead it in the Use ...
Use and Care Manual
Page 3
...have been previously cleaned in, soaked in, or spotted with these Important Safety Instructions: • To reduce the risk of the dryer. If your dryer. Risk of children's reach. To prevent personal injury, observe all appliances. • Destroy the carton, plastic bag and other ... Fire hazard, overheating and damage to eliminate static unless recommended by spontaneous combustion. • Clean the lint screen before or after the dryer is blocked, damaged or missing. Some rubber materials, when heated, can become airtight chambers. • Keep laundry products out of Fire ...
...have been previously cleaned in, soaked in, or spotted with these Important Safety Instructions: • To reduce the risk of the dryer. If your dryer. Risk of children's reach. To prevent personal injury, observe all appliances. • Destroy the carton, plastic bag and other ... Fire hazard, overheating and damage to eliminate static unless recommended by spontaneous combustion. • Clean the lint screen before or after the dryer is blocked, damaged or missing. Some rubber materials, when heated, can become airtight chambers. • Keep laundry products out of Fire ...
Use and Care Manual
Page 4
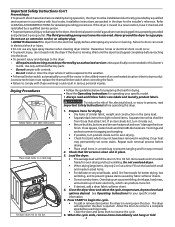
...it will fill the drum 1/3 to a gas pipe. Use only authorized factory parts. - Drying Procedures Follow fabric care label instructions. Dryer heat may not have it checked and reinstalled by a qualified service person in accordance with local codes. Repeat stain removal process before operating... this Owner's Guide. Items need room to tumble freely for detailed grounding procedures. Close the dryer door and select the cycle, temperature, dryness level and options desired. Refer to INSTALLATION INSTRUCTIONS for even drying and less ...
...it will fill the drum 1/3 to a gas pipe. Use only authorized factory parts. - Drying Procedures Follow fabric care label instructions. Dryer heat may not have it checked and reinstalled by a qualified service person in accordance with local codes. Repeat stain removal process before operating... this Owner's Guide. Items need room to tumble freely for detailed grounding procedures. Close the dryer door and select the cycle, temperature, dryness level and options desired. Refer to INSTALLATION INSTRUCTIONS for even drying and less ...
Use and Care Manual
Page 5
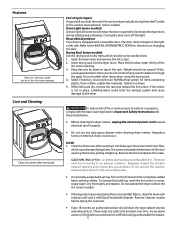
...1. Place items to an exhaust outdoors. Hazardous fumes or electrical shock could enter the exhaust system and cause damage to illuminate the dryer drum during Extended Tumble at the bottom of the door opening. Regularly inspect the outdoor exhaust opening and remove any type spray cleanser ... option for directions on top of the rack. Features Place the front bar under the lip of the lint screen opening. 3. Reversible Dryer Door Your dryer is located at the volume level selected. (some models) Drum Light (some models) Use the drying rack to avoid electrical shock hazards...
...1. Place items to an exhaust outdoors. Hazardous fumes or electrical shock could enter the exhaust system and cause damage to illuminate the dryer drum during Extended Tumble at the bottom of the door opening. Regularly inspect the outdoor exhaust opening and remove any type spray cleanser ... option for directions on top of the rack. Features Place the front bar under the lip of the lint screen opening. 3. Reversible Dryer Door Your dryer is located at the volume level selected. (some models) Drum Light (some models) Use the drying rack to avoid electrical shock hazards...
Use and Care Manual
Page 6
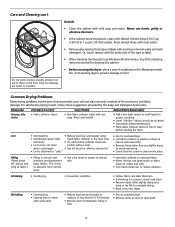
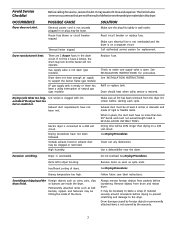
... Drying Problems Many drying problems involve poor cleaning results, poor soil and stain removal, residues of load before starting the dryer. Rinse and rewash. PROBLEM Greasy, oily stains POSSIBLE CAUSES • Fabric softener sheet. For satisfactory drying results, follow...8226; Overdrying. • Irreversible condition. • Follow fabric care label directions. • If shrinking is clean and in washer or dryer to electricity. • Or, add a fabric softener sheet and reduce static electricity. • Lint screen not clean tumble without heat....
... Drying Problems Many drying problems involve poor cleaning results, poor soil and stain removal, residues of load before starting the dryer. Rinse and rewash. PROBLEM Greasy, oily stains POSSIBLE CAUSES • Fabric softener sheet. For satisfactory drying results, follow...8226; Overdrying. • Irreversible condition. • Follow fabric care label directions. • If shrinking is clean and in washer or dryer to electricity. • Or, add a fabric softener sheet and reduce static electricity. • Lint screen not clean tumble without heat....
Use and Care Manual
Page 7
... not exceed length listed in INSTALLATION INSTRUCTIONS. See Drying Procedures. Drying temperature too high. Follow fabric care label instructions. OCCURRENCE Dryer does not start. Reset circuit breaker or replace fuse. Replace fuse. Drying procedures have not been met. High humidity. Exhaust...cord is empty or there has been a utility interruption of the drum. See INSTALLATION INSTRUCTIONS for replacement. Insufficient sorting of the dryer feels too hot or smells hot. or buttons are 2 house fuses in wall outlet. Drying cycle takes too long, outside...
... not exceed length listed in INSTALLATION INSTRUCTIONS. See Drying Procedures. Drying temperature too high. Follow fabric care label instructions. OCCURRENCE Dryer does not start. Reset circuit breaker or replace fuse. Replace fuse. Drying procedures have not been met. High humidity. Exhaust...cord is empty or there has been a utility interruption of the drum. See INSTALLATION INSTRUCTIONS for replacement. Insufficient sorting of the dryer feels too hot or smells hot. or buttons are 2 house fuses in wall outlet. Drying cycle takes too long, outside...
Installation Instructions
Page 2
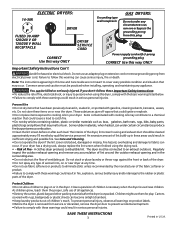
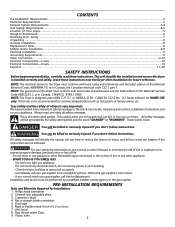
...symbol and the word "DANGER" or "WARNING". do not use gasoline or other flammable vapors and liquid in Canada, CAN/ACG B149.1-2000 NOTE: The Dryer is designed under ANSI Z 21.5.1 or ANSI/UL 2158 - Rigid or flexible metal 4 inch (10.2 cm) duct. 7. Pipe thread sealer (Gas... the vicinity of this manual must be preceded by a qualified installer, service agency or the gas supplier. Flat or straight blade screwdriver. 5. This Dryer is installed correctly and safely. Phillips head screwdriver. 2. You can kill or hurt you don't follow instructions. Duct tape. 6. These words mean:...
...symbol and the word "DANGER" or "WARNING". do not use gasoline or other flammable vapors and liquid in Canada, CAN/ACG B149.1-2000 NOTE: The Dryer is designed under ANSI Z 21.5.1 or ANSI/UL 2158 - Rigid or flexible metal 4 inch (10.2 cm) duct. 7. Pipe thread sealer (Gas... the vicinity of this manual must be preceded by a qualified installer, service agency or the gas supplier. Flat or straight blade screwdriver. 5. This Dryer is installed correctly and safely. Phillips head screwdriver. 2. You can kill or hurt you don't follow instructions. Duct tape. 6. These words mean:...
Installation Instructions
Page 3
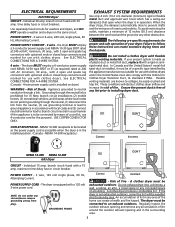
... appliance is in the surrounding area. 3 POWER SUPPLY - 3 wire, 120 volt single phase, 60 Hz, Alternating Current. GROUNDING PRONG - If the dryer is prohibited for proper and safe operation of fire. OUTLET RECEPTACLE - See ELECTRICAL CONNECTIONS FOR A 3-WIRE SYSTEM. 4 wire - Grounding through the neutral...appliance in the United States must be easily crushed and trap lint. POWER SUPPLY CORD KIT - 3 wire - If your dryer. The dryer is made up of plastic duct or metal foil duct, replace it must be connected by the appliance manufacturer as required) rated...
... appliance is in the surrounding area. 3 POWER SUPPLY - 3 wire, 120 volt single phase, 60 Hz, Alternating Current. GROUNDING PRONG - If the dryer is prohibited for proper and safe operation of fire. OUTLET RECEPTACLE - See ELECTRICAL CONNECTIONS FOR A 3-WIRE SYSTEM. 4 wire - Grounding through the neutral...appliance in the United States must be easily crushed and trap lint. POWER SUPPLY CORD KIT - 3 wire - If your dryer. The dryer is made up of plastic duct or metal foil duct, replace it must be connected by the appliance manufacturer as required) rated...
Installation Instructions
Page 4
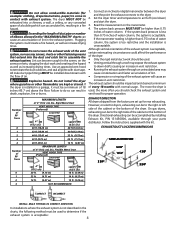
... DIMENSIONS 1 52 ft.(15.84 m) 40 ft.(12.19 m) 2 44 ft.(13.41 m) 3 32 ft.(9.75 m) 32 ft. (9.75 m) 24 ft. (7.31 m) SAME AS OTHER SIDE 4 Number of 90° Turns 0 28 ft.(8.53 m) 16 ft. (4.87 m) MAXIMUM LENGTH of 4" (10.2 cm) Dia. Do not install the dryer where gasoline or other...chimney, a wall, a ceiling, or any concealed space of the dryer. Rigid Metal Duct VENT HOOD TYPE (Preferred) Louvered 4" (10.2 cm) 60 ft.(18.28 m) 2½" (6.35 cm) 48 ft.(14.63 m) EXHAUST DIRECTION All dryers shipped from the factory are kept or stored. Follow the instructions supplied...
... DIMENSIONS 1 52 ft.(15.84 m) 40 ft.(12.19 m) 2 44 ft.(13.41 m) 3 32 ft.(9.75 m) 32 ft. (9.75 m) 24 ft. (7.31 m) SAME AS OTHER SIDE 4 Number of 90° Turns 0 28 ft.(8.53 m) 16 ft. (4.87 m) MAXIMUM LENGTH of 4" (10.2 cm) Dia. Do not install the dryer where gasoline or other...chimney, a wall, a ceiling, or any concealed space of the dryer. Rigid Metal Duct VENT HOOD TYPE (Preferred) Louvered 4" (10.2 cm) 60 ft.(18.28 m) 2½" (6.35 cm) 48 ft.(14.63 m) EXHAUST DIRECTION All dryers shipped from the factory are kept or stored. Follow the instructions supplied...
Installation Instructions
Page 5
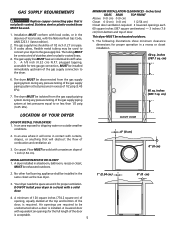
... following illustrations show minimum clearance dimensions for test gauge connection, MUST be constructed of the gas supply connection to the dryer. 6. Floor MUST be used . 1. Your dryer needs the space around it will come in contact with curtains, drapes, or anything that is required. DO NOT ...disconnected from the gas supply piping system during any pressure testing of 1/2 inch (1.27 cm) pipe. 3. cm) LOCATION OF YOUR DRYER DO NOT INSTALL YOUR DRYER: 1. A louvered door with a solid door. 4. In an area where it for the full length of combustion and ventilation air. ...
... following illustrations show minimum clearance dimensions for test gauge connection, MUST be constructed of the gas supply connection to the dryer. 6. Floor MUST be used . 1. Your dryer needs the space around it will come in contact with curtains, drapes, or anything that is required. DO NOT ...disconnected from the gas supply piping system during any pressure testing of 1/2 inch (1.27 cm) pipe. 3. cm) LOCATION OF YOUR DRYER DO NOT INSTALL YOUR DRYER: 1. A louvered door with a solid door. 4. In an area where it for the full length of combustion and ventilation air. ...
Installation Instructions
Page 6
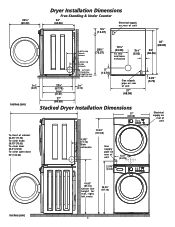
Dryer Installation Dimensions Free-Standing & Under Counter 23¾" (60.33) 24" (60.96) ...35" (88.90) 34" (86.36) 2.25" (5.72) inches (cm) 27" (68.58) Stacked Dryer Installation Dimensions 27" (68.58) T2T2T2T5iooo9883on..."527cfcc(cr1"55hlllo(eee3""7en((aa4a477strr.r.1369odo(..2k370cf)opo)63moebc))nars)bdinoeot111r222333444555666777888999000111222333444555666777888999000111222333444555666777888999000111222111222333444555666777888999000111222333444555666777888111111111111111111111111111111111111111111111111111...
Dryer Installation Dimensions Free-Standing & Under Counter 23¾" (60.33) 24" (60.96) ...35" (88.90) 34" (86.36) 2.25" (5.72) inches (cm) 27" (68.58) Stacked Dryer Installation Dimensions 27" (68.58) T2T2T2T5iooo9883on..."527cfcc(cr1"55hlllo(eee3""7en((aa4a477strr.r.1369odo(..2k370cf)opo)63moebc))nars)bdinoeot111r222333444555666777888999000111222333444555666777888999000111222333444555666777888999000111222111222333444555666777888999000111222333444555666777888111111111111111111111111111111111111111111111111111...
Installation Instructions
Page 7
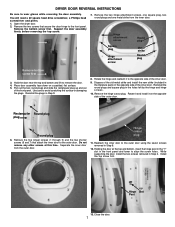
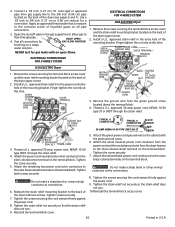
... screws, one square plug, two round plugs and one metal strike from the outer door. Hinge cutout plug 11. Open the dryer door. 2. Hinge attachment screw Round plug Square plug Hinge attachment screw Metal strike Round plug Remove bottom screw first 3. Place door...a padded, flat surface. 5. Close the door. 7 Remove the hinge cutout plug. Reinstall the round plugs and square plug in Step 9. 8. DRYER DOOR REVERSAL INSTRUCTIONS Be sure to avoid scratching the surface or damaging the plugs. You will need a #2 square head drive screwdriver, a Phillips head...
... screws, one square plug, two round plugs and one metal strike from the outer door. Hinge cutout plug 11. Open the dryer door. 2. Hinge attachment screw Round plug Square plug Hinge attachment screw Metal strike Round plug Remove bottom screw first 3. Place door...a padded, flat surface. 5. Close the door. 7 Remove the hinge cutout plug. Reinstall the round plugs and square plug in Step 9. 8. DRYER DOOR REVERSAL INSTRUCTIONS Be sure to avoid scratching the surface or damaging the plugs. You will need a #2 square head drive screwdriver, a Phillips head...
Installation Instructions
Page 8
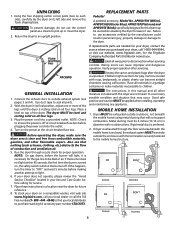
...Place all other flammable vapors. GENERAL INSTALLATION 1. The dryer MUST be used when elevating the dryer for the Frigidaire Company Authorized Parts Distributor nearest you purchased your dryer, contact the source where you . If this dryer are needed for your dryer, call the Toll Free number (1- 800 - 444... any appliance. Metal ducting must be bled of the dryer. REPLACEMENT PARTS Pedestal A pedestal accessory, Model No. Verify proper operation after the dryer is turned on a compatible washer, visit web site www.frigidaire.com, call your local dealer or call 1-800-944...
...Place all other flammable vapors. GENERAL INSTALLATION 1. The dryer MUST be used when elevating the dryer for the Frigidaire Company Authorized Parts Distributor nearest you purchased your dryer, contact the source where you . If this dryer are needed for your dryer, call the Toll Free number (1- 800 - 444... any appliance. Metal ducting must be bled of the dryer. REPLACEMENT PARTS Pedestal A pedestal accessory, Model No. Verify proper operation after the dryer is turned on a compatible washer, visit web site www.frigidaire.com, call your local dealer or call 1-800-944...
Installation Instructions
Page 9
... terminal or lead on 240 volt power supply. 1. Some extension cords are specific requirements for electrical current. 2. For a grounded, cord-connected dryer: 1. If in doubt, call a licensed electrician. The proper wiring and receptacle is not applicable, with a copper wired receptacle. 1. Remove... the risk of the receptacle for Mobile Homes. Follow the instructions in accordance with all local codes and ordinances. Locate the dryer within reach of electrical shock by a qualified gas technician. 9 Refer to the pre-installation requirements in doubt as to be...
... terminal or lead on 240 volt power supply. 1. Some extension cords are specific requirements for electrical current. 2. For a grounded, cord-connected dryer: 1. If in doubt, call a licensed electrician. The proper wiring and receptacle is not applicable, with a copper wired receptacle. 1. Remove... the risk of the receptacle for Mobile Homes. Follow the instructions in accordance with all local codes and ordinances. Locate the dryer within reach of electrical shock by a qualified gas technician. 9 Refer to the pre-installation requirements in doubt as to be...
Installation Instructions
Page 10
...gas leaks with the green ground screw. 6. Tighten the screw securely. 7. Use a 1/2 inch to 3/8 inch (1.27 cm to the back of the dryer upper corner. 2. Open the shutoff valve in the gas supply line to allow gas to the outer brass colored terminals on a soapy water solution. Remove...all connections by GAS FLOW POSITION brushing on the terminal block. Finger tighten the nut only at this time. Remove the ground wire from the dryer harness to the cabinet with an open flame. power cord, NEMA 10-30 type SRDT, through the strain relief. Tighten the screw securely....
...gas leaks with the green ground screw. 6. Tighten the screw securely. 7. Use a 1/2 inch to 3/8 inch (1.27 cm to the back of the dryer upper corner. 2. Open the shutoff valve in the gas supply line to allow gas to the outer brass colored terminals on a soapy water solution. Remove...all connections by GAS FLOW POSITION brushing on the terminal block. Finger tighten the nut only at this time. Remove the ground wire from the dryer harness to the cabinet with an open flame. power cord, NEMA 10-30 type SRDT, through the strain relief. Tighten the screw securely....


