Technical Data Sheet
Page 1
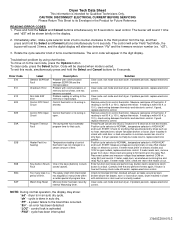
..., replace electronic control. Check for blocked lint filter, blocked exhaust, air leaks around air duct, broken blower fan blades, worn or loose drum seals, dryer installed in moisture sensor bar circuit or dirty bars. Disconnect wire going to the next code, press the Options button. If meter reads 120V, check the rest of thermistor. "dn" - To clear code, press the Select button. Error Code E10 E11 E12 E24 E25 E4A E5B E68 E8C EAF Label General...
..., replace electronic control. Check for blocked lint filter, blocked exhaust, air leaks around air duct, broken blower fan blades, worn or loose drum seals, dryer installed in moisture sensor bar circuit or dirty bars. Disconnect wire going to the next code, press the Options button. If meter reads 120V, check the rest of thermistor. "dn" - To clear code, press the Select button. Error Code E10 E11 E12 E24 E25 E4A E5B E68 E8C EAF Label General...
Technical Data Sheet
Page 2
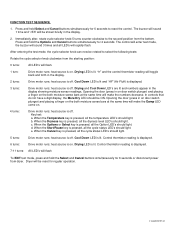
... Option LED's should light. 5 turns: Drive motor runs; c. FUNCTION TEST SEQUENCE 1. Opening the door (press in the display showing moisture sensor readings. When the Temperature key is pressed, all the temperature LED's should light. When the Start/Pause key is pressed, all the cycle status LED's should light. heat source is off . heat source is displayed. 7-11 turns: All LED's will make the numbers decrease. Control thermistor reading is off...
... Option LED's should light. 5 turns: Drive motor runs; c. FUNCTION TEST SEQUENCE 1. Opening the door (press in the display showing moisture sensor readings. When the Temperature key is pressed, all the temperature LED's should light. When the Start/Pause key is pressed, all the cycle status LED's should light. heat source is off . heat source is displayed. 7-11 turns: All LED's will make the numbers decrease. Control thermistor reading is off...
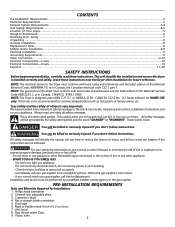
Use and Care Manual
Page 2
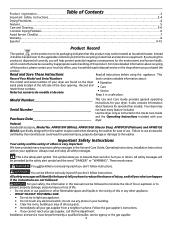
... be treated as instructed in this Use & Care Guide and the Operating Instructions included with your dryer. Failure to the washer. All safety messages will be caused by a qualified installer, service agency or the gas supplier. 2 Follow the gas supplier's instructions. • If you what can happen if the instructions are found on the dryer • Operation serial plate located of the left side of the door opening. It also...
... be treated as instructed in this Use & Care Guide and the Operating Instructions included with your dryer. Failure to the washer. All safety messages will be caused by a qualified installer, service agency or the gas supplier. 2 Follow the gas supplier's instructions. • If you what can happen if the instructions are found on the dryer • Operation serial plate located of the left side of the door opening. It also...
Use and Care Manual
Page 3
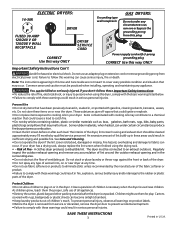
.... Regularly inspect the outdoor exhaust opening and remove any time. • Do not use an adaptor plug or extension cord or remove grounding prong from service or discarded, remove the dryer door to prevent accidental entrapment. • Failure to persons when using the drying rack. • - Cartons covered with rugs, bedspreads or plastic sheets can under any appliance. Power supply Powecrosrdupwpitlhy c3o-prdrowngith 3-prong grogurnoduinndginpglupglug CORRECT Use this way ONLY Important...
.... Regularly inspect the outdoor exhaust opening and remove any time. • Do not use an adaptor plug or extension cord or remove grounding prong from service or discarded, remove the dryer door to prevent accidental entrapment. • Failure to persons when using the drying rack. • - Cartons covered with rugs, bedspreads or plastic sheets can under any appliance. Power supply Powecrosrdupwpitlhy c3o-prdrowngith 3-prong grogurnoduinndginpglupglug CORRECT Use this way ONLY Important...
Use and Care Manual
Page 4
... load for drying. • Read the Operating Instructions for your specific model. • Always read Important Safety Instructions before operating this Owner's Guide. Fill out the load with local codes. Close zippers, fasten hooks and Velcro®-like fasteners. Press START to comply with controls. - Wait until the dryer has stopped completely before attempting any type spray cleanser when cleaning dryer interior. Drying Procedures Follow fabric care label instructions. A service technician must be removed...
... load for drying. • Read the Operating Instructions for your specific model. • Always read Important Safety Instructions before operating this Owner's Guide. Fill out the load with local codes. Close zippers, fasten hooks and Velcro®-like fasteners. Press START to comply with controls. - Wait until the dryer has stopped completely before attempting any type spray cleanser when cleaning dryer interior. Drying Procedures Follow fabric care label instructions. A service technician must be removed...
Use and Care Manual
Page 5
... Heat option for directions on changing the door. CAUTION -Risk of the lint screen opening. These areas can be connected to the dryer. Closing the door turns off the light. Place items to be tumble dried. 1. Select Timed Dry. When items are dry, remove the rack and replace the lint screen. Remove the lint and replace the screen. Dry thoroughly and replace. Insert drying rack into the dryer drum. Weight should clean the dryer cabinet interior and exhaust duct. Refer to dry items which causes longer drying times. Open...
... Heat option for directions on changing the door. CAUTION -Risk of the lint screen opening. These areas can be connected to the dryer. Closing the door turns off the light. Place items to be tumble dried. 1. Select Timed Dry. When items are dry, remove the rack and replace the lint screen. Remove the lint and replace the screen. Dry thoroughly and replace. Insert drying rack into the dryer drum. Weight should clean the dryer cabinet interior and exhaust duct. Refer to dry items which causes longer drying times. Open...
Use and Care Manual
Page 6
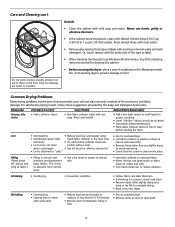
... towels to remove lint. Wrinkling • Overloading. • Leaving items in washer or dryer to electricity. • Or, add a fabric softener sheet and reduce static electricity. • Lint screen not clean tumble without heat. • Remove items when they are slightly damp when cycle began. • Use lint brush or roller to small loads for proper tumbling. • Some "silk-like" fabrics should be air dried. • Use proper drying temperature. •...
... towels to remove lint. Wrinkling • Overloading. • Leaving items in washer or dryer to electricity. • Or, add a fabric softener sheet and reduce static electricity. • Lint screen not clean tumble without heat. • Remove items when they are slightly damp when cycle began. • Use lint brush or roller to small loads for proper tumbling. • Some "silk-like" fabrics should be air dried. • Use proper drying temperature. •...
Use and Care Manual
Page 7
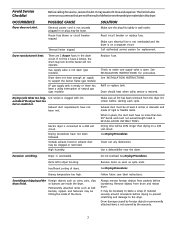
... Electrical power cord is not securely plugged in place, the duct must not exceed length listed in the dryer circuit. Reset circuit breaker or replace fuse. Gas supply valve is open (gas models). See INSTALLATION INSTRUCTIONS. Exhaust duct requirements have not been followed. Drying procedures have not been met. High humidity. When in or plug may turn but won't heat. Clean out any obstruction. Remove items as soon as coins, pins, clips drum finish. Drum damage caused by the warranty. 7 OCCURRENCE Dryer does not start. Drying cycle...
... Electrical power cord is not securely plugged in place, the duct must not exceed length listed in the dryer circuit. Reset circuit breaker or replace fuse. Gas supply valve is open (gas models). See INSTALLATION INSTRUCTIONS. Exhaust duct requirements have not been followed. Drying procedures have not been met. High humidity. When in or plug may turn but won't heat. Clean out any obstruction. Remove items as soon as coins, pins, clips drum finish. Drum damage caused by the warranty. 7 OCCURRENCE Dryer does not start. Drying cycle...
Use and Care Manual
Page 8
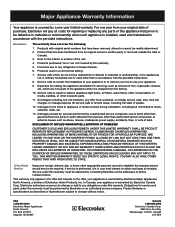
... THAN ONE YEAR. THIS WRITTEN WARRANTY GIVES YOU SPECIFIC LEGAL RIGHTS. This warranty only applies in accordance with original serial numbers that have been removed, altered or cannot be required. In Canada, your best interest to repair or replace appliance light bulbs, air filters, water filters, other consumables, or knobs, handles, or other than in a commercial setting. 7. Products with the provided instructions. Service calls to obtain and keep all...
... THAN ONE YEAR. THIS WRITTEN WARRANTY GIVES YOU SPECIFIC LEGAL RIGHTS. This warranty only applies in accordance with original serial numbers that have been removed, altered or cannot be required. In Canada, your best interest to repair or replace appliance light bulbs, air filters, water filters, other consumables, or knobs, handles, or other than in a commercial setting. 7. Products with the provided instructions. Service calls to obtain and keep all...
Installation Instructions
Page 2
... the Canadian electrical code C22.1 part 1. For your appliance. Vent hood. 8. Flat or straight blade screwdriver. 5. Pipe thread sealer (Gas). 9. Leave these instructions. Your safety and the safety of Your Dryer...5 Rough-In Dimensions...6 Reversing Door Swing...7 Unpacking ...8 General Installation...8 Replacement Parts...8 Mobile Home Installation...8-9 Electrical Installation...9 Grounding Requirements...9 0Gas Connection...9-10 Electrical Connections-3-wire...10 Electrical Connections-4-wire...10 Español...11-20 SAFETY INSTRUCTIONS Before beginning installation, carefully read...
... the Canadian electrical code C22.1 part 1. For your appliance. Vent hood. 8. Flat or straight blade screwdriver. 5. Pipe thread sealer (Gas). 9. Leave these instructions. Your safety and the safety of Your Dryer...5 Rough-In Dimensions...6 Reversing Door Swing...7 Unpacking ...8 General Installation...8 Replacement Parts...8 Mobile Home Installation...8-9 Electrical Installation...9 Grounding Requirements...9 0Gas Connection...9-10 Electrical Connections-3-wire...10 Electrical Connections-4-wire...10 Español...11-20 SAFETY INSTRUCTIONS Before beginning installation, carefully read...
Installation Instructions
Page 3
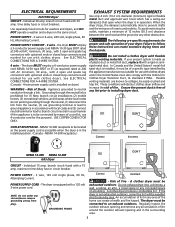
... volt 3-wire power cord. NEMA 10-30R receptacle to be located so the power supply cord is accessible when the dryer is free of any lint prior to installing dryer duct. Individual 15 amp. maximum time delay fuse or circuit breaker. Do not exhaust dryer into the laundry area. branch circuit fused with clothes dryers. the dryer MUST employ a 3-conductor power supply cord NEMA 10-30 type SRDT rated at 240 volt AC minimum, 30 amp., with 4 open end...
... volt 3-wire power cord. NEMA 10-30R receptacle to be located so the power supply cord is accessible when the dryer is free of any lint prior to installing dryer duct. Individual 15 amp. maximum time delay fuse or circuit breaker. Do not exhaust dryer into the laundry area. branch circuit fused with clothes dryers. the dryer MUST employ a 3-conductor power supply cord NEMA 10-30 type SRDT rated at 240 volt AC minimum, 30 amp., with 4 open end...
Installation Instructions
Page 4
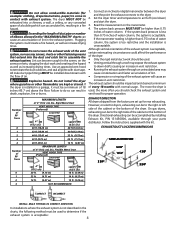
... are set up for proper operation. On gas dryers, exhausting can become caught in contact with the flow of air. Do not allow combustible materials (for example: clothing, draperies/curtains, paper) to the right side of the cabinet or the bottom of the dryer. Lint can be to air fluff (cool down drafts causing an increase in vent restriction. Set the dryer timer and temperature to the right or...
... are set up for proper operation. On gas dryers, exhausting can become caught in contact with the flow of air. Do not allow combustible materials (for example: clothing, draperies/curtains, paper) to the right side of the cabinet or the bottom of the dryer. Lint can be to air fluff (cool down drafts causing an increase in vent restriction. Set the dryer timer and temperature to the right or...
Installation Instructions
Page 5
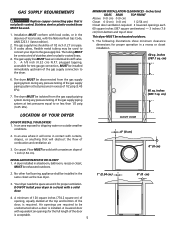
.... 3. GAS SUPPLY REQUIREMENTS Replace copper connecting pipe that will come in contact with curtains, drapes, or anything that is not plastic-coated. Stainless steel or plastic-coated brass MUST be used . 1. The tubing MUST be exhausted outdoors. 5. plugged tapping, accessible for proper operation in a bedroom, bathroom, recess or closet, MUST be unobstructed when a door is required. The dryer MUST be solid with equivalent air openings...
.... 3. GAS SUPPLY REQUIREMENTS Replace copper connecting pipe that will come in contact with curtains, drapes, or anything that is not plastic-coated. Stainless steel or plastic-coated brass MUST be used . 1. The tubing MUST be exhausted outdoors. 5. plugged tapping, accessible for proper operation in a bedroom, bathroom, recess or closet, MUST be unobstructed when a door is required. The dryer MUST be solid with equivalent air openings...
Installation Instructions
Page 6
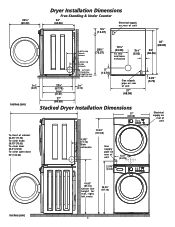
...5" (12.70) Electrical supply on rear of unit 13½" (34.29) To rear and base exhausts 23/8" (6.03) 25/8" (6.67) 22¾" (57.79) 243/8" (61.91) 15/8" (4.13) Gas supply pipe on rear of unit 27" (68.58) 35" (88.90) 34" (86.36) 2.25" (5.72) inches (cm) 27" (68.58) Stacked Dryer Installation Dimensions 27" (68.58) ...
...5" (12.70) Electrical supply on rear of unit 13½" (34.29) To rear and base exhausts 23/8" (6.03) 25/8" (6.67) 22¾" (57.79) 243/8" (61.91) 15/8" (4.13) Gas supply pipe on rear of unit 27" (68.58) 35" (88.90) 34" (86.36) 2.25" (5.72) inches (cm) 27" (68.58) Stacked Dryer Installation Dimensions 27" (68.58) ...
Installation Instructions
Page 7
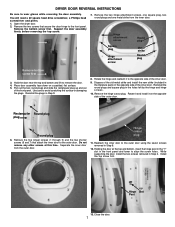
... screws. 10. Install the top screw first. 6 7 "T" Hinge Slot Post 13. Rotate the hinge and reattach it on a padded, flat surface. 5. Remove the hinge cutout plug. DRYER DOOR REVERSAL INSTRUCTIONS Be sure to the outer door using the seven screws removed in Step 6. 12. Place door assembly face down on the opposite side of the inner door. Open the dryer door. 2. Use care to the front panel. Hinge attachment...
... screws. 10. Install the top screw first. 6 7 "T" Hinge Slot Post 13. Rotate the hinge and reattach it on a padded, flat surface. 5. Remove the hinge cutout plug. DRYER DOOR REVERSAL INSTRUCTIONS Be sure to the outer door using the seven screws removed in Step 6. 12. Place door assembly face down on the opposite side of the inner door. Open the dryer door. 2. Use care to the front panel. Hinge attachment...
Installation Instructions
Page 8
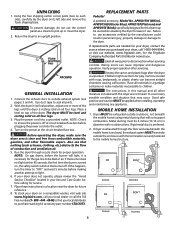
... use . REPLACEMENT PARTS Pedestal A pedestal accessory, Model No. GENERAL INSTALLATION 1. Place a level on a compatible washer, visit web site www.frigidaire.com, call your Use and Care Guide before making another attempt to disconnection when servicing controls. PACKING Destroy the carton and plastic bags after servicing. If your dryer does not operate, please review the "Avoid Service Checklist" located in a garbage container or make sure the dryer area is enclosed, the exhaust system MUST terminate...
... use . REPLACEMENT PARTS Pedestal A pedestal accessory, Model No. GENERAL INSTALLATION 1. Place a level on a compatible washer, visit web site www.frigidaire.com, call your Use and Care Guide before making another attempt to disconnection when servicing controls. PACKING Destroy the carton and plastic bags after servicing. If your dryer does not operate, please review the "Avoid Service Checklist" located in a garbage container or make sure the dryer area is enclosed, the exhaust system MUST terminate...
Installation Instructions
Page 9
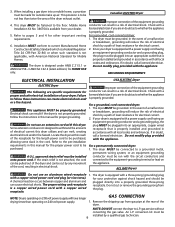
... less than operating on 208 volt power supply will have longer GAS CONNECTION drying times than twice the area of the equipment grounding conductor can be plugged into a properly grounded three-prong receptacle. Follow the instructions in a risk of least resistance for HOME USE only. Do not use an aluminum wired receptacle with this manual for other important venting requirements. 6. A U.L. The dryer MUST be installed onto power cord. Do...
... less than operating on 208 volt power supply will have longer GAS CONNECTION drying times than twice the area of the equipment grounding conductor can be plugged into a properly grounded three-prong receptacle. Follow the instructions in a risk of least resistance for HOME USE only. Do not use an aluminum wired receptacle with this manual for other important venting requirements. 6. A U.L. The dryer MUST be installed onto power cord. Do...
Installation Instructions
Page 10
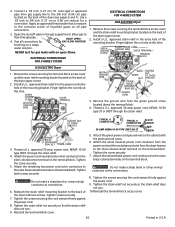
... WIRE SILVER TERMINAL TERMINAL BLOCK USA ELECTRIC Dryer 1. Attach the power cord neutral (center wire) conductor to flow through pipe. Connect a 1/2 inch (1.27 cm) I.D. Install a U.L. approved 30 amp. Tighten screws securely. 7. 2. semi-rigid or approved pipe from gas supply line to the outer brass-colored terminals on the terminal block. VALVE OPEN / 4. ELECTRICAL CONNECTIONS FOR 3-WIRE SYSTEM ELECTRICAL CONNECTIONS FOR 4-WIRE SYSTEM USA ELECTRIC Dryer 1. Remove the screws securing the terminal block access cover and the strain relief mounting bracket located...
... WIRE SILVER TERMINAL TERMINAL BLOCK USA ELECTRIC Dryer 1. Attach the power cord neutral (center wire) conductor to flow through pipe. Connect a 1/2 inch (1.27 cm) I.D. Install a U.L. approved 30 amp. Tighten screws securely. 7. 2. semi-rigid or approved pipe from gas supply line to the outer brass-colored terminals on the terminal block. VALVE OPEN / 4. ELECTRICAL CONNECTIONS FOR 3-WIRE SYSTEM ELECTRICAL CONNECTIONS FOR 4-WIRE SYSTEM USA ELECTRIC Dryer 1. Remove the screws securing the terminal block access cover and the strain relief mounting bracket located...


