User manual
Page 15
... chipset of this Nettop only support upto Directx 9, can install Operating System(Windows 7). Before we continue : ■ Your NETBOX power is an optional accessory. NETBOX driver CD. (In this package, you need other purchase an external USB DVD-ROM drive.) 2. BIOS SETUP UTILITY Boot Boot Device Priority Specifies the boot sequence...
... chipset of this Nettop only support upto Directx 9, can install Operating System(Windows 7). Before we continue : ■ Your NETBOX power is an optional accessory. NETBOX driver CD. (In this package, you need other purchase an external USB DVD-ROM drive.) 2. BIOS SETUP UTILITY Boot Boot Device Priority Specifies the boot sequence...
User manual
Page 18
... main menu will be displayed, click "Driver" to enter the Driver menu shown as below: 2.3. Install Drivers in Windows XP 2.1. Take out the Windows XP Install CD from the DVD-ROM drive, and put the NETBOX driver CD inside. 2.2. After all the other drivers, or you have to restart your system...Windows XP is completely installed, you can start using the NETBOX. You must click "Intel Chipset Driver" to install it manually. 2.4. Waiting for your NETBOX, then you need to install the necessary drivers before using it first. After that, you can click "One Click Setup" to install all...
... main menu will be displayed, click "Driver" to enter the Driver menu shown as below: 2.3. Install Drivers in Windows XP 2.1. Take out the Windows XP Install CD from the DVD-ROM drive, and put the NETBOX driver CD inside. 2.2. After all the other drivers, or you have to restart your system...Windows XP is completely installed, you can start using the NETBOX. You must click "Intel Chipset Driver" to install it manually. 2.4. Waiting for your NETBOX, then you need to install the necessary drivers before using it first. After that, you can click "One Click Setup" to install all...
User manual
Page 22
...below: 2.3. Waiting for the first use. After that, you can click "One Click Setup" to install all the other drivers, or you can click on each individual driver to select system settings, create an account, set a password...etc, until the whole process is completely installed, you have... to restart your system. Then you need to install the necessary drivers before using it first. When the Windows 7 is completed and enter Windows 7 operating system. 2. Use these options to install it . 18 ...
...below: 2.3. Waiting for the first use. After that, you can click "One Click Setup" to install all the other drivers, or you can click on each individual driver to select system settings, create an account, set a password...etc, until the whole process is completely installed, you have... to restart your system. Then you need to install the necessary drivers before using it first. When the Windows 7 is completed and enter Windows 7 operating system. 2. Use these options to install it . 18 ...
User manual
Page 23
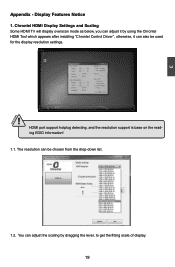
Display Features Notice 1. 3 CAUTION Appendix - HDMI port support hotplug detecting, and the resolution support is base on the reading EDID information! 1.1. Chrontel HDMI Display Settings and Scaling Some HDMI TV will display overscan mode as below, you can adjust it by using the Chrontel HDMI Tool which appears after installing "Chrontel Control Driver", otherwise, it can adjust the scaling by dragging the lever, to get the fitting scale of display. 19 You can also be chosen from the drop-down list. 1.2. The resolution can be used for the display resolution settings. !
Display Features Notice 1. 3 CAUTION Appendix - HDMI port support hotplug detecting, and the resolution support is base on the reading EDID information! 1.1. Chrontel HDMI Display Settings and Scaling Some HDMI TV will display overscan mode as below, you can adjust it by using the Chrontel HDMI Tool which appears after installing "Chrontel Control Driver", otherwise, it can adjust the scaling by dragging the lever, to get the fitting scale of display. 19 You can also be chosen from the drop-down list. 1.2. The resolution can be used for the display resolution settings. !
User manual
Page 24
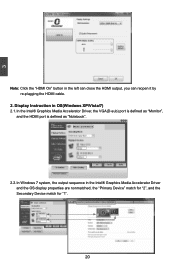
3 Note: Click the "HDMI On" button in OS(Windows XP/Vista/7) 2.1. In the Intel® Graphics Media Accelerator Driver, the VGA(D-sub) port is defined as "Monitor", and the HDMI port is defined as "Notebook". 2.2. Display Instruction in the left can close the HDMI output, you can reopen it by re-plugging the HDMI cable. 2. I n Windows 7 system, the output sequence in the Intel® Graphics Media Accelerator Driver and the OS display properties are nonmatched, the "Primary Device" match for "2", and the Secondary Device match for "1". 20
3 Note: Click the "HDMI On" button in OS(Windows XP/Vista/7) 2.1. In the Intel® Graphics Media Accelerator Driver, the VGA(D-sub) port is defined as "Monitor", and the HDMI port is defined as "Notebook". 2.2. Display Instruction in the left can close the HDMI output, you can reopen it by re-plugging the HDMI cable. 2. I n Windows 7 system, the output sequence in the Intel® Graphics Media Accelerator Driver and the OS display properties are nonmatched, the "Primary Device" match for "2", and the Secondary Device match for "1". 20
User manual
Page 25
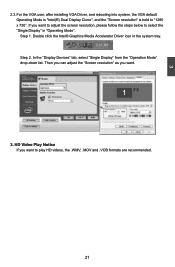
... the "Display Devices" tab, select "Single Display" from the "Operation Mode" drop-down list. Step 2. Double click the Intel® Graphics Media Accelerator Driver icon in "Operating Mode". HD Video Play Notice If you want . 3. 3 2.3. Step 1. If you want to select the "Single Display" in the... system tray. For the VGA user, after installing VGA Driver, and rebooting into system, the VGA default Operating Mode is "Intel(R) Dual Display Clone", and the "Screen resolution" is held to "1280 x 720".
... the "Display Devices" tab, select "Single Display" from the "Operation Mode" drop-down list. Step 2. Double click the Intel® Graphics Media Accelerator Driver icon in "Operating Mode". HD Video Play Notice If you want . 3. 3 2.3. Step 1. If you want to select the "Single Display" in the... system tray. For the VGA user, after installing VGA Driver, and rebooting into system, the VGA default Operating Mode is "Intel(R) Dual Display Clone", and the "Screen resolution" is held to "1280 x 720".

