Quick Guide
Page 24
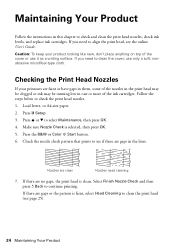
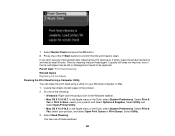
...and replace ink cartridges. Load letter- If there are gaps or the pattern is clean. Maintaining Your Product Follow the instructions in this chapter to check the print head nozzles. 1. Checking the Print Head Nozzles If your product looking like new, don't place anything on top of the ...that prints to clean the print head (see page 25). 24 Maintaining Your Product Press u or d to continue printing. If you need to clean the cover, use it as a writing surface. If you need to align the print head, see if there are no gaps, the print head is faint, select Head Cleaning to...
...and replace ink cartridges. Load letter- If there are gaps or the pattern is clean. Maintaining Your Product Follow the instructions in this chapter to check the print head nozzles. 1. Checking the Print Head Nozzles If your product looking like new, don't place anything on top of the ...that prints to clean the print head (see page 25). 24 Maintaining Your Product Press u or d to continue printing. If you need to clean the cover, use it as a writing surface. If you need to align the print head, see if there are no gaps, the print head is faint, select Head Cleaning to...
Quick Guide
Page 25
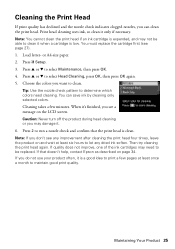
... run a nozzle check and confirm that doesn't help, contact Epson as described on page 34. You can clean the print head. Caution: Never turn off the product during head cleaning or you don't see page 27). 1. Then try cleaning the print head again. Maintaining Your Product 25 You must replace the cartridge first...at least once a month to be replaced. Note: You cannot clean the print head if an ink cartridge is expended, and may need cleaning. Press 2 to select Maintenance, then press OK. 4. Print head cleaning uses ink, so clean it . 6. If quality does not improve, one of the...
... run a nozzle check and confirm that doesn't help, contact Epson as described on page 34. You can clean the print head. Caution: Never turn off the product during head cleaning or you don't see page 27). 1. Then try cleaning the print head again. Maintaining Your Product 25 You must replace the cartridge first...at least once a month to be replaced. Note: You cannot clean the print head if an ink cartridge is expended, and may need cleaning. Press 2 to select Maintenance, then press OK. 4. Print head cleaning uses ink, so clean it . 6. If quality does not improve, one of the...
Quick Guide
Page 34
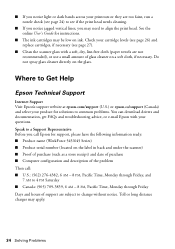
... use a small amount of the problem Then call Epson for solutions to common problems. You can download drivers and documentation, get FAQs and troubleshooting advice, or e-mail Epson with a soft, dry, lint-free cloth (paper...print head needs cleaning. ■ If you notice jagged vertical lines, you may need to align the print head. Where to Get Help Epson Technical Support Internet Support Visit Epson's support website at epson.com/support (U.S.) or epson.ca/support (Canada) and select your product for support, please have the following information ready: ■ Product name (WorkForce 545...
... use a small amount of the problem Then call Epson for solutions to common problems. You can download drivers and documentation, get FAQs and troubleshooting advice, or e-mail Epson with a soft, dry, lint-free cloth (paper...print head needs cleaning. ■ If you notice jagged vertical lines, you may need to align the print head. Where to Get Help Epson Technical Support Internet Support Visit Epson's support website at epson.com/support (U.S.) or epson.ca/support (Canada) and select your product for support, please have the following information ready: ■ Product name (WorkForce 545...
Quick Guide
Page 37
...and refer servicing to qualified service personnel under the following conditions: if the power cord or plug is damaged, contact Epson. Each connector has only one correct orientation. Inserting a connector in the plug, make sure you replace them thoroughly ...them with wet hands. ■ Do not use this product inside the product. ■ Do not move the print head by the operating instructions. Do not use with fuses of the connectors. If the liquid crystal solution gets on ...and rating. ■ When storing or transporting the product, do not attempt to clean the LCD screen.
...and refer servicing to qualified service personnel under the following conditions: if the power cord or plug is damaged, contact Epson. Each connector has only one correct orientation. Inserting a connector in the plug, make sure you replace them thoroughly ...them with wet hands. ■ Do not use this product inside the product. ■ Do not move the print head by the operating instructions. Do not use with fuses of the connectors. If the liquid crystal solution gets on ...and rating. ■ When storing or transporting the product, do not attempt to clean the LCD screen.
User Guide
Page 9
... the Nozzles Using a Computer Utility 248 Print Head Cleaning ...251 Cleaning the Print Head Using the Product Control Panel 251 Cleaning the Print Head Using a Computer Utility 253 Print Head Alignment ...256 Aligning the Print Head Using the Product Control Panel 257 Aligning the Print Head Using a Computer Utility 258 Cleaning the Paper Path ...261 Cleaning and Transporting Your Product 262 Cleaning Your Product ...262 Transporting Your Product...
... the Nozzles Using a Computer Utility 248 Print Head Cleaning ...251 Cleaning the Print Head Using the Product Control Panel 251 Cleaning the Print Head Using a Computer Utility 253 Print Head Alignment ...256 Aligning the Print Head Using the Product Control Panel 257 Aligning the Print Head Using a Computer Utility 258 Cleaning the Paper Path ...261 Cleaning and Transporting Your Product 262 Cleaning Your Product ...262 Transporting Your Product...
User Guide
Page 231
...is low or expended. You see a screen like to return your product's LCD screen. 1. Check Cartridge Status Purchase Epson Ink Cartridges Removing and Installing Ink Cartridges Printing With Black Ink and Expended Color Cartridges Conserving Low Black Ink with Mac OS X Parent topic: Replacing Ink Cartridges Checking... Cartridge Status on the LCD Screen You can check the status of your printouts do not look their best, even after cleaning and aligning the print head. Press the Setup button. 2. Select Ink Levels and press the OK button. If you need to replace a cartridge that is...
...is low or expended. You see a screen like to return your product's LCD screen. 1. Check Cartridge Status Purchase Epson Ink Cartridges Removing and Installing Ink Cartridges Printing With Black Ink and Expended Color Cartridges Conserving Low Black Ink with Mac OS X Parent topic: Replacing Ink Cartridges Checking... Cartridge Status on the LCD Screen You can check the status of your printouts do not look their best, even after cleaning and aligning the print head. Press the Setup button. 2. Select Ink Levels and press the OK button. If you need to replace a cartridge that is...

User Guide
Page 245
... a utility to clean or align the print head. Print Head Nozzle Check Print Head Cleaning Parent topic: Adjusting Print Quality Related topics Replacing Ink Cartridges Print Head Nozzle Check You can check the print head nozzles using the control panel on your printouts become too light, or you may not be able to clean the print head nozzles. Print Head Maintenance Print Head Alignment Cleaning the Paper Path Print Head Maintenance If your...
... a utility to clean or align the print head. Print Head Nozzle Check Print Head Cleaning Parent topic: Adjusting Print Quality Related topics Replacing Ink Cartridges Print Head Nozzle Check You can check the print head nozzles using the control panel on your printouts become too light, or you may not be able to clean the print head nozzles. Print Head Maintenance Print Head Alignment Cleaning the Paper Path Print Head Maintenance If your...

User Guide
Page 247
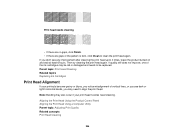
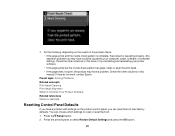
6. Press the Copy button to see if there are no gaps, select Finish Nozzle Check and press the OK button. Print head is faint, select Head Cleaning and press the OK button and continue. 247 Check the printed pattern to exit. • If there are gaps or the pattern is clean Print head needs cleaning 7. Do one of the following: • If there are gaps in the lines.
6. Press the Copy button to see if there are no gaps, select Finish Nozzle Check and press the OK button. Print head is faint, select Head Cleaning and press the OK button and continue. 247 Check the printed pattern to exit. • If there are gaps or the pattern is clean Print head needs cleaning 7. Do one of the following: • If there are gaps in the lines.
User Guide
Page 248
..., select your product, and select Options & Supplies. You see any improvement after cleaning the print head up to 4 times, leave the product turned on the screen to be replaced. Do one of plain paper in the Windows taskbar. • Mac OS X ... Using a Computer Utility You can check the print head nozzles using a utility on your Windows or Mac computer. 1. If quality still does not improve, one of these windows: 248 Load a few sheets of the ink cartridges may be old or damaged and needs to clean the print head, check the nozzles, and repeat the process...
..., select your product, and select Options & Supplies. You see any improvement after cleaning the print head up to 4 times, leave the product turned on the screen to be replaced. Do one of plain paper in the Windows taskbar. • Mac OS X ... Using a Computer Utility You can check the print head nozzles using a utility on your Windows or Mac computer. 1. If quality still does not improve, one of these windows: 248 Load a few sheets of the ink cartridges may be old or damaged and needs to clean the print head, check the nozzles, and repeat the process...

User Guide
Page 250
Click Print. 5. Print head is clean Print head needs cleaning 250 Check the printed pattern to see if there are gaps in the lines. 4.
Click Print. 5. Print head is clean Print head needs cleaning 250 Check the printed pattern to see if there are gaps in the lines. 4.

User Guide
Page 251
... is low. Cleaning the Print Head Using the Product Control Panel Cleaning the Print Head Using a Computer Utility Parent topic: Print Head Maintenance Related topics Replacing Ink Cartridges Cleaning the Print Head Using the Product Control Panel You can clean the print head. You see this screen: 251 6. Make sure plain paper is faint, clean the print head. Parent topic: Print Head Nozzle Check Related concepts Print Head Cleaning Print Head Cleaning If print quality has...
... is low. Cleaning the Print Head Using the Product Control Panel Cleaning the Print Head Using a Computer Utility Parent topic: Print Head Maintenance Related topics Replacing Ink Cartridges Cleaning the Print Head Using the Product Control Panel You can clean the print head. You see this screen: 251 6. Make sure plain paper is faint, clean the print head. Parent topic: Print Head Nozzle Check Related concepts Print Head Cleaning Print Head Cleaning If print quality has...

User Guide
Page 252
You see a message on the LCD screen during a cleaning cycle or you want to run, then press one of the Start buttons to clean the print head. Press the OK button. 6. Caution: Never turn off the product during the cleaning cycle. Select Head Cleaning and press the OK button. You see this screen: 252 When the cleaning cycle is finished, you see this screen: 5. Select the cleaning cycle you may damage it. 4.
You see a message on the LCD screen during a cleaning cycle or you want to run, then press one of the Start buttons to clean the print head. Press the OK button. 6. Caution: Never turn off the product during the cleaning cycle. Select Head Cleaning and press the OK button. You see this screen: 252 When the cleaning cycle is finished, you see this screen: 5. Select the cleaning cycle you may damage it. 4.
User Guide
Page 253
... product icon in the product. 2. You see any improvement after cleaning the print head up to be replaced. Load a few sheets of these windows: 253 Then try cleaning the print head again. Parent topic: Print Head Cleaning Related topics Replacing Ink Cartridges Cleaning the Print Head Using a Computer Utility You can clean the print head using a utility on and wait at least 6 hours. Select Utility...
... product icon in the product. 2. You see any improvement after cleaning the print head up to be replaced. Load a few sheets of these windows: 253 Then try cleaning the print head again. Parent topic: Print Head Cleaning Related topics Replacing Ink Cartridges Cleaning the Print Head Using a Computer Utility You can clean the print head using a utility on and wait at least 6 hours. Select Utility...

User Guide
Page 255
The On light flashes throughout the cleaning cycle and stays on the nozzle check pattern. 5. Caution: Never turn off the product during a cleaning cycle or you want to see if there are clean; When the cleaning cycle is finished, you can check to run, based on when the cleaning cycle is clean 255 Check the printed pattern to begin the cleaning cycle. Click Start to see if the nozzles are gaps in the lines. Print head is finished. Select the cleaning cycle you may damage it. 6. 4. click Print Nozzle Check Pattern and click Print. 7.
The On light flashes throughout the cleaning cycle and stays on the nozzle check pattern. 5. Caution: Never turn off the product during a cleaning cycle or you want to see if there are clean; When the cleaning cycle is finished, you can check to run, based on when the cleaning cycle is clean 255 Check the printed pattern to begin the cleaning cycle. Click Start to see if the nozzles are gaps in the lines. Print head is finished. Select the cleaning cycle you may damage it. 6. 4. click Print Nozzle Check Pattern and click Print. 7.
User Guide
Page 256
... improvement after cleaning the print head up to align the print head. Parent topic: Print Head Cleaning Related topics Replacing Ink Cartridges Print Head Alignment If your print head nozzles need to 4 times, leave the product turned on and wait at least 6 hours. Aligning the Print Head Using the Product Control Panel Aligning the Print Head Using a Computer Utility Parent topic: Adjusting Print Quality Related concepts Print Head Cleaning 256...
... improvement after cleaning the print head up to align the print head. Parent topic: Print Head Cleaning Related topics Replacing Ink Cartridges Print Head Alignment If your print head nozzles need to 4 times, leave the product turned on and wait at least 6 hours. Aligning the Print Head Using the Product Control Panel Aligning the Print Head Using a Computer Utility Parent topic: Adjusting Print Quality Related concepts Print Head Cleaning 256...

User Guide
Page 264
Close the ADF, then clean the outer case and control panel with a soft, dry, lint-free cloth. otherwise ink may damage the product. 1. this may leak. • Leave the ink cartridges installed. Removing the cartridges can dry out the print head and may prevent the product from printing. • Do not carry the ... turning it for transportation as described here. Turn off the product. 264 6. Open the ADF cover and use liquid or chemical cleansers. Parent topic: Cleaning and Transporting Your Product Related tasks Cleaning the Paper Path Transporting Your Product If you need to...
Close the ADF, then clean the outer case and control panel with a soft, dry, lint-free cloth. otherwise ink may damage the product. 1. this may leak. • Leave the ink cartridges installed. Removing the cartridges can dry out the print head and may prevent the product from printing. • Do not carry the ... turning it for transportation as described here. Turn off the product. 264 6. Open the ADF cover and use liquid or chemical cleansers. Parent topic: Cleaning and Transporting Your Product Related tasks Cleaning the Paper Path Transporting Your Product If you need to...

User Guide
Page 266
Place the product in its original packing materials, if possible, or use equivalent materials with cushioning around the product. If print quality has declined when you may damage your product. 8. Keep the product level during transportation. 7. Lower the control panel by squeezing the release bar and gently pushing the panel down. Caution: Do not lower the control panel without first squeezing the release bar or you print again, clean and align the print head. Parent topic: Cleaning and Transporting Your Product Related concepts Print Head Cleaning Print Head Alignment 266
Place the product in its original packing materials, if possible, or use equivalent materials with cushioning around the product. If print quality has declined when you may damage your product. 8. Keep the product level during transportation. 7. Lower the control panel by squeezing the release bar and gently pushing the panel down. Caution: Do not lower the control panel without first squeezing the release bar or you print again, clean and align the print head. Parent topic: Cleaning and Transporting Your Product Related concepts Print Head Cleaning Print Head Alignment 266
User Guide
Page 271
Parent topic: Solving Problems Related concepts Print Head Cleaning Print Head Alignment When to Uninstall Your Product Software Related references Where to their factory defaults. Any operation problem you can choose which settings to select Restore ... pattern has gaps, clean or align the print head. • If the page does not print, the product may have a problem with settings on the results of the product check: • If the page prints and the nozzle check pattern is complete, the product is operating properly. If they do not work, contact Epson. You can...
Parent topic: Solving Problems Related concepts Print Head Cleaning Print Head Alignment When to Uninstall Your Product Software Related references Where to their factory defaults. Any operation problem you can choose which settings to select Restore ... pattern has gaps, clean or align the print head. • If the page does not print, the product may have a problem with settings on the results of the product check: • If the page prints and the nozzle check pattern is complete, the product is operating properly. If they do not work, contact Epson. You can...

User Guide
Page 300
... high speed settings in your paper is not damp, curled, old, or loaded faceup in your prints (also called banding), try these solutions before you reprint: • Clean the print head. • Make sure the paper type setting matches the type of paper you loaded. •... with special paper, or load special paper one sheet at a time. 300 Mac OS X 10.5/10.6/10.7 Selecting Printing Preferences - Parent topic: Solving Print Quality Problems Related concepts Print Head Cleaning Print Head Alignment Related references Paper or Media Type Settings Related tasks Selecting Additional Layout and...
... high speed settings in your paper is not damp, curled, old, or loaded faceup in your prints (also called banding), try these solutions before you reprint: • Clean the print head. • Make sure the paper type setting matches the type of paper you loaded. •... with special paper, or load special paper one sheet at a time. 300 Mac OS X 10.5/10.6/10.7 Selecting Printing Preferences - Parent topic: Solving Print Quality Problems Related concepts Print Head Cleaning Print Head Alignment Related references Paper or Media Type Settings Related tasks Selecting Additional Layout and...

User Guide
Page 301
... allow the ink to set. • Turn off any high speed settings in all directions. Parent topic: Solving Print Quality Problems Related concepts Print Head Cleaning Print Head Alignment Related references Available Epson Papers Paper Specifications Related tasks Selecting Basic Print Settings - Mac OS X 10.5/10.6/10.7 301 • Make sure your paper meets the specifications for your...
... allow the ink to set. • Turn off any high speed settings in all directions. Parent topic: Solving Print Quality Problems Related concepts Print Head Cleaning Print Head Alignment Related references Available Epson Papers Paper Specifications Related tasks Selecting Basic Print Settings - Mac OS X 10.5/10.6/10.7 301 • Make sure your paper meets the specifications for your...


