
Important Setup Information
Page 1
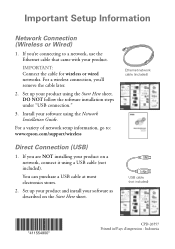
... that came with your product using the Network Installation Guide. Set up your product. Ethernet network cable (included) USB cable (not included) CPD-26557 Printed in/Pays d'impression : Indonesia For a wireless connection, you 're connecting to : www.epson.com/support/wireless Direct Connection (USB) 1. If you are NOT installing your software using the Start Here sheet...
... that came with your product using the Network Installation Guide. Set up your product. Ethernet network cable (included) USB cable (not included) CPD-26557 Printed in/Pays d'impression : Indonesia For a wireless connection, you 're connecting to : www.epson.com/support/wireless Direct Connection (USB) 1. If you are NOT installing your software using the Start Here sheet...
Network Installation Guide
Page 2
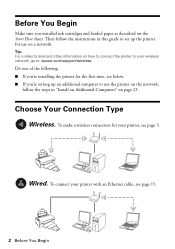
... on how to connect the printer to your wireless network, go to: epson.com/support/wireless Do one of the following: ■ If you're installing the printer for the first time, see below. ■ If you installed ink cartridges and loaded paper as ...Install on Additional Computers" on page 23. To make a wireless connection for your printer with an Ethernet cable, see page 3. Before You Begin Make sure you 're setting up an additional computer to set up the printer for use the printer on the network, follow the instructions in this guide to use on a network. To connect your printer...
... on how to connect the printer to your wireless network, go to: epson.com/support/wireless Do one of the following: ■ If you're installing the printer for the first time, see below. ■ If you installed ink cartridges and loaded paper as ...Install on Additional Computers" on page 23. To make a wireless connection for your printer with an Ethernet cable, see page 3. Before You Begin Make sure you 're setting up an additional computer to set up the printer for use the printer on the network, follow the instructions in this guide to use on a network. To connect your printer...

Network Installation Guide
Page 27
After making a successful network connection, you 're ready to print. Click Next and follow the on -screen Epson Information Center for details. See your Quick Guide or on -screen instructions to make the printer your operating system: ■ "Windows" below ■ "Mac OS X" on -screen instructions. When installation is complete, you see this screen: 2. If desired...
After making a successful network connection, you 're ready to print. Click Next and follow the on -screen Epson Information Center for details. See your Quick Guide or on -screen instructions to make the printer your operating system: ■ "Windows" below ■ "Mac OS X" on -screen instructions. When installation is complete, you see this screen: 2. If desired...
Quick Guide
Page 25
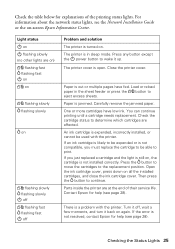
.... Check the cartridge status to be expended or is out or multiple pages have low ink. For information about the network status lights, see the Network Installation Guide or the on . The printer cover is jammed. An ink cartridge is turned on -screen Epson Information Center. If you must replace the cartridge to determine which cartridges are at...
.... Check the cartridge status to be expended or is out or multiple pages have low ink. For information about the network status lights, see the Network Installation Guide or the on . The printer cover is jammed. An ink cartridge is turned on -screen Epson Information Center. If you must replace the cartridge to determine which cartridges are at...
Quick Guide
Page 26
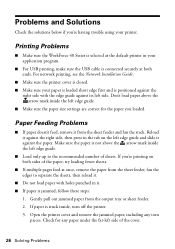
For network printing, see the Network Installation Guide. ■ Make sure the printer cover is closed. ■ Make sure your paper is loaded short edge first and is jammed, follow these steps: 1. Reload it against the right side, ... sure the WorkForce 40 Series is stuck inside the left edge guide. ■ Load only up to separate the sheets, then reload it. ■ Do not load paper with the edge guide against the paper. If you're printing on the left side. If paper is selected as the default printer in your printer. Problems and...
For network printing, see the Network Installation Guide. ■ Make sure the printer cover is closed. ■ Make sure your paper is loaded short edge first and is jammed, follow these steps: 1. Reload it against the right side, ... sure the WorkForce 40 Series is stuck inside the left edge guide. ■ Load only up to separate the sheets, then reload it. ■ Do not load paper with the edge guide against the paper. If you're printing on the left side. If paper is selected as the default printer in your printer. Problems and...
Start Here
Page 5
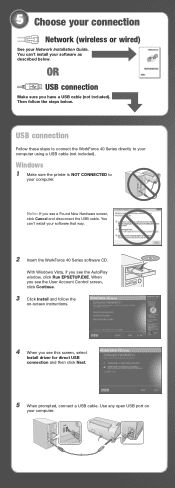
... the printer is NOT CONNECTED to your computer. USB connection Follow these steps to connect the WorkForce 40 Series directly to your computer using a USB cable (not included). OR USB connection Make sure you see a Found New Hardware screen, click Cancel and disconnect the USB cable. You can 't install your Network Installation Guide. 5 Choose your connection Network (wireless...
... the printer is NOT CONNECTED to your computer. USB connection Follow these steps to connect the WorkForce 40 Series directly to your computer using a USB cable (not included). OR USB connection Make sure you see a Found New Hardware screen, click Cancel and disconnect the USB cable. You can 't install your Network Installation Guide. 5 Choose your connection Network (wireless...
Start Here
Page 7
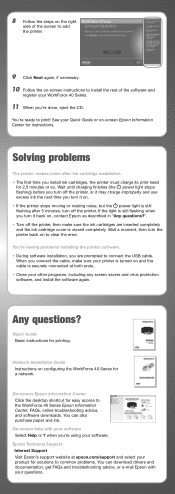
... flashing after ink cartridge installation. • The first time you connect the cable, make sure the ink cartridges are prompted to clear the error. Solving problems The printer makes noise after 5 minutes, turn it on -screen Epson Information Center for a network. If the light is still flashing when you turn the printer back on configuring the WorkForce 40 Series...
... flashing after ink cartridge installation. • The first time you connect the cable, make sure the ink cartridges are prompted to clear the error. Solving problems The printer makes noise after 5 minutes, turn it on -screen Epson Information Center for a network. If the light is still flashing when you turn the printer back on configuring the WorkForce 40 Series...


