User Manual
Page 2
... Setting Up Fax Features 16 Sending a Fax From the Control Panel 18 Receiving Faxes 19 Scanning a Document or Photo 20 Scanning With Epson Scan Software 20 Scanning With Mac OS X 10.6 21 Maintaining Your Product 22 Checking the Print Head Nozzles 22 Cleaning the Print Head 23 Checking Ink Levels 23 Purchasing...
... Setting Up Fax Features 16 Sending a Fax From the Control Panel 18 Receiving Faxes 19 Scanning a Document or Photo 20 Scanning With Epson Scan Software 20 Scanning With Mac OS X 10.6 21 Maintaining Your Product 22 Checking the Print Head Nozzles 22 Cleaning the Print Head 23 Checking Ink Levels 23 Purchasing...
User Manual
Page 12
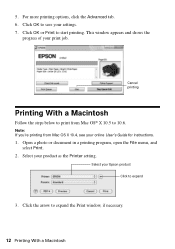
Click OK or Print to expand the Print window, if necessary. 12 Printing With a Macintosh Note: If you're printing from Mac OS® X 10.5 to expand 3. Click the arrow to start printing. This window appears and shows the progress of your online User's Guide for instructions. 1. 5....a photo or document in a printing program, open the File menu, and select Print. 2. Cancel printing Printing With a Macintosh Follow the steps below to print from Mac OS X 10.4, see your print job. Select your Epson product Click to 10.6. For more printing options, click the Advanced tab. 6.
Click OK or Print to expand the Print window, if necessary. 12 Printing With a Macintosh Note: If you're printing from Mac OS® X 10.5 to expand 3. Click the arrow to start printing. This window appears and shows the progress of your online User's Guide for instructions. 1. 5....a photo or document in a printing program, open the File menu, and select Print. 2. Cancel printing Printing With a Macintosh Follow the steps below to print from Mac OS X 10.4, see your print job. Select your Epson product Click to 10.6. For more printing options, click the Advanced tab. 6.
User Manual
Page 20
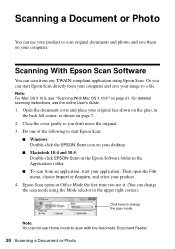
... Software You can scan from your computer and save them on page 21. Note: For Mac OS X 10.6, see the online User's Guide. 1. Open the document cover and place your original face-down on page 7. 2. Epson Scan opens in Office Mode the first time you use it. (You can change the scan... back left corner, as shown on the glass, in the upper right corner.) Click here to change the scan mode using Epson Scan. For detailed scanning instructions, see "Scanning With Mac OS X 10.6" on your computer. Or you don't move the original. 3. Close the cover gently so you can start your product...
... Software You can scan from your computer and save them on page 21. Note: For Mac OS X 10.6, see the online User's Guide. 1. Open the document cover and place your original face-down on page 7. 2. Epson Scan opens in Office Mode the first time you use it. (You can change the scan... back left corner, as shown on the glass, in the upper right corner.) Click here to change the scan mode using Epson Scan. For detailed scanning instructions, see "Scanning With Mac OS X 10.6" on your computer. Or you don't move the original. 3. Close the cover gently so you can start your product...

User Manual
Page 21
... save them as Preview and select Import From Scanner from the File menu, then select your computer. 1. Note: For details on your product. 2. Scanning With Mac OS X 10.6 21 If you see its icon in the Scan To pop-up menu. Your image is scanned and you would like to begin...
... save them as Preview and select Import From Scanner from the File menu, then select your computer. 1. Note: For details on your product. 2. Scanning With Mac OS X 10.6 21 If you see its icon in the Scan To pop-up menu. Your image is scanned and you would like to begin...
User Manual
Page 27
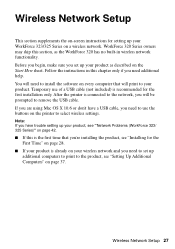
WorkForce 320 Series owners may skip this section, as described on a wireless network. You will need to use of a USB cable (not included) is connected to the network, you set up your product, see "Network Problems (WorkForce 323/ 325 Series)" on page 42. ■ If this chapter only if you need ...for the first installation only. If you are using Mac OS X 10.6 or don't have trouble setting up additional computers to print to remove the USB cable. Temporary use the buttons on the printer to your product as the WorkForce 320 has no built-in this is the first time that...
WorkForce 320 Series owners may skip this section, as described on a wireless network. You will need to use of a USB cable (not included) is connected to the network, you set up your product, see "Network Problems (WorkForce 323/ 325 Series)" on page 42. ■ If this chapter only if you need ...for the first installation only. If you are using Mac OS X 10.6 or don't have trouble setting up additional computers to print to remove the USB cable. Temporary use the buttons on the printer to your product as the WorkForce 320 has no built-in this is the first time that...
User Manual
Page 28
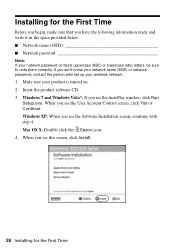
... Run Setup.exe. Windows 7 and Windows Vista®: If you see the Software Installation screen, continue with step 4. Make sure your wireless network. 1. Mac OS X: Double-click the Epson icon. 4. When you don't know your network name (SSID) or network password, contact the person who set up your product is turned on...
... Run Setup.exe. Windows 7 and Windows Vista®: If you see the Software Installation screen, continue with step 4. Make sure your wireless network. 1. Mac OS X: Double-click the Epson icon. 4. When you don't know your network name (SSID) or network password, contact the person who set up your product is turned on...
User Manual
Page 29
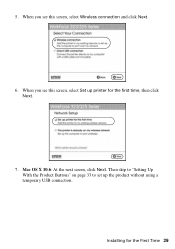
Then skip to "Setting Up With the Product Buttons" on page 33 to set up printer for the First Time 29 5. When you see this screen, select Set up the product without using a temporary USB connection. Mac OS X 10.6: At the next screen, click Next. Installing for the first time, then click Next. 7. When you see this screen, select Wireless connection and click Next. 6.
Then skip to "Setting Up With the Product Buttons" on page 33 to set up printer for the First Time 29 5. When you see this screen, select Set up the product without using a temporary USB connection. Mac OS X 10.6: At the next screen, click Next. Installing for the first time, then click Next. 7. When you see this screen, select Wireless connection and click Next. 6.

User Manual
Page 33
... Setting Up With the Product Buttons If you did not connect a USB cable to set up the product on page 37. To set up using Mac OS X 10.6, or you are using the product buttons: 1. Follow the instructions on the screen to the product, see the Installation Complete screen, print a test...
... Setting Up With the Product Buttons If you did not connect a USB cable to set up the product on page 37. To set up using Mac OS X 10.6, or you are using the product buttons: 1. Follow the instructions on the screen to the product, see the Installation Complete screen, print a test...

User Manual
Page 35
... how to the wireless router or access point" on page 36. 6. Installing for the network. Note: If you see the Firewall Warning screen, click Next. Mac OS X 10.6: Skip to finish selecting network settings. Wait while EpsonNet Setup configures your network password. 4. Follow the on-screen instructions to step 10 on...
... how to the wireless router or access point" on page 36. 6. Installing for the network. Note: If you see the Firewall Warning screen, click Next. Mac OS X 10.6: Skip to finish selecting network settings. Wait while EpsonNet Setup configures your network password. 4. Follow the on-screen instructions to step 10 on...
User Manual
Page 37
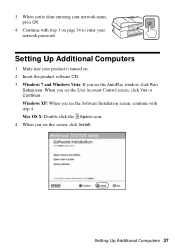
... this screen, click Install. Setting Up Additional Computers 1. Windows 7 and Windows Vista: If you see the Software Installation screen, continue with step 3 on . 2. Mac OS X: Double-click the Epson icon. 4. Insert the product software CD. 3. Windows XP: When you see the User Account Control screen, click Yes or Continue. When you see...
... this screen, click Install. Setting Up Additional Computers 1. Windows 7 and Windows Vista: If you see the Software Installation screen, continue with step 3 on . 2. Mac OS X: Double-click the Epson icon. 4. Insert the product software CD. 3. Windows XP: When you see the User Account Control screen, click Yes or Continue. When you see...
User Manual
Page 38
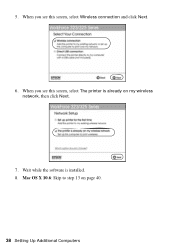
When you see this screen, select The printer is installed. 8. When you see this screen, select Wireless connection and click Next. 6. Wait while the software is already on page 40. 38 Setting Up Additional Computers Mac OS X 10.6: Skip to step 13 on my wireless network, then click Next. 7. 5.
When you see this screen, select The printer is installed. 8. When you see this screen, select Wireless connection and click Next. 6. Wait while the software is already on page 40. 38 Setting Up Additional Computers Mac OS X 10.6: Skip to step 13 on my wireless network, then click Next. 7. 5.

User Manual
Page 42
... trouble using . ■ If the product doesn't connect to know what kind of security it is within range of their service life. Network Problems (WorkForce 323/325 Series) The product cannot find my product on the network Make sure the product is turned on and the WiFi light on the... product is on . EpsonNet Setup was unsuccessful Make sure that the product is using your Epson product. Then remove and reinsert the CD to obtain the MAC address. If access restrictions are set on the wireless router or access point. If your wireless router or access point...
... trouble using . ■ If the product doesn't connect to know what kind of security it is within range of their service life. Network Problems (WorkForce 323/325 Series) The product cannot find my product on the network Make sure the product is turned on and the WiFi light on the... product is on . EpsonNet Setup was unsuccessful Make sure that the product is using your Epson product. Then remove and reinsert the CD to obtain the MAC address. If access restrictions are set on the wireless router or access point. If your wireless router or access point...
User Manual
Page 43
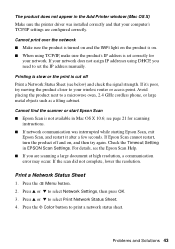
...Sheet (see below) and check the signal strength. Press u or d to select Print Network Status Sheet. 4. Cannot find the scanner or start Epson Scan ■ Epson Scan is set the IP address manually. Print a Network Status Sheet 1. Press the x Menu button. 2. Problems and Solutions 43 Avoid placing the... If your computer's TCP/IP settings are scanning a large document at high resolution, a communication error may occur. Check the Timeout Setting in Mac OS X 10.6; Cannot print over the network ■ Make sure the product is turned on and the WiFi light on the product is cut...
...Sheet (see below) and check the signal strength. Press u or d to select Print Network Status Sheet. 4. Cannot find the scanner or start Epson Scan ■ Epson Scan is set the IP address manually. Print a Network Status Sheet 1. Press the x Menu button. 2. Problems and Solutions 43 Avoid placing the... If your computer's TCP/IP settings are scanning a large document at high resolution, a communication error may occur. Check the Timeout Setting in Mac OS X 10.6; Cannot print over the network ■ Make sure the product is turned on and the WiFi light on the product is cut...
Product Brochure
Page 2
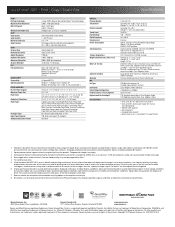
... 22 class B FCC Part 68 (U.S.A.), IC/CS03 (Canada) Printing: 18.1" x 21.3" x 11.9" Storage: 18.1" x 16.2" x 9.3" Weight: 15.7 lb WorkForce 320 all-in-one color. For details, see www.epson.com/cartridgeinfo 6 Display permanence based on accelerated testing of prints in dark storage conditions. Copyright 2010...like two-sided printing, may apply. 2 Compared to 50% of Seiko Epson Corporation. Black and color print speeds are trademarks and/or registered trademarks of the U.S. Actual print times will vary by Mac.® 4 For sending faxes only. 5 Yields based on the new ...
... 22 class B FCC Part 68 (U.S.A.), IC/CS03 (Canada) Printing: 18.1" x 21.3" x 11.9" Storage: 18.1" x 16.2" x 9.3" Weight: 15.7 lb WorkForce 320 all-in-one color. For details, see www.epson.com/cartridgeinfo 6 Display permanence based on accelerated testing of prints in dark storage conditions. Copyright 2010...like two-sided printing, may apply. 2 Compared to 50% of Seiko Epson Corporation. Black and color print speeds are trademarks and/or registered trademarks of the U.S. Actual print times will vary by Mac.® 4 For sending faxes only. 5 Yields based on the new ...

