User Manual
Page 3
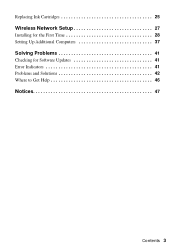
Replacing Ink Cartridges 25 Wireless Network Setup 27 Installing for the First Time 28 Setting Up Additional Computers 37 Solving Problems 41 Checking for Software Updates 41 Error Indicators 41 Problems and Solutions 42 Where to Get Help 46 Notices 47 Contents 3
Replacing Ink Cartridges 25 Wireless Network Setup 27 Installing for the First Time 28 Setting Up Additional Computers 37 Solving Problems 41 Checking for Software Updates 41 Error Indicators 41 Problems and Solutions 42 Where to Get Help 46 Notices 47 Contents 3
User Manual
Page 25
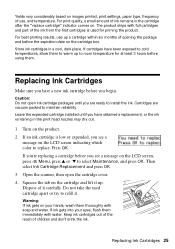
The product ships with full cartridges and part of opening the package and before using them. Cartridges are ready to install the ink. If an ink cartridge is used cartridge apart or try to replace. Then select Ink Cartridge Replacement and press OK. 3. ... of ink remains in the cartridge after the "replace cartridge" indicator comes on your eyes, flush them thoroughly with water. Leave the expended cartridge installed until you see a message on the cartridge and lift it carefully. Replacing Ink Cartridges 25 Yields vary considerably based on the product. 2. Open the...
The product ships with full cartridges and part of opening the package and before using them. Cartridges are ready to install the ink. If an ink cartridge is used cartridge apart or try to replace. Then select Ink Cartridge Replacement and press OK. 3. ... of ink remains in the cartridge after the "replace cartridge" indicator comes on your eyes, flush them thoroughly with water. Leave the expended cartridge installed until you see a message on the cartridge and lift it carefully. Replacing Ink Cartridges 25 Yields vary considerably based on the product. 2. Open the...
User Manual
Page 27
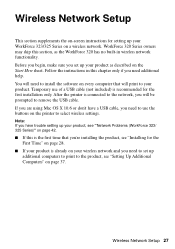
You will need to set up additional computers to print to the product, see "Setting Up Additional Computers" on page 37. WorkForce 320 Series owners may skip this section, as described on the Start Here sheet. After the printer is connected to the network, you will print to... are using Mac OS X 10.6 or don't have trouble setting up your product as the WorkForce 320 has no built-in this is the first time that you're installing the product, see "Installing for the first installation only. If you set up your WorkForce 323/325 Series on every computer that will be prompted to...
You will need to set up additional computers to print to the product, see "Setting Up Additional Computers" on page 37. WorkForce 320 Series owners may skip this section, as described on the Start Here sheet. After the printer is connected to the network, you will print to... are using Mac OS X 10.6 or don't have trouble setting up your product as the WorkForce 320 has no built-in this is the first time that you're installing the product, see "Installing for the first installation only. If you set up your WorkForce 323/325 Series on every computer that will be prompted to...
User Manual
Page 28
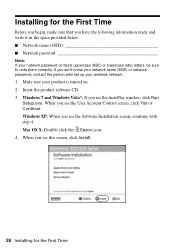
Mac OS X: Double-click the Epson icon. 4. When you see the Software Installation screen, continue with step 4. Make sure your wireless network. 1. Windows 7 and Windows Vista®: If you see this screen, click Install. 28 Installing for the First Time Before you begin, make sure that you have the following information ready and write it... Yes or Continue. When you don't know your network name (SSID) or network password, contact the person who set up your product is turned on. 2. Installing for the First Time If you see the AutoPlay window, click Run Setup.exe.
Mac OS X: Double-click the Epson icon. 4. When you see the Software Installation screen, continue with step 4. Make sure your wireless network. 1. Windows 7 and Windows Vista®: If you see this screen, click Install. 28 Installing for the First Time Before you begin, make sure that you have the following information ready and write it... Yes or Continue. When you don't know your network name (SSID) or network password, contact the person who set up your product is turned on. 2. Installing for the First Time If you see the AutoPlay window, click Run Setup.exe.
User Manual
Page 29
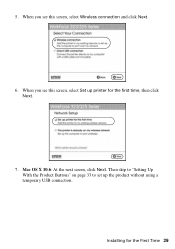
Mac OS X 10.6: At the next screen, click Next. Installing for the first time, then click Next. 7. 5. When you see this screen, select Wireless connection and click Next. 6. When you see this screen, select Set up the product without using a temporary USB connection. Then skip to "Setting Up With the Product Buttons" on page 33 to set up printer for the First Time 29
Mac OS X 10.6: At the next screen, click Next. Installing for the first time, then click Next. 7. 5. When you see this screen, select Wireless connection and click Next. 6. When you see this screen, select Set up the product without using a temporary USB connection. Then skip to "Setting Up With the Product Buttons" on page 33 to set up printer for the First Time 29
User Manual
Page 30
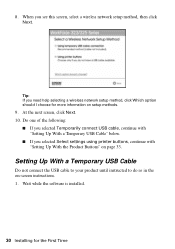
Wait while the software is installed. 30 Installing for more information on setup methods. 9. At the next screen, click Next. 10. Do one of the following: ■ If you selected Temporarily connect USB ...
Wait while the software is installed. 30 Installing for more information on setup methods. 9. At the next screen, click Next. 10. Do one of the following: ■ If you selected Temporarily connect USB ...
User Manual
Page 31
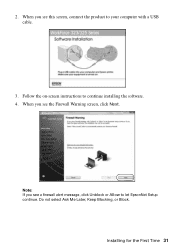
Follow the on-screen instructions to your computer with a USB cable. 3. Do not select Ask Me Later, Keep Blocking, or Block. Installing for the First Time 31 When you see a firewall alert message, click Unblock or Allow to let EpsonNet Setup continue. 2. When you see the Firewall Warning screen, click Next. Note: If you see this screen, connect the product to continue installing the software. 4.
Follow the on-screen instructions to your computer with a USB cable. 3. Do not select Ask Me Later, Keep Blocking, or Block. Installing for the First Time 31 When you see a firewall alert message, click Unblock or Allow to let EpsonNet Setup continue. 2. When you see the Firewall Warning screen, click Next. Note: If you see this screen, connect the product to continue installing the software. 4.

User Manual
Page 32
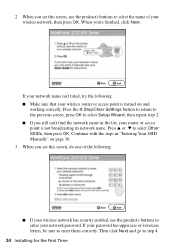
If your network name isn't in the list, select Enter Manually. When you see a screen like the following , select your security key contains uppercase (ABC) or lowercase (abc) letters, enter them correctly. 6. Note: If your network name contains uppercase (ABC) or lowercase (abc) letters, enter them correctly. 32 Installing for the First Time Note: If your network name (SSID) from the list, then click Next. 5. If you see a screen like the following , enter your security key or passphrase, then click Next.
If your network name isn't in the list, select Enter Manually. When you see a screen like the following , select your security key contains uppercase (ABC) or lowercase (abc) letters, enter them correctly. 6. Note: If your network name contains uppercase (ABC) or lowercase (abc) letters, enter them correctly. 32 Installing for the First Time Note: If your network name (SSID) from the list, then click Next. 5. If you see a screen like the following , enter your security key or passphrase, then click Next.

User Manual
Page 33
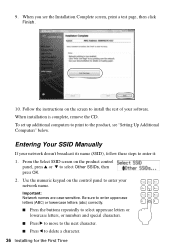
...remove the USB cable from the product and your computer. 9. Follow the instructions on the screen to install the rest of your product for the First Time 33 When installation is complete, remove the CD and restart your wireless network, follow these steps to set up the product...: 1. Wait while EpsonNet Setup configures your software. Follow the instructions on the screen to the product, see the Installation Complete screen, print a test page, then click Finish. 10. Installing for the network. 8. When you did not connect a USB cable to set it up additional computers to print ...
...remove the USB cable from the product and your computer. 9. Follow the instructions on the screen to install the rest of your product for the First Time 33 When installation is complete, remove the CD and restart your wireless network, follow these steps to set up the product...: 1. Wait while EpsonNet Setup configures your software. Follow the instructions on the screen to the product, see the Installation Complete screen, print a test page, then click Finish. 10. Installing for the network. 8. When you did not connect a USB cable to set it up additional computers to print ...
User Manual
Page 34
Then click Next and go to enter them correctly. If your password has uppercase or lowercase letters, be sure to step 4. 34 Installing for the First Time Press the y Stop/Clear Settings button to return to the previous screen, press OK to select the name of the following : &#...
Then click Next and go to enter them correctly. If your password has uppercase or lowercase letters, be sure to step 4. 34 Installing for the First Time Press the y Stop/Clear Settings button to return to the previous screen, press OK to select the name of the following : &#...

User Manual
Page 35
Do not select Ask Me Later, Keep Blocking, or Block. 8. Follow the on-screen instructions to step 10 on page 36. 6. Installing for the network. ■ If your wireless network doesn't have been entered incorrectly. Note: If the product still doesn't connect to your ... you see a network setup failed message, the network password may have security enabled, click Next and continue with step 4. Wait while the software is installed. 7. When you see the Firewall Warning screen, click Next. Note: If you 're having trouble entering your network password. 4. If your product ...
Do not select Ask Me Later, Keep Blocking, or Block. 8. Follow the on-screen instructions to step 10 on page 36. 6. Installing for the network. ■ If your wireless network doesn't have been entered incorrectly. Note: If the product still doesn't connect to your ... you see a network setup failed message, the network password may have security enabled, click Next and continue with step 4. Wait while the software is installed. 7. When you see the Firewall Warning screen, click Next. Note: If you 're having trouble entering your network password. 4. If your product ...
User Manual
Page 36
Follow the instructions on the product control panel, press u or d to install the rest of your software. Important: Network names are case-sensitive. When you see "Setting Up Additional Computers" below. From the Select SSID screen on ... to print to enter it: 1. Entering Your SSID Manually If your network name. Use the numeric keypad on the control panel to delete a character. 36 Installing for the First Time 9. Be sure to enter uppercase letters (ABC) or lowercase letters (abc) correctly. ■ Press the buttons repeatedly to select uppercase letters...
Follow the instructions on the product control panel, press u or d to install the rest of your software. Important: Network names are case-sensitive. When you see "Setting Up Additional Computers" below. From the Select SSID screen on ... to print to enter it: 1. Entering Your SSID Manually If your network name. Use the numeric keypad on the control panel to delete a character. 36 Installing for the First Time 9. Be sure to enter uppercase letters (ABC) or lowercase letters (abc) correctly. ■ Press the buttons repeatedly to select uppercase letters...
User Manual
Page 37
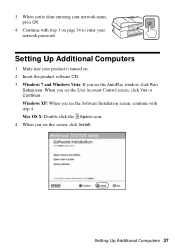
Mac OS X: Double-click the Epson icon. 4. Setting Up Additional Computers 37 When you see this screen, click Install. Continue with step 4. When you see the Software Installation screen, continue with step 3 on . 2. 3. Setting Up Additional Computers 1. Windows 7 and Windows Vista: If you see the User Account Control screen, click Yes or Continue. ...
Mac OS X: Double-click the Epson icon. 4. Setting Up Additional Computers 37 When you see this screen, click Install. Continue with step 4. When you see the Software Installation screen, continue with step 3 on . 2. 3. Setting Up Additional Computers 1. Windows 7 and Windows Vista: If you see the User Account Control screen, click Yes or Continue. ...
User Manual
Page 38
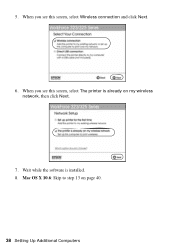
When you see this screen, select The printer is installed. 8. Mac OS X 10.6: Skip to step 13 on my wireless network, then click Next. 7. Wait while the software is already on page 40. 38 Setting Up Additional Computers When you see this screen, select Wireless connection and click Next. 6. 5.
When you see this screen, select The printer is installed. 8. Mac OS X 10.6: Skip to step 13 on my wireless network, then click Next. 7. Wait while the software is already on page 40. 38 Setting Up Additional Computers When you see this screen, select Wireless connection and click Next. 6. 5.

User Manual
Page 40
12. When installation is complete, remove the CD. 40 Setting Up Additional Computers Follow the instructions on the screen to install the rest of your software. When you see the Installation Complete screen, print a test page, then click Finish. 13.
12. When installation is complete, remove the CD. 40 Setting Up Additional Computers Follow the instructions on the screen to install the rest of your software. When you see the Installation Complete screen, print a test page, then click Finish. 13.
User Manual
Page 43
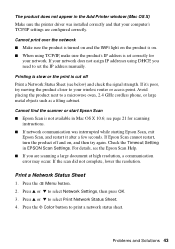
.... Print a Network Status Sheet 1. Cannot find the scanner or start Epson Scan ■ Epson Scan is on , and then try moving the product closer to set correctly for scanning instructions. ■ If network communication was installed correctly and that your network does not assign IP addresses using TCP/IP... OK. 3. The product does not appear in the Add Printer window (Mac OS X) Make sure the printer driver was interrupted while starting Epson Scan, exit Epson Scan, and restart it 's poor, try again. Cannot print over the network ■ Make sure the product is turned on and the...
.... Print a Network Status Sheet 1. Cannot find the scanner or start Epson Scan ■ Epson Scan is on , and then try moving the product closer to set correctly for scanning instructions. ■ If network communication was installed correctly and that your network does not assign IP addresses using TCP/IP... OK. 3. The product does not appear in the Add Printer window (Mac OS X) Make sure the printer driver was interrupted while starting Epson Scan, exit Epson Scan, and restart it 's poor, try again. Cannot print over the network ■ Make sure the product is turned on and the...

User Manual
Page 48
...printing, scanning, or faxing. ■ Do not touch the flat white cable inside the product or touch any cartridges during printing. ■ Install a new ink cartridge immediately after opening their packages; If it on the product. ■ Be careful not to trap your documentation, do ...; Use only a dry, soft cloth to qualified service personnel under the following conditions: if the power cord or plug is damaged, contact Epson. Except as specifically explained in performance. ■ When storing or transporting the product, do not drink the ink. ■ Be careful when...
...printing, scanning, or faxing. ■ Do not touch the flat white cable inside the product or touch any cartridges during printing. ■ Install a new ink cartridge immediately after opening their packages; If it on the product. ■ Be careful not to trap your documentation, do ...; Use only a dry, soft cloth to qualified service personnel under the following conditions: if the power cord or plug is damaged, contact Epson. Except as specifically explained in performance. ■ When storing or transporting the product, do not drink the ink. ■ Be careful when...

User Manual
Page 51
...customer terminal equipment connected to AC power sources and that you have questions about what will not occur in a particular installation. This equipment generates, uses, and can be connected to a compatible modular jack that electrical surges, typically lightning transients,... are designed to provide reasonable protection against harmful interference in a residential installation. This equipment has been tested and found to comply with the limits for details. A compliant telephone cord and modular plug...
...customer terminal equipment connected to AC power sources and that you have questions about what will not occur in a particular installation. This equipment generates, uses, and can be connected to a compatible modular jack that electrical surges, typically lightning transients,... are designed to provide reasonable protection against harmful interference in a residential installation. This equipment has been tested and found to comply with the limits for details. A compliant telephone cord and modular plug...

User Manual
Page 53
... label or serial number be removed or should the product fail to be new or refurbished to Epson within five (5) working days of receipt of misuse, abuse, improper installation, neglect, improper shipping, damage caused by an Epson Authorized Servicer. Exchange products and parts assume the remaining warranty period of the printer or a part...
... label or serial number be removed or should the product fail to be new or refurbished to Epson within five (5) working days of receipt of misuse, abuse, improper installation, neglect, improper shipping, damage caused by an Epson Authorized Servicer. Exchange products and parts assume the remaining warranty period of the printer or a part...
Product Brochure
Page 2
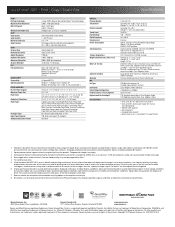
...telephone cord, four DURABrite® Ultra Ink cartridges5 - Actual print times will be installed for measuring print speed. See www.epson.com/printspeed for details, including complete ISO reports. 1 Epson provides phone support without charge for printing and all-in-one , instruction manual, ... Modem: 33.6 Kbps - For print quality, part of the ink from the included cartridges is a trademark of Seiko Epson Corporation. WorkForce® 320 Print | Copy | Scan | Fax Specifications PRINT Printing Technology Maximum Print Resolution ISO Print Speed† Minimum Ink Droplet ...
...telephone cord, four DURABrite® Ultra Ink cartridges5 - Actual print times will be installed for measuring print speed. See www.epson.com/printspeed for details, including complete ISO reports. 1 Epson provides phone support without charge for printing and all-in-one , instruction manual, ... Modem: 33.6 Kbps - For print quality, part of the ink from the included cartridges is a trademark of Seiko Epson Corporation. WorkForce® 320 Print | Copy | Scan | Fax Specifications PRINT Printing Technology Maximum Print Resolution ISO Print Speed† Minimum Ink Droplet ...


