User Manual
Page 3
Replacing Ink Cartridges 25 Wireless Network Setup 27 Installing for the First Time 28 Setting Up Additional Computers 37 Solving Problems 41 Checking for Software Updates 41 Error Indicators 41 Problems and Solutions 42 Where to Get Help 46 Notices 47 Contents 3
Replacing Ink Cartridges 25 Wireless Network Setup 27 Installing for the First Time 28 Setting Up Additional Computers 37 Solving Problems 41 Checking for Software Updates 41 Error Indicators 41 Problems and Solutions 42 Where to Get Help 46 Notices 47 Contents 3
User Manual
Page 25
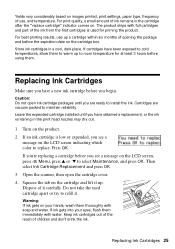
... the reach of the ink from the first cartridges is low or expended, you see a message on the LCD screen, press x Menu, press u or d to install the ink. If you're replacing a cartridge before you see a message on the LCD screen indicating which color to room temperature for priming the product... cartridge after the "replace cartridge" indicator comes on. Replacing Ink Cartridges Make sure you are vacuum packed to refill it carefully. Leave the expended cartridge installed until you have been exposed to cold temperatures, allow them thoroughly with soap and water.
... the reach of the ink from the first cartridges is low or expended, you see a message on the LCD screen, press x Menu, press u or d to install the ink. If you're replacing a cartridge before you see a message on the LCD screen indicating which color to room temperature for priming the product... cartridge after the "replace cartridge" indicator comes on. Replacing Ink Cartridges Make sure you are vacuum packed to refill it carefully. Leave the expended cartridge installed until you have been exposed to cold temperatures, allow them thoroughly with soap and water.
User Manual
Page 27
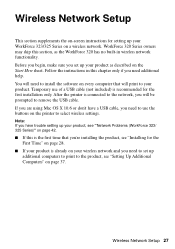
...as described on page 37. You will need to install the software on a wireless network. Temporary use the buttons on the printer to select wireless settings. Note: If you have a USB cable, you need to set up your product as the WorkForce 320 has no built-in this is the first time...if you need additional help. Wireless Network Setup This section supplements the on-screen instructions for setting up your WorkForce 323/325 Series on every computer that you're installing the product, see "Installing for the First Time" on page 28. ■ If your product is already on your wireless network...
...as described on page 37. You will need to install the software on a wireless network. Temporary use the buttons on the printer to select wireless settings. Note: If you have a USB cable, you need to set up your product as the WorkForce 320 has no built-in this is the first time...if you need additional help. Wireless Network Setup This section supplements the on-screen instructions for setting up your WorkForce 323/325 Series on every computer that you're installing the product, see "Installing for the First Time" on page 28. ■ If your product is already on your wireless network...
User Manual
Page 28
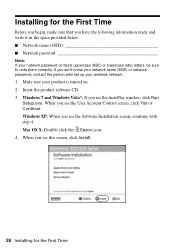
... the product software CD. 3. When you see the User Account Control screen, click Yes or Continue. When you see the Software Installation screen, continue with step 4. Installing for the First Time Windows XP: When you don't know your network name (SSID) or network password, contact the person who ...set up your product is turned on. 2. Mac OS X: Double-click the Epson icon. 4. If you see this screen, click Install. 28 Installing for the First Time Before you begin, make sure that you have the following information ready and write it in ...
... the product software CD. 3. When you see the User Account Control screen, click Yes or Continue. When you see the Software Installation screen, continue with step 4. Installing for the First Time Windows XP: When you don't know your network name (SSID) or network password, contact the person who ...set up your product is turned on. 2. Mac OS X: Double-click the Epson icon. 4. If you see this screen, click Install. 28 Installing for the First Time Before you begin, make sure that you have the following information ready and write it in ...
User Manual
Page 29
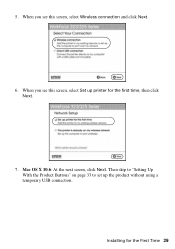
Mac OS X 10.6: At the next screen, click Next. When you see this screen, select Wireless connection and click Next. 6. 5. Then skip to "Setting Up With the Product Buttons" on page 33 to set up printer for the First Time 29 Installing for the first time, then click Next. 7. When you see this screen, select Set up the product without using a temporary USB connection.
Mac OS X 10.6: At the next screen, click Next. When you see this screen, select Wireless connection and click Next. 6. 5. Then skip to "Setting Up With the Product Buttons" on page 33 to set up printer for the First Time 29 Installing for the first time, then click Next. 7. When you see this screen, select Set up the product without using a temporary USB connection.
User Manual
Page 30
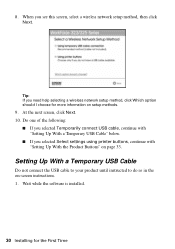
... methods. 9. Tip: If you need help selecting a wireless network setup method, click Which option should I choose for the First Time Wait while the software is installed. 30 Installing for more information on -screen instructions. 1. At the next screen, click Next. 10.
... methods. 9. Tip: If you need help selecting a wireless network setup method, click Which option should I choose for the First Time Wait while the software is installed. 30 Installing for more information on -screen instructions. 1. At the next screen, click Next. 10.
User Manual
Page 31
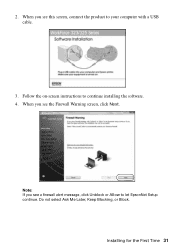
Follow the on-screen instructions to let EpsonNet Setup continue. Do not select Ask Me Later, Keep Blocking, or Block. When you see this screen, connect the product to your computer with a USB cable. 3. Installing for the First Time 31 Note: If you see the Firewall Warning screen, click Next. 2. When you see a firewall alert message, click Unblock or Allow to continue installing the software. 4.
Follow the on-screen instructions to let EpsonNet Setup continue. Do not select Ask Me Later, Keep Blocking, or Block. When you see this screen, connect the product to your computer with a USB cable. 3. Installing for the First Time 31 Note: If you see the Firewall Warning screen, click Next. 2. When you see a firewall alert message, click Unblock or Allow to continue installing the software. 4.

User Manual
Page 32
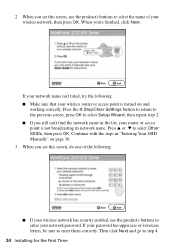
When you see a screen like the following , select your network name contains uppercase (ABC) or lowercase (abc) letters, enter them correctly. 32 Installing for the First Time 5. Note: If your security key contains uppercase (ABC) or lowercase (abc) letters, enter them correctly. 6. If your network name (SSID) from the list, then click Next. If you see a screen like the following , enter your security key or passphrase, then click Next. Note: If your network name isn't in the list, select Enter Manually.
When you see a screen like the following , select your network name contains uppercase (ABC) or lowercase (abc) letters, enter them correctly. 32 Installing for the First Time 5. Note: If your security key contains uppercase (ABC) or lowercase (abc) letters, enter them correctly. 6. If your network name (SSID) from the list, then click Next. If you see a screen like the following , enter your security key or passphrase, then click Next. Note: If your network name isn't in the list, select Enter Manually.

User Manual
Page 33
... you see "Setting Up Additional Computers" on page 37. To set up using Mac OS X 10.6, or you are using the product buttons: 1. Installing for the network. 8. Setting Up With the Product Buttons If you did not connect a USB cable to set it up additional computers to print to... install the rest of your computer. 7. Wait while EpsonNet Setup configures your computer. 9. Follow the on your wireless network, follow these steps to set ...
... you see "Setting Up Additional Computers" on page 37. To set up using Mac OS X 10.6, or you are using the product buttons: 1. Installing for the network. 8. Setting Up With the Product Buttons If you did not connect a USB cable to set it up additional computers to print to... install the rest of your computer. 7. Wait while EpsonNet Setup configures your computer. 9. Follow the on your wireless network, follow these steps to set ...
User Manual
Page 34
... name of the following : ■ Make sure that your wireless router or access point is not broadcasting its network name. Press u or d to step 4. 34 Installing for the First Time When you still can't find the network name in "Entering Your SSID Manually" on and working correctly. Then click Next and...
... name of the following : ■ Make sure that your wireless router or access point is not broadcasting its network name. Press u or d to step 4. 34 Installing for the First Time When you still can't find the network name in "Entering Your SSID Manually" on and working correctly. Then click Next and...

User Manual
Page 35
... or lowercase letters, or numbers, be sure to enter them correctly. If you see the Firewall Warning screen, click Next. Wait while the software is installed. 7. Installing for the network. Mac OS X 10.6: Skip to finish selecting network settings. Note: If the product still doesn't connect to your wireless network, see a network...
... or lowercase letters, or numbers, be sure to enter them correctly. If you see the Firewall Warning screen, click Next. Wait while the software is installed. 7. Installing for the network. Mac OS X 10.6: Skip to finish selecting network settings. Note: If the product still doesn't connect to your wireless network, see a network...
User Manual
Page 36
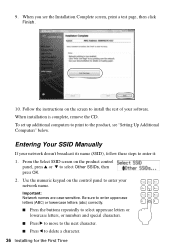
... these steps to enter it: 1. Entering Your SSID Manually If your software. To set up additional computers to print to delete a character. 36 Installing for the First Time Important: Network names are case-sensitive. When you see "Setting Up Additional Computers" below. From the Select SSID screen on ...the control panel to select Other SSIDs, then press OK. 2. When installation is complete, remove the CD. Use the numeric keypad on the product control panel, press u or d to enter your network name.
... these steps to enter it: 1. Entering Your SSID Manually If your software. To set up additional computers to print to delete a character. 36 Installing for the First Time Important: Network names are case-sensitive. When you see "Setting Up Additional Computers" below. From the Select SSID screen on ...the control panel to select Other SSIDs, then press OK. 2. When installation is complete, remove the CD. Use the numeric keypad on the product control panel, press u or d to enter your network name.
User Manual
Page 37
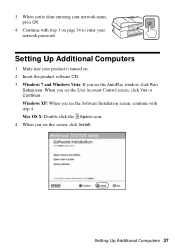
...AutoPlay window, click Run Setup.exe. When you see this screen, click Install. Make sure your network password. When you see the User Account Control screen, click Yes or Continue. 3. Mac OS X: Double-click the Epson icon. 4. Continue with step 4. Insert the product software CD. 3.... Windows XP: When you see the Software Installation screen, continue with step 3 on page 34 to enter your product is turned on. ...
...AutoPlay window, click Run Setup.exe. When you see this screen, click Install. Make sure your network password. When you see the User Account Control screen, click Yes or Continue. 3. Mac OS X: Double-click the Epson icon. 4. Continue with step 4. Insert the product software CD. 3.... Windows XP: When you see the Software Installation screen, continue with step 3 on page 34 to enter your product is turned on. ...
User Manual
Page 38
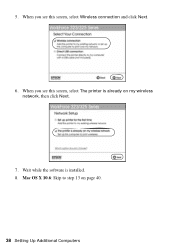
Mac OS X 10.6: Skip to step 13 on my wireless network, then click Next. 7. When you see this screen, select The printer is installed. 8. When you see this screen, select Wireless connection and click Next. 6. Wait while the software is already on page 40. 38 Setting Up Additional Computers 5.
Mac OS X 10.6: Skip to step 13 on my wireless network, then click Next. 7. When you see this screen, select The printer is installed. 8. When you see this screen, select Wireless connection and click Next. 6. Wait while the software is already on page 40. 38 Setting Up Additional Computers 5.

User Manual
Page 40
Follow the instructions on the screen to install the rest of your software. When you see the Installation Complete screen, print a test page, then click Finish. 13. When installation is complete, remove the CD. 40 Setting Up Additional Computers 12.
Follow the instructions on the screen to install the rest of your software. When you see the Installation Complete screen, print a test page, then click Finish. 13. When installation is complete, remove the CD. 40 Setting Up Additional Computers 12.
User Manual
Page 43
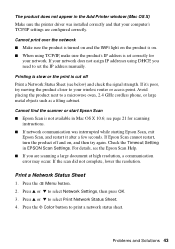
...If the scan did not complete, lower the resolution. Press the x Menu button. 2. Printing is slow or the print is not available in EPSON Scan Settings. Press the x Color button to a microwave oven, 2.4 GHz cordless phone, or large metal objects such as a filing cabinet. Avoid... then try moving the product closer to set correctly for scanning instructions. ■ If network communication was installed correctly and that your wireless router or access point. see the Epson Scan Help. ■ If you need to your computer's TCP/IP settings are scanning a large document...
...If the scan did not complete, lower the resolution. Press the x Menu button. 2. Printing is slow or the print is not available in EPSON Scan Settings. Press the x Color button to a microwave oven, 2.4 GHz cordless phone, or large metal objects such as a filing cabinet. Avoid... then try moving the product closer to set correctly for scanning instructions. ■ If network communication was installed correctly and that your wireless router or access point. see the Epson Scan Help. ■ If you need to your computer's TCP/IP settings are scanning a large document...
User Manual
Page 48
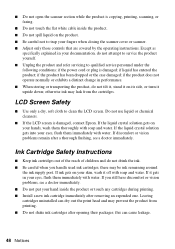
...printing, scanning, or faxing. ■ Do not touch the flat white cable inside the product or touch any cartridges during printing. ■ Install a new ink cartridge immediately after removing an expended one. If the liquid crystal solution gets on your hands, wash them thoroughly with water.... Use only a dry, soft cloth to qualified service personnel under the following conditions: if the power cord or plug is damaged, contact Epson. If discomfort or vision problems remain after opening their packages; there may prevent the product from the cartridges. if the product has been...
...printing, scanning, or faxing. ■ Do not touch the flat white cable inside the product or touch any cartridges during printing. ■ Install a new ink cartridge immediately after removing an expended one. If the liquid crystal solution gets on your hands, wash them thoroughly with water.... Use only a dry, soft cloth to qualified service personnel under the following conditions: if the power cord or plug is damaged, contact Epson. If discomfort or vision problems remain after opening their packages; there may prevent the product from the cartridges. if the product has been...

User Manual
Page 51
... a circuit different from that electrical surges, typically lightning transients, are designed to provide reasonable protection against harmful interference in a residential installation. The Telephone Consumer Protection Act of 1991 makes it is sent and an identification of the business or other entity, or other .... If you may cause harmful interference to radio or television reception. A plug and jack used in accordance with the instructions, may install an AC surge arrestor in the AC outlet to which the receiver is connected. ■ Consult the dealer or an experienced radio...
... a circuit different from that electrical surges, typically lightning transients, are designed to provide reasonable protection against harmful interference in a residential installation. The Telephone Consumer Protection Act of 1991 makes it is sent and an identification of the business or other entity, or other .... If you may cause harmful interference to radio or television reception. A plug and jack used in accordance with the instructions, may install an AC surge arrestor in the AC outlet to which the receiver is connected. ■ Consult the dealer or an experienced radio...

User Manual
Page 53
... warranty does not cover ribbons, ink cartridges or third party parts, components, or peripheral devices added to return the defective one. If Epson authorizes repair instead of misuse, abuse, improper installation, neglect, improper shipping, damage caused by disasters such as fire, flood, and lightning, improper electrical current, software problems, interaction with non...
... warranty does not cover ribbons, ink cartridges or third party parts, components, or peripheral devices added to return the defective one. If Epson authorizes repair instead of misuse, abuse, improper installation, neglect, improper shipping, damage caused by disasters such as fire, flood, and lightning, improper electrical current, software problems, interaction with non...
Product Brochure
Page 2
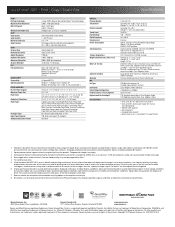
...epson.com/cartridgeinfo 6 Display permanence based on accelerated testing of their respective companies. Actual print stability will vary by Mac.® 4 For sending faxes only. 5 Yields based on ISO/IEC 24711 tests in the cartridges after the "replace cartridge" signal. All other air pollutants and improves fuel efficiency. WorkForce® 320...-sided printing3 • ENERGY STAR qualified • RoHS compliant • Designed to be installed for the life of January 1, 2009. Environmental Protection Agency that reduces greenhouse gases and other product and brand ...
...epson.com/cartridgeinfo 6 Display permanence based on accelerated testing of their respective companies. Actual print stability will vary by Mac.® 4 For sending faxes only. 5 Yields based on ISO/IEC 24711 tests in the cartridges after the "replace cartridge" signal. All other air pollutants and improves fuel efficiency. WorkForce® 320...-sided printing3 • ENERGY STAR qualified • RoHS compliant • Designed to be installed for the life of January 1, 2009. Environmental Protection Agency that reduces greenhouse gases and other product and brand ...


